2011 DODGE GRAND CARAVAN window
[x] Cancel search: windowPage 10 of 100

KEY FOB
Locking And Unlocking The Doors/Liftgate
• Press the LOCK button once to lock allthe doors and the liftgate. Press the
UNLOCK button once to unlock the
driver’s door only and twice within five
seconds to unlock all the doors and
liftgate.
• All doors can be programmed to unlock on the first press of the UNLOCK
button. Refer to Programmable
Features in this guide.
Panic Alarm
• Press the PANIC button once to turn the panic alarm on.
• Wait approximately three seconds and press the button a second time to turn the
panic alarm off.
Power Liftgate
• Press the LIFTGATE button twice within five seconds to power open/close thePower Liftgate. If the button is pressed while the liftgate is being power closed, the
liftgate will reverse to the full open position.
Power Sliding Doors
• Press the LEFT or RIGHT Power Sliding Door button twice within five seconds topower open/close the Power Sliding Door. If the button is pressed while the door is
being power closed, the door will reverse to the full open position.
Express Window Feature
• To remotely lower both front door windows at the same time, press and release theUNLOCK button and then immediately press and hold the UNLOCK button until
the windows lower to the level desired or until they lower completely.
Emergency Key
• Should the battery in the vehicle or the Key Fob transmitter go dead, there is anemergency key located in the Key Fob that can be used for locking and unlocking
the doors. To remove the emergency key, slide the button at the top of the Key Fob
sideways with your thumb and then pull the key out with your other hand.
CAUTION!
• If your vehicle battery becomes low or dead, your Key Fob will become lockedin the ignition.
(Continued)
GETTING STARTED
8
Page 11 of 100

CAUTION!(Continued)
• Do not attempt to remove the Key Fob while in this condition, damage couldoccur to the Key Fob or ignition module. Only remove the emergency key for
locking and unlocking the doors.
• Leave the Key Fob in the ignition and either: • Jump Start the vehicle.
• Charge the battery.
• Contact your dealer for assistance on how to remove the Key Fob usingthe manual over ride method.
WARNING!
• Leaving unattended children in a vehicle is dangerous for a number ofreasons. A child or others could be severely injured or killed. Children should
be warned not to touch the parking brake, brake pedal, or the shift lever. Do
not leave the Key Fob inside the vehicle or in the ignition. A child could start
the vehicle, operate power windows, other controls, or move the vehicle.
• Do not leave children or animals inside parked vehicles in hot weather. Interior heat build-up may cause them to be severely injured or killed.
• Keep Key Fob transmitters away from children. Operation of the Remote Start System, windows, door locks or other controls could cause serious injury or
death.
REMOTE START
• Press the REMOTE START buttonx2twice within five seconds. Pressing the
REMOTE START button a third time shuts the engine off.
• To drive the vehicle, press the UNLOCK button, insert the Key Fob in the ignition and turn to the ON/RUN position.
• With remote start, the engine will only run for 15 minutes (timeout) unless the ignition Key Fob is placed in the ON/RUN position.
• The vehicle must be started with the Key Fob after two consecutive timeouts.
WARNING!
• Do not start or run an engine in a closed garage or confined area. Exhaust gas contains Carbon Monoxide (CO) which is odorless and colorless. Carbon
Monoxide is poisonous and can cause you or others to be severely injured or
killed when inhaled.
• Keep Key Fob transmitters away from children. Operation of the Remote Start System, windows, door locks or other controls could cause you and others to
be severely injured or killed.
GETTING STARTED
9
Page 13 of 100

SUPPLEMENTAL RESTRAINT SYSTEM (SRS) —
AIRBAGS
• This vehicle has Advanced Front Airbags for both the driver and right frontpassenger as a supplement to the seat belt restraint system. The Advanced Front
Airbags will not deploy in every type of collision.
• Advanced Front Airbags are designed to provide additional protection by supplementing the seat belts in certain frontal collisions depending on the severity
and type of collision. Advanced Front Airbags are not expected to reduce the risk
of injury in rear, side, or rollover collisions.
• This vehicle is equipped with Supplemental Side Airbag Inflatable Curtains to protect the driver, front and rear passengers sitting next to a window.
• This vehicle is equipped with Supplemental Seat-Mounted Side Airbags to provide enhanced protection to help protect an occupant during a side impact.
• If the Airbag Warning Light
is not on during starting, stays on, or turns on
while driving, have the vehicle serviced by an authorized service center
immediately.
• Refer to the Owner's Manual on the DVD for further details regarding the Supplemental Restraint System (SRS).
WARNING!
• Relying on the airbags alone could lead to more severe injuries in a collision.The airbags work with your seat belt to restrain you properly. In some
collisions, the airbags won't deploy at all. Always wear your seat belts even
though you have airbags.
• Being too close to the steering wheel or instrument panel during Advanced Front Airbag deployment could cause serious injury, including death. Airbags
need room to inflate. Sit back, comfortably extending your arms to reach the
steering wheel or instrument panel.
• Supplemental Side Airbag Inflatable Curtains and Supplemental Seat-Mounted Side Airbags need room to inflate. Do not lean against the
door or window. Sit upright in the center of the seat.
• Being too close to the Supplemental Side Airbag Inflatable Curtain and/or Seat-Mounted Side Airbag during deployment could cause you to be severely
injured or killed.
• Do not drive your vehicle after the airbags have deployed. If you are involved in another collision, the airbags will not be in place to protect you.
• After any collision, the vehicle should be taken to an authorized dealer immediately.
GETTING STARTED
11
Page 25 of 100

FUEL ECONOMY (ECON) MODE
• The Fuel Economy (ECON) mode can improve the vehicle’s overall fuel economyduring normal driving conditions.
• Press the “econ” switch in the center stack of the instrument panel and a green light will indicate the ECON mode is engaged.
• When the Fuel Economy (ECON) Mode is engaged, the vehicle control systems will be able to change the following:
• The transmission will upshift sooner and downshift later.
• The transmission will skip select gears during shifts to allow the engine to
operate at lower speeds.
• The torque converter clutch will engage sooner (lower engine rpm’s) and remain on longer.
• The engine idle speed will be lower.
• The overall driving performance will be more conservative.
MANUAL CLIMATE CONTROLS
Air Recirculation
• Use recirculation for maximum A/C operation.
• For window defogging, turn the recirculation button off.
• Recirculation is not allowed in defrost, floor, defrost/floor (mix) modes.
OPERATING YOUR VEHICLE
23
Page 26 of 100

THREE ZONE MANUAL CLIMATE CONTROLS
Air Recirculation
• Use recirculation for maximum A/C operation.
• For window defogging, turn the recirculation button off.
• Recirculation is not allowed in defrost, floor, defrost/floor (mix) modes.
Rear Window Defroster
• Pressing the rear window defroster button will turn on the defroster forapproximately 10 minutes. An indicator in the button will illuminate when the rear
window defroster is on. For an additional five minutes of operation, press the
button a second time.
Activating Rear Passenger Climate Controls
• Rotate the rear blower control, located on the main climate control in theinstrument panel, to the “REAR” position. This enables the rear passenger climate
controls located in the headliner above the second row seats.
OPERATING YOUR VEHICLE
24
Page 27 of 100

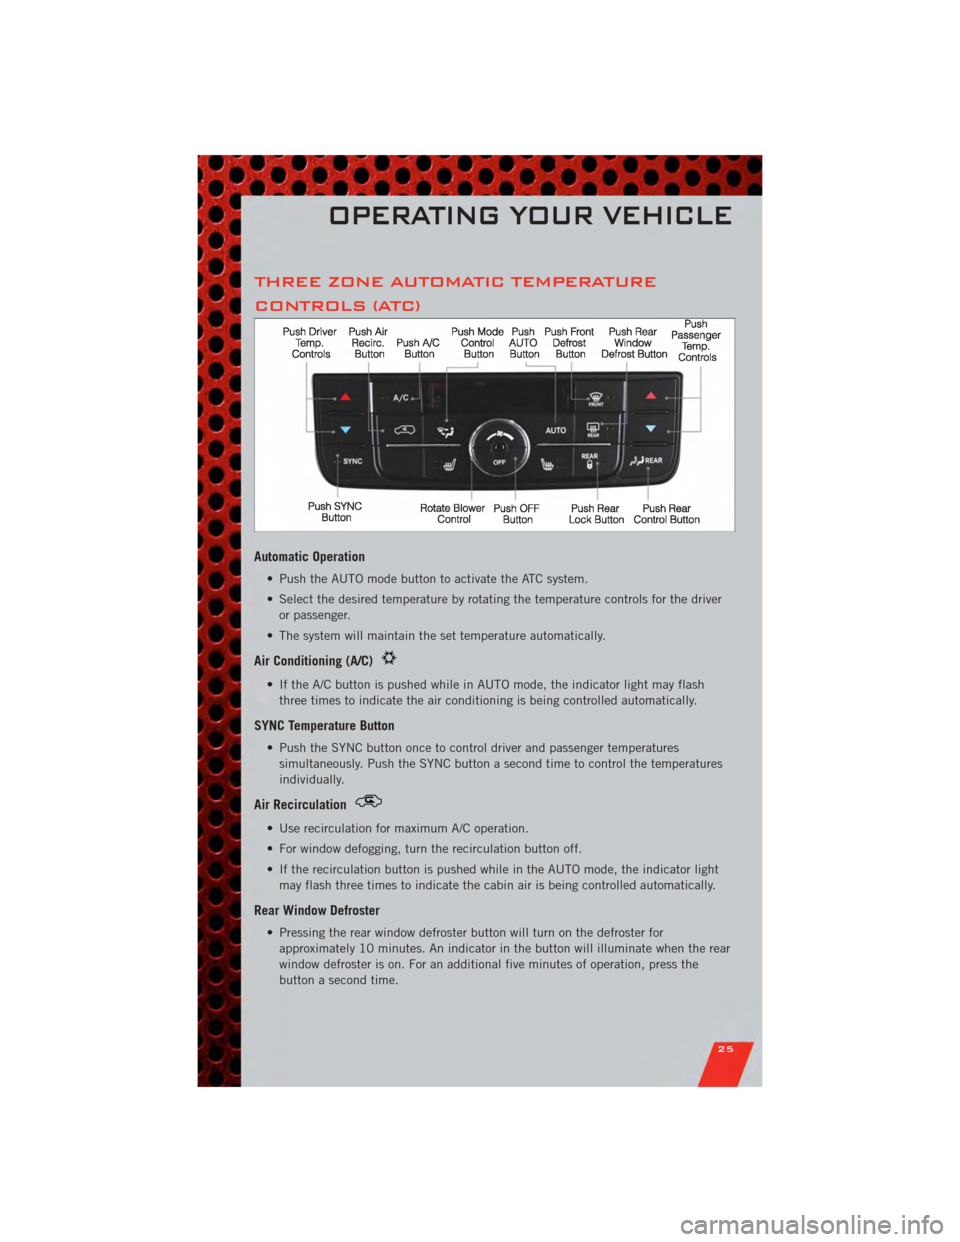
THREE ZONE AUTOMATIC TEMPERATURE
CONTROLS (ATC)
Automatic Operation
• Push the AUTO mode button to activate the ATC system.
• Select the desired temperature by rotating the temperature controls for the driveror passenger.
• The system will maintain the set temperature automatically.
Air Conditioning (A/C)
• If the A/C button is pushed while in AUTO mode, the indicator light may flash three times to indicate the air conditioning is being controlled automatically.
SYNC Temperature Button
• Push the SYNC button once to control driver and passenger temperaturessimultaneously. Push the SYNC button a second time to control the temperatures
individually.
Air Recirculation
• Use recirculation for maximum A/C operation.
• For window defogging, turn the recirculation button off.
• If the recirculation button is pushed while in the AUTO mode, the indicator lightmay flash three times to indicate the cabin air is being controlled automatically.
Rear Window Defroster
• Pressing the rear window defroster button will turn on the defroster forapproximately 10 minutes. An indicator in the button will illuminate when the rear
window defroster is on. For an additional five minutes of operation, press the
button a second time.
OPERATING YOUR VEHICLE
25
Page 33 of 100

WARNING!
• Never leave children in a vehicle with the key in the ignition switch.Occupants, particularly unattended children, can become entrapped by the
power sunroof while operating the power sunroof switch. Such entrapment
may result in serious injury or death.
• In a collision, there is a greater risk of being thrown from a vehicle with an open sunroof. You could also be severely injured or killed. Always fasten your
seat belt properly and make sure all passengers are properly secured.
• Do not allow small children to operate the sunroof. Never allow your fingers, other body parts, or any object to project through the sunroof opening. Injury
may result.
WIND BUFFETING
• Wind buffeting can be described as a helicopter-type percussion sound. Ifbuffeting occurs with the rear windows open, adjust the front and rear windows
together.
• If buffeting occurs with the sunroof open, adjust the sunroof opening, or adjust any window. This will minimize buffeting.
OPERATING YOUR VEHICLE
31
Page 87 of 100

Integrated Power Module (fuses)
• The Integrated Power Module (fuses) is located in the engine compartment nearthe battery. This center contains cartridge fuses, mini-fuses and relays.
Cavity Cartridge Fuse Mini-Fuse Description
J1 40 Amp Green Power Folding Seat
J2 30 Amp Pink Power Liftgate Module
J3 30 Amp Pink Rear Door Module (RR Door
Node)
J4 25 Amp Natural Driver Door Node
J5 25 Amp Natural Passenger Door Node
J6 40 Amp Green Anti-Lock Brake System (ABS)
Pump/ESP
J7 30 Amp Pink Anti-Lock Brake System (ABS)
Valve/ESP
J8 40 Amp Green Power Memory Seat (If
Equipped)
J9 40 Amp Green PZEV Motor/Flex Fuel
J10 30 Amp Pink Headlamp Wash Relay/Manifold
Tuning Valve
J11 30 Amp Pink Power Sliding Door
Module/Thatchum Relay Lock
Feed
J13 60 Amp Yellow Ignition Off Draw (IOD) — Main
J14 40 Amp Green Rear Window Defogger
J15 30 Amp Pink Front Blower
J17 40 Amp Green Starter Solenoid
J18 20 Amp Blue Powertrain Control Module
(PCM) Trans Range
J19 60 Amp Yellow Radiator Fan
J20 30 Amp Pink Front Wiper LO/HI
J21 20 Amp Blue Front/Rear Washer
J22 25 Amp Natural Sunroof Module
M1 15 Amp Blue Center High Mounted Stop
Light (CHMSL)/Brake Switch
M2 —— —
M3 20 Amp Yellow Spare Fuse
M4 10 Amp Red Trailer Tow
M5 25 Amp
NaturalInverter
M6 20 Amp Yellow Power Outlet #1 (ACC), Rain
Sensor
M7 20 Amp Yellow Power Outlet #2 (BATT/ACC
SELECT)
MAINTAINING YOUR VEHICLE
85