Page 93 of 562

Installing The Child Restraint System
We urge you to carefully follow the directions of the
manufacturer when installing your child restraint. Many,
but not all, restraint systems will be equipped with
separate straps on each side, with each having a hook or
connector, and a means for adjusting the tension in the
strap. Forward-facing toddler restraints and some
rearward-facing infant restraints will also be equipped
with a tether strap, a hook and means for adjusting the
tension in the strap. Not all child restraint systems will be
installed as described here. Again, carefully follow the
installation instructions that are provided with the child
restraint system.
In general, you will first loosen the child seat adjusters on
the lower straps and tether straps so that you can more
easily attach the hook or connector to the lower anchor-
ages and tether anchorages. Then tighten all three straps
as you push the child restraint rearward and downward
into the seat.Not all child restraint systems will be installed as we
have described here. Again, carefully follow the instruc-
tions that come with the child restraint system.
WARNING!
Improper installation of a child restraint to the
LATCH anchorages can lead to failure of an infant or
child restraint. The child could be badly injured or
killed. Follow the manufacturer’s directions exactly
when installing an infant or child restraint.
Installing The LATCH-Compatible Child Restraint
System
Each vehicle, except commercial cargo vehicles, is
equipped with the child restraint anchorage sys-
tem called LATCH, which stands for Lower An-
chors and Tether for CHildren. Two LATCH child
restraint anchorage systems are installed on all second-row
seats and in the center position on all third row fold-in-floor
2
THINGS TO KNOW BEFORE STARTING YOUR VEHICLE 91
Page 94 of 562

seats. Second-row seats also feature tether strap anchorages,
located in the rear surface of the seatback. In addition, all
third row fold-in-floor seats are equipped with a child
restraint tether anchor at the center seating position.
NOTE:
•When using the LATCH attaching system to install a
child restraint, please ensure that all seat belts not being
used for occupant restraints are stowed and out of reach
of children. It is recommended that before installing the
child restraint, buckle the seat belt so the seat belt is
tucked behind the child restraint and out of reach. If the
buckled seat belt interferes with the child restraint instal-
lation, instead of tucking the seat belt behind the child
restraint, route the seat belt through the child restraint
belt path and then buckle it. This should stow the seat
belt out of the reach of an inquisitive child. Remind all
children in the vehicle that the seat belts are not toys and
should not be played with, and never leave your child
unattended in the vehicle.
•If your child restraint seat is not LATCH-compatible,
install the restraint using the vehicle seat belts.
Installing the Lower Attachments:
1. The vehicle lower anchorages are round bars located
at the rear of the seat cushion where it meets the seatback.
LATCH Anchorages (Second Row Anchorages Shown)
92 THINGS TO KNOW BEFORE STARTING YOUR VEHICLE
Page 110 of 562

�Seats .............................. 127
▫ Power Seats — If Equipped ............. 128
▫ Power Lumbar — If Equipped ........... 130
▫ Heated Seats — If Equipped ............ 130
▫ Manual Front/Second Row Seat Adjuster . . . 133
▫ Manual Reclining Seats — If Equipped ..... 134
▫ Head Restraints ..................... 135
▫ Stow ’n Go� Seating — If Equipped ....... 139
▫ Quad Seats — If Equipped ............. 146
▫ Second Row Bench Seat — If Equipped .... 152
▫ Third Row Power Recline — If Equipped . . . 153
▫ Third Row Power Folding Seat — If
Equipped .......................... 153 ▫
Manually Folding Third Row Seats — If
Equipped .......................... 156
▫ Plastic Grocery Bag Retainer Hooks ....... 159
� Driver Memory Seat — If Equipped ........ 159
▫ Setting Memory Positions And Linking RKE
Transmitter To Memory ................ 160
▫ Easy Entry/Exit Seat (Available With
Memory Seat Only) ................... 162
� To Open And Close The Hood ............ 163
� Lights ............................. 165
▫ Headlight Switch .................... 165
▫ Automatic Headlights — If Equipped ...... 165
▫ Headlights On With Wipers — If Equipped . . 166
▫ Headlight Delay — If Equipped .......... 166
108 UNDERSTANDING THE FEATURES OF YOUR VEHICLE
Page 141 of 562
Head Restraints — Second Row Bench
To raise the head restraint, pull upward on the head
restraint. To lower the head restraint, press the push
button, located at the base of the head restraint, and push
downward on the head restraint.
Head Restraints — Third Row
The head restraint in the center position can be raised and
lowered for tether routing. Refer to “Occupant Re-
straints” in “Things To Know Before Starting Your Ve-
hicle” for further information.
Stow ’n Go�Seating — If Equipped
On vehicles equipped with Stow ’n Go� seating, the
second and third row seats can be folded into the floor for
convenient storage.
Second Row Stow ’n Go�
On vehicles equipped with Stow ’n Go� seats, the seats
will fold and tumble in one motion.
1. Move the front seat fully forward.
2. Recline the front seatback fully forward.
3. Raise the armrests on the second row seat.
Push Button
3
UNDERSTANDING THE FEATURES OF YOUR VEHICLE 139
Page 145 of 562

CAUTION!
The storage bin cover must be locked and flat to
avoid damage from contact with the front seat tracks,
which have minimal clearance to the cover.
WARNING!
In a collision, serious injury could result if the seat
storage bin covers are not properly latched.
•Do not drive the vehicle with the storage bin
covers open.
•Keep the storage bin covers closed and latched
while the vehicle is in motion.
•Do not use a storage bin latch as a tie down.
To Unstow Second Row Seats
1. Pull up on the storage bin latch to open the cover.
2. Pull up on the strap to lift the seat out of the storage
bin and push the seat rearward to latch the seat anchors.
3. Lift the seatback to the full upright position.
4. Return the head restraint to its upright position, close
the storage bin cover and slide the storage bin locking
mechanism to the “Unlocked” position.
Stow ’n Go�Seat — Folded And Latched Position
To tumble or stow the seat from the folded and latched
position: return the seatback and head restraint to the
upright position. Then pull up on the seatback recliner
lever on the outboard side of the seat to fold head rest
and seatback and tumble seat forward.
3
UNDERSTANDING THE FEATURES OF YOUR VEHICLE 143
Page 147 of 562
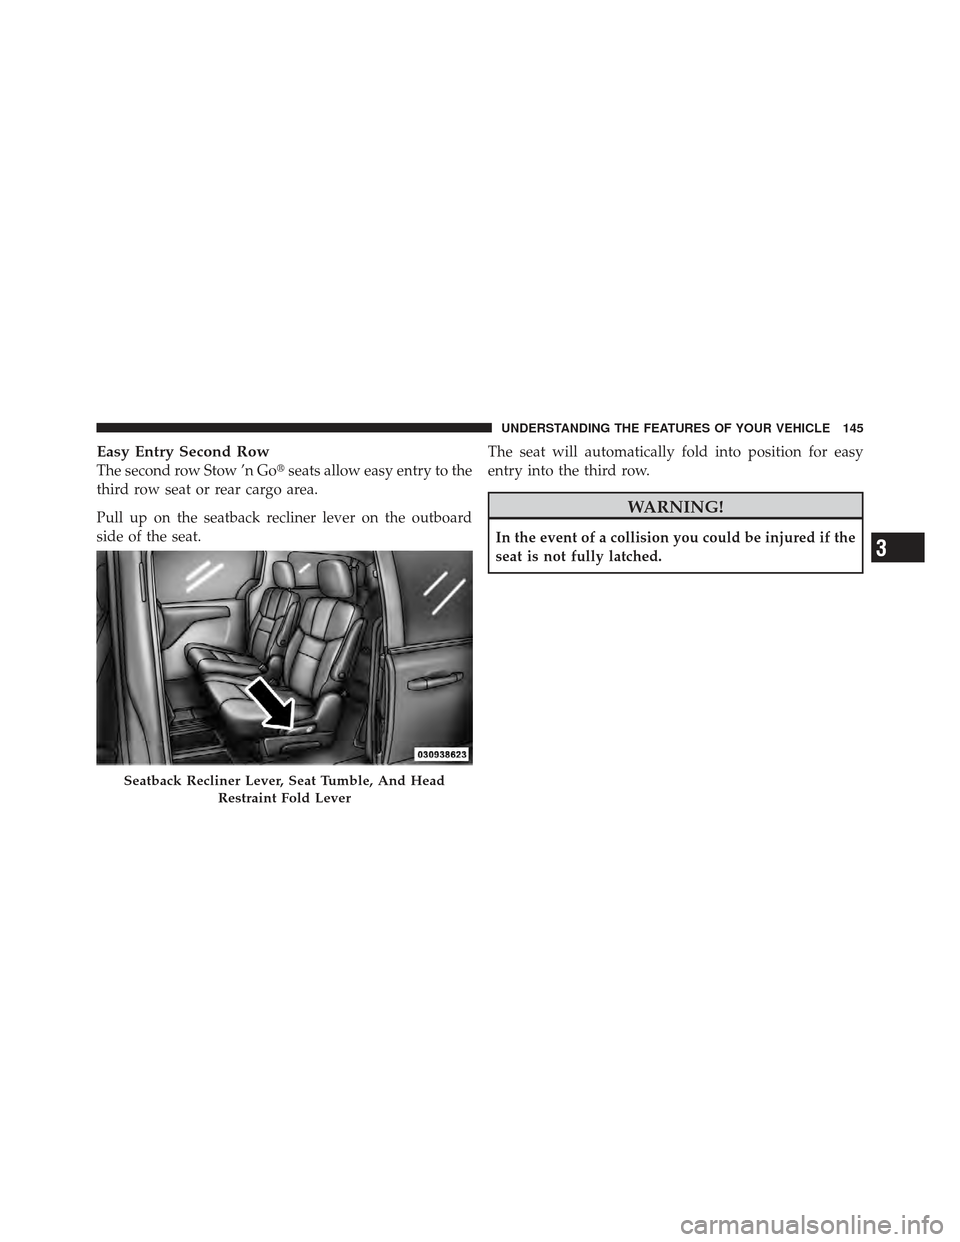
Easy Entry Second Row
The second row Stow ’n Go�seats allow easy entry to the
third row seat or rear cargo area.
Pull up on the seatback recliner lever on the outboard
side of the seat. The seat will automatically fold into position for easy
entry into the third row.
WARNING!
In the event of a collision you could be injured if the
seat is not fully latched.
Seatback Recliner Lever, Seat Tumble, And Head
Restraint Fold Lever
3
UNDERSTANDING THE FEATURES OF YOUR VEHICLE 145
Page 150 of 562
Easy Entry
The Quad seats can be tilted forward for easy entry into
the third row. With the Quad seat in the fold-flat position,
lift up on the easy entry lever located near the bottom of
the seat and lift the seat forward.For passengers seated in the third row, there is a pull
strap located on the outboard side of the seat near the
bottom of the seat back. Third row passengers can pull on
the strap and push the Quad seat forward for folding the
seatback and accessing the easy entry lever.
Easy Entry LeverPull Strap for Third Row Passengers
148 UNDERSTANDING THE FEATURES OF YOUR VEHICLE
Page 151 of 562
To provide additional space behind the second row seats,
the seats can be folded forward.
With the seat in its fold-flat position, pull upward on the
easy-access release lever and lift the seat into the desired
position.Pull out the retainer strap from the sewn-in pocket
located on the base of the seat cushion.
Fold-Flat Release Lever
Retainer Strap
3
UNDERSTANDING THE FEATURES OF YOUR VEHICLE 149