2011 DODGE DURANGO ad blue
[x] Cancel search: ad bluePage 49 of 108

Uconnect™ Phone
• To determine if your vehicle is equipped with Uconnect™ Phone, press the
Uconnect™ Phone button
. If your vehicle has this feature, after a couple
seconds you will hear a voice prompt. If not, you will see a message on the radio
“Uconnect phone not available”.
• The Uconnect™ Phone is a voice-activated, hands-free, in-vehicle communications
system with Voice Command Capability (see Voice Command section).
• The Uconnect™ Phone allows you to dial a phone number with your mobile phone
using simple voice commands.
• For vehicles equipped with Video Entertainment System (VES)™, refer to the
Uconnect™ Phone section of the Uconnect™ User's Manual on the DVD for
further details.
• For vehicles not equipped with VES™, refer to your vehicle Owner's Manual on the
DVD for further details.
NOTE:The Uconnect™ Phone requires a mobile phone equipped with the Bluetooth
®
Hands-Free Profile, Version 0.96 or higher. For Uconnect™ customer support, call
1–877–855–8400 or visit www.dodge.com/uconnect.
Phone Pairing
NOTE:Pairing is a one-time initial setup before using the phone. You will also need to
follow the Bluetooth®instructions in your cell phone user guide to complete the phone
pairing setup.
• Press the Phone button
on either the radio or steering wheel to begin.
• Wait for the “ready” prompt and BEEP.
• (After the BEEP), say “Uconnect setup”.
• (After the BEEP), say “phone pairing”.
• (After the BEEP), say “pair a phone”.
• Follow the audible prompts.
• You will be asked to enter a four-digit Personal Identification Number (PIN), which
you will later need to enter into your mobile phone. You can enter any four-digit
PIN. You will not need to remember this PIN after the initial pairing process.
• You will then be prompted to give the phone pairing a name (each phone paired
should have a unique name).
• Next you will be asked to give this new pairing a priority of 1 thru 7 (up to seven
phones may be paired); 1 is the highest and 7 is the lowest priority. The system
will only connect to the highest priority phone that exists within the proximity of
the vehicle.
Making A Phone Call
• Press the Phone buttonon either the radio or steering wheel.
• (After the BEEP), say “dial” (or “call” a name).
• (After the BEEP), say number (or name).
ELECTRONICS
47
Page 51 of 108

Uconnect™ VOICE COMMAND
• The Uconnect™ Voice Command system allows you to control your AM, FM radio,
satellite radio, disc player, HDD, Uconnect™ Phone, a memo recorder, and
supported portable media devices.
• When you press the Voice Command button
located on the radio faceplate
or steering wheel, you will hear a beep. The beep is your signal to give a command.
If you do not say a command within a few seconds, the system will present you
with a list of options. If you ever wish to interrupt the system while it lists options,
press the Voice Command button
, listen for the BEEP, and say your
command.
Voice Command for Text Messaging
• If equipped with Uconnect™ Voice Command, your Media Center 430N radio may
be able to play incoming SMS messages through the vehicle sound system.
• It also allows you to respond by selecting from various pre-defined phrases.
• Not all phones are compatible with this feature. Refer to the phone compatibility
list at www.dodge.com/uconnect. Connected mobile phones must be
bluetooth-compatible, and paired with your radio.
Changing The Volume
• Start a dialogue by pressing the Voice Command button, then say a
command (for example, “tutorial”).
• Use the radio ON/OFF VOLUME rotary knob to adjust the volume to a comfortable
level while the Voice Command system is speaking. The volume setting for Voice
Command is different than the audio system.
• For vehicles equipped with Video Entertainment System (VES)™, refer to the
Uconnect™ Voice Command section of the Uconnect™ User's Manual on the DVD
for further details.
• For vehicles not equipped with VES™, refer to your vehicle Owner's Manual on the
DVD for Uconnect™ Voice Command information.
NOTE:To access the tutorial, press the Voice Command button
. After the
BEEP, say “tutorial”. Press any hard-key/button or touch the display (Touch-Screen
radio) to cancel the tutorial.
WARNING!
Any voice commanded system should be used only in safe driving conditions
following local laws and phone use. All attention should be kept on the roadway
ahead. Failure to do so may result in a collision causing you and others to be
severely injured or killed.
ELECTRONICS
49
Page 53 of 108

Bluetooth®Streaming Audio (Media Center 430/430N/230/130 only)
• If equipped with Uconnect™ Voice Command, your bluetooth-equipped iPod®
devices, cellphones or other media players, may also be able to stream music to
your vehicle's speakers. Your connected device must be bluetooth-compatible, and
paired with your Media Center radio (see Uconnect™ Phone for pairing
instructions). Press the AUX button on the radio faceplate until "BT" is displayed
on the radio screen.
WARNING!
Do not plug in or remove the iPod®or external device while driving. Failure to
follow this warning could result in a collision.
VIDEO ENTERTAINMENT SYSTEM (VES)™
System Operation
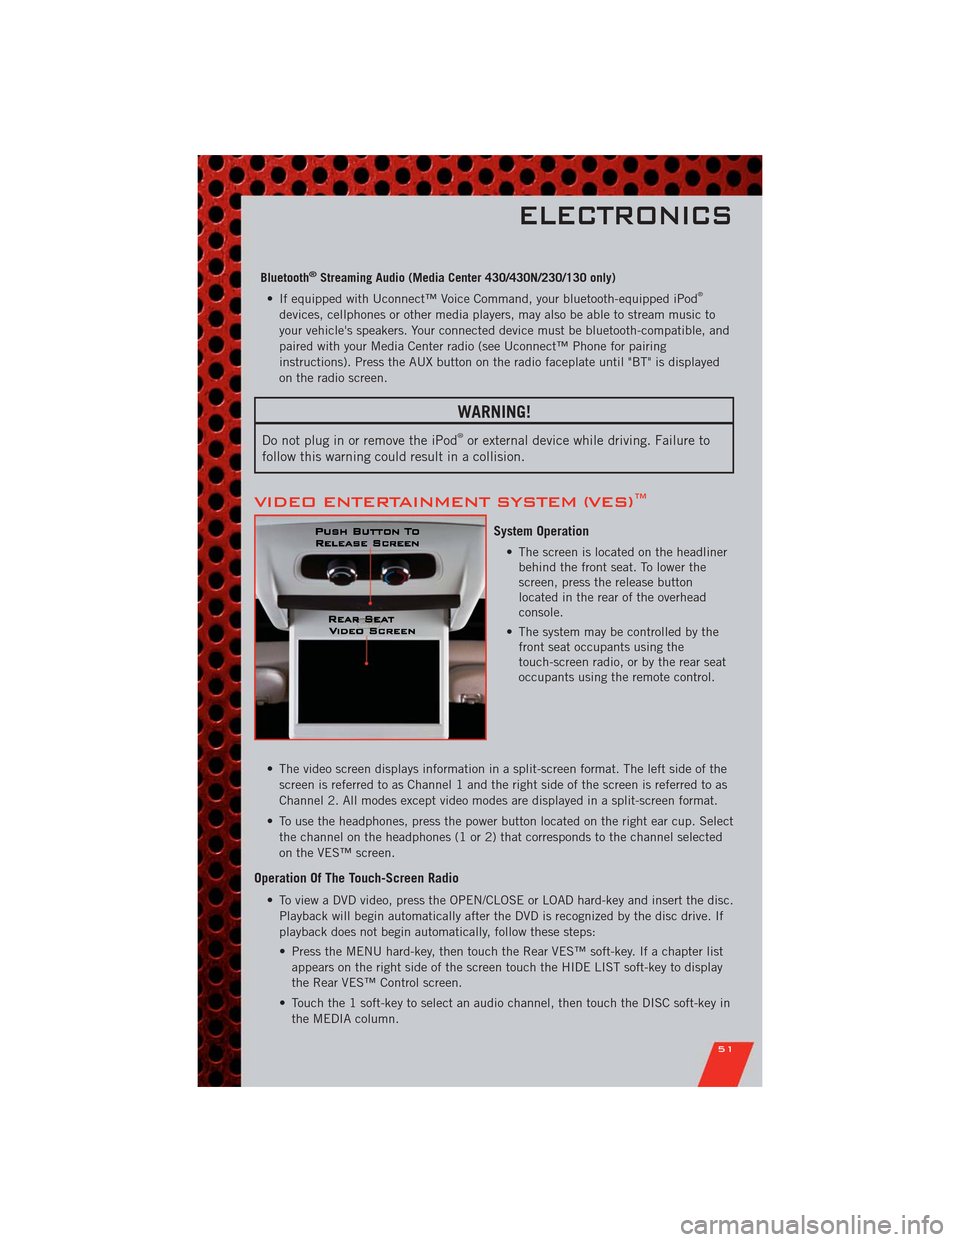
• The screen is located on the headliner
behind the front seat. To lower the
screen, press the release button
located in the rear of the overhead
console.
• The system may be controlled by the
front seat occupants using the
touch-screen radio, or by the rear seat
occupants using the remote control.
• The video screen displays information in a split-screen format. The left side of the
screen is referred to as Channel 1 and the right side of the screen is referred to as
Channel 2. All modes except video modes are displayed in a split-screen format.
• To use the headphones, press the power button located on the right ear cup. Select
the channel on the headphones (1 or 2) that corresponds to the channel selected
on the VES™ screen.
Operation Of The Touch-Screen Radio
• To view a DVD video, press the OPEN/CLOSE or LOAD hard-key and insert the disc.
Playback will begin automatically after the DVD is recognized by the disc drive. If
playback does not begin automatically, follow these steps:
• Press the MENU hard-key, then touch the Rear VES™ soft-key. If a chapter list
appears on the right side of the screen touch the HIDE LIST soft-key to display
the Rear VES™ Control screen.
• Touch the 1 soft-key to select an audio channel, then touch the DISC soft-key in
the MEDIA column.
ELECTRONICS
51
Page 90 of 108

Cavity Cartridge Fuse Mini Fuse Description
J01 40 Amp Green –
J02 30 Amp Pink Power Liftgate Module
J03 30 Amp Pink Trailer Tow
J04 25 Amp
NaturalDriver Door Node
J05 25 Amp
NaturalPassenger Door Node
J06 40 Amp Green Antilock Brakes Pump/Stability
Control System
J07 30 Amp Pink Antilock Brakes Valve/Stability
Control System
J08 40 Amp Green Power Seat
J09 30 Amp Pink E-Brake
J10 30 Amp Pink Headlamp Wash Relay Contact
J11 30 Amp Pink Drive Train Control Module
J12 30 Amp Pink Rear Defroster
J13 60 Amp Yellow Main Ignition Off Draw (IOD)
J14 20 Amp Blue Trailer Tow Lamps/Park Lamps
J15 40 Amp Green Front Cabin Fan/Blower
J17 40 Amp Green Starter Motor Solenoid
J18 20 Amp Blue Powertrain Control Module/
Powertrain Control Module
Transmission Range
J19 60 Amp Yellow Radiator Fan Motor HI/Radiator Fan
Motor Low
J20 30 Amp Pink Front Wiper
J21 20 Amp Blue Front/Rear Washer Control
J22 25 Amp
NaturalSunroof Module
M1 15 Amp Blue Stop Lamp
M2 20 Amp Yellow –
M3 20 Amp Yellow Liftgate Unlock/DRL Relay/Third
Row Headrest
M5 25 Amp
Natural115V AC Power Inverter
M6 20 Amp Yellow Rain Sensor/Cigar Lighter
M7 20 Amp Yellow Power Outlet #2 (Switchable)
M8 20 Amp Yellow Front Heated Seat & Steering
Wheel
M9 20 Amp Yellow Rear Heated Seats
M10 15 Amp Blue Video/Universal Garage Door
Opener/Hands Free/Vanity Lamps
M11 10 Amp Red Heating, Ventilation & Air
Conditioning (Climate Control
System)
MAINTAINING YOUR VEHICLE
88
Page 91 of 108

Cavity Cartridge Fuse Mini Fuse Description
M12 30 Amp Green Radio/Amplifier
M13 20 Amp Yellow Instrument Cluster/Ignition Module
M14 20 Amp Yellow Back Up Camera
M15 20 Amp Yellow Power Seat Module(s)/Adaptive
Cruise Control/Audio
Telematics/Daytime Running Lights
Relay/Instrument Cluster
M16 10 Amp Red Occupant Restraint Controller
M19 25 Amp
NaturalAutomatic Shutdown 1 and 2
M20 15 Amp Blue Instrument Cluster/Steering Wheel
Switches
M21 20 Amp Yellow Automatic Shutdown 3
M22 10 Amp Red Horns (Low/High) – Right
M23 10 Amp Red Horns (Low/High) – Left
M24 25 Amp
NaturalRear Wiper
M25 20 Amp Yellow Fuel Pump Motor Output
M26 10 Amp Red Switch Bank/Interior Lighting
M27 10 Amp Red Ignition Switch/Wireless Control
Module/Keyless Entry Module
M28 15 Amp Blue Powertrain Controller/Transmission
Controller
M29 10 Amp Red Tire Pressure Monitor
M30 15 Amp Blue J1962 Diag Connector
M31 20 Amp Yellow Backup Lamps
M32 10 Amp Red Occupant Restraint Controller
M33 10 Amp Red Powertrain Controller/Transmission
Controller
M34 10 Amp Red Park Assist Module/Climate Control
System Module/IR Sensor/Compass
Module
M35 15 Amp Blue LH Rear Parklamps
M36 20 Amp Yellow Power Outlet
M37 10 Amp Red Antilock Brakes/Stability Control
System Module/Stoplamp Switch
Sensor
M38 25 Amp
NaturalAll Door Lock &Unlock
MAINTAINING YOUR VEHICLE
89