Page 363 of 452

•Your vehicle has been built with improved fluids
that protect the performance and durability of
your vehicle and also allow extended maintenance
intervals. Do not use chemical")
CAUTION! (Continued)
•Your vehicle has been built with improved fluids
that protect the performance and durability of
your vehicle and also allow extended maintenance
intervals. Do not use chemical flushes in these
components as the chemicals can damage your
engine, transmission, power steering or air condi-
tioning. Such damage is not covered by the New
Vehicle Limited Warranty. If a flush is needed
because of component malfunction, use only the
specified fluid for the flushing procedure.
Engine Oil
Checking Oil Level
To assure proper lubrication of your vehicle’s engine, the
engine oil must be maintained at the correct level. The
best time to check the engine oil level is about five
minutes after a fully warmed-up engine is shut off.Checking the oil while the vehicle is on level ground will
improve the accuracy of the oil level readings. Always
maintain the oil level within the SAFE zone on the
dipstick. Adding one quart/liter of oil when the reading
is at the bottom of the SAFE zone will result in a reading
at the top of the safe zone on these engines.
CAUTION!
Overfilling or underfilling the crankcase will cause
oil aeration or loss of oil pressure. This could damage
your engine.
Change Engine Oil
The oil change indicator system will remind you that it is
time to take your vehicle in for scheduled maintenance.
Refer to the “Maintenance Schedule” for further informa-
tion.7
MAINTAINING YOUR VEHICLE 361
Page 372 of 452

•Damage to the catalytic converter can result if your
vehicle is not kept in proper operating condition.
In the event of engine malfunction, particularly
involving engine misfir")
CAUTION! (Continued)
•Damage to the catalytic converter can result if your
vehicle is not kept in proper operating condition.
In the event of engine malfunction, particularly
involving engine misfire or other apparent loss of
performance, have your vehicle serviced promptly.
Continued operation of your vehicle with a severe
malfunction could cause the converter to overheat,
resulting in possible damage to the converter and
vehicle.
Under normal operating conditions, the catalytic con-
verter will not require maintenance. However, it is im-
portant to keep the engine properly tuned to assure
proper catalyst operation and prevent possible catalyst
damage. NOTE:
Intentional tampering with emissions control
systems can result in civil penalties being assessed
against you.
In unusual situations involving grossly malfunctioning
engine operation, a scorching odor may suggest severe
and abnormal catalyst overheating. If this occurs, stop
the vehicle, turn off the engine and allow it to cool.
Service, including a tune-up to manufacturer’s specifica-
tions, should be obtained immediately.
To minimize the possibility of catalytic converter dam-
age:
•Do not shut off the engine or interrupt the ignition,
when the transmission is in gear and the vehicle is in
motion.
•Do not try to start the engine by pushing or towing the
vehicle.
370 MAINTAINING YOUR VEHICLE
Page 380 of 452

•Do not allow petroleum based fluid to contami-
nate the brake fluid. Brake seal components could
be damaged, causing partial or complete brake
failure. This could result in a c")
WARNING! (Continued)
•Do not allow petroleum based fluid to contami-
nate the brake fluid. Brake seal components could
be damaged, causing partial or complete brake
failure. This could result in a collision.
Automatic Transmission
Selection Of Lubricant
It is important that the proper lubricant is used in the
transmission to assure optimum transmission perfor-
mance. Use only the manufacturer ’s recommended trans-
mission fluid. Refer to “Fluids, Lubricants, and Genuine
Parts” in “Maintaining Your Vehicle” for further informa-
tion. It is important that the transmission fluid be main-
tained at the prescribed level using the recommended
fluid. No chemical flushes should be used in any trans-
mission; only the approved lubricant may be used.
Special Additives
Automatic Transmission Fluid (ATF) is an engineered
product and its performance may be impaired by supple-
mental additives. Therefore, do not add any fluid addi-
tives to the transmission. The only exception to this
policy is the use of special dyes to aid in detecting fluid
leaks. In addition, avoid using transmission sealers as
they may adversely affect seals.
NOTE:If your vehicle is equipped with a dipstick, use
the following procedure. If your vehicle has a capped
dipstick, it is sealed and should not be tampered with.
Your authorized dealer has the proper tools to ensure that
the fluid level is set properly.
378 MAINTAINING YOUR VEHICLE
Page 381 of 452
. This occurs after at
least 15 miles (24 km) of driving. At normal operating
temperat")
Fluid Level Check
Check the fluid level while the transmission is at normal
operating temperature 180° F (82° C). This occurs after at
least 15 miles (24 km) of driving. At normal operating
temperature the fluid cannot be held comfortably be-
tween the fingertips.
To check the automatic transmission fluid level properly,
the following procedure must be used:
1. Operate the engine at idle speed and normal operating
temperature.
2. The vehicle must be on level ground.
3. Fully apply the parking brake and press the brake
pedal.
4. Place the shift lever momentarily into each gear posi-
tion, ending with the shift lever in PARK.5. Remove the dipstick, wipe it clean and reinsert it until
seated.
6. Remove the dipstick again and note the fluid level on
both sides. The fluid level should be between the “HOT”
(upper) reference holes on the dipstick at normal operat-
ing temperature. Verify that solid coating of oil is seen on
both sides of the dipstick. If the fluid is low, add as
required into the dipstick tube.
Do not overfill.After
adding any quantity of oil through the oil fill tube, wait
a minimum of two minutes for the oil to fully drain into
the transmission before rechecking the fluid level.
NOTE: If it is necessary to check the transmission below
the operating temperature, the fluid level should be
between the two “COLD” (lower) holes on the dipstick
with the fluid at approximately 70° F (21° C) (room
temperature). If the fluid level is correctly established at
room temperature, it should be between the “HOT”
7
MAINTAINING YOUR VEHICLE 379
Page 382 of 452
 reference holes when the transmission reaches
180° F (82° C). Remember it is best to check the level at
the normal operating temperature.
CAUTION!
Be aware that if the fluid temperature is b")
(upper) reference holes when the transmission reaches
180° F (82° C). Remember it is best to check the level at
the normal operating temperature.
CAUTION!
Be aware that if the fluid temperature is below 50° F
(10° C) it may not register on the dipstick. Do not add
fluid until the temperature is elevated enough to
produce an accurate reading.
7. Check for leaks. Release the parking brake.
To prevent dirt and water from entering the transmission
after checking or replenishing fluid, make certain that the
dipstick cap is properly reseated. It is normal for the
dipstick cap to spring back slightly from its fully-seated
position, as long as its seal remains engaged in the
dipstick tube.
CAUTION!
•Do not use chemical flushes in your transmission
as the chemicals can damage your transmission
components. Such damage is not covered by the
New Vehicle Limited Warranty.
•Using a transmission fluid other than the manu-
facturer’s recommended fluid may cause deterio-
ration in transmission shift quality and/or torque
converter shudder. Using a transmission fluid,
other than the manufacturer’s recommended fluid,
will result in more frequent fluid and filter
changes. Refer to “Fluids, Lubricants, and Genu-
ine Parts” in “Maintaining Your Vehicle” for fur-
ther information.
380 MAINTAINING YOUR VEHICLE
Page 391 of 452
CavityCartridge
Fuse Mini-
Fuse Description
18 20 Amp
Yellow Fuel Pump
19 15 Amp
Blue Rear Center Brake
Lamp
20 20 Amp
Yellow Instrument Cluster/
Door Locks/Brake
Transmission Shift
Interlock
21 25 Amp
Natural Audio Amp
22 20 Amp
Yellow Power Outlet
(Switchable)
23 20 Amp
Yellow Fog Lamps
24 20 Amp
Yellow Powertrain Control
Module B+Cavity
Cartridge
Fuse Mini-
Fuse Description
25 15 Amp
Blue Instrument Cluster
Illumination
26 20 Amp
Yellow Ignition Run/Start
Feed
27 10 Amp
Red Power Mirror
28 20 Amp
Yellow Power Outlet
29 20 Amp
Yellow Body Control Module
4 (Wipers)
30 Spare
31 30 Amp
Green Ignition Run/AC/
Windows
32 30 Amp Pink Body Control Module
1 (Ext. Lights # 1)
7
MAINTAINING YOUR VEHICLE 389
Page 405 of 452
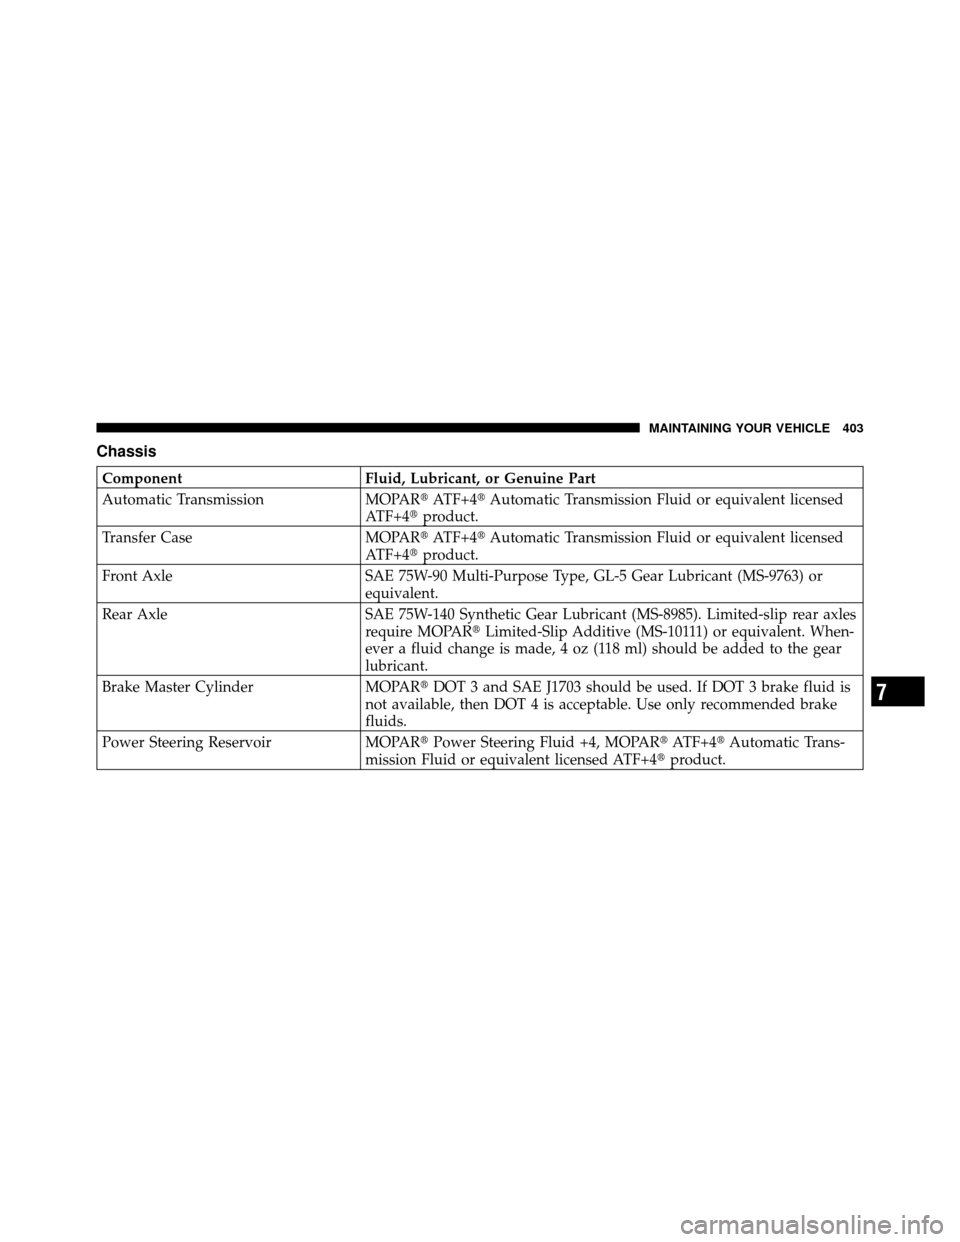
Chassis
ComponentFluid, Lubricant, or Genuine Part
Automatic Transmission MOPAR�ATF+4�Automatic Transmission Fluid or equivalent licensed
ATF+4� product.
Transfer Case MOPAR�ATF+4�Automatic Transmission Fluid or equivalent licensed
ATF+4� product.
Front Axle SAE 75W-90 Multi-Purpose Type, GL-5 Gear Lubricant (MS-9763) or
equivalent.
Rear Axle SAE 75W-140 Synthetic Gear Lubricant (MS-8985). Limited-slip rear axles
require MOPAR�Limited-Slip Additive (MS-10111) or equivalent. When-
ever a fluid change is made, 4 oz (118 ml) should be added to the gear
lubricant.
Brake Master Cylinder MOPAR�DOT 3 and SAE J1703 should be used. If DOT 3 brake fluid is
not available, then DOT 4 is acceptable. Use only recommended brake
fluids.
Power Steering Reservoir MOPAR�Power Steering Fluid +4, MOPAR� ATF+4�Automatic Trans-
mission Fluid or equivalent licensed ATF+4� product.
7
MAINTAINING YOUR VEHICLE 403
Page 409 of 452

Your authorized dealer will reset the oil change indicator
message after completing the scheduled oil change. If a
scheduled oil change is performed by someone other
than your authorized dealer, the message can be reset by
referring to the steps described under “Electronic Vehicle
Information Center (EVIC)/Oil Change Required” in
“Understanding Your Instrument Panel” or under “In-
strument Cluster Description/Odometer/Trip Odom-
eter” in “Understanding Your Instrument Panel” for
further information.
At Each Stop For Fuel
•Check the engine oil level about five minutes after a
fully warmed engine is shut off. Checking the oil level
while the vehicle is on level ground will improve the
accuracy of the oil level reading. Add oil only when
the level is at or below the ADD or MIN mark.
•Check the windshield washer solvent and add if
required.
Once A Month
•Check tire pressure and look for unusual wear or
damage.
•Inspect the battery, and clean and tighten the terminals
as required.
•Check the fluid levels of the coolant reservoir, brake
master cylinder, and transmission, and add as needed.
•Check all lights and other electrical items for correct
operation.
8
M A I
N T
E
N A
N CE
S
C
H E
D
U L
E
SMAINTENANCE SCHEDULES 407