Page 178 of 452

▫Notes On Playing MP3 Files ............ 216
▫ Operation Instructions - Auxiliary Mode .... 219
� Media Center 130 With Satellite Radio
(Sales Code RES+RSC) ................... 220
▫ Operating Instructions — Radio Mode ..... 220
▫ Operation Instructions — CD Mode For CD
And MP3 Audio Play ................. 226
▫ Notes On Playing MP3 Files ............ 228
▫ List Button (CD Mode For MP3 Play) ...... 230
▫ Info Button (CD Mode For MP3 Play) ...... 230
▫ Uconnect™ Multimedia
(Satellite Radio) — If Equipped .......... 231�
Steering Wheel Audio
Controls — If Equipped .................. 236
▫ Radio Operation ..................... 236
▫ CD Player ......................... 237
� CD/DVD Disc Maintenance .............. 237
� Radio Operation And Mobile Phones ....... 238
� Climate Controls ...................... 238
▫ Air Conditioning And Heater ............ 238
▫ Operating Tips ...................... 241
▫ Operation Tips Chart ................. 244
176 UNDERSTANDING YOUR INSTRUMENT PANEL
Page 195 of 452
SEEK Buttons
Press and release the SEEK buttons to search for the next
listenable station in AM/FM mode. Press the right switch
to seek up and the left switch to seek down. The radio
will remain tuned to the new station until you make
another selection. Holding either button will bypass
stations without stopping until you release it.
SCAN Button
Pressing the SCAN button causes the tuner to search for
the next listenable station in AM, FM or Satellite (if
equipped) frequencies, pausing for five seconds at each
listenable station before continuing to the next. To stop
the search, press the SCAN button a second time.
Voice Command Button Uconnect™ Phone —
If Equipped
Press this button to operate the Uconnect™ Phone feature
(if equipped). Refer to “Voice Command in the Uconnect™
User Manual located on the DVD for further details.
If your vehicle is not equipped with or this feature is not
available on your vehicle, a “Not Equipped With
Uconnect Phone” message will display on the radio
screen.
Phone Button Uconnect™ Phone — If Equipped
Press this button to operate the Uconnect™ Phone feature
(if equipped). Refer to “Uconnect™ Phone” in the
Uconnect™ User Manual located on the DVD for further
details.
If your vehicle is not equipped with or this feature is not
available on your vehicle, a “Not Equipped With
Uconnect Phone” message will display on the radio
screen.
TIME Button
Press the TIME button to alternate locations of the time
and frequency display.
4
UNDERSTANDING YOUR INSTRUMENT PANEL 193
Page 199 of 452
•DVD Enter -When the disc is in DVD Menu mode,
selecting DVD Enter will allow you to play the current
highlighted selection. Use the remote control to scroll
up and down the menu (if equipped).
•DISC Play/Pause - You can toggle between
playing the DVD and pausing the DVD by
pushing the SELECT button (if equipped).
•DVD Play Options - Selecting the DVD Play Options
will display the following:
•Subtitle – Repeatedly pressing SELECT will switch
subtitles to different subtitle languages that are
available on the disc (if equipped).
•Audio Stream – Repeatedly pressing SELECT will
switch to different audio languages (if supported on
the disc) (if equipped).
•Angle – Repeatedly pressing SELECT will change
the viewing angle if supported by the DVD disc (if
equipped).
NOTE:
•The available selections for each of the above entries
varies depending upon the disc.
•These selections can only be made while playing a
DVD.
•VES™ Power - Allows you to turn VES™ ON and
OFF (if equipped).
•VES™ Lock - Locks out rear VES™ remote controls (if
equipped).
•VES™ CH1/CH2 - Allows the user to change the
mode of either the IR1 or IR2 wireless headphones by
pressing the AUDIO/SELECT button (if equipped).
4
UNDERSTANDING YOUR INSTRUMENT PANEL 197
Page 207 of 452
LIST Button (DISC Mode for MP3/WMA Play)
Pressing the LIST button will bring up a list of all folders
on the disc. Scrolling up or down the list is done by
turning the TUNE/SCROLL control knob. Selecting a
folder by pressing the TUNE/SCROLL control knob will
begin playing the files contained in that folder (or the
next folder in sequence if the selection does not contain
playable files).
The folder list will time out after five seconds.
INFO Button (DISC Mode for MP3/WMA Play)
Pressing the INFO button repeatedly will scroll through
the following TAG information: Song Title, Artist, File
Name, and Folder Name (if available).
Press the INFO button once more to return to�elapsed
time� priority mode.
Press and hold the INFO button for three seconds or
more and radio will display song titles for each file. Press and hold the INFO button again for three seconds
to return to
�elapsed time� display.
Operation Instructions - Auxiliary Mode
The auxiliary (AUX) jack is an audio input jack which
allows the user to plug in a portable device such as an
MP3/WMA player, cassette player, or microphone and
utilize the vehicle’s audio system to amplify the source
and play through the vehicle speakers.
Pressing the AUX button will change the mode to auxil-
iary device if the AUX jack is connected.
NOTE:The AUX device must be turned on and the
device’s volume set to the proper level. If the AUX audio
is not loud enough, turn the device’s volume up. If the
AUX audio sounds distorted, turn the device’s volume
down.
SEEK Button (Auxiliary Mode)
No function.
4
UNDERSTANDING YOUR INSTRUMENT PANEL 205
Page 208 of 452
SCAN Button (Auxiliary Mode)
No function.
EJECT Button (Auxiliary Mode)
No function.
TIME Button (Auxiliary Mode)
Press the TIME button to change the display from
elapsed playing time to time of day. The time of day will
display for five seconds.
RW/FF (Auxiliary Mode)
No function.
SET Button (Auxiliary Mode)
No function.
Operating Instructions — Voice Command System
(If Equipped)
For the radio, Refer to “Voice Command” in the
Uconnect™ User Manual located on the DVD for further
details.
Operating Instructions - Uconnect™ Phone
(If Equipped)
Refer to “Uconnect™ Phone” in the Uconnect™ User
Manual located on the DVD for further details.
Operating Instructions - Video Entertainment
System (VES)™ (If Equipped)
Refer to “Video Entertainment System (VES)™” in the
Uconnect™ User Manual located on the DVD for further
details.
Dolby�
Manufactured under license from Dolby�Laboratories.
�Dolby�� and the double-D symbol are trademarks of
Dolby� Laboratories.
206 UNDERSTANDING YOUR INSTRUMENT PANEL
Page 223 of 452
SEEK Buttons
Press and release the SEEK buttons to search for the next
listenable station in AM/FM mode. Press the right switch
to seek up and the left switch to seek down. The radio
will remain tuned to the new station until you make
another selection. Holding either button will bypass
stations without stopping until you release it.
Voice Command System (Radio) — If Equipped
Refer to “Voice Command” in “Understanding The Fea-
tures If Your Vehicle”.
Voice Command Button Uconnect™ Phone —
If Equipped
Press this button to operate the Uconnect™ Phone feature
(if equipped). Refer to “Uconnect™ Phone” in “Under-
standing The Features If Your Vehicle”.
If your vehicle is not equipped with or this feature is not
available on your vehicle, a “Not Equipped With Uconnect
Phone” message will display on the radio screen.
Phone Button Uconnect™ Phone — If Equipped
Press this button to operate the Uconnect™ Phone feature
(if equipped). Refer to “Uconnect™ Phone” in “Under-
standing The Features If Your Vehicle”.
If your vehicle is not equipped with or this feature is not
available on your vehicle, a “Not Equipped With
Uconnect Phone” message will display on the radio
screen.
TIME Button
Press the TIME button to alternate display of the time
and radio frequency.
Clock Setting Procedure
1. Press and hold the TIME button until the hours blink.
2. Adjust the hours by turning the right side TUNE/
SCROLL control knob.
4
UNDERSTANDING YOUR INSTRUMENT PANEL 221
Page 237 of 452
SETUP Button
Pressing the SETUP button allows you to select the
following items:
•Display Sirius ID number — Press the AUDIO/
SELECT button to display the Sirius ID number. This
number is used to activate, deactivate, or change the
Sirius subscription.
SET Button – To Set the Pushbutton Memory
When you are receiving a channel that you wish to
commit to pushbutton memory, press the SET button.
The symbol SET 1 will now show in the display window.
Select the button (1-6) you wish to lock onto this channel
and press and release that button. If a button is not
selected within five seconds after pressing the SET but-
ton, the channel will continue to play but will not be
stored into pushbutton memory.You may add a second channel to each pushbutton by
repeating the above procedure with this exception: Press
the SET button twice and SET 2 will show in the display
window. Each button can be set for SET 1 and SET 2. This
allows a total of 12 Satellite channels to be stored into
pushbutton memory. The channels stored in SET 2
memory can be selected by pressing the pushbutton
twice.
Every time a preset button is used, a corresponding
button number will display.
Buttons 1 - 6
These buttons tune the radio to the channels that you
commit to pushbutton memory (12 Satellite stations).
Operating Instructions - Uconnect™ Phone
(If Equipped)
Refer to “Uconnect™ Phone” in “Understanding The
Features If Your Vehicle”.
4
UNDERSTANDING YOUR INSTRUMENT PANEL 235
Page 240 of 452
NOTE:If you experience difficulty in playing a particu-
lar disc, it may be damaged (i.e., scratched, reflective
coating removed, a hair, moisture or dew on the disc)
oversized, or have protection encoding. Try a known
good disc before considering disc player service.
RADIO OPERATION AND MOBILE PHONES
Under certain conditions, the mobile phone being on in
your vehicle can cause erratic or noisy performance from
your radio. This condition may be lessened or eliminated
by relocating the mobile phone antenna. This condition is
not harmful to the radio. If your radio performance does
not satisfactorily “clear” by the repositioning of the
antenna, it is recommended that the radio volume be
turned down or off during mobile phone operation when
not using Uconnect™ (if equipped).
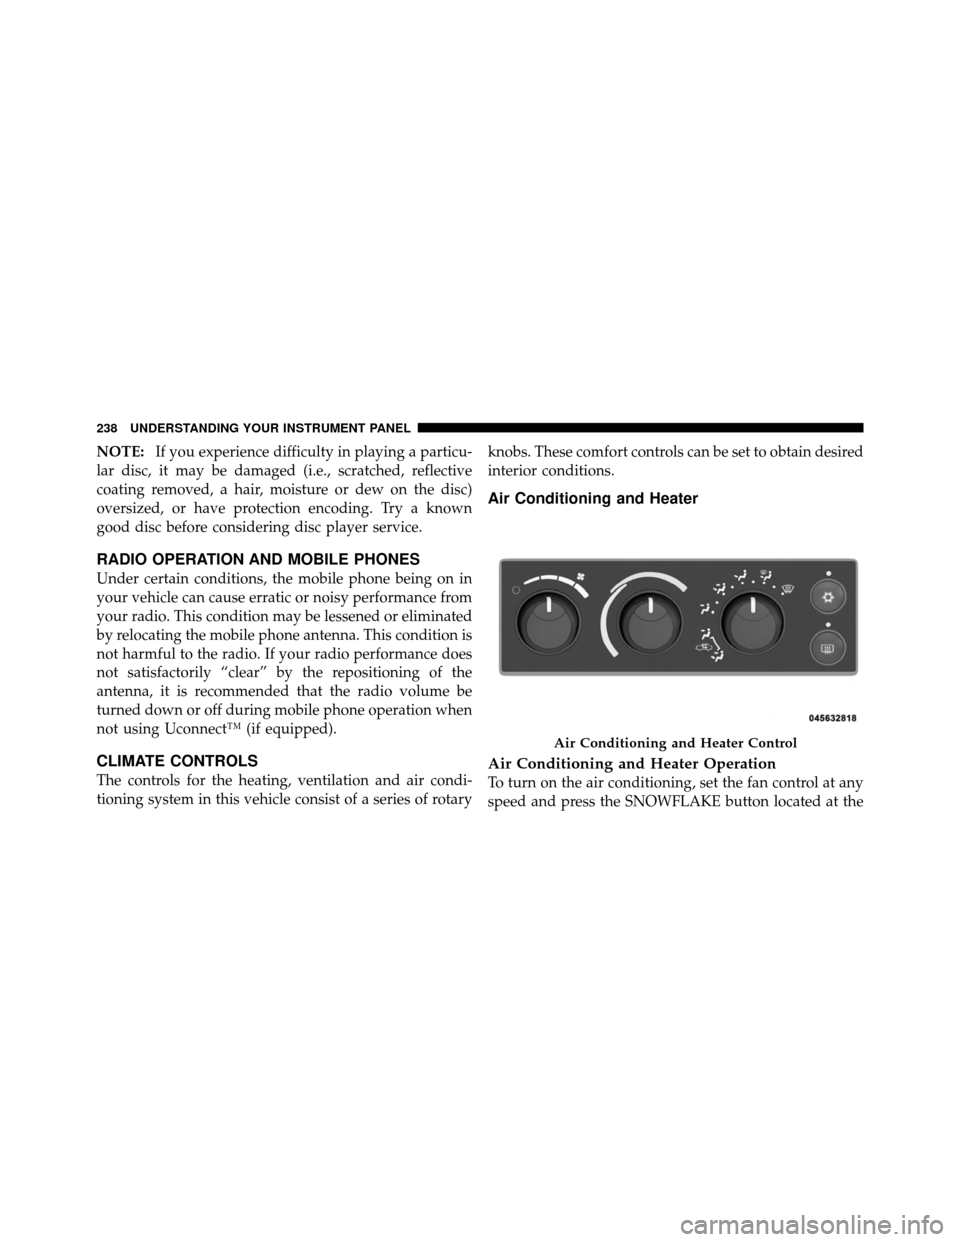
CLIMATE CONTROLS
The controls for the heating, ventilation and air condi-
tioning system in this vehicle consist of a series of rotary knobs. These comfort controls can be set to obtain desired
interior conditions.
Air Conditioning and Heater
Air Conditioning and Heater Operation
To turn on the air conditioning, set the fan control at any
speed and press the SNOWFLAKE button located at the
Air Conditioning and Heater Control
238 UNDERSTANDING YOUR INSTRUMENT PANEL