2011 DODGE CARAVAN display
[x] Cancel search: displayPage 251 of 562

INSTRUMENT CLUSTER DESCRIPTIONS
1. Tachometer
The red segments indicate the maximum permissible
engine revolutions per minute (RPM x 1000) for each gear
range. Before reaching the red area, ease up on the
accelerator.
2. Front Fog Light Indicator — If EquippedThis indicator will illuminate when the front fog
lights are on.
3. Park/Headlight ON Indicator — If Equipped This indicator will illuminate when the park
lights or headlights are turned on.
4. Turn Signal Indicators The arrow will flash with the exterior turn signal
when the turn signal lever is operated. If the vehicle is driven 1 mile (1.6 km) with either turn
signal on, a continuous chime will sound to alert you to
turn the signal off. If either indicator flashes at a rapid
rate, check for a defective outside light bulb.
5. High Beam Indicator
This indicator shows that the high beam head-
lights are on. Push the multifunction lever forward
to switch the headlights to high beam, and pull toward
yourself (normal position) to return to low beam.
6. Compass Mini-Trip Computer (CMTC) or Electronic
Vehicle Information Center (EVIC) Display — If
Equipped
Odometer
The odometer display shows the total distance the ve-
hicle has been driven.
4
UNDERSTANDING YOUR INSTRUMENT PANEL 249
ProCarManuals.com
Page 252 of 562
U.S. Federal regulations require that upon transfer of
vehicle ownership, the seller certify to the purchaser the
correct mileage that the vehicle has been driven. If your
odometer needs to be repaired or serviced, the repair
technician should leave the odometer reading the same
as it was before the repair or service. If s/he cannot do so,
then the odometer must be set at zero, and a sticker must
be placed in the door jamb stating what the mileage was
before the repair or service. It is a good idea for you to
make a record of the odometer reading before the repair/
service, so that you can be sure that it is properly reset, or
that the door jamb sticker is accurate if the odometer
must be reset at zero.Message Display Area
When the appropriate conditions exist, the following
odometer messages will display:
door
............................. Door Ajar
gATE ........................... Liftgate Ajar
LoW tirE ..................... LowTirePr essure
gASCAP ....................... Fuel Cap Fault
noFUSE .......................... Fuse Fault
CHAngE OIL ............... Oil Change Required
CRUISE ..................... Cruise Control On
LoCOOL ........................ Low Coolant
LoWASH .................... LowW asher Fluid
NOTE: Some of the above warnings will be displayed in
the Electronic Vehicle Information Center Display Area
located in the instrument cluster.
Refer to ”Electronic Vehicle Information Center (EVIC)
Display — If Equipped” for further information.
250 UNDERSTANDING YOUR INSTRUMENT PANEL
ProCarManuals.com
Page 253 of 562
LoW tirE
When the appropriate condition exists, the odometer dis-
play will toggle between LoW and tirE for three cycles.
gASCAP
If the vehicle diagnostic system determines that the fuel
filler cap is loose, improperly installed, or damaged, a
“gASCAP” message will display in the odometer display
area. Tighten the fuel filler cap properly and press the
TRIP ODOMETER button to turn off the message. If the
problem continues, the message will appear the next time
the vehicle is started.
noFUSE
If the vehicle diagnostic system determines that the
Ignition Off Draw (IOD) fuse is improperly installed, or
damaged, a “noFUSE” message will display in the odom-
eter display area. For further information on fuses and
fuse locations refer to “Fuses” in “Maintaining Your
Vehicle”.CHAngE OIL
Your vehicle is equipped with an engine oil change
indicator system. The
CHAngE OILmessage will flash in
the instrument cluster odometer for approximately
12 seconds, after a single chime has sounded, to indicate
the next scheduled oil change interval. The engine oil
change indicator system is duty cycle-based, which
means the engine oil change interval may fluctuate
dependent upon your personal driving style.
Unless reset, this message will continue to display each
time you turn the ignition switch to the ON/RUN
position. To turn off the message temporarily, press and
release the Trip / Odometer Display reset button on the
instrument cluster. To reset the oil change indicator
system (after performing the scheduled maintenance),
perform the following steps.
1. Turn the ignition switch to the ON/RUN position (do
not start the engine).
4
UNDERSTANDING YOUR INSTRUMENT PANEL 251
ProCarManuals.com
Page 254 of 562
2. Fully depress the accelerator pedal, slowly, three times
within 10 seconds.
3. Turn the ignition switch to the OFF/LOCK position.
NOTE:If the indicator message illuminates when you
start the engine, the oil change indicator system did not
reset. If necessary, repeat these steps.
Compass Mini-Trip Computer (CMTC) Display — If
Equipped
On vehicles equipped with Compass Mini-Trip Com-
puter (CMTC), the display provides the outside tempera-
ture, one of eight compass headings to indicate the
direction the vehicle is facing, and the current radio
station. For further information, refer to “Compass Mini-
Trip Computer”. Electronic Vehicle Information Center (EVIC) Display
— If Equipped
The Electronic Vehicle Information Center (EVIC) fea-
tures a driver-interactive display that is located in the
instrument cluster. For further information, refer to
“Electronic Vehicle Information Center (EVIC)”.
7. Anti-Lock Brake (ABS) Light
This light monitors the Anti-Lock Brake System
(ABS). The light will turn on when the ignition
switch is turned to the ON/RUN position and
may stay on for as long as four seconds.
If the ABS light remains on or turns on while driving, it
indicates that the Anti-Lock portion of the brake system
is not functioning and that service is required. However,
the conventional brake system will continue to operate
normally if the BRAKE warning light is not on.
252 UNDERSTANDING YOUR INSTRUMENT PANEL
ProCarManuals.com
Page 259 of 562
15. Air Bag Warning LightThis light will turn on for four to eight seconds
as a bulb check when the ignition switch is first
turned to ON/RUN. If the light is either not on
during starting, stays on, or turns on while
driving, have the system inspected at an authorized
dealer as soon as possible. Refer to “Occupant Restraints”
in “Things To Know Before Starting Your Vehicle” for
further information.
16. Shift Lever Indicator
The Shift Lever Indicator is self-contained within the
instrument cluster. It displays the gear position of the
automatic transmission.
NOTE:
•You must apply the brakes before shifting from PARK.
•The highest available transmission gear is displayed in
the lower right corner of the Electronic Vehicle Infor-
mation Center (EVIC) whenever the Electronic Range Select (ERS) feature is active. Use the +/- selector on
the shift lever to activate ERS. Refer to “Automatic
Transmission” in “Starting And Operating” for further
information.
17. Vehicle Security Light — If Equipped This light will flash at a fast rate for approxi-
mately 15 seconds, when the vehicle security
alarm is arming, and then will flash slowly
until the vehicle is disarmed.
18. Brake Warning Light This light monitors various brake functions,
including brake fluid level and parking brake
application. If the brake light turns on it may
indicate that the parking brake is applied, that
the brake fluid level is low, or that there is a problem with
the anti-lock brake system reservoir.
4
UNDERSTANDING YOUR INSTRUMENT PANEL 257
ProCarManuals.com
Page 264 of 562

If a problem is detected, the light will come on while the
engine is running. Cycle the ignition key when the
vehicle has completely stopped and the shift lever is
placed in the PARK position, the light should turn off.
If the light remains lit with the engine running, your
vehicle will usually be drivable; however, see an autho-
rized dealer for service as soon as possible. If the light is
flashing when the engine is running, immediate service is
required and you may experience reduced performance,
an elevated/rough idle or engine stall and your vehicle
may require towing.
COMPASS MINI-TRIP COMPUTER (CMTC) — IF
EQUIPPED
NOTE:
•The compass on your vehicle is self-calibrating, elimi-
nating the need to manually calibrate the compass.
•If the vehicle is equipped with the manufacturers gps
(Navigation Radio), the NAV system will provide the
compass direction, and the variance and calibration
menus will be unavailable. The compass will perform
accurately, based on GPS signals instead of the Earth’s
magnetic field.
The Compass Mini-Trip Computer is located in the
instrument cluster and features a driver-interactive dis-
play (displays information on outside temperature, com-
pass direction, and trip information).
NOTE: The system will display the last known outside
temperature when starting the vehicle and may need to
be driven several minutes before the updated tempera-
ture is displayed. Engine temperature can also affect the
displayed temperature; therefore, temperature readings
are not updated when the vehicle is not moving.
262 UNDERSTANDING YOUR INSTRUMENT PANEL
ProCarManuals.com
Page 265 of 562
CMTC Reset Buttons
CMTC Reset Button
Press the STEP button located on the steering wheel to
scroll through sub menus (i.e., Trip Functions: AVG Fuel
Economy, DTE, Elapsed Time, and Units).
To reset the display shown, turn the ignition switch to the
ON position, then press and hold the RESET button for
approximately two seconds.
When the appropriate conditions exist, the following
messages will display:
NE....... Eight-point compass headings are displayed
(N, S, E, W, NE, NW, SE, SW)
14°F ............ T emperature (Fahrenheit or Celsius)
AV G ......... Average Fuel Economy (U.S. or Metric)
DTE ....................... Distance to Empty
ET ............................ Elapsed Time
P .......................... Park Assist On/OffShould this wrench symbol display with the
letter
Pnext to it, your Park Assist System
needs servicing. Contact an authorized dealer.
CMTC Trip Odometer (ODO)
This display shows the distance traveled since the last
reset. Press and release the STEP button on the steering
wheel to switch from odometer to Trip A or Trip B or to
ECO. Press and hold the RESET button while the
odometer/trip odometer is displayed to reset.
Trip A
Shows the total distance traveled for Trip A since the last
reset.
Trip B
Shows the total distance traveled for Trip B since the last
reset.
4
UNDERSTANDING YOUR INSTRUMENT PANEL 263
ProCarManuals.com
Page 266 of 562
Compass/Temperature Display
Compass Variance
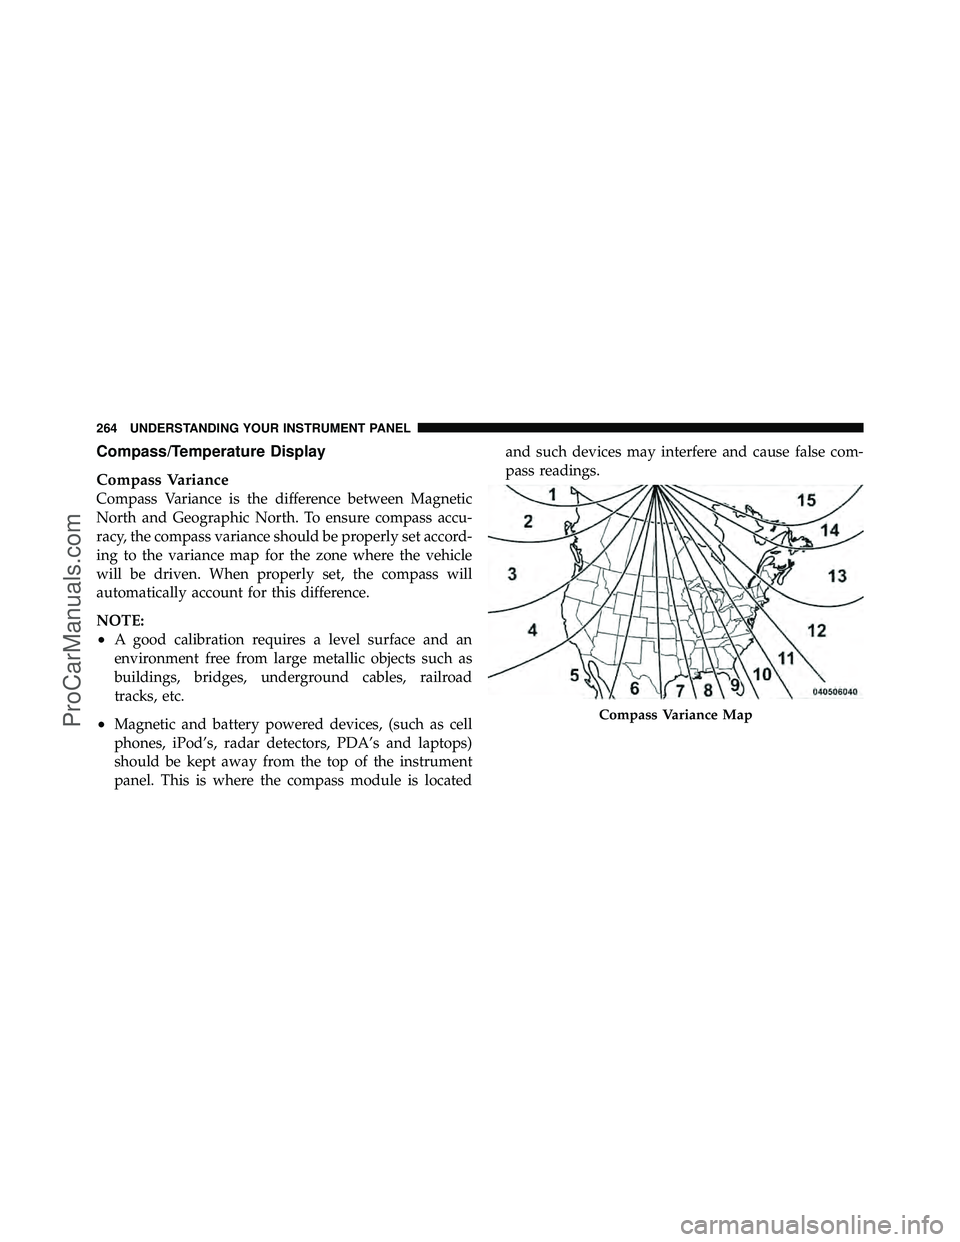
Compass Variance is the difference between Magnetic
North and Geographic North. To ensure compass accu-
racy, the compass variance should be properly set accord-
ing to the variance map for the zone where the vehicle
will be driven. When properly set, the compass will
automatically account for this difference.
NOTE:
•A good calibration requires a level surface and an
environment free from large metallic objects such as
buildings, bridges, underground cables, railroad
tracks, etc.
•Magnetic and battery powered devices, (such as cell
phones, iPod’s, radar detectors, PDA’s and laptops)
should be kept away from the top of the instrument
panel. This is where the compass module is locatedand such devices may interfere and cause false com-
pass readings.Compass Variance Map
264 UNDERSTANDING YOUR INSTRUMENT PANEL
ProCarManuals.com