2011 DODGE CALIBER Radio
[x] Cancel search: RadioPage 33 of 80
• Touch one of the ADD PICTURES soft-keys, then select the type of media inserted.
• Use the PAGE soft-keys to page through a list of pictures and press the picture youwould like to import.
• Confirm your selection by touching the YES soft-key. The imported picture is now available in the MANAGE MY PICTURES screen.
• In order to display the imported picture in the radio screen, touch the desired picture soft-key.
• Select this picture by pressing the PICTURE VIEW soft-key. A check mark indicates the currently used picture.
Cleaning Your Touch-Screen Radio
• Do not spray any liquid or caustic chemicals directly on the screen. Use a cleanand dry micro fiber lens cleaning cloth in order to clean the touch-screen.
• If necessary, use a lint-free cloth dampened with a cleaning solution such as isopropyl alcohol or an isopropyl alcohol and water solution ratio of 50:50. Be sure
to follow the solvent manufacturer's precautions and directions.
USB Port
• The USB Port on the radio allows you to copy songs from a connected USB drive orsupported media device onto your Media Center hard drive.
• The USB port located in the glove box also offers the ability to play songs from connected USB drives, or supported media devices. Supported devices may be
controlled through the vehicles steering wheel or radio controls and may be
charged through the USB port.
Navigation – Media Center 430N (Sales Code RHB) Only
• For software updates, visit http://www.garmin.com/chrysler website, or contact yourauthorized dealer for the latest available software.
• The Navigation system receives GPS signals from satellites to display the position of your vehicle. You may experience interruptions or delays in receiving navigation
information in garages, tunnels, large cities, or other situations where the vehicle
does not have a direct line of sight to the sky.
• Voice Command is not available for navigation commands on this radio (although Voice Command functions for all other radio functions).
Map • Touch the NAV soft-key in the upper-right corner of your radio screen, to access the Navigation system.
• Touch the View Mapsoft-key to display a map of your current position.
Finding a Point of Interest • Touch the NAV soft-key in the upper-right corner of your radio screen to access the Navigation system.
• Touch the Where To?soft-key to program a destination.
• Next touch one of the subcategories to search for your destination. Address, Points of Interest, Recently Found, Favorites and Intersection are a few of the options.
ELECTRONICS
31
Page 34 of 80
• After touching one of the subcategories, follow the on-screen steps to complete theprocess and be routed to your destination.
Setting a Home Location • Touch the NAV soft-key in the upper-right corner of your radio screen, to access the Navigation system.
• Touch the Where To?soft-key, then touch Go Home.
• Next, select from: • Enter My Address – enter an address for the location using the on-screenkeyboard.
• Use my current location – sets your current location as your Home Location.
• Choose from Recently Found – select a location from your recently found locations.
• After you set your Home Location, touch Where To?, then touch Go Home.
Editing Home Location • Touch the NAV soft-key in the upper-right corner of your radio screen, to access the Navigation system.
• Touch the Where To?soft-key, then touch Favorites.
• Touch the location you want to edit.
• Next, touch Press for More.
• Touch Edit.
• Follow the on-screen steps for editing the Home Location.
Go Home • Touch the NAV soft-key in the upper-right corner of your radio screen, to access the Navigation system.
• Touch Where To? , then touch Go Home.
SIRIUS Travel Link
• To access SIRIUS Travel Link, press the MENU hard-key, then touch the Travel
Link soft-key.
NOTE: SIRIUS Travel Link requires a subscription, sold separately after trial
subscription included with vehicle purchase.
• SIRIUS Travel Link brings a wealth of useful information into your vehicle and rightto your fingertips:
• Weather
• View detailed weather conditions at your current location.
• Ski Info
• View ski and snowboarding conditions at ski resorts.
• Fuel Prices
• Check detailed price information for fuel stations near your current location.
ELECTRONICS
32
Page 35 of 80
•Movie Listings
• Check which movies (includes start times, ratings, run lengths and summaries)
are playing at theaters near your current location.
• Sports Scores
• View scores and upcoming events for all major sports.
• Your favorite location, theater and sports teams can be stored for quick access.
• Refer to your Media Center 730N (RHR) User's Manual or Media Center 430/430N (RBZ/RHB) User's Manual for more details.
STEERING WHEEL AUDIO CONTROLS
• The steering wheel audio controls arelocated on the rear surface of the
steering wheel.
Right Switch
• Press the switch up or down toincrease or decrease the volume.
• Press the button in the center to change modes AM/FM/CD/SAT.
Left Switch
• Press the switch up or down to searchfor the next listenable station or select
the next or previous CD track.
• Press the button in the center to select the next preset station (radio) or to change CDs if equipped with a CD changer.
Uconnect™ Phone
• To determine if your vehicle is equipped with Uconnect™ Phone, press theUconnect™ Phone button. If your vehicle has this feature, after a couple
seconds you will hear a voice prompt. If not, you will see a message on the radio
“Uconnect phone not available”.
• The Uconnect™ Phone is a voice-activated, hands-free, in-vehicle communications system with Voice Command Capability (see Voice Command section).
• The Uconnect™ Phone allows you to dial a phone number with your mobile phone using simple voice commands.
• For vehicles equipped with Video Entertainment System (VES)™, refer to the Uconnect™ Phone section of the Uconnect™ User's Manual on the DVD for
further details.
• For vehicles not equipped with VES™, refer to your vehicle Owner's Manual on the DVD for further details.
ELECTRONICS
33
Page 37 of 80
Transfer Ongoing Call Between Handset And Vehicle
• During a call, press the Voice Command button.
• (After the BEEP), say “transfer call”.
Changing The Volume
• Start a dialogue by pressing the Phone button, then adjust the volume during
a normal call.
• Use the radio ON/OFF VOLUME rotary knob to adjust the volume to a comfortable level while the Uconnect™ system is speaking. Please note the volume setting for
Uconnect™ is different than the audio system.
NOTE: To access the tutorial, press the Uconnect™ hard-key. After the BEEP, say
“tutorial”. Press any hard-key/button or touch the display (Touch-Screen radio) to
cancel the tutorial.
WARNING!
• Any voice commanded system should be used only in safe driving conditions following local laws and phone use. All attention should be kept on the
roadway ahead. Failure to do so may result in a collision causing you and
others to be severely injured or killed.
• In an emergency, to use Uconnect™ Phone, your mobile phone must be: • turned on,
• paired to Uconnect™ Phone,
• and have network coverage.
Uconnect™ VOICE COMMAND
• The Uconnect™ Voice Command system allows you to control your AM, FM radio,satellite radio, disc player, Uconnect™ Phone, a memo recorder, and supported
portable media devices. The Voice Command system also provides limited
capability to select and play music by artist, song, album, music, genre, or playlist
from your compatible iPod
®device (this capability is available for Media Center
430/430N when connected to the USB port).
• When you press the Voice Command button
located on the radio faceplate
or steering wheel, you will hear a beep. The beep is your signal to give a command.
If you do not say a command within a few seconds, the system will present you
with a list of options. If you ever wish to interrupt the system while it lists options,
press the Voice Command button
, listen for the BEEP, and say your
command.
Voice Command for Text Messaging
• If equipped with Uconnect™ Voice Command, your Media Center 430N radio may be able to play incoming SMS messages through the vehicle sound system.
• It also allows you to respond by selecting from various pre-defined phrases.
ELECTRONICS
35
Page 38 of 80
• Not all phones are compatible with this feature. Refer to the phone compatibilitylist at www.dodge.com/uconnect. Connected mobile phones must be
bluetooth-compatible, and paired with your radio.
Changing The Volume
• Start a dialogue by pressing the Voice Command button, then say a
command (for example, “tutorial”).
• Use the radio ON/OFF VOLUME rotary knob to adjust the volume to a comfortable level while the Voice Command system is speaking. The volume setting for Voice
Command is different than the audio system.
• For vehicles equipped with Video Entertainment System (VES)™, refer to the Uconnect™ Voice Command section of the Uconnect™ User's Manual on the DVD
for further details.
• For vehicles not equipped with VES™, refer to your vehicle Owner's Manual on the DVD for Uconnect™ Voice Command information.
NOTE: To access the tutorial, press the Voice Command button
. After the
BEEP, say “tutorial”. Press any hard-key/button or touch the display (Touch-Screen
radio) to cancel the tutorial.
WARNING!
Any voice commanded system should be used only in safe driving conditions
following local laws and phone use. All attention should be kept on the roadway
ahead. Failure to do so may result in a collision causing you and others to be
severely injured or killed.
iPod®/USB/MP3 CONTROL
• There are many ways to play music from iPod®players or other portable devices
through your vehicle's speakers. Your choices depend on what radio your vehicle is
equipped with.
• The radio sales code is located on the lower right side of the radio faceplate.
If Equipped with Media Center 130 with Satellite Radio (Sales Code RES + RSC) or
Media Center 430/430N (Sales Code RBZ/RHB)
• The USB port located within the glove box allows you to plug an iPod®into the
vehicle's sound system.
• To hear audio from devices connected to this port from a non-touch-screen radio, press the AUX button on the radio faceplate. From a touch-screen radio, press the
MEDIA hard-key, then touch the AUX or iPod
®soft-key.
• When connected to this feature: • The iPod
®can be controlled using the radio buttons to Play, Browse, and List
the iPod®or external devices contents. Refer to the Owner's Manual on the DVD
for details.
ELECTRONICS
36
Page 39 of 80
• The iPod®battery charges when plugged into the USB port (if supported by the
specific audio device).
• Compatible iPod
®devices may also be controllable using voice commands
(Media Center 430/430N with Uconnect™ Phone required). Refer to the
Owner's Manual on the DVD for details.
NOTE:
• The USB port supports certain Mini, Classic, Nano, Touch, and iPhone
®devices. The
USB port also supports playing music from compatible external USB Mass Storage
Class memory devices. For supported audio file formats, refer to the USB Port
section in the Owner's Manual on the DVD. Refer to www.dodge.com/uconnect
website for a list of tested iPod
®s. Some iPod®software versions may not fully
support the USB port features. Please visit Apple’s website for iPod®software
updates.
Bluetooth
®Streaming Audio (Media Center 430/430N/230/130 only)
• If equipped with Uconnect™ Voice Command, your bluetooth-equipped iPod®
devices, cellphones or other media players, may also be able to stream music to
your vehicle's speakers. Your connected device must be bluetooth-compatible, and
paired with your Media Center radio (see Uconnect™ Phone for pairing
instructions). Press the AUX button on the radio faceplate until "BT" is displayed
on the radio screen.
WARNING!
Do not plug in or remove the iPod®or external device while driving. Failure to
follow this warning could result in a collision.
ELECTRONIC VEHICLE INFORMATION CENTER
(EVIC)
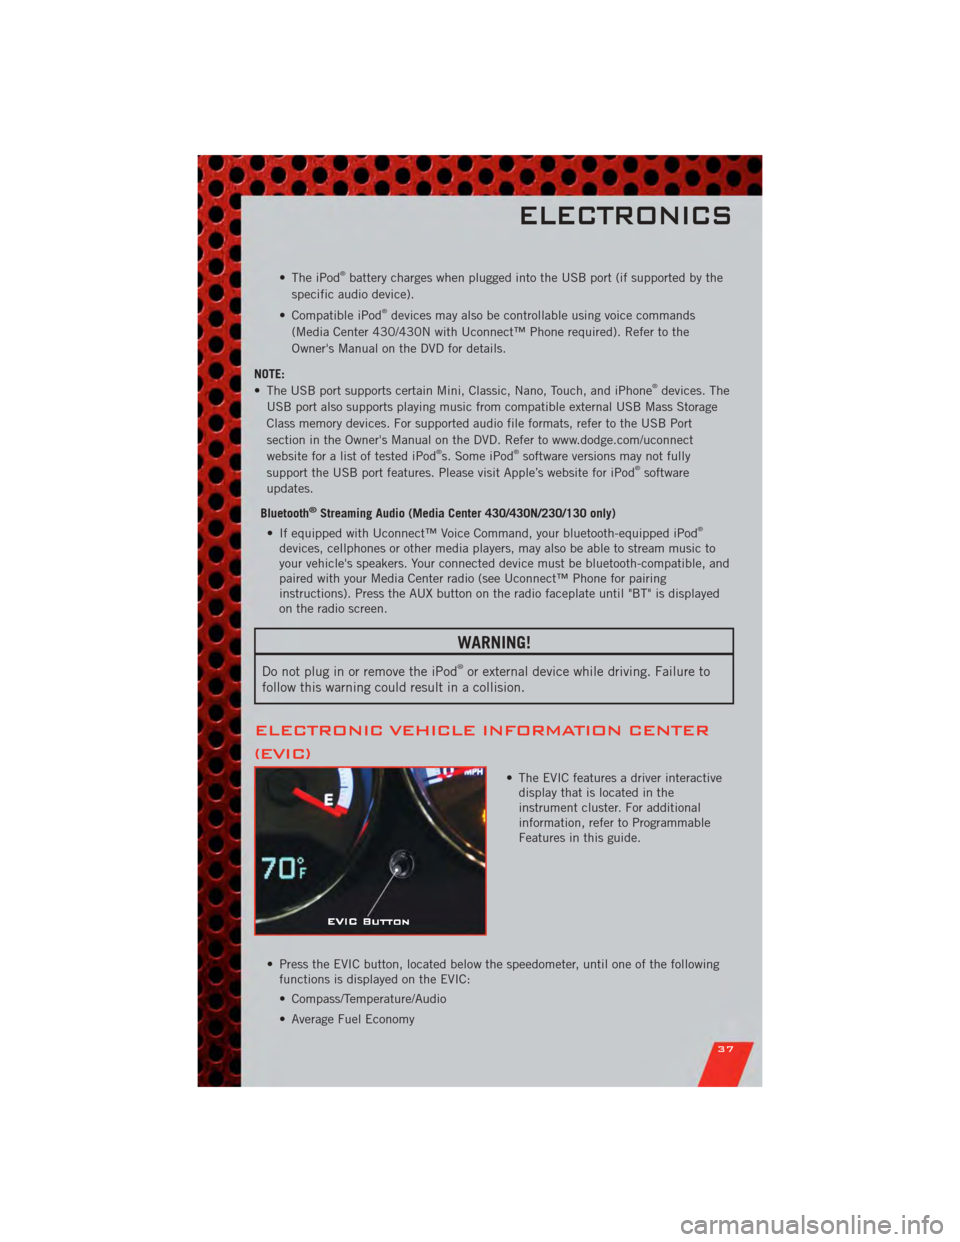
• The EVIC features a driver interactive display that is located in the
instrument cluster. For additional
information, refer to Programmable
Features in this guide.
• Press the EVIC button, located below the speedometer, until one of the following functions is displayed on the EVIC:
• Compass/Temperature/Audio
• Average Fuel Economy
ELECTRONICS
37
Page 55 of 80

Preparations for Jump-Start
• The battery in your vehicle is located in the front of the engine compartment belowthe air intake duct. To access the battery remove the air intake duct by turning the
two finger screws, located on the radiator support.
• Set the parking brake, shift theautomatic transmission into PARK and
turn the ignition to LOCK.
• Turn off the heater, radio, and all unnecessary electrical accessories.
• If using another vehicle to jump-start the battery, park the vehicle within the
jumper cables reach, set the parking
brake and make sure the ignition is
OFF.
Jump-Starting Procedure
• Connect the positive (+)end of the jumper cable to the positive (+)post of the
discharged vehicle.
• Connect the opposite end of the positive (+)jumper cable to the positive (+)post
of the booster battery.
• Connect the negative end (-)of the jumper cable to the negative (-)post of the
booster battery.
• Connect the opposite end of the negative (-)jumper cable to a good engine ground
(exposed metal part of the discharged vehicle’s engine) away from the battery and
the fuel injection system.
• Start the engine in the vehicle that has the booster battery, let the engine idle a few minutes, and then start the engine in the vehicle with the discharged battery.
WHAT TO DO IN EMERGENCIES
53
Page 68 of 80

FUSES
Integrated Power Module (fuses)
• The Integrated Power Module is located in the engine compartment near the aircleaner assembly. This center contains cartridge fuses and mini-fuses.
Cavity Cartridge Fuse Mini-Fuse Description
1 Empty Empty
2 15 Amp Lt Blue AWD/4WD ECU Feed
3 10 Amp Red CHMSL Brake Switch Feed
4 10 Amp Red Ignition Switch Feed/OCM
5 20 Amp Yellow Trailer Tow
6 10 Amp Red IOD Sw/Pwr Mir/Steering Cntrl
Sdar/Hands-Free Phone
7 30 Amp Green IOD Sense1
8 30 Amp Green IOD Sense2
9 40 Amp Green Power Seats
10 20 Amp Yellow CCN Power Locks/Interior Lighting
11 15 Amp Lt Blue Power Outlet
12 20 Amp Yellow Ign Run/Acc Inverter
13 20 Amp Yellow Pwr Run/Acc Outlet RR/Dome
Lamp/Cigar Lighter
14 10 Amp Red IOD CCN
15 40 Amp Green RAD Fan Relay Battery Feed
16 15 Amp Lt Blue IGN Run/ACC Dome Lamp/Sunroof/
Rear Wiper Motor/ACC Inverter
17 10 Amp Red IOD Feed Mod-Wcm
18 40 Amp Green ASD Relay Contact PWR Feed
19 20 Amp Yellow PWR Am p1&Amp2Feed
20 15 Amp Lt Blue IOD Feed Radio
21 10 Amp Red IOD Feed Intrus Mod/Siren (If
Equipped)
MAINTAINING YOUR VEHICLE
66