Page 210 of 494
•Distance To Empty (DTE)
Shows the estimated distance that can be traveled with
the fuel remaining in the tank. This estimated distance is
determined by a weighted average of the instantaneous
and average fuel economy, according to the current fuel
tank level. DTE cannot be reset through the SELECT
button.
NOTE: Significant changes in driving style or vehicle
loading will greatly affect the actual drivable distance of
the vehicle, regardless of the DTE display value.
When the DTE value is less than 30 miles (48 km)
estimated driving distance, the DTE display will change
to a text display of �LOW FUEL”. This display will
continue until the vehicle runs out of fuel. Adding a
significant amount of fuel to the vehicle will turn off the
LOW FUEL text and a new DTE value will display.•Elapsed Time
Shows the total elapsed time of travel since the last reset.
Elapsed time will increment when the ignition switch is
in the ON or START position.
To Reset The Display
Reset will only occur if a resettable function is currently
displayed. Press and hold the SELECT button once to
clear the function currently displayed.
To reset all resettable functions, press and release the
SELECT button a second time within three seconds of
resetting the currently displayed function (Reset ALL will
display during this three-second window).
Display Units In
Press and release the MENU button until “Display Units
In” displays in the EVIC. To make your selection, press
and release the SELECT button until ENGLISH or MET-
RIC appears.
208 UNDERSTANDING YOUR INSTRUMENT PANEL
Page 213 of 494
NOTE:Magnetic and battery powered devices, (such as
cell phones, iPod’s, radar detectors, PDA’s and laptops)
should be kept away from the top of the instrument
panel. This is where the compass module is located and
such devices may interfere and cause false compass
readings. 1. Turn the ignition switch to the ON position. Leave the
shift lever in PARK.
2. Press and release the MENU button until “Personal
Settings” displays in the EVIC.
3. Press and release the DOWN button until “Compass
Variance” and the current Variance Value displays in the
EVIC.
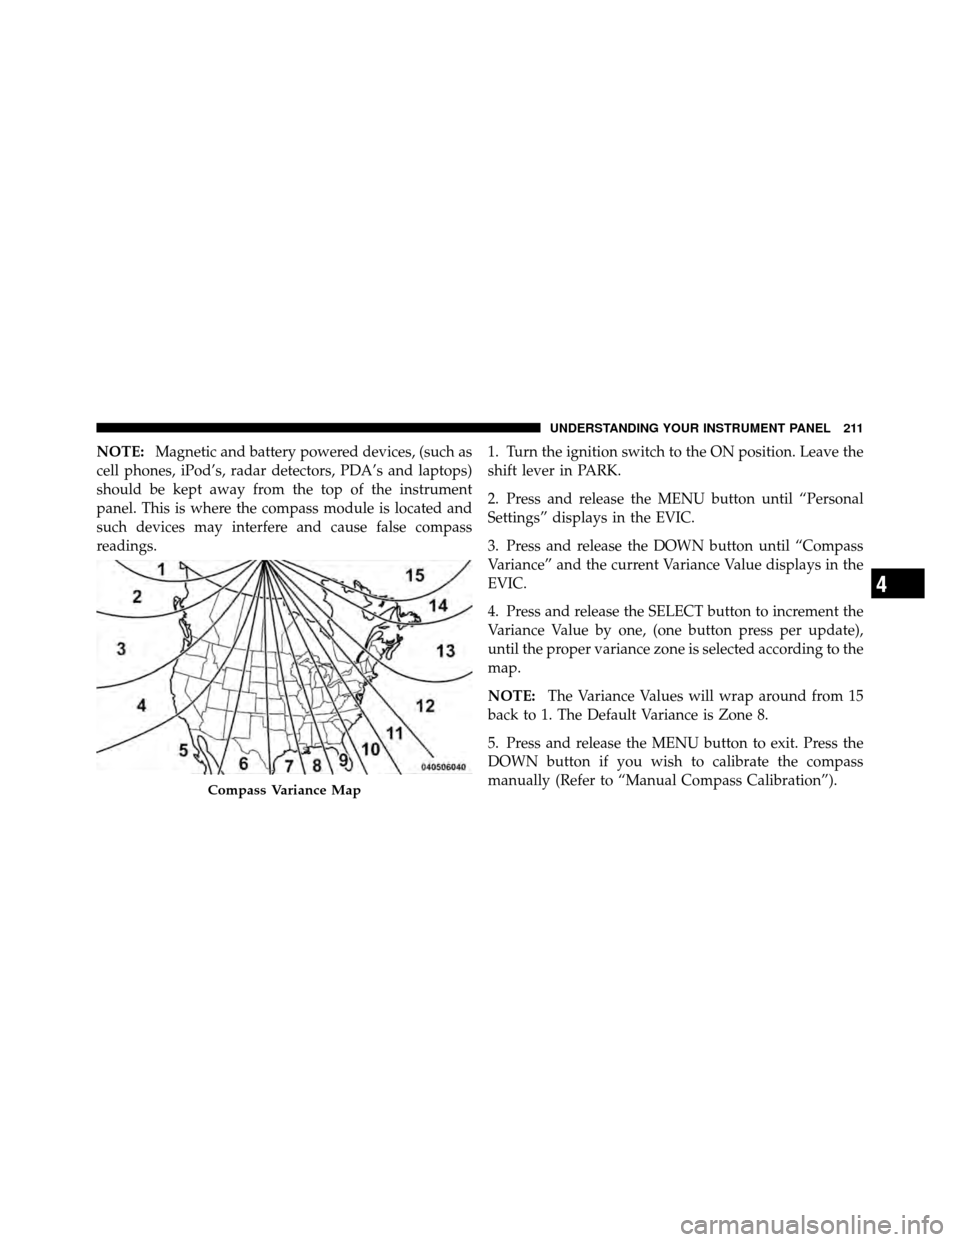
4. Press and release the SELECT button to increment the
Variance Value by one, (one button press per update),
until the proper variance zone is selected according to the
map.
NOTE:
The Variance Values will wrap around from 15
back to 1. The Default Variance is Zone 8.
5. Press and release the MENU button to exit. Press the
DOWN button if you wish to calibrate the compass
manually (Refer to “Manual Compass Calibration”).
Compass Variance Map
4
UNDERSTANDING YOUR INSTRUMENT PANEL 211
Page 215 of 494

Sound Horn with Lock
When ON is selected, a short horn sound will occur when
the RKE transmitter LOCK button is pressed. This feature
may be selected with or without the Flash Lights with
Lock feature. To make your selection, press and release
the SELECT button until ON or OFF appears.
Flash Lamps with Lock
When ON is selected, the front and rear turn signals will
flash when the doors are locked or unlocked with the
RKE transmitter. This feature may be selected with or
without the Sound Horn on lock feature selected. To
make your selection, press and release the SELECT
button until ON or OFF appears.
Headlamp Off Delay
When this feature is selected, the driver can choose to
have the headlights remain on for 0, 30, 60, or 90 seconds
when exiting the vehicle. To make your selection, press
the SELECT button until 0, 30, 60, or 90 seconds appears.
Headlights With Wipers
(Available with Auto Headlights Only)
When ON is selected, and the headlight switch is in the
AUTO position, the headlights will turn on approxi-
mately 10 seconds after the wipers are turned on. The
headlights will also turn off when the wipers are turned
off if they were turned on by this feature. To make your
selection, press the SELECT button until ON or OFF
appears.
NOTE:Turning the headlights on during the daytime
causes the instrument panel lights to dim. To increase the
brightness, refer to “Lights” in “Understanding The
Features Of Your Vehicle.”
Key-Off Power Delay
When this feature is selected, the power window
switches, radio, Uconnect™ phone (if equipped), and
power outlets will remain active for up to 10 minutes
after the ignition switch is turned to the LOCK position.
4
UNDERSTANDING YOUR INSTRUMENT PANEL 213
Page 217 of 494
MEDIA CENTER 230 (REQ) — AM/FM STEREO
RADIO AND 6–DISC CD/DVD CHANGER
(MP3/WMA AUX JACK)
NOTE:The radio sales code is located on the lower right
side of the radio faceplate.
Operating Instructions - Radio Mode
NOTE: The ignition switch must be in the ON or ACC
position to operate the radio.
Power Switch/Volume Control (Rotary)
Push the ON/VOLUME control knob to turn on the
radio. Press the ON/VOLUME control knob a second
time to turn off the radio.
Electronic Volume Control
The electronic volume control turns continuously (360
degrees) in either direction without stopping. Turning the
ON/VOLUME control knob to the right increases the
volume and to the left decreases it.
When the audio system is turned ON, the sound will be
set at the same volume level as last played.
SEEK Buttons
Press and release the SEEK buttons to search for the next
listenable station in AM/FM mode. Press the right switchMedia Center 230 (REQ)
4
UNDERSTANDING YOUR INSTRUMENT PANEL 215
Page 226 of 494
NOTE:The ignition switch must be in the ON or ACC
position to operate the radio.
LOAD Button — Loading Compact Disc(s)
Press the LOAD button and the pushbutton with the
corresponding number (1-6) where the CD is being
loaded. The radio will display PLEASE WAIT and
prompt when to INSERT DISC. After the radio displays
�INSERT DISC,� insert the CD into the player.
Radio display will show �LOADING DISC�when the disc
is loading and “READING DISC” when the radio is
reading the disc.
CAUTION!
This CD player will accept 4–3/4 in (12 cm) discs only.
The use of other sized discs may damage the CD
player mechanism.
Eject Button — Ejecting Compact Disc(s)
Press the EJECT button and the pushbutton
with the corresponding number (1-6) where the
CD was loaded and the disc will unload and
move to the entrance for easy removal. Radio
display will show �EJECTING DISC�when the disc is
being ejected and prompt the user to remove the disc.
Press and hold the EJECT button for five seconds and all
CDs will be ejected from the radio.
The disc can be ejected with the radio and ignition OFF.
SEEK Button (CD MODE)
Press the right SEEK button for the next selection on the
CD. Press the left SEEK button to return to the beginning
of the current selection, or return to the beginning of the
previous selection if the CD is within the first second of
the current selection. Pressing and holding the SEEK
button will allow you to scroll through the tracks faster in
CD and MP3/MWA modes.
224 UNDERSTANDING YOUR INSTRUMENT PANEL
Page 233 of 494
2. Your Vehicle Identification Number.
To access the ESN/SID, refer to the following steps:
ESN/SID Access
With the ignition switch in the ON/RUN or ACC posi-
tion and the radio on, press the SETUP button and scroll
using the TUNE/SCROLL control knob until Sirius ID is
selected. Press the TUNE/SCROLL control knob and the
Sirius ID number will display. The Sirius ID number
display will time out in two minutes. Press any button on
the radio to exit this screen.
Selecting Uconnect™ Multimedia (Satellite) Mode
Press the SAT button until�SAT�appears in the display. A
CD may remain in the radio while in the Satellite radio
mode.
Satellite Antenna
To ensure optimum reception, do not place items on the
roof around the rooftop antenna location. Metal objects placed within the line of sight of the antenna will cause
decreased performance. Larger luggage items such as
bikes should be placed as far rearward as possible, within
the loading design of the rack. Do not place items directly
on or above the antenna.
Reception Quality
Satellite reception may be interrupted due to one of the
following reasons:
•The vehicle is parked in an underground parking
structure or under a physical obstacle.
•Dense tree coverage may interrupt reception in the
form of short audio mutes.
•Driving under wide bridges or along tall buildings can
cause intermittent reception.
•Placing objects over or too close to the antenna can
cause signal blockage.
4
UNDERSTANDING YOUR INSTRUMENT PANEL 231
Page 234 of 494
Operating Instructions - Uconnect™ Multimedia
(Satellite) Mode
NOTE:The ignition switch must be in the ON/RUN or
ACC position to operate the radio.
SEEK Buttons
Press and release the SEEK buttons to search for the next
channel in Satellite mode. Press the right switch to seek
up and the left switch to seek down. The radio will
remain tuned to the new channel until you make another
selection. Holding either button will bypass channels
without stopping until you release it.
SCAN Button
Pressing the SCAN button causes the tuner to search for
the next channel, pausing for eight seconds before con-
tinuing to the next. To stop the search, press the SCAN
button a second time.
INFO Button
Pressing the INFO button will cycle the display informa-
tion between Artist, Song Title, and Composer (if avail-
able). Also, pressing and holding the INFO button for an
additional three seconds will make the radio display the
Song Title all of the time (press and hold again to return
to normal display).
RW/FF
Pressing the RW (Rewind) or FF (Fast Forward) buttons
causes the tuner to search for the next channel in the
direction of the arrows.
TUNE Control (Rotary)
Turn the rotary TUNE/SCROLL control knob clockwise
to increase or counterclockwise to decrease the channel.
MUSIC TYPE Button
Pressing this button once will turn on the Music Type
mode for five seconds. Pressing the MUSIC TYPE button
232 UNDERSTANDING YOUR INSTRUMENT PANEL
Page 237 of 494

Operating Instructions — Radio Mode
NOTE:The ignition switch must be in the ON or ACC
position to operate the radio.
Power Switch/Volume Control (Rotary)
Push the ON/VOLUME control knob to turn on the
radio. Push the ON/VOLUME control knob a second
time to turn off the radio.
Electronic Volume Control
The electronic volume control turns continuously (360
degrees) in either direction, without stopping. Turning
the ON/VOLUME control knob to the right increases the
volume, and to the left decreases it.
When the audio system is turned on, the sound will be
set at the same volume level as last played.
SEEK Buttons
Press and release the SEEK buttons to search for the next
listenable station in AM/FM mode. Press the right switch to seek up and the left switch to seek down. The radio
will remain tuned to the new station until you make
another selection. Holding either button will bypass
stations without stopping, until you release it.
TIME Button
Press the TIME button to alternate display of the time
and radio frequency.
Clock Setting Procedure
1. Press and hold the TIME button until the hours blink.
2. Adjust the hours by turning the right side TUNE/
SCROLL control knob.
3. After adjusting the hours, press the right side TUNE/
SCROLL control knob to set the minutes. The minutes
will begin to blink.
4
UNDERSTANDING YOUR INSTRUMENT PANEL 235