Page 425 of 494

•To avoid contamination from foreign matter or
moisture, use only new brake fluid or fluid that
has been in a tightly closed container. Keep the
master cylinder reservoir cap se")
WARNING! (Continued)
•To avoid contamination from foreign matter or
moisture, use only new brake fluid or fluid that
has been in a tightly closed container. Keep the
master cylinder reservoir cap secured at all times.
Brake fluid in a open container absorbs moisture
from the air resulting in a lower boiling point.
This may cause it to boil unexpectedly during hard
or prolonged braking, resulting in sudden brake
failure. This could result in a collision.
•Overfilling the brake fluid reservoir can result in
spilling brake fluid on hot engine parts, causing
the brake fluid to catch fire. Brake fluid can also
damage painted and vinyl surfaces, care should be
taken to avoid its contact with these surfaces.(Continued)
WARNING! (Continued)
•Do not allow petroleum based fluid to contami-
nate the brake fluid. Brake seal components could
be damaged, causing partial or complete brake
failure. This could result in a collision.
Automatic Transmission
The automatic transmission and differential assembly are
contained within a single housing.
The fluid level in the automatic transmission should be
checked whenever the vehicle is serviced. Operation with
an improper fluid level will greatly reduce the life of the
transmission and the fluid.
7
MAINTAINING YOUR VEHICLE 423
Page 427 of 494

Fluid Level Check – 2.4L Engine
Use the following procedure to check the automatic
transmission fluid level properly:
1. Park the vehicle on level ground.
2. Run the engine at curb idle speed for a minimum of
60 seconds.
3. Apply the parking brake fully.
4. Place the shift lever momentarily into each gear posi-
tion ending with the lever in PARK.
5. Wipe the area around the dipstick clean to eliminate
the possibility of dirt entering the transmission.
6. Remove the dipstick and determine if the fluid is hot
or cold. Hot fluid is approximately 180° F (82° C), which
is the normal operating temperature after the vehicle isdriven at least 15 miles (24 km). Hot fluid cannot be held
comfortably between the fingertips. Cold fluid is at a
temperature below 80° F (27° C).
7. Wipe the dipstick clean and reinsert until seated. Then,
remove dipstick and note the reading.
a. If the fluid is hot, the reading should be in the
crosshatched area marked “HOT” (between the upper
two holes in the dipstick).
b. If the fluid is cold, the fluid level should be between
the lower two holes in the area marked “COLD.”
If the fluid level is low, add sufficient fluid through the
filler (dipstick) tube to bring it to the proper level. Do not
overfill.
7
MAINTAINING YOUR VEHICLE 425
Page 431 of 494

Wheel And Wheel Trim Care
All wheels and wheel trim, especially aluminum and
chrome-plated wheels, should be cleaned regularly with
a mild soap and water to prevent corrosion. To remove
heavy soil and/or excessive brake dust, use MOPAR�
Wheel Cleaner or equivalent or select a nonabrasive,
non-acidic cleaner. Do not use scouring pads, steel wool,
a bristle brush, or metal polishes. Only MOPAR�or
equivalent is recommended. Do not use oven cleaner.
Avoid automatic car washes that use acidic solutions or
harsh brushes that may damage the wheels’ protective
finish.
Cleaning Headlights
Your vehicle has plastic headlights that are lighter and
less susceptible to stone breakage than glass headlights.
Plastic is not as scratch resistant as glass and therefore
different lens cleaning procedures must be followed. To minimize the possibility of scratching the lenses and
reducing light output, avoid wiping with a dry cloth. To
remove road dirt, wash with a mild soap solution fol-
lowed by rinsing.
Do not use abrasive cleaning components, solvents, steel
wool or other aggressive material to clean the lenses.
Stain Repel Fabric Cleaning Procedure – If
Equipped
Stain Repel seats may be cleaned in the following man-
ner:
•Remove as much of the stain as possible by blotting
with a clean, dry towel.
•Blot any remaining stain with a clean, damp towel.
•For tough stains, apply MOPAR�
Total Clean or
equivalent, or a mild soap solution to a clean, damp
cloth and remove the stain. Use a fresh, damp towel to
remove soap residue.
7
MAINTAINING YOUR VEHICLE 429
Page 435 of 494
CavityCartridge
Fuse Mini
Fuse Description
1 40 Amp
Green —Power Top Module –
If Equipped
2— 20 Amp
Yellow AWD Module
3— 10 Amp
Red Center High
Mounted Stop Light
(CHMSL)/Brake
Switch
4— 10 Amp
Red Ignition Switch
5— 20 Amp
Yellow Trailer Tow – If
Equipped
6— 10 Amp
Red Power Mirror
Switch/Climate Con-
trols
7— 30 Amp
Green Ignition Off Draw
(IOD) Sense 1
Totally Integrated Power Module
7
MAINTAINING YOUR VEHICLE 433
Page 438 of 494
CavityCartridge
Fuse Mini
Fuse Description
32 30 Amp
Pink —Auto Shutdown
(ASD) Relay 1
33 — 10 Amp
Red Switch Bank/
Diagnostic Link
Connector/
Powertrain Control
Module (PCM)
34 30 Amp
Pink —Anti-Lock Brakes
(ABS) Module – If
Equipped/Electronic
Stability Control
(ESC) Module – If
EquippedCavity
Cartridge
Fuse Mini
Fuse Description
35 40 Amp
Green —Anti-Lock Brakes
(ABS) Module – If
Equipped/Electronic
Stability Control
(ESC) Module – If
Equipped
36 30 Amp
Pink —Passenger Door Mod-
ule (PDM)/Driver
Door Module (DDM)
37 — 25 Amp
Natural Power Top Module –
If Equipped
436 MAINTAINING YOUR VEHICLE
Page 446 of 494
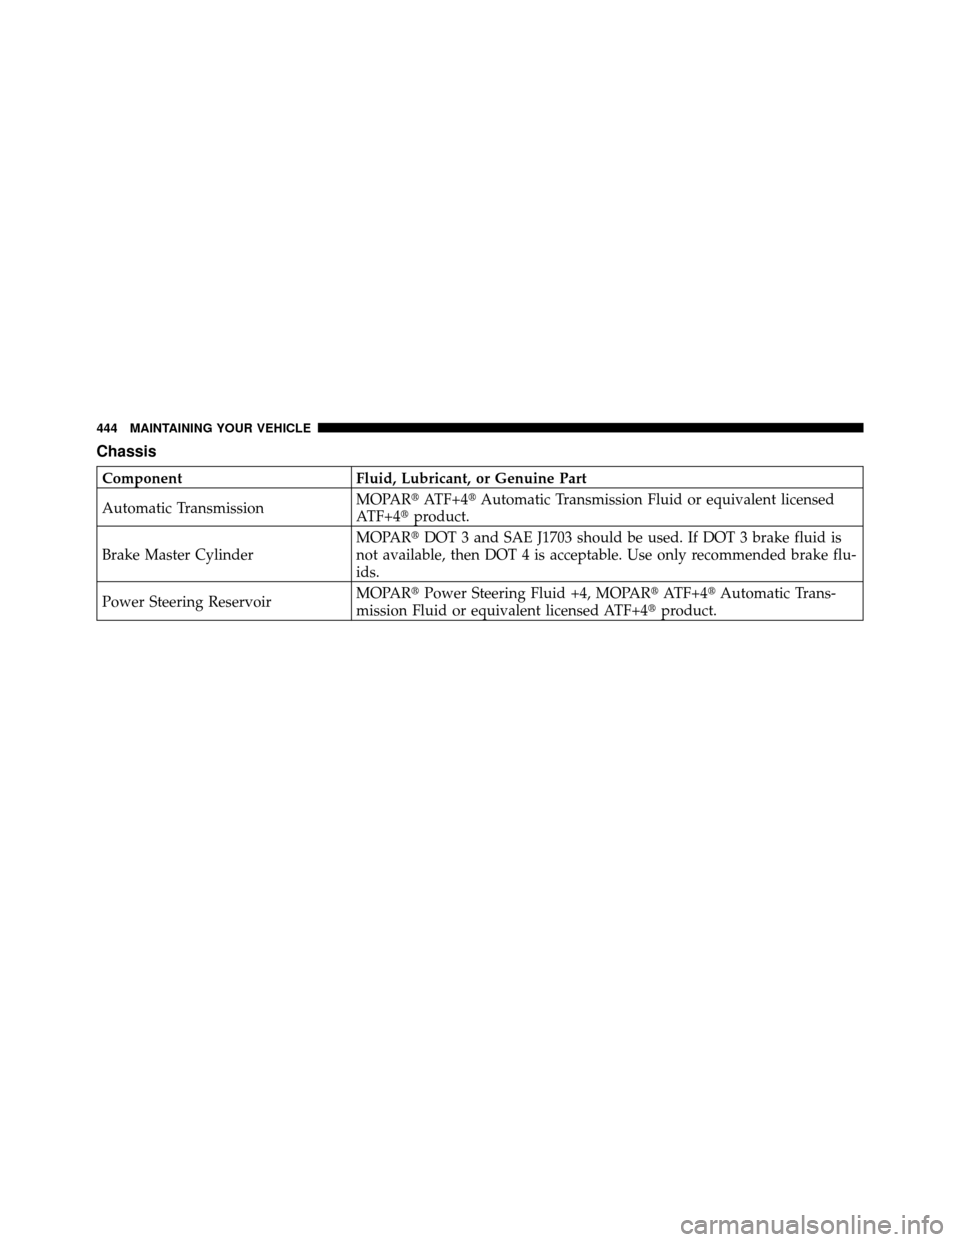
Chassis
ComponentFluid, Lubricant, or Genuine Part
Automatic Transmission MOPAR�
ATF+4�Automatic Transmission Fluid or equivalent licensed
ATF+4� product.
Brake Master Cylinder MOPAR�
DOT 3 and SAE J1703 should be used. If DOT 3 brake fluid is
not available, then DOT 4 is acceptable. Use only recommended brake flu-
ids.
Power Steering Reservoir MOPAR�
Power Steering Fluid +4, MOPAR� ATF+4�Automatic Trans-
mission Fluid or equivalent licensed ATF+4� product.
444 MAINTAINING YOUR VEHICLE
Page 450 of 494
Once A Month
•Check tire pressure and look for unusual wear or
damage.
•Inspect the battery and clean and tighten the terminals
as required.
•Check the fluid levels of coolant reservoir, brake
master cylinder, and transmission and add as needed.
•Check all lights and other electrical items for correct
operation.At Each Oil Change
•Change the engine oil filter.
•Inspect the brake hoses and lines.
CAUTION!
Failure to perform the required maintenance items
may result in damage to the vehicle.
Required Maintenance Intervals
Refer to the Maintenance Schedules on the following
pages for the required maintenance intervals.
8
M
A I
N T
E
N A
N CE
S
C
H E
D
U L
E
S448 MAINTENANCE SCHEDULES
Page 451 of 494
 or
6 Months Maintenance Service
Schedule
❏Change the engine oil and engine oil
filter.
❏ Rotate the tires, rotate at the first sign of
irregular wear, even if it occurs bef")
8,000 Miles (13,000 km) or
6 Months Maintenance Service
Schedule
❏Change the engine oil and engine oil
filter.
❏ Rotate the tires, rotate at the first sign of
irregular wear, even if it occurs before
8,000 miles (13 000 km).
Odometer Reading Date
Repair Order #Dealer Code
Signature, Authorized Service Center
16,000 Miles (26,000 km) or 12 Months Maintenance Service
Schedule
❏Change the engine oil and engine oil filter.
❏ Rotate the tires, rotate at the first sign of irregular wear, even if it occurs before
16,000 miles (26 000 km).
❏ If using your vehicle for any of the following: Dusty or off-road conditions. Inspect the
engine air cleaner filter; replace if necessary.
❏ Replace the air conditioning filter.
❏ Inspect the brake linings, replace if necessary.
❏ Inspect exhaust system. Perform the first inspection at 16,000 miles (26 000 km) or
12 months.
❏ Inspect the front suspension, tie rod ends and boot seals for cracks or leaks and all parts for
damage, wear, improper looseness or end play; replace if necessary.
Odometer Reading Date
Repair Order #Dealer Code
Signature, Authorized Service Center
8
M
A I
N T
E
N A
N CE
S
C
H E
D
U L
E
SMAINTENANCE SCHEDULES 449
/Brake
Switch
4— 10")
 Relay 1
33 — 10 Amp
Red Switch Bank/
Diagnostic Link
Connector/
Powertrain Control
Module (PCM)
34 30 Amp
Pink —Ant")