Page 381 of 494
4. Turn the jack screw to the left until the jack can be
placed under the jacking location. Once the jack is
positioned, turn the jack screw to the right until the jack
head is properly engaged with the lift area closest to the
wheel to be changed. Do not raise the vehicle until you
are sure the jack is securely engaged.
Front Jacking LocationRear Jacking Location6
WHAT TO DO IN EMERGENCIES 379
Page 383 of 494

WARNING!
•To avoid the risk of forcing the vehicle off the jack,
do not tighten the wheel nuts fully until the
vehicle has been lowered. Failure to follow this
warning may result in personal injury.
•To avoid possible personal injury, handle the
wheel covers with care to avoid contact with any
sharp edges.
7. Lower the vehicle by turning the jack screw to the left.
8. Finish tightening the nuts. Push down on the wrench
while at the end of the handle for increased leverage.
Tighten the lug nuts in a star pattern until each nut has
been tightened twice. The correct wheel nut torque is
100 ft lbs (135 N·m). If you doubt that you have tightened
the nuts correctly, have them checked with a torque
wrench by your authorized dealer or at a service station. 9. Remove the wheel blocks and lower the jack until it is
free. Reassemble the lug wrench to the jack assembly and
stow it in the spare tire area. Secure the assembly using
the means provided.
WARNING!
A loose tire or jack thrown forward in a collision or
hard stop could endanger the occupants of the ve-
hicle. Always stow the jack parts and the spare tire in
the places provided.
10. Place the deflated (flat) tire in the cargo area and have
the tire repaired or replaced as soon as possible.
11. Check the tire pressure as soon as possible. Correct
the tire pressure as required.
6
WHAT TO DO IN EMERGENCIES 381
Page 394 of 494
CAUTION!
•Do not use sling type equipment when towing.
Damage to the fascia will occur.
•When securing the vehicle to a flatbed truck, do
not attach to front or rear suspension components.
Damage to your vehicle may result from improper
towing.
•Do not push or tow this vehicle with another
vehicle as damage to the bumper fascia and trans-
mission may result.
•If the vehicle being towed requires steering, the
ignition switch must be in the ON position, not
the LOCK or ACC positions.
The manufacturer recommends towing your vehicle with
all four wheels OFF the ground using a flatbed. If flatbed equipment is not available, and the transmis-
sion is operable, the vehicle may be flat towed (with all
four wheels on the ground) under the following condi-
tions:
•The shift lever must be in NEUTRAL.
•The distance to be traveled must not exceed 15 mi
(24 km).
•The towing speed must not exceed 25 mph (40 km/h).
If the transmission is not operable, or the vehicle must
be towed faster than 25 mph (40 km/h) or farther than 15
mi (24 km), it must be towed with the front wheels OFF
the ground (using a flatbed truck, towing dolly, or
wheel lift equipment with the front wheels raised).
392 WHAT TO DO IN EMERGENCIES
Page 412 of 494
Refrigerant Recovery And Recycling
R-134a air conditioning refrigerant is a hydrofluoro-
carbon (HFC) that is endorsed by the Environmental
Protection Agency and is an ozone-saving product. How-
ever, the manufacturer recommends that air conditioning
service be performed by authorized dealers or other
service facilities using recovery and recycling equipment.
NOTE:Use only manufacturer approved A/C System
Sealers, Stop Leak Products, Seal Conditioners, Compres-
sor Oil, and Refrigerants.
A/C Air Filter – If Equipped
Refer to the “Maintenance Schedule” for the proper
maintenance intervals.
WARNING!
Do not remove the A/C Air Filter while the blower is
operating or personal injury may result. The A/C Air Filter is located in the fresh air inlet behind
the glove box. Perform the following procedure to re-
place the filter:
1. Open the glove box and remove all contents.
2. Push in on the sides of the glove box and lower the
door.
3. Disconnect the glove box door dampener from the slot
on the side of the box. This is done by grasping the
dampener connector (on the outside of the box) and the
end of the connector pin (on the inside of the box) with
your thumb and forefinger and pulling outward while
lightly lifting upward on the door with your other hand.
Once disconnected, the dampener will retract under-
neath the instrument panel if you release it.
4. Pivot the glove box downward.
5. Disengage the two retaining tabs that secure the filter
cover to the HVAC housing and remove the cover.
410 MAINTAINING YOUR VEHICLE
Page 425 of 494
WARNING! (Continued)
•To avoid contamination from foreign matter or
moisture, use only new brake fluid or fluid that
has been in a tightly closed container. Keep the
master cylinder reservoir cap secured at all times.
Brake fluid in a open container absorbs moisture
from the air resulting in a lower boiling point.
This may cause it to boil unexpectedly during hard
or prolonged braking, resulting in sudden brake
failure. This could result in a collision.
•Overfilling the brake fluid reservoir can result in
spilling brake fluid on hot engine parts, causing
the brake fluid to catch fire. Brake fluid can also
damage painted and vinyl surfaces, care should be
taken to avoid its contact with these surfaces.(Continued)
WARNING! (Continued)
•Do not allow petroleum based fluid to contami-
nate the brake fluid. Brake seal components could
be damaged, causing partial or complete brake
failure. This could result in a collision.
Automatic Transmission
The automatic transmission and differential assembly are
contained within a single housing.
The fluid level in the automatic transmission should be
checked whenever the vehicle is serviced. Operation with
an improper fluid level will greatly reduce the life of the
transmission and the fluid.
7
MAINTAINING YOUR VEHICLE 423
Page 442 of 494
4. Pull the bulb out of the socket and replace the bulb.
5. If the bulb comes in contact with any oily surface,
clean the bulb with rubbing alcohol.
6. Reinsert the bulb and socket assembly and rotate
clockwise
1�4turn to secure.
Fog Lamps
1. Access to the lamps through the lower fascia cutout is
limited.
2. Turn the steering wheel to allow access and remove
the inner fender shield.
3. Rotate the bulb and connector
1�4turn counterclock-
wise.
4. Pull the bulb off of connector and replace with a new
one.
CAUTION!
Do not touch the new bulb with your fingers. Oil
contamination will severely shorten bulb life. If the
bulb comes in contact with an oily surface, clean the
bulb with rubbing alcohol.
440 MAINTAINING YOUR VEHICLE
Page 474 of 494
About Your Brakes....................... 304
ABS (Anti-Lock Brake System) .............. 306
Adding Engine Coolant (Antifreeze) .......... 417
Adding Fuel ........................... 354
Adding Washer Fluid ..................... 413
Additives, Fuel ......................... 348
Air Cleaner, Engine (Engine Air Cleaner Filter) . . . 407
Air Conditioner Maintenance ............... 409
Air Conditioning ........................ 269
Air Conditioning Controls ................. 269
Air Conditioning Filter .................280,410
Air Conditioning Refrigerant .............409,410
Air Conditioning System .............269,273,409
Air Conditioning, Operating Tips ............ 281
Air Pressure, Tires ....................... 327
Airbag .............................. 58,67
Airbag Deployment ....................... 68
Airbag Light ..................... 66,71,86,189
Airbag Maintenance ....................... 70 Airbag, Side
........................ 62,64,67
Airbag, Window (Side Curtain) ...........62,64,67
Alarm System (Security Alarm) ............18,196
Alterations/Modifications, Vehicle ............. 7
Antenna, Satellite Radio ................231,256
Anti-Lock Brake System (ABS) .............. 306
Anti-Lock Warning Light .................. 306
Anti-Theft Security Alarm (Theft Alarm) ........ 18
Antifreeze (Engine Coolant) ..............417,442
Disposal ........................... 419
Appearance Care ........................ 426
Ashtray ............................... 175
Assistance Towing ....................... 112
Auto Down Power Windows ................ 36
Auto Unlock, Doors ....................... 32
Auto Up Power Windows .................. 37
Automatic Dimming Mirror ................. 94
Automatic Door Locks ..................... 32
Automatic Oil Change Indicator ..........194,206
472 INDEX
Page 483 of 494
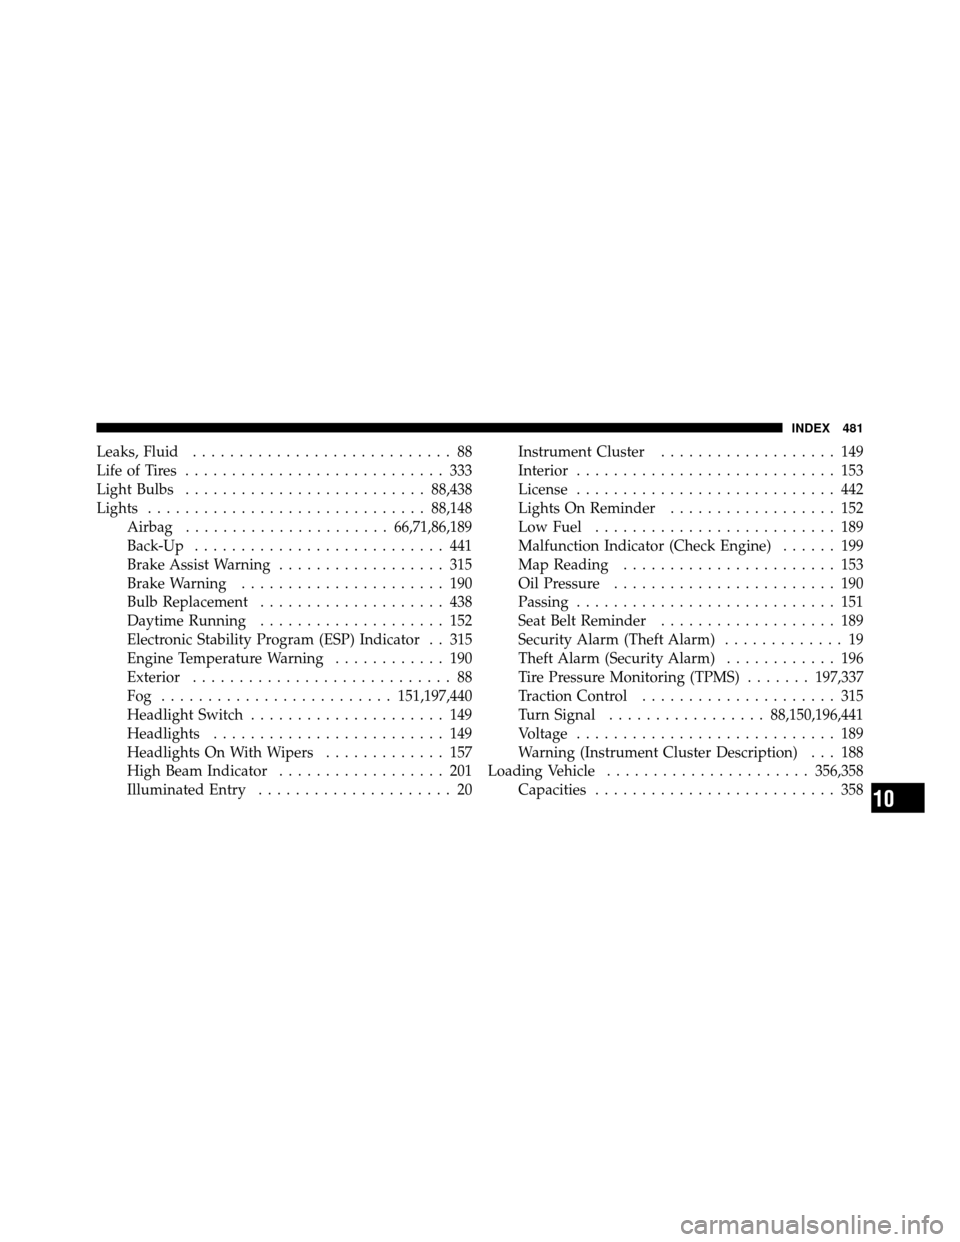
Leaks, Fluid............................ 88
Life of Tires ............................ 333
Light Bulbs .......................... 88,438
Lights .............................. 88,148
Airbag ...................... 66,71,86,189
Back-Up ........................... 441
Brake Assist Warning .................. 315
Brake Warning ...................... 190
Bulb Replacement .................... 438
Daytime Running .................... 152
Electronic Stability Program (ESP) Indicator . . 315
Engine Temperature Warning ............ 190
Exterior ............................ 88
Fog ......................... 151,197,440
Headlight Switch ..................... 149
Headlights ......................... 149
Headlights On With Wipers ............. 157
High Beam Indicator .................. 201
Illuminated Entry ..................... 20 Instrument Cluster
................... 149
Interior ............................ 153
License ............................ 442
Lights On Reminder .................. 152
Low Fuel .......................... 189
Malfunction Indicator (Check Engine) ...... 199
Map Reading ....................... 153
Oil Pressure ........................ 190
Passing ............................ 151
Seat Belt Reminder ................... 189
Security Alarm (Theft Alarm) ............. 19
Theft Alarm (Security Alarm) ............ 196
Tire Pressure Monitoring (TPMS) .......197,337
Traction Control ..................... 315
Turn Signal ................. 88,150,196,441
Voltage ............................ 189
Warning (Instrument Cluster Description) . . . 188
Loading Vehicle ...................... 356,358
Capacities .......................... 358
10
INDEX 481