Page 90 of 494
Periodic Safety Checks You Should Make Outside
The Vehicle
Tires
Examine tires for excessive tread wear and uneven wear
patterns. Check for stones, nails, glass, or other objects
lodged in the tread or sidewall. Inspect the tread for cuts
and cracks. Inspect sidewalls for cuts, cracks and bulges.
Check the wheel nuts for tightness. Check the tires
(including spare) for proper cold inflation pressure.
Lights
Have someone observe the operation of exterior lights
while you work the controls. Check turn signal and high
beam indicator lights on the instrument panel.
Door Latches
Check for positive closing, latching, and locking.
Fluid Leaks
Check area under vehicle after overnight parking for fuel,
engine coolant, oil, or other fluid leaks. Also, if gasoline
fumes are detected or if fuel, power steering fluid, or
brake fluid leaks are suspected, the cause should be
located and corrected immediately.
88 THINGS TO KNOW BEFORE STARTING YOUR VEHICLE
Page 156 of 494
There is a second light located midway back in the
headliner.
To protect the battery, the interior lights will turn off
automatically 10 minutes after the ignition switch is
moved to the LOCK position. This will occur if the
interior lights were switched on manually or are on
because a door is open. To restore interior light operation,
either turn the ignition switch ON or cycle the light
switch.
WINDSHIELD WIPERS AND WASHERS
The wipers and washers are operated by a switch
on the control lever. The lever is located on the
right side of the steering column.Rotate the end of the lever to the LO position for
low-speed wiper operation, or to the HI position for
high-speed wiper operation.Windshield Wiper/Washer Lever
154 UNDERSTANDING THE FEATURES OF YOUR VEHICLE
Page 168 of 494

Gate Operator/Canadian Programming
Canadian radio frequency laws require transmitter sig-
nals to time-out (or quit) after several seconds of trans-
mission – which may not be long enough for HomeLink�
to pick up the signal during programming. Similar to this
Canadian law, some U.S. gate operators are designed to
time-out in the same manner.
It may be helpful to unplug the device during the cycling
process to prevent possible overheating of the garage
door or gate motor.
If you are having difficulties programming a garage door
opener or a gate operator, replace “Programming
HomeLink�” Step 3, with the following:
3. Continue to press and hold the HomeLink�button,
while you press and release (“cycle”), your handheld
transmitter every two seconds until HomeLink� hassuccessfully accepted the frequency signal. The indica-
tor light will flash slowly and then rapidly when fully
trained.
If you unplugged the device for training, plug it back in
at this time.
Then proceed with Step 4 under “Programming
HomeLink�,” earlier in this section.
Using HomeLink�
To operate, press and release the programmed
HomeLink�
button. Activation will now occur for the
trained device (i.e., garage door opener, gate operator,
security system, entry door lock, home/office lighting,
etc.,). The handheld transmitter of the device may also be
used at any time.
166 UNDERSTANDING THE FEATURES OF YOUR VEHICLE
Page 214 of 494

Personal Settings
(Customer-Programmable Features)
Personal Settings allows the driver to set and recall
features when the automatic transaxle is in PARK.
Press and release the MENU button until “Personal
Settings” displays in the EVIC.
Press and release the DOWN button to display the
following programmable features:
Language
When in this display you may select different languages
for all display nomenclature, including the trip functions.
Pressing the SELECT button while in this display selects
English, Spanish, French, German, Italian, or Dutch de-
pending on availability. As you continue, the displayed
information will be shown in the selected language.
Auto Unlock on Exit
When ON is selected and the transaxle is in the PARK or
NEUTRAL position, all doors will unlock when the
driver’s door is opened. To make your selection, press the
SELECT button until ON or OFF appears.
RKE Unlock
When “Driver Door 1st Press” is selected, only the
driver’s door will unlock on the first press of the Remote
Keyless Entry (RKE) transmitter UNLOCK button. When
Driver Door 1st Press is selected, you must press of the
RKE transmitter UNLOCK button twice to unlock the
passenger’s doors. When “All Doors 1st Press” is se-
lected, all of the doors will unlock on the first press of the
RKE transmitter UNLOCK button. To make your selec-
tion, press and release the SELECT button until “Driver
Door 1st Press” or “All Doors 1st Press” appears.
212 UNDERSTANDING YOUR INSTRUMENT PANEL
Page 215 of 494

Sound Horn with Lock
When ON is selected, a short horn sound will occur when
the RKE transmitter LOCK button is pressed. This feature
may be selected with or without the Flash Lights with
Lock feature. To make your selection, press and release
the SELECT button until ON or OFF appears.
Flash Lamps with Lock
When ON is selected, the front and rear turn signals will
flash when the doors are locked or unlocked with the
RKE transmitter. This feature may be selected with or
without the Sound Horn on lock feature selected. To
make your selection, press and release the SELECT
button until ON or OFF appears.
Headlamp Off Delay
When this feature is selected, the driver can choose to
have the headlights remain on for 0, 30, 60, or 90 seconds
when exiting the vehicle. To make your selection, press
the SELECT button until 0, 30, 60, or 90 seconds appears.
Headlights With Wipers
(Available with Auto Headlights Only)
When ON is selected, and the headlight switch is in the
AUTO position, the headlights will turn on approxi-
mately 10 seconds after the wipers are turned on. The
headlights will also turn off when the wipers are turned
off if they were turned on by this feature. To make your
selection, press the SELECT button until ON or OFF
appears.
NOTE:Turning the headlights on during the daytime
causes the instrument panel lights to dim. To increase the
brightness, refer to “Lights” in “Understanding The
Features Of Your Vehicle.”
Key-Off Power Delay
When this feature is selected, the power window
switches, radio, Uconnect™ phone (if equipped), and
power outlets will remain active for up to 10 minutes
after the ignition switch is turned to the LOCK position.
4
UNDERSTANDING YOUR INSTRUMENT PANEL 213
Page 216 of 494

Opening either front vehicle door will cancel this feature.
To make your selection, press the SELECT button until
Off, 45 sec., 5 min., or 10 min. appears.
Illumin. Approach
When this feature is selected, the headlights will activate
and remain on for up to 90 seconds when the doors are
unlocked with the remote keyless entry transmitter. To
make your selection, press the SELECT button until
“OFF,” “30 sec,” “60 sec,” or “90 sec” appears.
Hill Start Assist (HSA) — If Equipped
When on is selected, the HSA system is active. Refer to
“Electronic Brake Control System” in “Starting And
Operating” for system function and operating informa-
tion. To make your selection, press and release the
SELECT button until “On” or “Off” appears.
Display ECO — If Equipped
The “ECO” message is located in the EVIC, this message
can be turned on or off. To make your selection, press and
release the SELECT button until “ON” or “OFF” appears.
Display Units In
The EVIC and odometer can be changed between English
and Metric units of measure. To make your selection,
press and release the SELECT button until “ENGLISH”
or “METRIC” appears.
Calibrate Compass
Refer to “Compass Display” for more information.
Compass Variance
Refer to “Compass Display” for more information.
214 UNDERSTANDING YOUR INSTRUMENT PANEL
Page 413 of 494

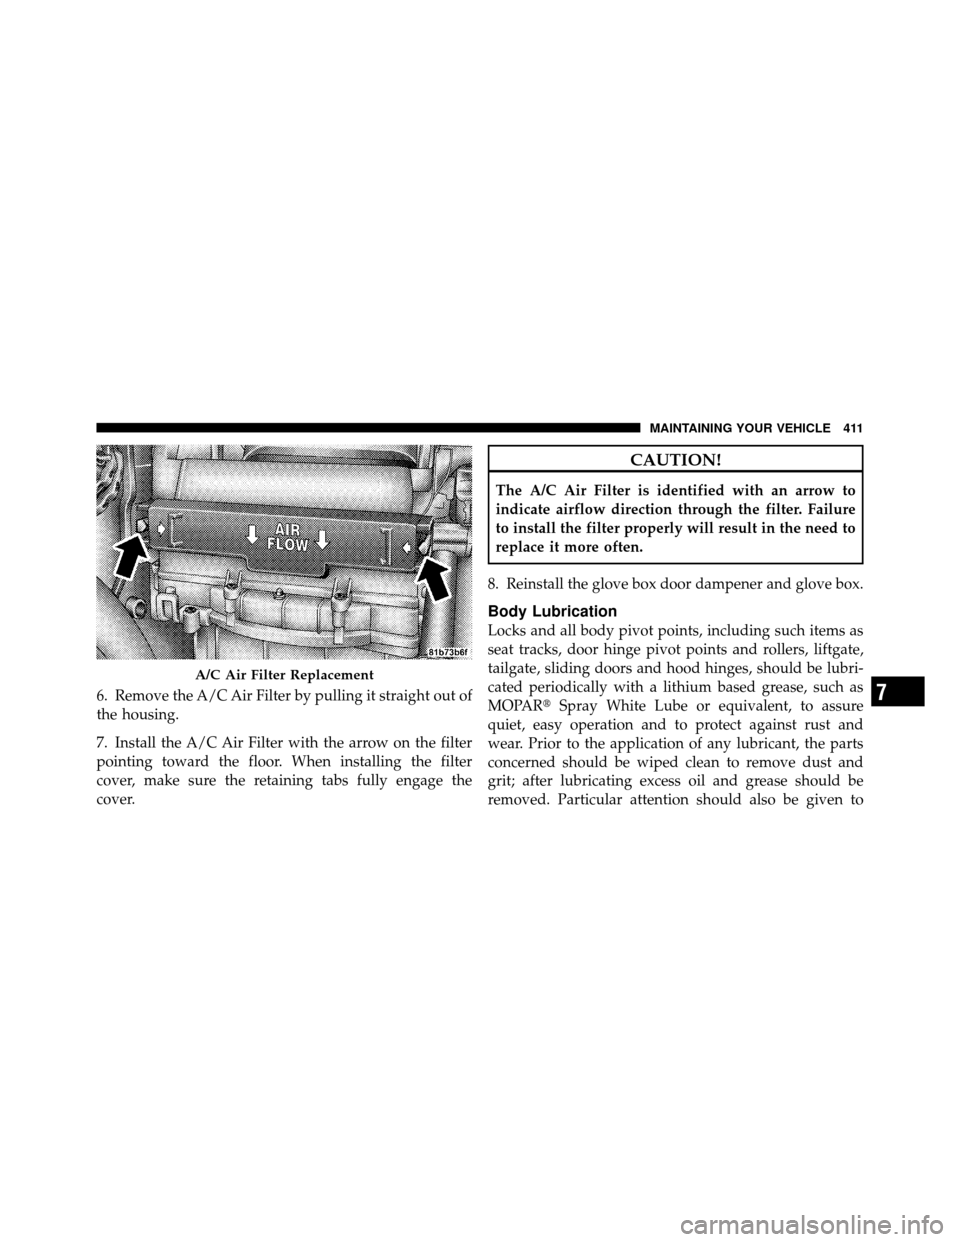
6. Remove the A/C Air Filter by pulling it straight out of
the housing.
7. Install the A/C Air Filter with the arrow on the filter
pointing toward the floor. When installing the filter
cover, make sure the retaining tabs fully engage the
cover.
CAUTION!
The A/C Air Filter is identified with an arrow to
indicate airflow direction through the filter. Failure
to install the filter properly will result in the need to
replace it more often.
8. Reinstall the glove box door dampener and glove box.
Body Lubrication
Locks and all body pivot points, including such items as
seat tracks, door hinge pivot points and rollers, liftgate,
tailgate, sliding doors and hood hinges, should be lubri-
cated periodically with a lithium based grease, such as
MOPAR� Spray White Lube or equivalent, to assure
quiet, easy operation and to protect against rust and
wear. Prior to the application of any lubricant, the parts
concerned should be wiped clean to remove dust and
grit; after lubricating excess oil and grease should be
removed. Particular attention should also be given to
A/C Air Filter Replacement
7
MAINTAINING YOUR VEHICLE 411
Page 438 of 494
CavityCartridge
Fuse Mini
Fuse Description
32 30 Amp
Pink —Auto Shutdown
(ASD) Relay 1
33 — 10 Amp
Red Switch Bank/
Diagnostic Link
Connector/
Powertrain Control
Module (PCM)
34 30 Amp
Pink —Anti-Lock Brakes
(ABS) Module – If
Equipped/Electronic
Stability Control
(ESC) Module – If
EquippedCavity
Cartridge
Fuse Mini
Fuse Description
35 40 Amp
Green —Anti-Lock Brakes
(ABS) Module – If
Equipped/Electronic
Stability Control
(ESC) Module – If
Equipped
36 30 Amp
Pink —Passenger Door Mod-
ule (PDM)/Driver
Door Module (DDM)
37 — 25 Amp
Natural Power Top Module –
If Equipped
436 MAINTAINING YOUR VEHICLE