Page 176 of 494
WARNING!
To avoid serious injury or death:
•Only devices designed for use in this type of
outlet should be inserted into any 12 Volt outlet.
•Do not touch with wet hands.
•Close the lid when not in use and while driving
the vehicle.
•If this outlet is mishandled, it may cause an
electric shock and failure.
CAUTION!
•Many accessories that can be plugged in draw
power from the vehicle’s battery, even when not in
use (i.e., cellular phones, etc.). Eventually, if
plugged in long enough, the vehicle’s battery will
discharge sufficiently to degrade battery life
and/or prevent the engine from starting.
•Accessories that draw higher power (i.e., coolers,
vacuum cleaners, lights, etc.) will degrade the
battery even more quickly. Only use these inter-
mittently and with greater caution.
•After the use of high power draw accessories, or
long periods of the vehicle not being started (with
accessories still plugged in), the vehicle must be
driven a sufficient length of time to allow the
generator to recharge the vehicle’s battery.
174 UNDERSTANDING THE FEATURES OF YOUR VEHICLE
Page 183 of 494
REAR WINDOW FEATURES
Rear Window Defroster
The rear window defroster button is located on the
climate control (Mode) knob. Press this button to
turn on the rear window defroster and the heated outside
mirrors (if equipped). An indicator in the button will
illuminate when the rear window defroster is on. The
rear window defroster automatically turns off after ap-
proximately 10 minutes. For an additional five minutes of
operation, press the button a second time.
NOTE: To prevent excessive battery drain, use the rear
window defroster only when the engine is operating.
CAUTION!
Failure to follow these cautions can cause damage to
the heating elements:
•Use care when washing the inside of the rear
window. Do not use abrasive window cleaners on
the interior surface of the window. Use a soft cloth
and a mild washing solution, wiping parallel to
the heating elements. Labels can be peeled off
after soaking with warm water.
•Do not use scrapers, sharp instruments, or abra-
sive window cleaners on the interior surface of the
window.
•Keep all objects a safe distance from the window.
3
UNDERSTANDING THE FEATURES OF YOUR VEHICLE 181
Page 207 of 494
Press and release the SELECT Button to accept
a selection. The SELECT Button also resets
various Trip Functions.
Electronic Vehicle Information Center (EVIC)
Displays
When the appropriate conditions exist, the EVIC displays
the following messages:
•Turn Signal On (with a continuous warning chime
after one mile traveled)
•Left Front Turn Signal Light Out (with a single chime)
•Left Rear Turn Signal Light Out (with a single chime)
•Right Front Turn Signal Light Out (with a single
chime)
•Right Rear Turn Signal Light Out (with a single chime)
•RKE (Remote Keyless Entry) Battery Low (with a
single chime)
•Personal Settings Not Available – Vehicle Not In PARK
•Personal Settings Not Available – Vehicle in Motion
•Door(s) Ajar (with a single chime if vehicle is in
motion)
•Trunk Ajar (with a single chime)
•Headlights On
•Key In Ignition
•Remote start aborted — Door ajar
•Remote start aborted — Hood ajar
•Remote start aborted — Trunk ajar
•Remote start aborted — Fuel low
•Remote start disabled — System fault
SELECTButton
4
UNDERSTANDING YOUR INSTRUMENT PANEL 205
Page 213 of 494
NOTE:Magnetic and battery powered devices, (such as
cell phones, iPod’s, radar detectors, PDA’s and laptops)
should be kept away from the top of the instrument
panel. This is where the compass module is located and
such devices may interfere and cause false compass
readings. 1. Turn the ignition switch to the ON position. Leave the
shift lever in PARK.
2. Press and release the MENU button until “Personal
Settings” displays in the EVIC.
3. Press and release the DOWN button until “Compass
Variance” and the current Variance Value displays in the
EVIC.
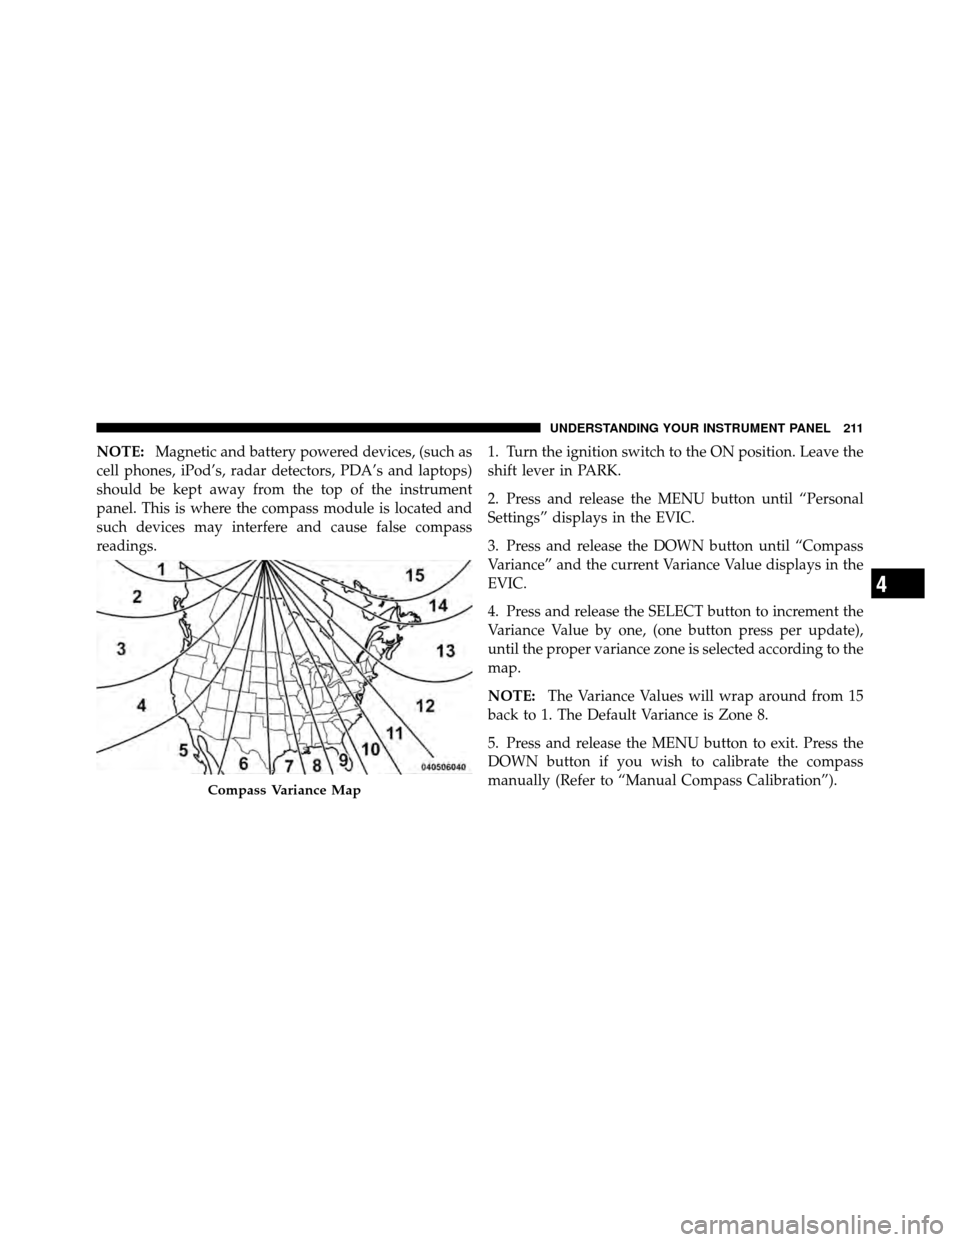
4. Press and release the SELECT button to increment the
Variance Value by one, (one button press per update),
until the proper variance zone is selected according to the
map.
NOTE:
The Variance Values will wrap around from 15
back to 1. The Default Variance is Zone 8.
5. Press and release the MENU button to exit. Press the
DOWN button if you wish to calibrate the compass
manually (Refer to “Manual Compass Calibration”).
Compass Variance Map
4
UNDERSTANDING YOUR INSTRUMENT PANEL 211
Page 262 of 494
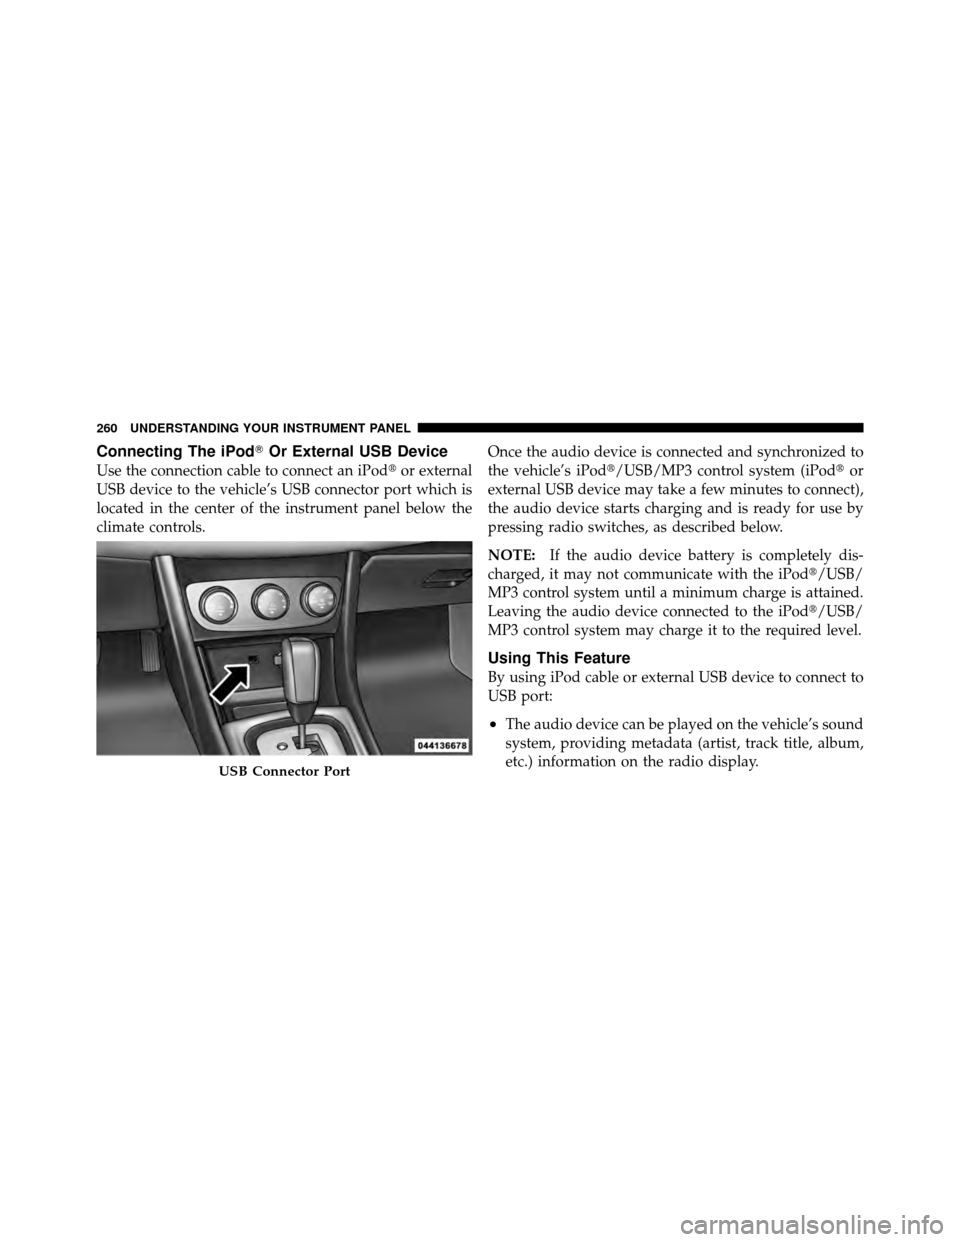
Connecting The iPod�Or External USB Device
Use the connection cable to connect an iPod �or external
USB device to the vehicle’s USB connector port which is
located in the center of the instrument panel below the
climate controls. Once the audio device is connected and synchronized to
the vehicle’s iPod�/USB/MP3 control system (iPod�
or
external USB device may take a few minutes to connect),
the audio device starts charging and is ready for use by
pressing radio switches, as described below.
NOTE: If the audio device battery is completely dis-
charged, it may not communicate with the iPod�/USB/
MP3 control system until a minimum charge is attained.
Leaving the audio device connected to the iPod�/USB/
MP3 control system may charge it to the required level.
Using This Feature
By using iPod cable or external USB device to connect to
USB port:
•The audio device can be played on the vehicle’s sound
system, providing metadata (artist, track title, album,
etc.) information on the radio display.
USB Connector Port
260 UNDERSTANDING YOUR INSTRUMENT PANEL
Page 263 of 494
•The audio device can be controlled using the radio
buttons to Play, Browse, and List the iPod�contents.
•The audio device battery charges when plugged into
the USB/AUX connector (if supported by the specific
audio device)
Controlling The iPod�Or External USB Device
Using Radio Buttons
To get into the iPod�/USB/MP3 control mode and access
a connected audio device, either press the “AUX” button
on the radio faceplate or press the VR button and say
�USB� or�Switch to USB�. Once in the iPod�/USB/MP3
control mode, audio tracks (if available from audio
device) start playing over the vehicle’s audio system.
Play Mode
When switched to iPod�/USB/MP3 control mode, the
iPod� or external USB device automatically starts Play mode. In Play mode, the following buttons on the radio
faceplate may be used to control the iPod
�or external
USB device and display data:
•Use the TUNE control knob to select the next or
previous track.
•Turning it clockwise (forward) by one click, while
playing a track, skips to the next track or press the
VR button and say �Next Track�.
•Turning it counterclockwise (backward) by one
click, will jump to the previous track in the list or
press the VR button and say �Previous Track�
•Jump backward in the current track by pressing and
holding the <
button long enough will jump to the beginning of
the current track.
•Jump forward in the current track by pressing and
holding the FF>> button.
4
UNDERSTANDING YOUR INSTRUMENT PANEL 261
Page 291 of 494

For vehicles equipped with Tip Start (Six-Speed Trans-
mission),turn the ignition switch to the START position
and release it as soon as the starter engages. The starter
motor will continue to run, and it will disengage auto-
matically when the engine is running. If the engine fails
to start, the starter will disengage automatically in 10 sec-
onds. If this occurs, turn the ignition switch to the LOCK
position, wait 10 to 15 seconds, then repeat the “Normal
Starting” procedure.
Extreme Cold Weather (Below –20°F or �29°C)
To ensure reliable starting at these temperatures, use of
an externally powered electric engine block heater (avail-
able from your dealer) is recommended.
If Engine Fails To Start
WARNING!
•Never pour fuel or other flammable liquids into
the throttle body air inlet opening in an attempt to
start the vehicle. This could result in a flash fire
causing serious personal injury.
•Do not attempt to push or tow your vehicle to get it
started. Vehicles equipped with an automatic trans-
mission cannot be started this way. Unburned fuel
could enter the catalytic converter and once the
engine has started, ignite and damage the converter
and vehicle. If the vehicle has a discharged battery,
booster cables may be used to obtain a start from a
booster battery or the battery in another vehicle.
This type of start can be dangerous if done improp-
erly. Refer to “Jump Starting” in “What To Do In
Emergencies” for further information.
5
STARTING AND OPERATING 289
Page 350 of 494
To fix a Non-FFV vehicle inadvertently fueled once with
E-85 perform the following:
•change the engine oil and oil filter
•disconnect and reconnect the battery
•drain the fuel tank (see your authorized dealer)
More extensive repairs will be required for prolonged
exposure to E-85 fuel.
MMT In Gasoline
MMT is a manganese-containing metallic additive that is
blended into some gasoline to increase octane. Gasoline
blended with MMT provides no performance advantage
beyond gasoline of the same octane number without
MMT. Gasoline blended with MMT reduces spark plug
life and reduces emissions system performance in some
vehicles. The manufacturer recommends that gasoline
without MMT be used in your vehicle. The MMT content
of gasoline may not be indicated on the gasoline pump, therefore, you should ask your gasoline retailer whether
the gasoline contains MMT. It is even more important to
look for gasoline without MMT in Canada, because MMT
can be used at levels higher than those allowed in the
United States. MMT is prohibited in Federal and Califor-
nia reformulated gasoline.
Materials Added To Fuel
All gasoline sold in the United States is required to
contain effective detergent additives. Use of additional
detergents or other additives is not needed under normal
conditions and they would result in additional cost.
Therefore, you should not have to add anything to the
fuel.
348 STARTING AND OPERATING