2011 Citroen JUMPY reverse
[x] Cancel search: reversePage 39 of 260

37
Gearboxes and steering wheel
READY TO GO
2
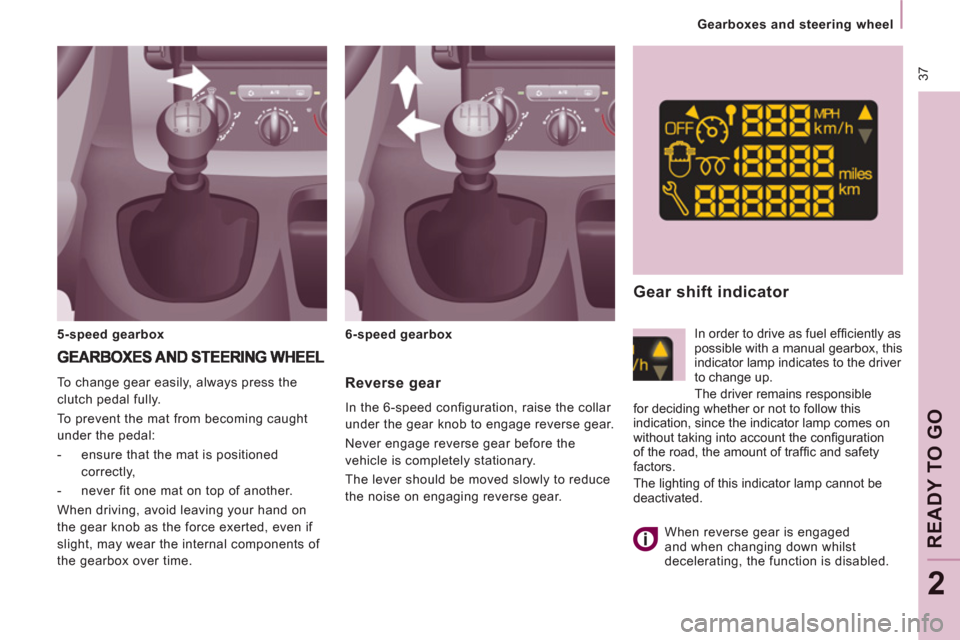
Reverse gear
In the 6-speed configuration, raise the collar
under the gear knob to engage reverse gear.
Never engage reverse gear before the
vehicle is completely stationary.
The lever should be moved slowly to reduce
the noise on engaging reverse gear. To change gear easily, always press the
clutch pedal fully.
To prevent the mat from becoming caught
under the pedal:
- ensure that the mat is positioned
correctly,
- never fit one mat on top of another.
When driving, avoid leaving your hand on
the gear knob as the force exerted, even if
slight, may wear the internal components of
the gearbox over time.
5-speed gearbox
6-speed gearbox
Gear shift indicator
In order to drive as fuel effi ciently as
possible with a manual gearbox, this
indicator lamp indicates to the driver
to change up.
The driver remains responsible
for deciding whether or not to follow this
indication, since the indicator lamp comes on
without taking into account the confi guration
of the road, the amount of traffi c and safety
factors.
The lighting of this indicator lamp cannot be
deactivated.
When reverse gear is engaged
and when changing down whilst
decelerating, the function is disabled.
Page 40 of 260

38
Gearboxes and steering wheel
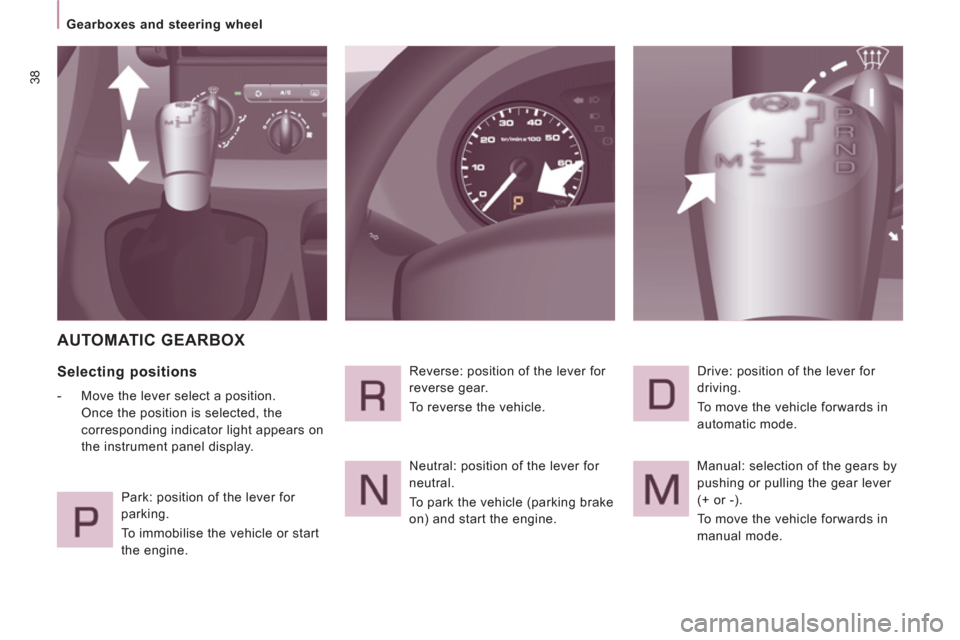
AUTOMATIC GEARBOX
Selecting positions
- Move the lever select a position.
Once the position is selected, the
corresponding indicator light appears on
the instrument panel display.
Park: position of the lever for
parking.
To immobilise the vehicle or start
the engine. Reverse: position of the lever for
reverse gear.
To reverse the vehicle.
Neutral: position of the lever for
neutral.
To park the vehicle (parking brake
on) and start the engine. Drive: position of the lever for
driving.
To move the vehicle forwards in
automatic mode.
Manual: selection of the gears by
pushing or pulling the gear lever
(+ or -).
To move the vehicle forwards in
manual mode.
Page 41 of 260

39
Gearboxes and steering wheel
READY TO GO
2
Moving off
With the engine running, to move off from
position P
.
For immediate maximum acceleration
without touching the gear lever,
depress the accelerator pedal to the extent
of its travel, passing the point of resistance
(kickdown). The gearbox will automatically
change down or maintain the gear selected
until maximum engine speed is reached.
On a descent, the gearbox will automatically
change down in order to provide efficient
engine braking and good pickup.
If you take your foot off the accelerator
suddenly, the gearbox will not change to a
higher gear for reasons of safety.
When stationary with the gear lever in
position D
(drive), a vibration limiting device
is activated by pressing the brake pedal.
- gradually release the
pressure on the brake pedal;
the vehicle then moves off.
- Press the brake pedal to
come out of position P
,
- select position R
or D
,
- gradually release the
pressure on the brake pedal;
the vehicle then moves off.
You can also move off from position N
.
- With your foot on
the brake, release
the parking brake,
- select position R
, D
or M
,
- Select position D
. The gearbox always selects the most
suitable gear taking account of the following:
- the style of driving,
- the road profile,
- the vehicle load.
The gearbox is then operating in auto-
adaptive mode, without any action on your
part.
Reverse gear
- Select position R
, with the
vehicle stationary and the
engine at idle.
Stopping the vehicle, starting the
engine
- Select position P
to
immobilise the vehicle
or
to start the engine
, with the
parking brake on or off.
If the battery is flat and the gear lever
is in position P
, it will be impossible to
change to another position.
- You can also select position N
to park
or to start the
engine
, with the parking
brake on.
If position N
is engaged inadvertently
while driving, allow the engine to return
to idle before engaging position D
to restore
drive.
Page 83 of 260

81
Mirrors and windows
EASE OF USE
and
COMFOR
T
3
ELECTRIC WINDOWS
1.
Driver's electric window control
2.
Passenger electric window control The electrical functions of the electric
windows are deactivated:
- approximately 45 seconds after the
ignition is switched off,
- after one of the front doors is opened,
if the ignition is off.
Reinitialisation
Following reconnection of the battery,
the safety auto-reverse function must be
reinitialised.
Lower the window fully, then raise it, it will
rise in steps of a few centimetres each time
the control is pressed. Repeat the operation
until the window is fully closed.
Continue to press the control for at least one
second after the window closed position has
been reached.
The safety auto-reverse does not operate
during these operations.
Manual mode
Press or pull the control, without passing the
point of resistance. The window stops when
you release the control.
Automatic mode
Press or pull the control, beyond the point
of resistance. The window opens or closes
fully when the control is released. Pressing
the control again stops the movement of
the window.
Safety auto-reverse
If your vehicle is fitted with the safety
auto-reverse function, when the window
rises and meets an obstacle, it stops and
partially lowers.
In the event of unwanted opening of the
window on closing, press the control until
the window is fully open. Within the next
4 seconds, pull the control until the window
is fully closed.
The safety auto-reverse does not operate
during these operations. There are two operating modes:
Good practice
If the electric windows meet an obstacle
during operation, you must reverse the
movement of the window. To do this, press
the control concerned.
When the driver operates the passenger
electric window controls, he must ensure
that no one is preventing correct closing of
the windows.
The driver must ensure that the passengers
use the electric windows correctly.
Be aware of children when operating
the windows.
Page 85 of 260

83
Parking sensors
SAFETY
4
Engage reverse gear
An audible signal confi rms the activation of the
system by engaging reverse gear.
The proximity information is indicated by an audible
signal which becomes more rapid as the vehicle
approaches the obstacle. When the distance
between the rear of the vehicle and the obstacle
is less than approximately thirty centimetres, the
audible signal becomes continuous.
Stop the assistance
Change to neutral.
REAR PARKING SENSORS
The audible and/or visual rear parking
sensor system consists of four proximity
sensors, installed in the rear bumper. The
sensors detect any obstacle which enters
the field: person, vehicle, tree, fence, behind
the vehicle during the manoeuvre.
Certain objects detected at the beginning of
the manoeuvre will no longer be detected
at the end of the manoeuvre due to the
blind spots between and below the sensors.
Examples: stake, roadworks cone or
pavement post.
Activation/Deactivation
You can activate or deactivate the
system by pressing this button.
The activation or deactivation of
the system is stored when the
vehicle stops.
Malfunction
In the event of a malfunction, when reverse
gear is engaged the LED in the button
comes on, accompanied by an audible
signal and a message in the screen. Contact
a CITROËN dealer or a qualified workshop.
Good practice
In bad weather or in winter, ensure that the
sensors are not covered with mud, ice or
snow.
The system will be deactivated automatically
if a trailer is being towed or if a bicycle
carrier is fitted (vehicle fitted with a
towbar or bicycle carrier recommended by
CITROËN).
The parking assistance cannot, in any
circumstances, take the place of the
vigilance and responsibility of the driver.
Display in the screen
You are advised to deactivate the system if
your vehicle is fitted with a rear ladder or if
you are transporting a load which exceeds
the length of the vehicle.
Page 105 of 260

10
3
Under the bonnet
CHECK
S
6
DIESEL ENGINES
8 -
Power steering reservoir.
9 -
Removable towing eye.
10 -
Repriming pump
( a
: 1.6 litre HDi; b
: 2 litre HDi).
11 -
Engine oil filling funnel (2 litre HDi).
7.1 -
Engine oil filler cap.
If your vehicle is fitted with this oil filler tube,
proceed as follows:
A -
Remove the oil filler cap.
B -
Remove the filler tube from its location.
C -
Place the filler tube in the filler opening
as shown on the illustration.
D -
Turn it a 1/4 of a turn to the left to lock it
then top up the oil.
To refit, proceed in the reverse order without
forgetting to retighten the cap A
correctly.
UNDER THE BONNET
1 -
Windscreen/headlamp wash reservoir.
2 -
Fuse box.
3 -
Coolant reservoir.
4 -
Brake and clutch fluid reservoir.
5 -
Air filter.
6 -
Dipstick.
7 -
Engine oil filler cap.
Page 118 of 260

11 6
Changing a wheel
CHANGING A WHEEL
If your vehicle is equipped with a spare
wheel located underneath the vehicle, follow
these instructions.
1. PARKING THE VEHICLE
- You must ensure that the occupants
get out of the vehicle and wait in a safe
location.
- If possible, park the vehicle on level,
stable and non-slippery ground.
- Apply the parking brake, switch off the
ignition and engage first or reverse gear.
- If available, place a chock under the
wheel diagonally opposite the one to be
changed.
On certain types of ground and/or if heavy
loads are being transported, the vehicle
must be raised in order to disengage
the spare wheel from the carrier. Call a
CITROËN dealer or a qualified workshop.
If your vehicle is fitted with suspension
with pneumatic compensation, please
deactivate the system. Refer to the "Rear
suspension" section of chapter 3.
2. TOOLS
- If fitted on your vehicle, open the
plastic flap located at the rear left of
the vehicle.
- Unscrew the nut then take out the jack
and the wheelbrace.
1.
Wheelbrace.
2.
Jack.
3.
Towing eye.
The jack and the tool kit are specific to
your vehicle. Do not use them for other
purposes.
Page 124 of 260

122
Changing a bulb
3.
Direction indicators
Type B
, PY21W - 21W (amber)
- Turn the bulb holder a quarter turn
anticlockwise.
- Remove the bulb by pressing it lightly
while turning it anticlockwise.
- Change the bulb.
- Ensure that the cover is refitted
correctly all the way round to ensure
sealing.
FRONT LAMPS
Open the bonnet. To access the bulbs,
reach behind the headlamp unit.
Carry out the operations in reverse order to
refit each bulb.
1.
Dipped/Main beam headlamps
Type C
, H4 - 55W
- Remove the centre cover by pulling
the flexible rubber tab.
- Disconnect the electrical connector.
- Release the retaining spring.
- Change the bulb taking care to
align the metal part with the slots in
the lamp.
2.
Sidelamps
Type A
, W5W - 5W
- Remove the cover by pulling the
flexible rubber tab.
- Remove the bulb holder fitted by
pressure by pulling the connector.
- Change the bulb.
- Ensure that the cover is refitted
correctly all the way round to ensure
sealing.
4.
Foglamps
Type C
, H1 - 55W
Contact a CITROËN dealer or a qualified
workshop.