Page 126 of 260
124
Changing a bulb
REAR LIGHTS
For further information concerning the bulbs,
refer to the "Types of bulb".
- Identify the faulty bulb then open
the rear doors to 180°. Refer to the
"Accesses" section of chapter 2.
- Remove the two fixing nuts.
Pull the lens block from the outside.
- Holding the light, disconnect the
electrical connector.
- Move aside the 8 tabs then extract the
bulb holder.
- Remove the faulty bulb by pressing it
lightly while turning it anticlockwise.
- Change the bulb.
1.
Brake lights/side lights
Type B
, P21/5W - 21/5W
2.
Direction indicators
Type B
, PY21W - 21W (amber)
3.
Reversing lights
Type B
, P21W - 21W
4.
Fog lamps
Type B
, P21W - 21W When refitting, take care to correctly
reposition:
- the 8 tabs,
- the two white lugs in the two rubber
holes to maintain the sealing of the light,
- the supply wire to avoid trapping it.
Page 127 of 260

125
Changing a bulb
QUICK HEL
P
7
THIRD BRAKE LIGHT
Type A
, W5W - 5W
NUMBER PLATE LIGHTS
Type A
, W5W - 5W
Light located on the inside (tailgate)
- Unscrew the two screws using a Torx
TM
screwdriver with 20 socket.
- Remove the plastic cover.
- Remove the bulb holder moving aside
the two tabs.
- Remove the faulty bulb by pressing it
lightly while turning it anticlockwise.
- Change the bulb.
Type B
, P21W - 21W
With tailgate
- Move aside the plastic lens using a
screwdriver, on the point indicated by
the arrow.
- Change the bulb.
- Replace the plastic lens and press on it.
With hinged doors
- Unclip the interior trim.
- Disconnect the connector by moving
aside its tab.
- Remove the plastic cover.
- Turn the bulb holder a quarter turn
anticlockwise.
- Change the bulb.
Light located on the outside (hinged doors)
- Unscrew the two screws using a Torx TM
screwdriver with 20 socket.
- Remove the light.
- Change the bulb.
Type B
, P21W - 21W
Light on high door
- Remove the screws using an 8 wrench.
- Remove the faulty bulb by pressing it
lightly while turning it anticlockwise.
- Change the bulb.
Page 151 of 260
9.7
03
°
SCREEN AND MAIN MENU
The system uses the complete and detailed NAVTEQ maps installed directly on the equipment's hard disk.
Updates of the maps of the UK and of the other European countries, supplied by our partner NAVTEQ, are available from the CITROËN network.
This displa
ys the following information, via the audio control panel:
- time,
- date,
- ambient temperature
(if there is a risk of ice, you are warned by amessage),
- audio source displa
ys (radio, CD, jukebox, ...),
- telematic system displays
(telephone, services, ...),
- check o
f openings (doors, boot, ...),
- warnin
g messages (e.g.: "Fuel level low") and vehicle function statusmessages (e.g.: "Auto lighting activated") displayed temporarily,
- trip computer information,
- GPS
(Europe) satellite navigation system information.
> COLOUR SCREEN
Telephone
Orange
Time:
Date:
Screen confi guration: refer to the section - Screen menu map.
Page 200 of 260

9.56
04
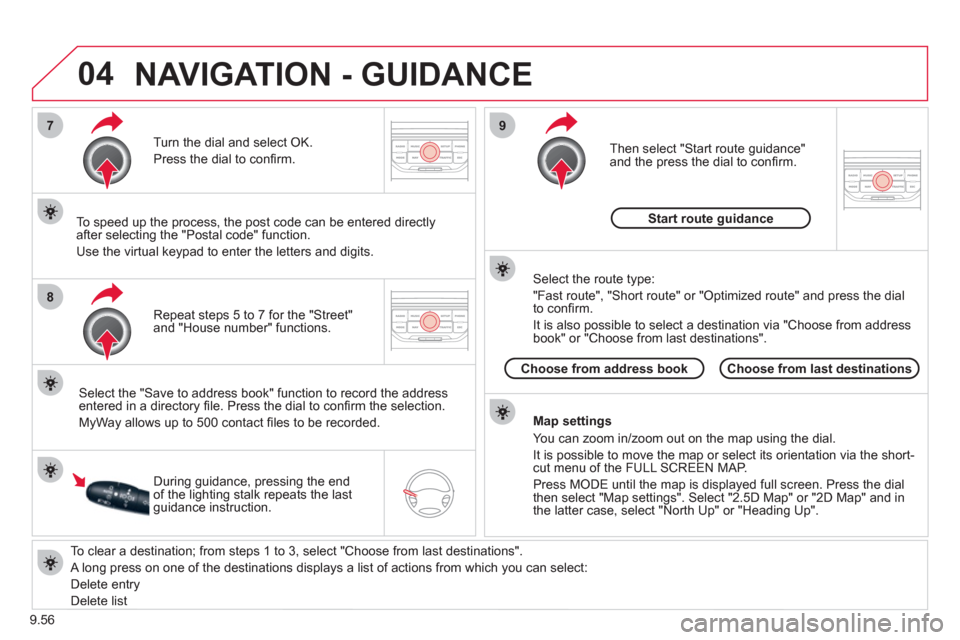
7
8
9
To clear a destination; from steps 1 to 3, select "Choose from last destinations".
A long press on one of the destinations displays a list of actions from which you can select:
Delete entr
y
D
elete listRepeat steps 5 to 7
for the "Street" and "House number" functions. Turn the dial and select
OK.
Pr
ess the dial to confi rm.
Select the "Save to address book" function to record the address
entered in a directory fi le. Press the dial to confi rm the selection.
M
yWay allows up to 500 contact fi les to be recorded.
To speed up the process, the post code can be entered directl
y
after selecting the "Postal code" function.
Use the virtual ke
ypad to enter the letters and digits.
Then select "
Start route guidance"
and the press the dial to confi rm.
During guidance, pressing the endof the lighting stalk repeats the last guidance instruction.
Map settin
gs
You can zoom in/zoom out on the map usin
g the dial.
It is possible to move the map or select its orientation via the short-cut menu of the FULL SCREEN MAP.
Press M
ODE until the map is displayed full screen. Press the dial
then select "Map settings". Select "2.5D Map" or "2D Map" and in
the latter case, select "North Up" or "Heading Up".
Select the route type:
"Fast route", "
Short route" or "Optimized route" and press the dial
to confi rm.
It is also
possible to select a destination via "Choose from address
book" or "Choose from last destinations".
Choose from last destinations Choose from address bookStart route
guidance
NAVIGATION - GUIDANCE
Page 228 of 260

9.84
01
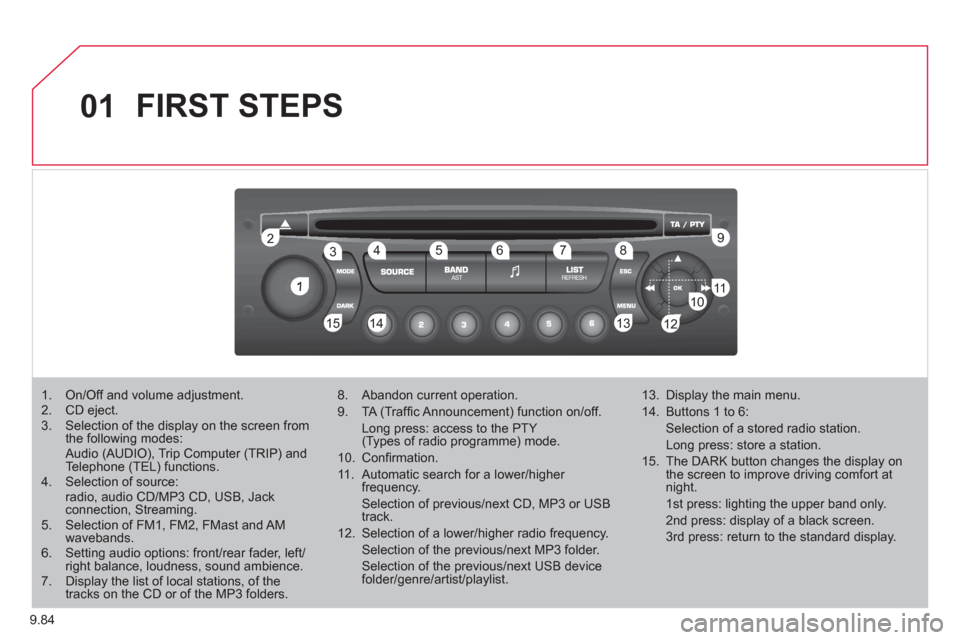
1
22
10101111
133144155
33445566778899
122
FIRST STEPS
1. On/Off and volume adjustment. 2. CD eject. 3. Selection of the display on the screen from the following modes: Audio (AUDIO), Trip Computer (TRIP) and Telephone (TEL) functions. 4. Selection of source: radio, audio CD/MP3 CD, USB, Jackconnection, Streaming. 5. Selection of FM1, FM2, FMast and AMwavebands.6. Setting audio options: front/rear fader, left/right balance, loudness, sound ambience.7. Display the list of local stations, of thetracks on the CD or of the MP3 folders.
8. Abandon current operation.
9. TA (Traffi c Announcement) function on/off.
Long press: access to the PTY (Types of radio programme) mode.
10. Confi rmation.
11. Automatic search for a lower/higher frequency.
Selection of previous/next CD, MP3 or USB track.
12. Selection of a lower/higher radio frequency.
Selection of the previous/next MP3 folder.
Selection of the previous/next USB devicefolder/genre/artist/playlist.
13. Display the main menu.
14. Buttons 1 to 6:
Selection of a stored radio station.
Long press: store a station.
15. The DARK button changes the display on the screen to improve driving comfort at night.
1st press: lighting the upper band only.
2nd press: display of a black screen.
3rd press: return to the standard display.
Page 250 of 260
144
Instruments and controls
Headlamp beam height adjustment 44
Starter, ignition 41
Wiper controls 45-46
Automatic wiping 45
Windscreen/headlamp wash 45
Trip computer Section 9
Cruise control 47-49
Fixed speed limiter 49
Speed limiter 50-52
Steering mounted controls:
- NaviDrive Section 9
- MyWay Section 9
- Audio system Section 9
Lighting controls 42-43
Automatic illumination of headlamps 44
Foglamps 43
Daytime running lamps 43
Opening the bonnet 102
Parking brake 82
Electric windows,
electric mirrors 79-81
Instrument panels, screens, speedometers 26-27
Warning lamps, indicator lamps 28-33
Indicators, gauge 34-36
Setting the time in the instrument panel 27
Dashboard lighting dimmer 36
Gear shift indicator 37
Steering wheel adjustment 41
Horn 84
Page 253 of 260
Technical data - Maintenance
VISUAL SEARCH
10
TECHNICAL DATA - MAINTENANCE
Identifi cation markingss, serial number,
paint code, tyres 142
Engine fuses 129
Windscreen/headlamp wash, levels 106
Bulbs, lighting,
changing bulbs 121-125
Opening the bonnet, stay 102 Warning lamps 28-33
Changing a wiper blade 131
Under the bonnet
- Diesel 103
- petrol 104
Fuel cut-off,
Diesel priming 111-112
Engine technical data 141
Van dimensions 134-137
Platform cab dimensions 138-139
Weights 140
Model code 148 Checks 107-108
- battery,
- gearbox,
- carbon/passenger compartment fi lter,
- oil fi lter,
- particle emission fi lter,
- parking brake,
- brake pads,
- brake drums, discs.
Emissions controls (EOBD) 35 Water bleeding, Diesel fi lter 108 Levels 105-106
- Diesel additive,
- dipstick,
- power steering fl uid,
- brake fl uid,
- coolant,
- screen and headlamp wash fl uid.
Towing, lifting 132-133
Towed loads 140