Page 196 of 260
9.52
03 GENERAL OPERATION
For a detailed global view of the menus available, refer to the"Screen menu map" section.
Press the M
ODE button several times in succession for access to the following menus:
For cleaning the screen, the use of a soft, non-abrasive cloth (spectacles cloth) is recommended, with no additional product. RADIO / MUSIC MEDI
A PLAYERS
TELEPHONE
(If a conversation is in progress)
FULL SCREEN MA
P
NAVIGATION
(If guidance is in progress)
SETUP:
system language *
, date and time *
, display,
vehicle settings * , unit and system settings,
"Demo mode".
TRAFFIC:
TMC information and messages.
* Available accordin
g to model. TRIP COMPUTE
R
Page 198 of 260
9.54
03GENERAL OPERATION
DISPLAY ACCORDING TO THE CONTEXT
FULL SCREEN MAP:
Abort guidance/Resume guidance
Set destination
POIs nearb
y
Position info
Map settings
Zoom/Scroll
1
1
1
1
1
1
RADIO:
In FM mode
Traffi c info (TA)
RD
S
R
adiotext
Regional prog.
In AM mode
AM
TA
R
efresh AM list
FM
1
2
1
2
2
2
2
2
2
2
MUSIC MEDIA PLAYERS:
Traffi c info (TA)
Play options
Normal order
R
andom track
Re
peat folder
Select musi
c
Scan
1
1
2
2
2
2
1
Page 200 of 260

9.56
04
7
8
9
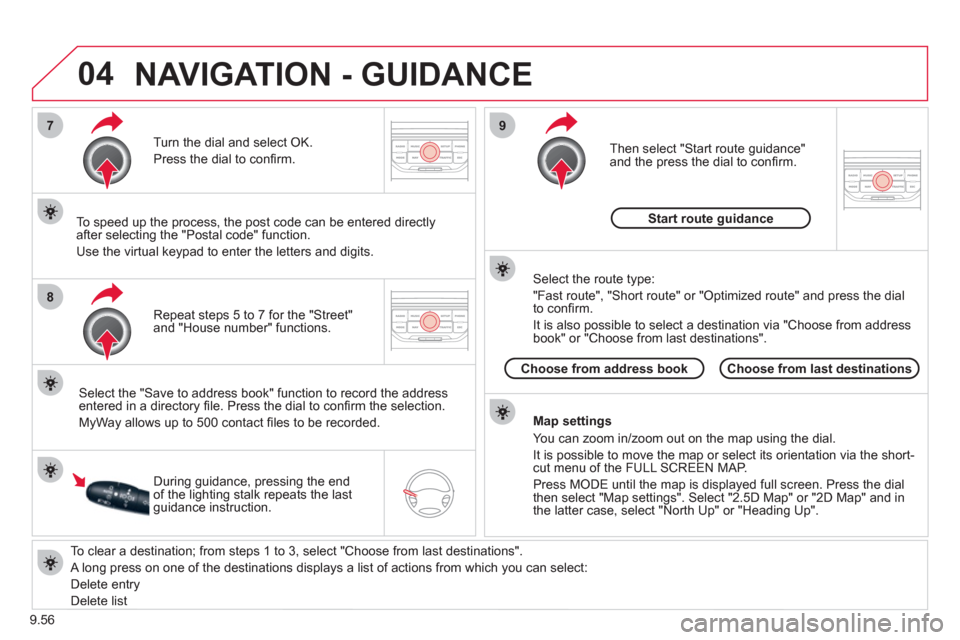
To clear a destination; from steps 1 to 3, select "Choose from last destinations".
A long press on one of the destinations displays a list of actions from which you can select:
Delete entr
y
D
elete listRepeat steps 5 to 7
for the "Street" and "House number" functions. Turn the dial and select
OK.
Pr
ess the dial to confi rm.
Select the "Save to address book" function to record the address
entered in a directory fi le. Press the dial to confi rm the selection.
M
yWay allows up to 500 contact fi les to be recorded.
To speed up the process, the post code can be entered directl
y
after selecting the "Postal code" function.
Use the virtual ke
ypad to enter the letters and digits.
Then select "
Start route guidance"
and the press the dial to confi rm.
During guidance, pressing the endof the lighting stalk repeats the last guidance instruction.
Map settin
gs
You can zoom in/zoom out on the map usin
g the dial.
It is possible to move the map or select its orientation via the short-cut menu of the FULL SCREEN MAP.
Press M
ODE until the map is displayed full screen. Press the dial
then select "Map settings". Select "2.5D Map" or "2D Map" and in
the latter case, select "North Up" or "Heading Up".
Select the route type:
"Fast route", "
Short route" or "Optimized route" and press the dial
to confi rm.
It is also
possible to select a destination via "Choose from address
book" or "Choose from last destinations".
Choose from last destinations Choose from address bookStart route
guidance
NAVIGATION - GUIDANCE
Page 224 of 260

9.80
QUESTIONANSWER SOLUTION
TA is selected. However, certain traffi c jams
along the route are not
indicated in real time.
On starting, it is several minutes before the system begins to receive the
traffi c information. Wait until the traffi c information is being received correctly (displaying of the traffi c information symbols on the map).
In certain countries, onl
y major routes (motorways...) are listed for the
traffi c information. This phenomenon is normal. The system is
dependent on the traffi c information available.
I receive a speed camera
alert for a camera which
is not on my route.The system announces all speed cameras located in a conical zoneforward of the vehicle. It may detect speed cameras on nearby or parallel roads. Zoom the map to view the exact position o
f thespeed camera.
The audible speed
camera alert is not
working. A
udible alerts are not active. Activate audible alerts in Navigation Menu, Settings, Set parameters for risk areas.
Th
e alert volume level is set to minimum. Increase the speed camera alert volume.
Th
e altitude is not displayed. On starting, the initialisation of the GPS may take up to 3 minutes toreceive more than 3 satellites correctly. Wait until the system has started up completely.
Check that there is a GPS coverage of at least
3 satellites (long press on the SETUP button, then select GPS coverage).
Dependin
g on the geographical environment (tunnel...) or the weather,
the conditions of reception of the GPS signal may vary. This phenomenon is normal. The system is
dependent on the conditions of reception of the
GPS signal.
The route is notcalculated successfully.The exclusion criteria may confl ict with the current location (exclusion of
toll roads on a motorway with tolls). Check the exclusion criteria.
Page 237 of 260

9.93
06
1
2
3
4
5
6
7
8
9
10
BLUETOOTH FUNCTIONS
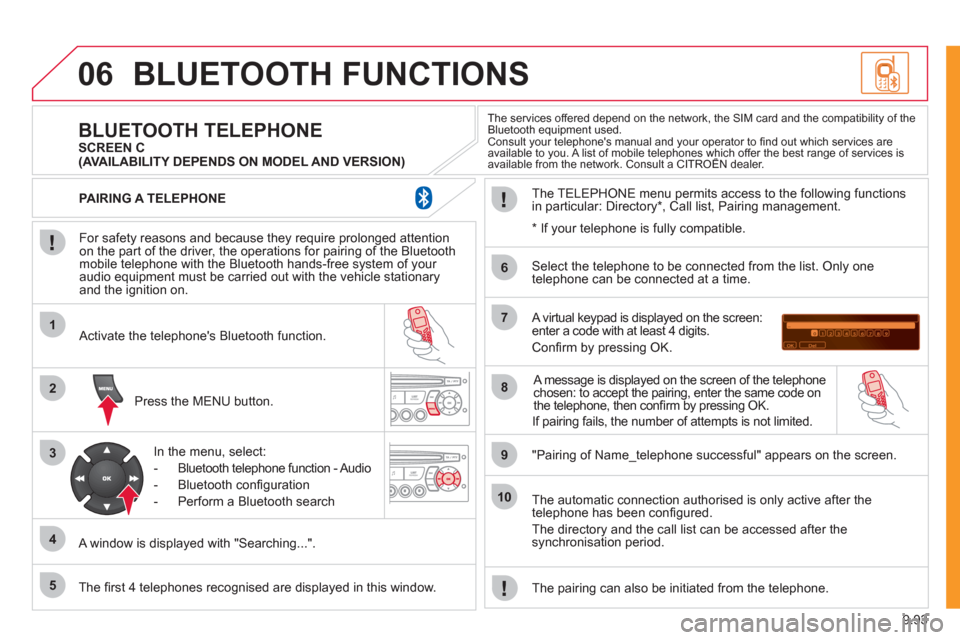
For safety reasons and because they require prolonged attentionon the part of the driver, the operations for pairing of the Bluetooth mobile telephone with the Bluetooth hands-free system of your
audio equipment must be carried out with the vehicle stationary
and the ignition on.
Press the MENU button.
A window is displa
yed with "Searching...".
Activate the telephone's Bluetooth
function.
In the menu, select:
- Bluetooth tele
phone function - Audio
- Bluetooth confi
guration
- P
erform a Bluetooth search
The services offered depend on the network, the SIM card and the compatibility of theBluetooth equipment used.
Consult your telephone's manual and your operator to fi nd out which services are available to you. A list of mobile telephones which offer the best range of services isavailable from the network. Consult a CITROËN dealer. yp
BLUETOOTH TELEPHONE SCREEN C
The TELEPH
ONE menu permits access to the following functions
in particular: Directory * , Call list, Pairing management.
The fi rst 4 telephones reco
gnised are displayed in this window.
A virtual keypad is displayed on the screen: enter a code with at least 4 digits.
Confi rm by pressing OK.
"Pairin
g of Name_telephone successful" appears on the screen.
Select the telephone to be connected from the list.
Only one
telephone can be connected at a time.
A messa
ge is displayed on the screen of the telephone chosen: to accept the pairing, enter the same code on
the telephone, then confi rm by pressing OK.
The automatic connection authorised is onl
y active after the
telephone has been confi gured.
The directory and the call list can be accessed a
fter thesynchronisation period.
PAIRING A TELEPHONE
The pairin
g can also be initiated from the telephone.
(AVAILABILITY DEPENDS ON MODEL AND VERSION)
* If
your telephone is fully compatible.
If pairin
g fails, the number of attempts is not limited.
Page:
< prev 1-8 9-16 17-24