Page 10 of 268
Interior
8
INSTRUMENTS AND CONTROLS
1.
Lights and direction indicator control
stalk.
2.
Instrument panel with screen.
3.
Wipers, screenwash, trip computer
control stalk.
4.
Gear lever.
5.
Ignition.
6.
Audio system controls.
7.
Driver's airbag, horn.
8.
Steering wheel height and reach
adjustment.
9.
Headlamp beam adjustment.
10.
Cruise control, speed limiter
switches.
11 .
12 volt accessory socket (120 W max)
of the cigarette lighter type.
12.
Ashtray.
13.
Glove box, auxiliary socket,
passenger's airbag deactivation
switch.
Page 138 of 268

136
Changing a fuse
CHANGING A FUSE
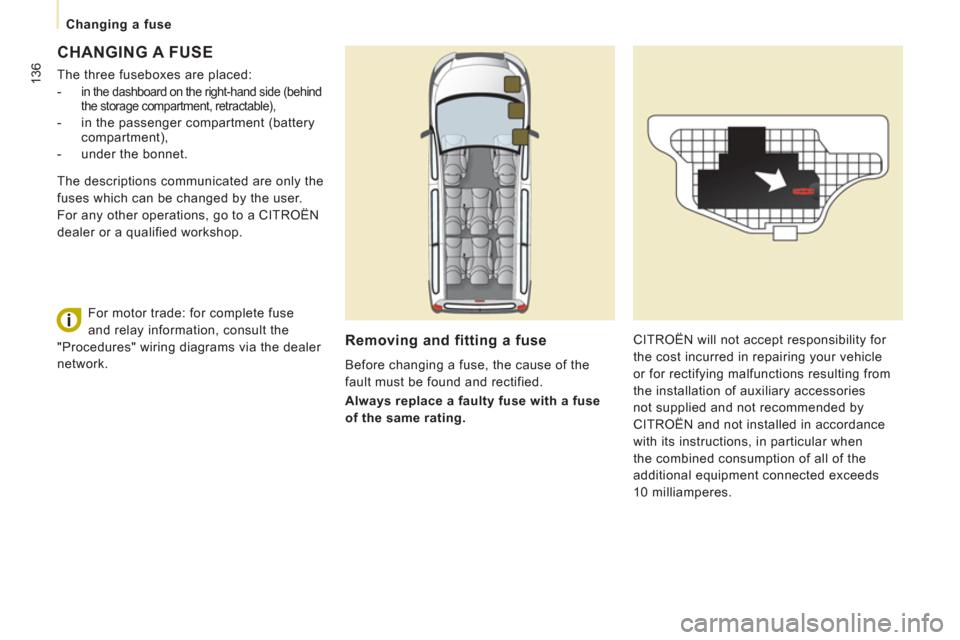
The three fuseboxes are placed:
-
in the dashboard on the right-hand side (behind
the storage compartment, retractable),
- in the passenger compartment (battery
compartment),
- under the bonnet.
Removing and fitting a fuse
Before changing a fuse, the cause of the
fault must be found and rectified.
Always replace a faulty fuse with a fuse
of the same rating. CITROËN will not accept responsibility for
the cost incurred in repairing your vehicle
or for rectifying malfunctions resulting from
the installation of auxiliary accessories
not supplied and not recommended by
CITROËN and not installed in accordance
with its instructions, in particular when
the combined consumption of all of the
additional equipment connected exceeds
10 milliamperes. The descriptions communicated are only the
fuses which can be changed by the user.
For any other operations, go to a CITROËN
dealer or a qualified workshop.
For motor trade: for complete fuse
and relay information, consult the
"Procedures" wiring diagrams via the dealer
network.
Page 156 of 268

9.4
01
2
8
16
18 17
71114 3
59
4 1512 13
61
10
FIRST STEPS
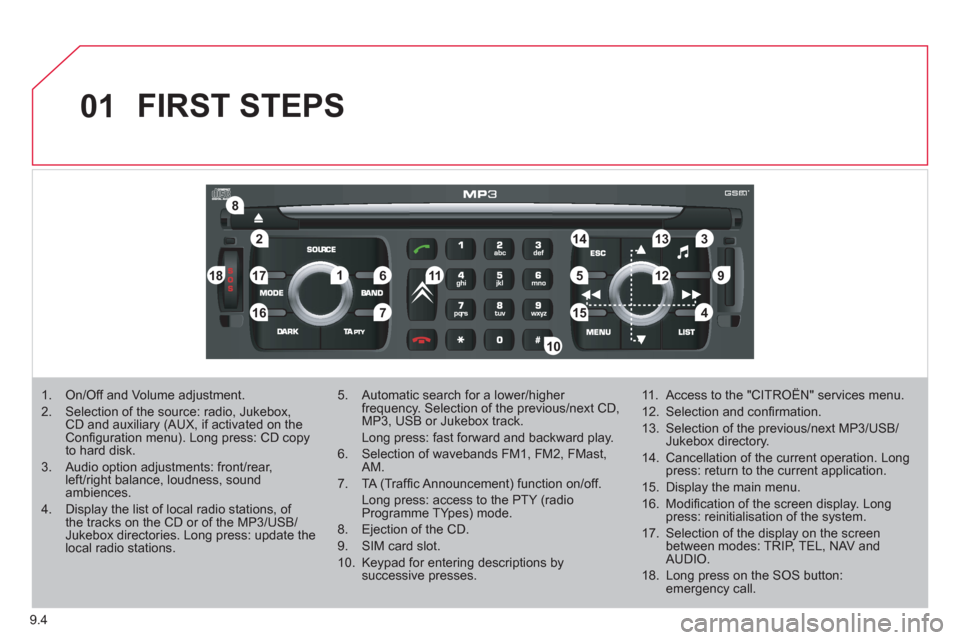
1. On/Off and Volume adjustment.
2. Selection of the source: radio, Jukebox, CD and auxiliary (AUX, if activated on the Confi guration menu). Long press: CD copyto hard disk.
3. Audio option adjustments: front/rear,left/right balance, loudness, sound ambiences.
4. Display the list of local radio stations, of the tracks on the CD or of the MP3/USB/Jukebox directories. Long press: update the local radio stations.
5. Automatic search for a lower/higher frequency. Selection of the previous/next CD, MP3, USB or Jukebox track.
Long press: fast forward and backward play.
6. Selection of wavebands FM1, FM2, FMast,AM.
7. TA (Traffi c Announcement) function on/off.
Long press: access to the PTY (radioProgramme TYpes) mode.
8. Ejection of the CD.
9. SIM card slot.
10. Keypad for entering descriptions by successive presses.
11. Access to the "CITROËN" services menu.
12. Selection and confi rmation.
13. Selection of the previous/next MP3/USB/Jukebox directory.
14. Cancellation of the current operation. Longpress: return to the current application.
15. Display the main menu.
16. Modifi cation of the screen display. Longpress: reinitialisation of the system.
17. Selection of the display on the screen between modes: TRIP, TEL, NAV and AUDIO.
18. Long press on the SOS button: emergency call.
Page 160 of 268
9.8
03SCREEN AND MAIN MENU
For maintenance of thescreen, the use of asoft, non-abrasive cloth(spectacles cloth) isrecommended without anyadditional product.
TRAFFIC INFORMATION:TMC information, messages.
MAP: orientation, details,display.
NAVIGAT ION GUIDANCE:GPS, stages, options.
VEHICLE DIAGNOSTICS:alert log, status of the functions.
VIDEO: activation,parameters.
CONFIGURATION: vehicle, display,time, languages, voice, auxiliarysocket (AUX) parameters.
TELEMATIC: telephone,directory, SMS.
AUDIO FUNCTIONS: radio,CD, Jukebox, options.
Long press on MENU: help.
Page 182 of 268
9.30
06
1
2
AUDIO/VIDEO
Connect the portable device (MP3 player…) to the audio
sockets (white and red, RCA
type) located in the glovebox using a suitable audio cable (JACK or RCA). Press the MENU button then select the "
Confi guration" function,
then "Sounds", then "Activate auxiliary source" to activate the
NaviDrive audio/telephone auxiliary input.
It is not possible to cop
y the fi les onto the hard disk via the auxiliary input.Pr
ess the SOURCE button several
times in succession and select AUX.
USING THE AUXILIARY INPUT (AUX)
AUDIO (JACK/RCA) CABLE NOT SUPPLIED
Displa
y and control is on the portable device.
Page 195 of 268

9.43
10
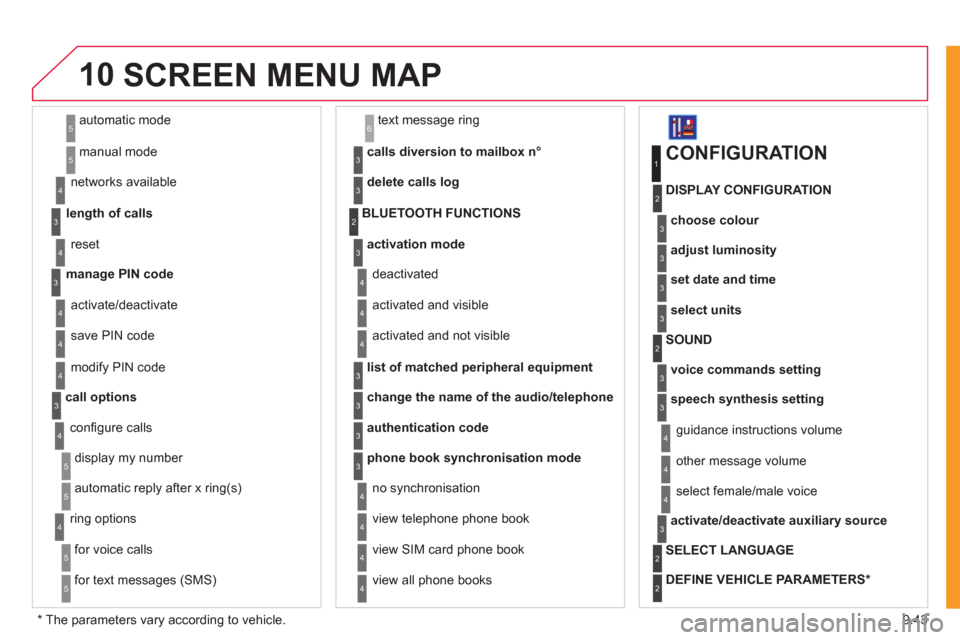
automatic mode
manual mode
5
5
length of calls n
etworks available
3
4
reset 4
manage PIN code3
activate/deactivate
save PIN code 4
4
modify PIN code 4
call options3
confi gure calls
display my number
automatic repl
y after x ring(s)
5
5
4
ring options
for voice calls
for text messa
ges (SMS)
5
5
4
calls diversion to mailbox n°
text message ring 6
3
delete calls log3
activation mode3
BLUETOOTH FUNCTIONS2
deactivated
activated and visible
activated and not visible
4
4
4
list of matched peripheral equipment3
change the name of the audio/telephone3
authentication code3
phone book synchronisation mode3
no synchronisation
view telephone phone book
view
SIM card phone book
4
4
4
view all phone books 4
CONFIGURATION
choose colour
DISPLAY CONFIGURATION
1
2
3
adjust luminosity3
set date and time3
select units3
voice commands setting
SOUND2
3
speech synthesis setting3
guidance instructions volume
ot
her message volume
4
4
select female/male voice 4
activate/deactivate auxiliary source3
SELECT LANGUAGE2
DEFINE VEHICLE PARAMETERS *
2
SCREEN MENU MAP
*
The parameters vary according to vehicle.
Page 220 of 268
9.68
07
43 1
2
MUSIC MEDIA PLAYERS
Connect the portable device(MP3/WMA player…) to the RCA
audio sockets (white and red)using a JACK/RCA audio cable.
Press the M
USIC button then
press it again or select the Music Menu function and press the dial to confi rm.
Select the AUX music source and
press the dial to confi rm. Play beginsautomatically.
Select the "External device" functionand press the dial to activate it.
External device
USING THE EXTERNAL INPUT (AUX)
Music Menu
AUDIO JACK-RCA CABLE NOT SUPPLIED
The display and management of the controls is on the portable device.
Page 242 of 268

9.90
05
1
1
2
3
USB BOX
The system puts together playlists (temporary memory) createdover a period which depends on the capacity of the USB device.
The other sources are available durin
g this time.
The pla
ylists are updated each time the ignition is switched off or each time a USB memory stick is connected.
When connectin
g for the fi rst time, the classifi cation suggested
is by folder. When you reconnect, the classifi cation selected
previously is retained.
Connect the memory stick to the port, directly or using a lead. If the audio equipment is switched
on, the USB source is detected as soon as it
is connected. Play begins automatically after a
delay which depends on the capacity of theUSB memory stick.
The fi le formats reco
gnised are .mp3 (mpeg1 layer 3 only), .wma (standard 9 only,
128 kbits/sec compression), .wav and .ogg.
The playlists types accepted are m
3u, .pls, .wpl.
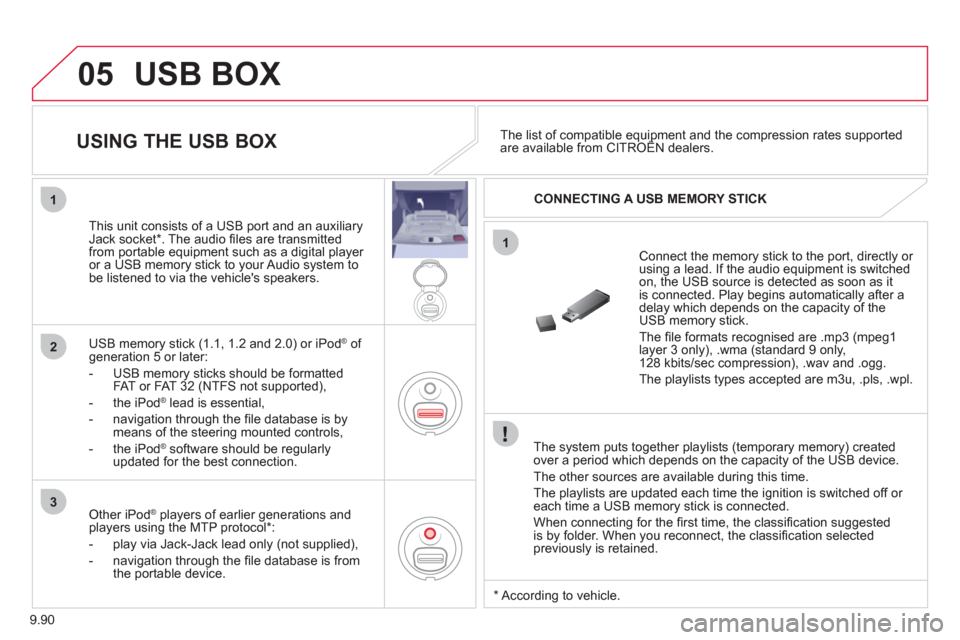
This unit consists o
f a USB port and an auxiliaryJack socket * . The audio fi les are transmitted
from portable equipment such as a digital player
or a USB memory stick to your Audio system tobe listened to via the vehicle's speakers.
U
SB memory stick (1.1, 1.2 and 2.0) or iPod ®of generation 5 or later:
- USB memor
y sticks should be formattedFAT or FAT 32 (NTFS not supported),
- t
he iPod®
lead is essential, ®
- navigation through the fi le database is bymeans of the steering mounted controls,
- th
e iPodÆ
software should be regularlyÆ
updated for the best connection.
The list of compatible equipment and the compression rates supported are available from CITROÀN dealers. pqpp
USING THE USB BOX
CONNECTING A USB MEMORY STICK
Other iPod®
players of earlier generations and®
players using the MTP protocol * :
- pla
y via Jack-Jack lead only (not supplied),
- navi
gation through the fi le database is from
the portable device.
*
Accordin
g to vehicle.