Page 160 of 268
9.8
03SCREEN AND MAIN MENU
For maintenance of thescreen, the use of asoft, non-abrasive cloth(spectacles cloth) isrecommended without anyadditional product.
TRAFFIC INFORMATION:TMC information, messages.
MAP: orientation, details,display.
NAVIGAT ION GUIDANCE:GPS, stages, options.
VEHICLE DIAGNOSTICS:alert log, status of the functions.
VIDEO: activation,parameters.
CONFIGURATION: vehicle, display,time, languages, voice, auxiliarysocket (AUX) parameters.
TELEMATIC: telephone,directory, SMS.
AUDIO FUNCTIONS: radio,CD, Jukebox, options.
Long press on MENU: help.
Page 161 of 268
9.9
03SCREEN AND MAIN MENU
DISPLAY ACCORDING TO
THE CONTEXT
NAVIGATION (IF NAVIGATION IS IN PROGRESS): Pr
ess the OK dial to access short-cut menus according to the display on thescreen.
resume
/stop guidance1
1
1
1
divert route
route type
consult traffi c info
1zoom/scroll map
position info1
1
1
1
select as destination
select as sta
ge
store this position
1exit map mode
1guidance option
IN "ZOOM/SCROLL" MODE
call list1
1
1
1
dial
phone book
voice mail
INTERNAL TELEPHONE
call list1
1
1
1
call
phone book
private mode/hands-free mode
1place call on hold/resume call
BLUETOOTH TELEPHONE
alert log1
1status of functions
VEHICLE DIAGNOSTICS
Page 182 of 268
9.30
06
1
2
AUDIO/VIDEO
Connect the portable device (MP3 player…) to the audio
sockets (white and red, RCA
type) located in the glovebox using a suitable audio cable (JACK or RCA). Press the MENU button then select the "
Confi guration" function,
then "Sounds", then "Activate auxiliary source" to activate the
NaviDrive audio/telephone auxiliary input.
It is not possible to cop
y the fi les onto the hard disk via the auxiliary input.Pr
ess the SOURCE button several
times in succession and select AUX.
USING THE AUXILIARY INPUT (AUX)
AUDIO (JACK/RCA) CABLE NOT SUPPLIED
Displa
y and control is on the portable device.
Page 184 of 268
9.32
07
1
2
1
2
3
INTERNAL TELEPHONE
Install the SIM card
in the holder andthen insert it in theslot.
Open the holder by pressing the buttonusing the tip of a pen.
Your
SIM card must be installed and removed with the NaviDrive
audio and telematics system switched off and the ignition off.
To remove the
SIM card, repeat step 1.
Confi rm the PIN code by pressing
the # button.
Enter the PIN code on the ke
ypad.
When enterin
g your PIN code, tick the "Store PIN" tab to gain
access to the telephone without having to enter this code when
it is used subsequently.
INSTALLING YOUR SIM CARD
(NOT SUPPLIED)
ENTERING THE PIN CODE
PINcode
Page 185 of 268

9.33
07
1
2
3
4
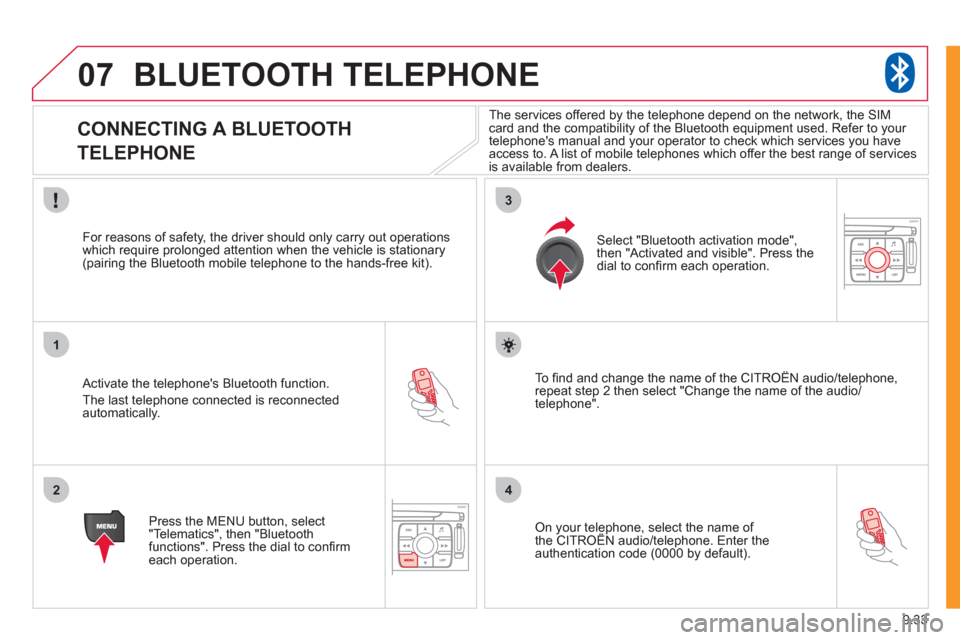
BLUETOOTH TELEPHONE
CONNECTING A BLUETOOTH
TELEPHONE
Activate the telephone's Bluetooth function.
The last telephone connected is reconnectedautomatically.
For reasons o
f safety, the driver should only carry out operations
which require prolonged attention when the vehicle is stationary (pairing the Bluetooth mobile telephone to the hands-free kit).
Press the MENU button, select
"Telematics", then "Bluetoothfunctions". Press the dial to confi rmeach operation.
To fi nd and chan
ge the name of the CITROËN audio/telephone,
repeat step 2 then select "Change the name of the audio/
telephone".
Select "Bluetooth activation mode"
,
then "Activated and visible". Press thedial to confi rm each operation.
On your telephone, select the name of the CITROÀN audio/telephone. Enter the yp,
authentication code (0000 by default).
The services offered b
y the telephone depend on the network, the SIM card and the compatibility of the Bluetooth equipment used. Refer to your
telephone's manual and your operator to check which services you have
access to. A list of mobile telephones which offer the best range of services
is available from dealers.
Page 186 of 268
9.34
07BLUETOOTH TELEPHONE
CONNECTING A BLUETOOTH
TELEPHONE
To change the telephone connected, repeat step 2 then select
"List of matched peripheral equipment" and press OK to confi rm.
The list of previously connected telephones (10 maximum)appears. Select the telephone of your choice, confi rm,
then select "Connect" and press the dial to confi rm.
To chan
ge the authentication code, repeat step 2 then select
"Authentication code" and save the code of your choice.
The call list consists o
f calls made from the vehicle's telephoneonly.
Once the telephone has been connected, the system can synchronise the address book and the call list. Repeat step 2then select "Phone book synchronisation mode". Select thesynchronisation of your choice and press the dial to confi rm.
The s
ynchronisation may take a few minutes.
Page 187 of 268

9.35
07
1
2
4
3
6
5
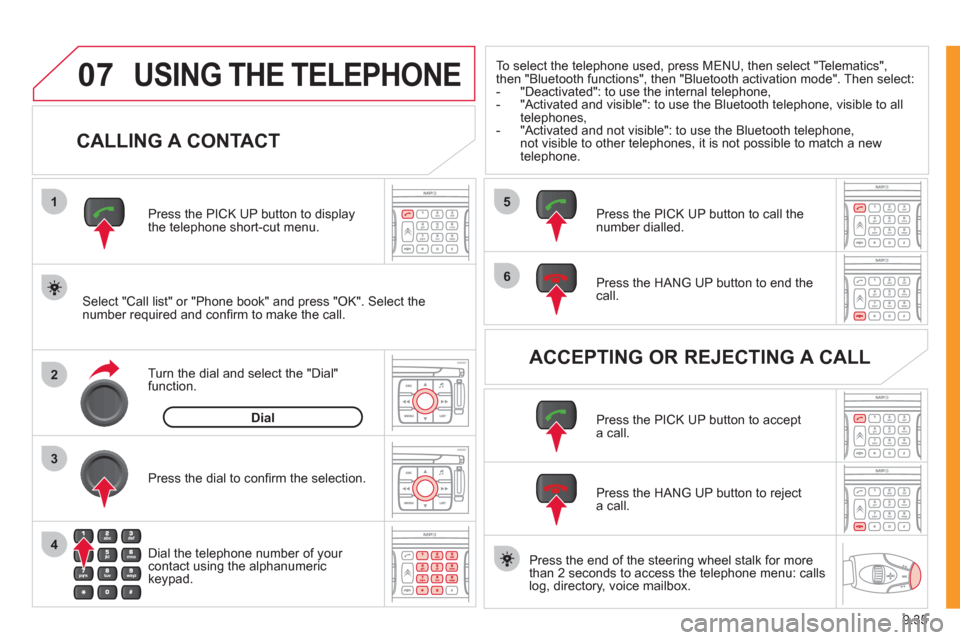
USING THE TELEPHONE
CALLING A CONTACT
Select "Call list" or "Phone book" and press "OK". Select thenumber required and confi rm to make the call. Press the PICK UP button to displa
ythe telephone short-cut menu.
Dial the telephone number of
your contact using the alphanumeric keypad. Pr
ess the dial to confi rm the selection.
Press the HAN
G UP button to end the call.
Press the PI
CK UP button to call thenumber dialled.
Press the HANG UP button to re
ject a call.
Press the PI
CK UP button to accept a call.
ACCEPTING OR REJECTING A CALL Turn the dial and select the "Dial" function.
Dial
To select the telephone used, press MENU, then select "Telematics",
then "Bluetooth
functions", then "Bluetooth activation mode". Then select:
- "Deactivated": to use the internal telephone,
- "Activated and visible": to use the Bluetooth telephone, visible to all
telephones,
-
"Activated and not visible": to use the Bluetooth telephone, not visible to other telephones, it is not possible to match a new
telephone.
Press the end of the steerin
g wheel stalk for more
than 2 seconds to access the telephone menu: calls
log, directory, voice mailbox.
Page 194 of 268
9.42
10
playlist management
hi-fi (320 kbps)
delete
jukebox data
Jukebox status
high (192 kbps)
normal
(128 kbps)
3
3
3
4
4
4
TELEMATICS
call list
CALL
1
2
3
dial3
directory3
mailbox3
services3
customer contact centre4
CITROËN assistance
CITROËN service
messa
ges received
4
4
4
managing directory fi les3
DIRECTORY 2
consult or modify a fi le
add a fi le
delete a fi le
4
4
4
confi gure directory
delete all fi les
3
4
select a directory
name director
y 4
4
fi le transfer select startin
g directory
3
4
exchange by infrared
send all records
send one record
receive by infrared
5
5
5
4
exchange with SIM card
send all records to
SIM
send one record to SIM
5
5
4
receive all SIM fi les
receive a
SIM fi le
5
5
exchange with Bluetooth
4
read received text messages
TEXT MESSAGES
(SMS)2
3
send a text message3
write a text message3
delete list of text messages3
network
TELEPHONE FUNCTIONS 2
3
network search mode 4
SCREEN MENU MAP
jukebox confi guration3