2011 CHRYSLER TOWN AND COUNTRY Ground
[x] Cancel search: GroundPage 59 of 100

RECREATIONAL TOWING (BEHIND
MOTORHOME, ETC.)NOTE: If the vehicle requires towing, make
sure all four wheels are off the ground.
CAUTION!
Towing this vehicle behind another
vehicle (flat-towing with all four wheels on
the ground) is not recommended.
UTILITY
57
Page 68 of 100

• Block both the front and rear of the wheeldiagonally opposite the jacking position. For
example, if changing the right front tire,
block the left rear wheel.
NOTE: Passengers should not remain in the
vehicle when the vehicle is being jacked.
Jacking Instructions
NOTE: Refer to the “Compact Spare Tire” section of “Tires – General Information” for
information about the spare tire, its use, and operation.
1. Loosen (but do not remove) the wheel lug nuts by turning them to the left one turn while the wheel is still on the ground.
2. There are two jack engagement locations on each side of the vehicle body. These locations are on the sill flange of the vehicle body.
Rear jack locations are between a pair of down-facing tabs on the sill flange of the vehicle side
body.
Front jack location is on the sill flange of the
vehicle body and is located 6 in (150 mm) from
door edge.
WHAT TO DO IN EMERGENCIES
66
Page 70 of 100

3. Turn the compact spare tire so that the valve stem is down, and place the tire into the sparetire/cover assembly. Slide the wheel spacer through the center of the wheel and spare
tire/cover assembly, so that the two retainer tabs snap out and engage the spare tire cover on
the opposite side.
4. Using the winch T-handle, rotate the drive nut to the right until the compact spare tire/cover assembly is drawn into place against the underside of the vehicle.
5. Continue to rotate the nut to the right until you hear the winch mechanism click three times. It cannot be overtightened. Check under the vehicle to ensure the compact spare tire/cover
assembly is positioned correctly against the underside of the vehicle.
Road Tire Installation
Vehicles Equipped With Wheel Covers
1. Mount the road tire on the axle.
2. To ease the installation process for steel wheels with wheel covers, install two lug nuts on the mounting studs which are on each side of the valve stem. Install the lug nuts with the cone
shaped end of the nut toward the wheel. Lightly tighten the lug nuts.
3. Align the valve notch in the wheel cover with the valve stem on the wheel. Install the cover by hand, snapping the cover over the two lug nuts. Do not use a hammer or excessive force to
install the cover.
4. Install the remaining lug nuts with the cone shaped end of the nut toward the wheel. Lightly tighten the lug nuts. To avoid the risk of forcing the vehicle off the jack, do not tighten the lug
nuts fully until the vehicle is lowered to the ground.
5. Lower the vehicle to the ground by turning the jack handle counterclockwise.
6. Finish tightening the lug nuts. Push down on the wrench while at the end of the handle for increased leverage. Tighten the lug nuts in a star pattern until each nut has been tightened
twice. The correct tightness of each lug nut is 102 ft/lbs (138 N·m). If in doubt about the
correct tightness, have them checked with a torque wrench by your authorized dealer or
service station.
7. After 25 miles (40 km) check the lug nut torque with a torque wrench to ensure that all lug nuts are properly seated against the wheel.
Vehicles Without Wheel Covers 1. Mount the road tire on the axle.
2. Install the remaining lug nuts with the cone shaped end of the nut toward the wheel. Lightly tighten the lug nuts.
3. Lower the vehicle to the ground by turning the jack handle counterclockwise.
4. Finish tightening the lug nuts. Push down on the wrench while at the end of the handle for increased leverage. Tightening the lug nuts in a star pattern until each nut has been tightened
twice. The correct tightness of each lug nut is 102 ft/lbs (138 N·m). If in doubt about the
correct tightness, have them checked with a torque wrench by your authorized dealer or
service station.
5. After 25 miles (40 km) check the lug nut torque with a torque wrench to ensure that all lug nuts are properly seated against the wheel. WHAT TO DO IN EMERGENCIES
68
Page 72 of 100

WARNING!(Continued)
• Do not get under the vehicle when it is on a jack.
• Only use the jack in the positions indicated and for lifting this vehicle during a tirechange.
• If working on or near a roadway, be extremely careful of motor traffic.
• To assure that spare tires, flat or inflated, are securely stowed, spares must be stowed with the valve stem facing the ground.
• Getting under a jacked-up vehicle is dangerous. The vehicle could slip off the jack and fall on you. You could be crushed. Never get any part of your body under a vehicle that is
on a jack. If you need to get under a raised vehicle, take it to a service center where it can
be raised on a lift.
• Raising the vehicle higher than necessary can make the vehicle less stable. It could slip off the jack and hurt someone near it. Raise the vehicle only enough to remove the tire.
• To avoid the risk of forcing the vehicle off the jack, do not tighten the lug nuts fully until the vehicle has been lowered.
• A loose tire or jack thrown forward in a collision or hard stop could endanger the occupants of the vehicle. Always stow the jack parts and the spare tire in the places
provided. Have the deflated (flat) tire repaired or replaced immediately.
• A loose compact spare tire/cover assembly, thrown forward in a collision or hard stop could endanger the occupants of the vehicle. Alway s stow the compact spare tire with
the cover assembly in the place provided.
• Verify that both retainer tabs of the wheel spacer have been properly extended through the center of the wheel and spare tire/cover assembly. Failure to properly engage both
retainer tabs could result in loss of the spare tire and cover assembly, which will cause
vehicle damage and may cause loss of vehicle control.
• To avoid the risk of forcing the vehicle off the jack, do not tighten the lug nuts fully until the vehicle is lowered to the ground.
JUMP-STARTING
• If your vehicle has a discharged battery it canbe jump-started using a set of jumper cables
and a battery in another vehicle or by using a
portable battery booster pack.
• Jump-starting can be dangerous if done improperly so please follow the procedures in
this section carefully.
NOTE: When using a portable battery
booster pack follow the manufacturer’s
operating instructions and precautions.
WHAT TO DO IN EMERGENCIES
70
Page 73 of 100

Preparations for Jump-Start
• The battery in your vehicle is located on the left side of the engine compartment.
• Set the parking brake, shift the automatic transmission into PARK and turn the ignition toLOCK.
• Turn off the heater, radio, and all unnecessary electrical accessories.
• If using another vehicle to jump-start the battery, park the vehicle within the jumper cables reach, set the parking brake and make sure the ignition is OFF.
Jump-Starting Procedure
• Connect the positive (+)end of the jumper cable to the positive (+)post of the discharged
vehicle.
• Connect the opposite end of the positive (+)jumper cable to the positive (+)post of the
booster battery.
• Connect the negative end (-)of the jumper cable to the negative (-)post of the booster
battery.
• Connect the opposite end of the negative (-)jumper cable to a good engine ground (exposed
metal part of the discharged vehicle's engine) away from the battery and fuel injection system.
• Start the engine in the vehicle that has the booster battery, let the engine idle a few minutes, and then start the engine in the vehicle with the discharged battery.
Once the engine is started, remove the jumper cables in the reverse sequence:
• Disconnect the negative (-)jumper cable from the negative (-)post of the vehicle with the
discharged battery.
• Disconnect the negative end (-)of the jumper cable from the negative (-)post of the booster
battery.
• Disconnect the opposite end of the positive (+)jumper cable from the positive (+)post of the
booster battery.
• Disconnect the positive (+)end of the jumper cable from the positive (+)post of the
discharged vehicle.
• If frequent jump-starting is required to start your vehicle you should have the battery and charging system inspected at your authorized dealer.
CAUTION!
• Do not use a portable battery booster pack or any other booster source with a systemvoltage greater than 12 Volts or damage to the battery, starter motor, alternator or
electrical system may occur.
• Failure to follow these procedures could result in damage to the charging system of the booster vehicle or the discharged vehicle.
• Accessories that can be plugged into the vehicle power outlets draw power from the vehicle’s battery, even when not in use (i.e., cellular phones, etc.). Eventually, if plugged
in long enough, the vehicle’s battery will discharge sufficiently to degrade battery life
and/or prevent the engine from starting.
WHAT TO DO IN EMERGENCIES
71
Page 74 of 100

WARNING!
• When temperatures are below the freezing point, electrolyte in a discharged battery mayfreeze. Do not attempt jump-starting because the battery could rupture or explode and
cause personal injury. Battery temperature must be brought above freezing point before
attempting a jump-start.
• Take care to avoid the radiator cooling fan whenever the hood is raised. It can start anytime the ignition switch is on. You can be injured by moving fan blades.
• Remove any metal jewelry, such as watch bands or bracelets, that might make an inadvertent electrical contact. You could be severely injured.
• Batteries contain sulfuric acid that can burn your skin or eyes and generate hydrogen gas which is flammable and explosive. Keep open flames or sparks away from the battery.
• Do not allow vehicles to touch each other as this could establish a ground connection and personal injury could result.
• Failure to follow this procedure could result in personal injury or property damage due to battery explosion.
• Do not connect the cable to the negative post (-)of the discharged battery. The
resulting electrical spark could cause the battery to explode and could result in personal
injury.
SHIFT LEVER OVERRIDE
• If a malfunction occurs and the shift levercannot be moved out of the PARK position,
you can use the following procedure to
temporarily move the shift lever:
• To access the shift lever override, remove the cover located to the top right of the
shift lever in the instrument panel.
• Firmly set the parking brake.
• Turn the ignition switch to the ACC or ON position without starting the engine.
• Press and maintain firm pressure on the brake pedal.
• The override can be activated by pressing the white-colored tab, which can be
accessed through the hole in the
instrument panel.
• Move the shift lever into the NEUTRAL position.
• The vehicle may then be started in NEUTRAL.
• Reinstall the override cover.
WHAT TO DO IN EMERGENCIES
72
Page 75 of 100
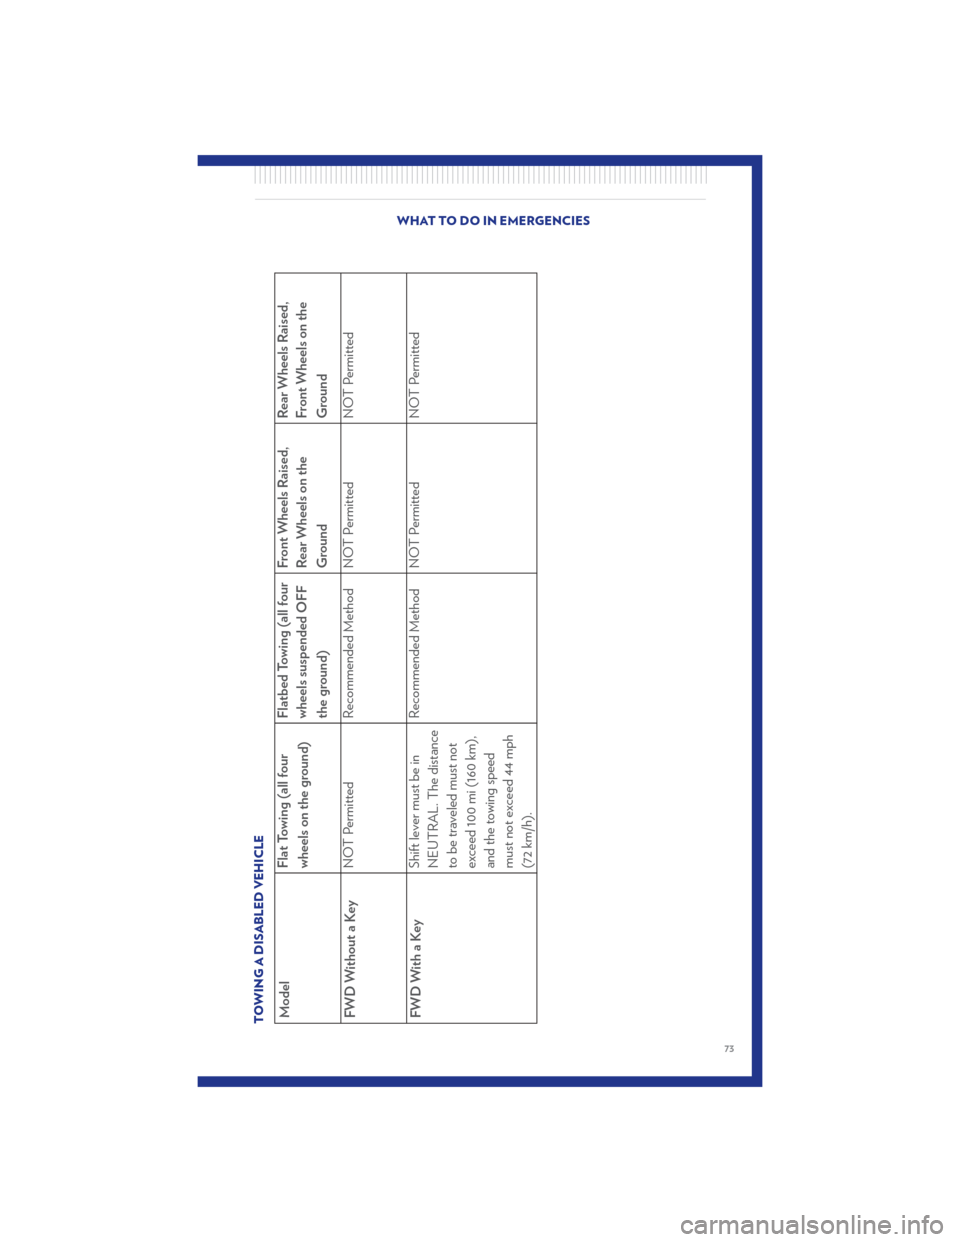
TOWING A DISABLED VEHICLEModelFlat Towing (all four
wheels on the ground)Flatbed Towing (all four
wheels suspended OFF
the ground)Front Wheels Raised,
Rear Wheels on the
GroundRear Wheels Raised,
Front Wheels on the
Ground
FWD Without a Key NOT Permitted Recommended Method NOT Permitted NOT Permitted
FWD With a Key Shift lever must be in
NEUTRAL. The distance
to be traveled must not
exceed 100 mi (160 km),
and the towing speed
must not exceed 44 mph
(72 km/h).Recommended Method NOT Permitted NOT Permitted
WHAT TO DO IN EMERGENCIES
73
Page 79 of 100

CAUTION!
• Damage to the fuel system or emissions control system could result from using an
improper gas cap. A poorly fitting cap could let impurities into the fuel system and may
cause the MIL to turn on, due to fuel vapors escaping from the system.
• To avoid fuel spillage and overfilling, do not “top off ” the fuel tank after filling.
WARNING!
• Never have any smoking materials lit in or near the vehicle when the gas cap is removed
or the tank filled.
• Never add fuel when the engine is running. This is in violation of most state and federal
fire regulations and will cause the MIL to turn on.
• A fire may result if gasoline is pumped into a portable container that is inside of a vehicle.
You could be burned. Always place gas containers on the ground while filling.
MAINTAINING YOUR VEHICLE
77