Page 97 of 573

you make sure that you can install the child restraint in
the vehicle where you will use it, before you buy it.
•The restraint must be appropriate for your child’s
weight and height. Check the label on the restraint for
weight and height limits.
•Carefully follow the instructions that come with the
restraint. If you install the restraint improperly, it may
not work when you need it.
•Buckle the child into the seat according to the child
restraint manufacturer’s directions.
WARNING!
When your child restraint is not in use, secure it in
the vehicle with the seat belt or remove it from the
vehicle. Do not leave it loose in the vehicle. In a
sudden stop or accident, it could strike the occupants
or seatbacks and cause serious personal injury.
Installing The Child Restraint System
We urge you to carefully follow the directions of the
manufacturer when installing your child restraint. Many,
but not all, restraint systems will be equipped with
separate straps on each side, with each having a hook or
connector, and a means for adjusting the tension in the
strap. Forward-facing toddler restraints and some
rearward-facing infant restraints will also be equipped
with a tether strap, a hook and means for adjusting the
tension in the strap. Not all child restraint systems will be
installed as described here. Again, carefully follow the
installation instructions that are provided with the child
restraint system.
In general, you will first loosen the child seat adjusters on
the lower straps and tether straps so that you can more
easily attach the hook or connector to the lower anchor-
ages and tether anchorages. Then tighten all three straps
as you push the child restraint rearward and downward
into the seat.
94 THINGS TO KNOW BEFORE STARTING YOUR VEHICLE
Page 135 of 573

Power Seats — If Equipped
Some models may be equipped with eight-way power seats
for the driver and front passenger. The power seat switches
are located on the outboard side of the seat. The switches
control the movement of the seat cushion and the seatback.
Adjusting The Seat Forward Or Rearward
The seat can be adjusted both forward and rearward.
Push the seat switch forward or rearward, the seat will
move in the direction of the switch. Release the switch
when you have reached the desired position.
Adjusting The Seat Up Or Down
The height of the seats can be adjusted up or down. Pull
upward or push downward on the seat switch, the seat
will move in the direction of the switch. Release the
switch when the desired position has been reached.
Tilting The Seat Up Or Down
The angle of the seat cushion can be adjusted in four
directions. Pull upward or push downward on the front
or rear of the seat switch, the front or rear of the seat
cushion will move in the direction of the switch. Release
the switch when the desired position has been reached.
Driver Power Seat Switch
1 — Seat Switch2 — Seatback Switch
132 UNDERSTANDING THE FEATURES OF YOUR VEHICLE
Page 241 of 573
 of driving for the leveling
to complete depending on")
A hydraulic pump contained within the shock absorbers
raises the rear of the vehicle to the correct height. It takes
approximately 1 mile (1.6 km) of driving for the leveling
to complete depending on road surface conditions.
If the leveled vehicle is not moved for approximately
15 hours, the leveling system will bleed itself down. The
vehicle must be driven to reset the system.
ROOF LUGGAGE RACK — IF EQUIPPED
The crossbars on your vehicle are delivered stowed
within the roof rack side rails. If adding cargo, deploy the
crossbars. Distribute cargo weight evenly on the roof rack
crossbars, to maximum of 150 lbs (68 kg). The roof rack
does not increase the total load carrying capacity of the
vehicle. Be sure the total load of cargo inside the vehicle
plus that on the external rack does not exceed the
maximum vehicle load capacity.The crossbars and side rails are designed to carry weight
on vehicles equipped with a luggage rack. The load must
not exceed 150 lbs (68 kg), and should be uniformly
distributed over the luggage rack crossbars.
Crossbar Stowed In Side Rail
238 UNDERSTANDING THE FEATURES OF YOUR VEHICLE
Page 390 of 573
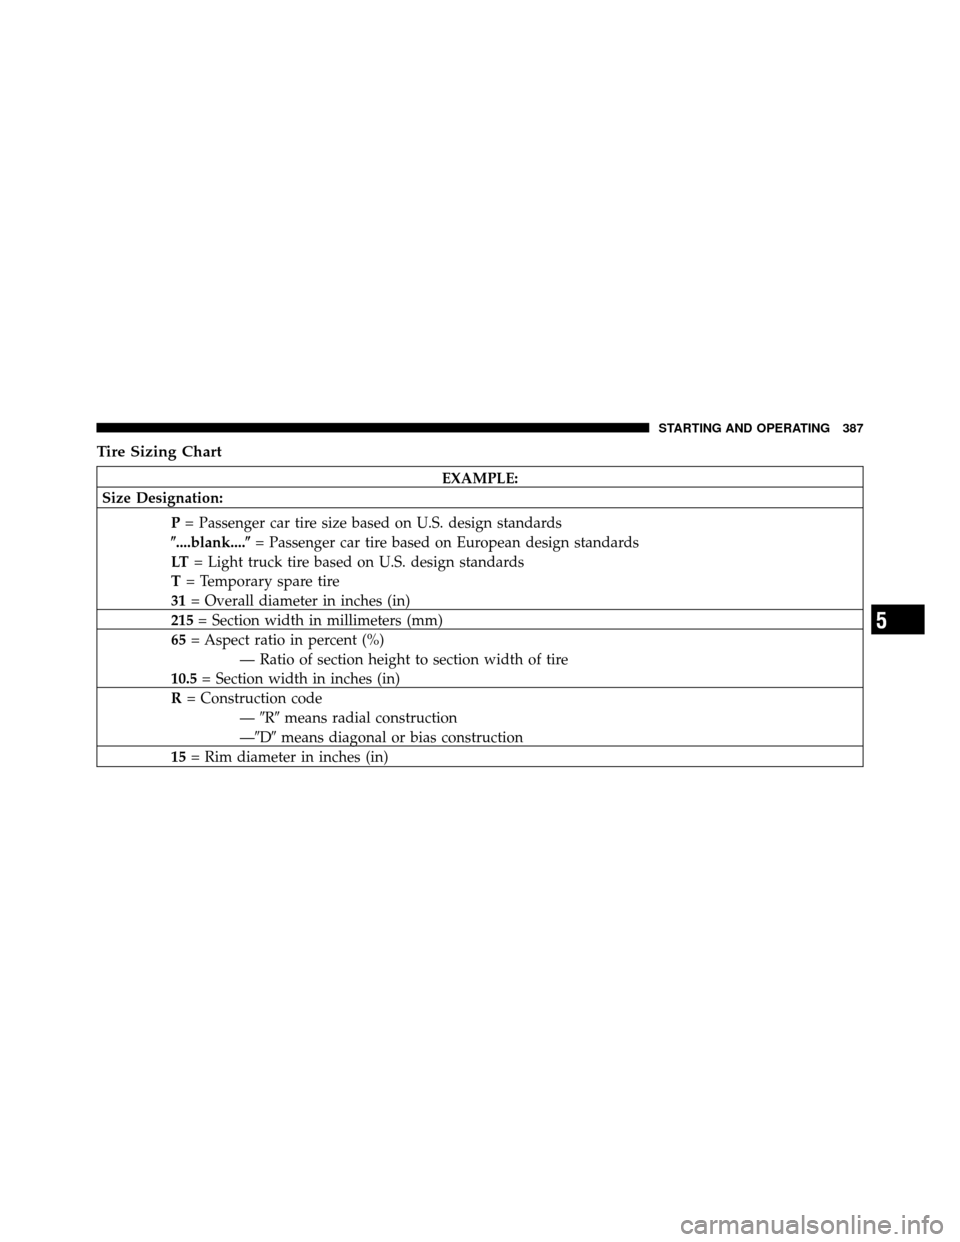
Tire Sizing Chart
EXAMPLE:
Size Designation:
P= Passenger car tire size based on U.S. design standards
�....blank....� = Passenger car tire based on European design standards
LT = Light truck tire based on U.S. design standards
T = Temporary spare tire
31 = Overall diameter in inches (in)
215 = Section width in millimeters (mm)
65 = Aspect ratio in percent (%)
— Ratio of section height to section width of tire
10.5 = Section width in inches (in)
R = Construction code
—�R� means radial construction
—�D� means diagonal or bias construction
15 = Rim diameter in inches (in)
5
STARTING AND OPERATING 387
Page 434 of 573

The GCWR is the total permissible weight of your vehicle
and trailer when weighed in combination.
NOTE:The GCWR rating includes a 150 lbs (68 kg)
allowance for t")
Gross Combination Weight Rating (GCWR)
The GCWR is the total permissible weight of your vehicle
and trailer when weighed in combination.
NOTE:The GCWR rating includes a 150 lbs (68 kg)
allowance for the presence of a driver.
Gross Axle Weight Rating (GAWR)
The GAWR is the maximum capacity of the front and rear
axles. Distribute the load over the front and rear axles
evenly. Make sure that you do not exceed either front or
rear GAWR. Refer to “Vehicle Loading/Vehicle Certifica-
tion Label” in “Starting and Operating” for further
information.
WARNING!
It is important that you do not exceed the maximum
front or rear GAWR. A dangerous driving condition
can result if either rating is exceeded. You could lose
control of the vehicle and have a collision.
Trailer Tongue Weight (TW)
The TW is the downward force exerted on the hitch ball
by the trailer. In most cases it should not be less than 10%
or more than 15% of the trailer load. You must consider
this as part of the load on your vehicle.
Frontal Area
The frontal area is the maximum height multiplied by the
maximum width of the front of a trailer.
Trailer Sway Control
The trailer sway control is a telescoping link that can be
installed between the hitch receiver and the trailer tongue
that typically provides adjustable friction associated with
the telescoping motion to dampen any unwanted trailer
swaying motions while traveling.
Weight-Carrying Hitch
A weight-carrying hitch supports the trailer tongue
weight, just as if it were luggage located at a hitch ball or
some other connecting point of the vehicle. This type of
5
STARTING AND OPERATING 431