Page 100 of 573
LATCH Anchorages (Second Row Anchorages Shown)LATCH Anchorages
(Third Row 60/40 Anchorages Shown)
2
THINGS TO KNOW BEFORE STARTING YOUR VEHICLE 97
Page 102 of 573
WARNING!
An incorrectly anchored tether strap could lead to
increased head motion and possible injury to the
child. Use only the anchor positions directly behind
the child seat to secure a child restraint top tether
strap.
Installing The Child Restraint Using The Vehicle
Seat Belts
The seat belts in the passenger seating positions are
equipped with an Automatic Locking Retractor to secure
a Child Restraint System (CRS). These types of seat belts
are designed to keep the lap portion of the seat belt tight
around the child restraint so that it is not necessary to use
a locking clip. The ALR will make a ratcheting noise if
you extract the entire belt from the retractor and then
allow the belt to retract into the retractor. For additional
information on ALR, refer to “Automatic Locking Mode”
LATCH Anchorages
(Third Row 60/40 Anchorage Shown)
2
THINGS TO KNOW BEFORE STARTING YOUR VEHICLE 99
Page 103 of 573
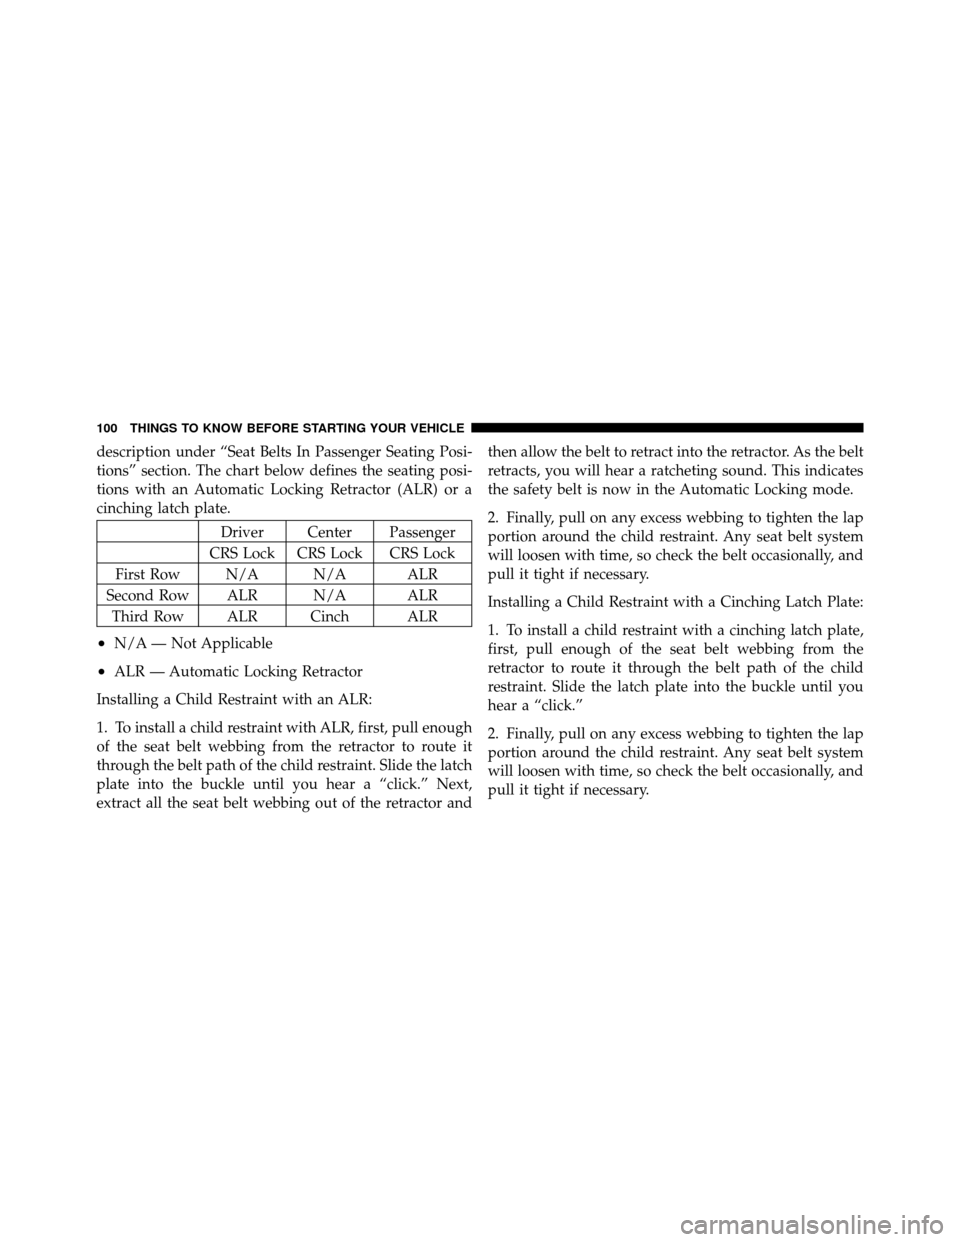
description under “Seat Belts In Passenger Seating Posi-
tions” section. The chart below defines the seating posi-
tions with an Automatic Locking Retractor (ALR) or a
cinching latch plate.
Driver Center Passenger
CRS Lock CRS Lock CRS Lock
First Row N/A N/A ALR
Second Row ALR N/A ALR Third Row ALR Cinch ALR
•N/A — Not Applicable
•ALR — Automatic Locking Retractor
Installing a Child Restraint with an ALR:
1. To install a child restraint with ALR, first, pull enough
of the seat belt webbing from the retractor to route it
through the belt path of the child restraint. Slide the latch
plate into the buckle until you hear a “click.” Next,
extract all the seat belt webbing out of the retractor and then allow the belt to retract into the retractor. As the belt
retracts, you will hear a ratcheting sound. This indicates
the safety belt is now in the Automatic Locking mode.
2. Finally, pull on any excess webbing to tighten the lap
portion around the child restraint. Any seat belt system
will loosen with time, so check the belt occasionally, and
pull it tight if necessary.
Installing a Child Restraint with a Cinching Latch Plate:
1. To install a child restraint with a cinching latch plate,
first, pull enough of the seat belt webbing from the
retractor to route it through the belt path of the child
restraint. Slide the latch plate into the buckle until you
hear a “click.”
2. Finally, pull on any excess webbing to tighten the lap
portion around the child restraint. Any seat belt system
will loosen with time, so check the belt occasionally, and
pull it tight if necessary.
100 THINGS TO KNOW BEFORE STARTING YOUR VEHICLE
Page 112 of 573
Periodic Safety Checks You Should Make Outside
The Vehicle
Tires
Examine tires for excessive tread wear and uneven wear
patterns. Check for stones, nails, glass, or other objects
lodged in the tread or sidewall. Inspect the tread for cuts
and cracks. Inspect sidewalls for cuts, cracks and bulges.
Check the wheel nuts for tightness. Check the tires
(including spare) for proper cold inflation pressure.
Lights
Have someone observe the operation of exterior lights
while you work the controls. Check turn signal and high
beam indicator lights on the instrument panel.
Door Latches
Check for positive closing, latching, and locking.
Fluid Leaks
Check area under vehicle after overnight parking for fuel,
engine coolant, oil, or other fluid leaks. Also, if gasoline
fumes are detected or if fuel, power steering fluid, or
brake fluid leaks are suspected, the cause should be
located and corrected immediately.2
THINGS TO KNOW BEFORE STARTING YOUR VEHICLE 109
Page 140 of 573
to one, indicating the change. The LOW-level setting will
turn OFF automatically after approximately 45 minutes.
Manual Front/Second Row Seat Adjuster
Both front seats are adjustable forward or rearward. The
manual seat adjustment handle is located under the seat
cushion at the front edge of each seat.While sitting in the seat, pull up on the handle and slide
the seat forward or rearward. Release the bar once you
have reached the desired position. Then, using body
pressure, move forward and rearward on the seat to be
sure that the seat adjusters have latched.
WARNING!
•Adjusting a seat while driving may be dangerous.
Moving a seat while driving could result in loss of
control which could cause a collision and serious
injury or death.
•Seats should be adjusted before fastening the seat
belts and while the vehicle is parked. Serious
injury or death could result from a poorly adjusted
seat belt.
Manual Seat Adjuster
3
UNDERSTANDING THE FEATURES OF YOUR VEHICLE 137
Page 141 of 573
Manual Reclining Seats — If Equipped
For models equipped with manual reclining seats, the
recline lever is located on the outboard side of the seat.To recline, lean forward slightly, lift the lever, then push
back to the desired position and release the lever. Lean
forward and lift the lever to return the seatback to its
normal position. Using body pressure, lean forward and
rearward on the seat to be sure the seatback has latched.
WARNING!
Do not ride with the seatback reclined so that the
shoulder belt is no longer resting against your chest.
In a collision you could slide under the seat belt,
which could result in serious injury or death.
Head Restraints
Head restraints are designed to reduce the risk of injury
by restricting head movement in the event of a rear
impact. Head restraints should be adjusted so that the top
of the head restraint is located above the top of your ear.
Manual Recline Lever
138 UNDERSTANDING THE FEATURES OF YOUR VEHICLE
Page 146 of 573
Head Restraints — Third Row
The head restraint in the center position can be raised and
lowered for tether routing. Refer to “Occupant Re-
straints” in “Things To Know Before Starting Your Ve-
hicle” for further information.
Stow ’n Go�Seating — If Equipped
On vehicles equipped with Stow ’n Go� seating, the
second and third row seats can be folded into the floor for
convenient storage.
Second Row Stow ’n Go�
On vehicles equipped with Stow ’n Go� seats, the seats
will fold and tumble in one motion.
1. Move the front seat fully forward.
2. Recline the front seatback fully forward.
3. Raise the armrests on the second row seat. NOTE:
Seat will not stow in the storage bin unless the
armrests are raised.
4. Slide the storage bin locking mechanism to the
“LOCK” position and then pull up on the storage bin
latch to open the cover.
Storage Bin Cover Lock Release
3
UNDERSTANDING THE FEATURES OF YOUR VEHICLE 143
Page 149 of 573
6. Push the seat into the storage bin.
7. Close the storage bin cover.CAUTION!
The storage bin cover must be locked and flat to
avoid damage from contact with the front seat tracks,
which have minimal clearance to the cover.
WARNING!
In a collision, serious injury could result if the seat
storage bin covers are not properly latched.
•Do not drive the vehicle with the storage bin
covers open.
•Keep the storage bin covers closed and latched
while the vehicle is in motion.
•Do not use a storage bin latch as a tie down.
Seat In Storage Bin
146 UNDERSTANDING THE FEATURES OF YOUR VEHICLE


