Page 293 of 573
highlighted, then press and release the SELECT button
until a check-mark appears next to the setting, showing
that the setting has been selected.
Illuminated Approach
When this feature is selected, the headlights will activate
and remain on for up to 90 seconds when the doors are
unlocked with the RKE transmitter. To make your selec-
tion, scroll up or down until the preferred setting is
highlighted, then press and release the SELECT button
until a check-mark appears next to the setting, showing
that the setting has been selected.
Flashers with Sliding Door
When this feature is selected the signal lamps activate
when power or manual sliding doors are in operation,
signaling other drivers that someone may be exiting or
entering the vehicle. To make your selection, press and
release the SELECT button until a check-mark appearsnext to the feature showing the system has been activated
or the check-mark is removed showing the system has
been deactivated.
Keyless Enter-N-Go (Passive Entry)
This feature allows you to lock and unlock the vehicle’s
door(s) without having to press the RKE transmitter lock
or unlock buttons. To make your selection, press and
release the SELECT button until a check-mark appears
next to the feature showing the system has been activated
or the check-mark is removed showing the system has
been deactivated. Refer to “Keyless Enter-N-Go” in
“Things To Know Before Starting Your Vehicle”.
Easy Exit Seat
This feature provides automatic driver seat positioning to
enhance driver mobility when entering and exiting the
vehicle. To make your selection, press and release the
SELECT button until a check-mark appears next to the
290 UNDERSTANDING YOUR INSTRUMENT PANEL
Page 294 of 573

feature showing the system has been activated or the
check-mark is removed showing the system has been
deactivated.
NOTE:The seat will return to the memorized seat
location (if Recall Memory with Remote Key Unlock is set
to ON) when the RKE transmitter is used to unlock the
door. Refer to “Driver Memory Seat” in “Understanding
The Features Of Your Vehicle” for further information.
Tilt Mirror In Reverse
When this feature is selected and the vehicle is placed in
a reverse gear, the driver’s side mirror will tilt downward
to allow the driver to see into the previous blind spot and
avoid objects in close proximity to the rear of the vehicle.
To make your selection, press and release the SELECT
button until a check-mark appears next to the feature
showing the system has been activated or the check-mark
is removed showing the system has been deactivated.
Blind Spot Alert
There are three selections when operating Blind Spot
Alert (“Blind Spot Alert Lights”, “Blind Spot Alert
Lights/CHM”, “Blind Spot Alert Off”). The Blind Spot
Alert feature can be activated in “Blind Spot Alert Lights”
mode, when this mode is selected the Blind Spot Monitor
(BSM) system is activated and will only show a visual
alert in the outside mirrors. The Blind Spot Alert feature
can be activated in “Blind Spot Alert Lights/CHM”
mode, in this mode the Blind Spot Monitor (BSM) will
show a visual alert in the outside mirrors as well as an
audible alert when the turn signal is on. When “Blind
Spot Alert Off” is selected the Blind Spot Monitor (BSM)
system is deactivated.
To make your selection, press and release the SELECT
button until a check-mark appears next to the feature
showing the system has been activated or the check-mark
is removed showing the system has been deactivated.
4
UNDERSTANDING YOUR INSTRUMENT PANEL 291
Page 324 of 573
List Or Browse Mode
During Play mode, pressing any of the buttons described
below, will bring up List mode. List mode enables
scrolling through the list of menus and tracks on the
audio device.
•TUNEcontrol knob: The TUNEcontrol knob functions
in a similar manner as the scroll wheel on the audio
device or external USB device.
•Turning it clockwise (forward) and counterclock-
wise (backward) scrolls through the lists, displaying
the track detail on the radio display. Once the track
to be played is highlighted on the radio display,
press the TUNEcontrol knob to select and start
playing the track. Turning the TUNEcontrol knob
fast will scroll through the list faster. During fast
scroll, a slight delay in updating the information on
the radio display may be noticeable.
•During all List modes, the iPod� displays all lists in
“wrap-around” mode. So if the track is at the
bottom of the list, just turn the wheel backward
(counterclockwise) to get to the track faster.
•In List mode, the radio PRESETbuttons are used as
shortcuts to the following lists on the iPod� or
external USB device.
•Preset 1 – Playlists
•Preset 2 – Artists
•Preset 3 – Albums
•Preset 4 – Genres
•Preset 5 – Audiobooks
•Preset 6 – Podcasts
4
UNDERSTANDING YOUR INSTRUMENT PANEL 321
Page 330 of 573
Radio Operation
Pressing the top of the switch will SEEK up for the next
listenable station, and pressing the bottom of the switch
will SEEK down for the next listenable station.
The button located in the center of the left-hand switch
will tune to the next preset station that you have pro-
grammed in the radio preset pushbutton.
CD Player
Pressing the top of the switch once will go to the next
track on the CD. Pressing the bottom of the switch once
will go to the beginning of the current track, or to the
beginning of the previous track if it is within one second
after the current track begins to play.
If you press the switch up or down twice it plays the
second track; three times, it will play the third, etc.
The button in the center of the left-hand switch has no
function in this mode.
CD/DVD DISC MAINTENANCE
To keep a CD/DVD in good condition, take the following
precautions:
1. Handle the disc by its edge; avoid touching the
surface.
2. If the disc is stained, clean the surface with a soft cloth,
wiping from center to edge.
3. Do not apply paper or tape to the disc; avoid scratch-
ing the disc.
4. Do not use solvents such as benzene, thinner, cleaners,
or anti-static sprays.
5. Store the disc in its case after playing.
6. Do not expose the disc to direct sunlight.
7. Do not store the disc where temperatures may become
too high.
4
UNDERSTANDING YOUR INSTRUMENT PANEL 327
Page 336 of 573
Economy Mode
If ECONOMY mode is desired, press the A/C button to
turn off the indicator light and the A/C compressor.
Rotate the temperature control knob to the desired
temperature.
Max A/C
For maximum cooling use the A/C and RECIRCULA-
TION mode buttons at the same time.
Three-Zone Temperature Control — If Equipped
With the Three-Zone Temperature Control system, each
front seat occupant can independently control the Heat-
ing, Ventilation, and Air Conditioning operations coming
from the outlets on their side of the vehicle.
The primary control for the rear blower is on the front
climate control unit located on the instrument panel.
When the front control is in any position other than rear,
the front control operates all the rear functions.The rear airflow modes will mirror the front unit opera-
tion. Rear PANEL mode is automatically selected when
the front control is in the PANEL mode. When the front
unit is in BI-LEVEL mode, airflow will be emitted from
both the upper and lower rear outlets. When the front
control is in FLOOR, DEFROST, or MIX modes, airflow
will be directed out of the rear floor outlets.
Manual Temperature Control
4
UNDERSTANDING YOUR INSTRUMENT PANEL 333
Page 348 of 573
Panel ModeAir is directed through the outlets in the instrument
panel. These outlets can be adjusted for direction,
and turned on or off to control airflow.
NOTE: For maximum airflow to the rear, the center
instrument panel outlets can be directed toward the rear
seat passengers.
Bi-Level Mode Air comes from the instrument panel outlets, floor
outlets and defrost outlets. A slight amount of air is
also directed through the side window demister outlets.
NOTE: In many temperature positions, the BI-LEVEL
mode is designed to provide cooler air out of the panel
outlets and warmer air from the floor outlets. Floor Mode
Air comes from the floor outlets. A slight amount of
air is directed through the defrost and side window
demister outlets.
Mix Mode Air comes from the floor, defrost and side window
demist outlets. This mode works best in cold or
snowy conditions. It allows you to stay comfort-
able, while keeping the windshield clear.
Defrost Mode Air comes from the windshield and side window
demist outlets. Use DEFROST mode with maxi-
mum blower and temperature settings for best wind-
shield and side window defrosting.
NOTE: While operating in the other modes, the system
will not automatically sense the presence of fog, mist or
ice on the windshield. DEFROST mode must be manually
selected to clear the windshield and side glass.
4
UNDERSTANDING YOUR INSTRUMENT PANEL 345
Page 357 of 573
�Driving Through Water ................. 372
▫ Flowing/Rising Water ................. 372
▫ Shallow Standing Water ............... 372
� Power Steering ....................... 374
▫ Power Steering Fluid Check ............. 375
� Parking Brake ........................ 375
� Anti-Lock Brake System (ABS) ............ 377
▫ Anti-Lock Brake Warning Light .......... 379
� Electronic Brake Control System ........... 380
▫ Traction Control System (TCS) ........... 380
▫ Brake Assist System (BAS) .............. 381
▫ Electronic Stability Control (ESC) ......... 382�
Tire Safety Information ................. 385
▫ Tire Markings ....................... 385
▫ Tire Identification Number (TIN) ......... 389
▫ Tire Terminology And Definitions ......... 390
▫ Tire Loading And Tire Pressure .......... 391
� Tires — General Information ............. 395
▫ Tire Pressure ....................... 395
▫ Tire Inflation Pressures ................ 396
▫ Tire Pressures For High-Speed Operation . . . 397
▫ Radial-Ply Tires ..................... 398
▫ Spare Tire Matching Original Equipped Tire
And Wheel – If Equipped .............. 398
▫ Compact Spare Tire – If Equipped ........ 399
354 STARTING AND OPERATING
Page 367 of 573
This system prevents the key fob from being removed
unless the shift lever is in PARK. It also prevents moving
the shift lever out of PARK, unless the key fob is in the
ACC/ON position, and the brake pedal is pressed.
NOTE:If a malfunction occurs, the system will trap the
key fob in the ignition cylinder to warn you that this
safety feature is inoperable. The engine can be started
and stopped but the key fob cannot be removed until you
obtain service.
Brake/Transmission Shift Interlock System
This vehicle is equipped with a Brake Transmission Shift
Interlock System (BTSI) that holds the shift lever in the
PARK position when the ignition switch is in the LOCK
position (OFF position with Keyless Go™). To move the
shift lever out of the PARK position, the ignition switch
must be turned to the ON or START position (engine
running or not) and the brake pedal must be pressed.
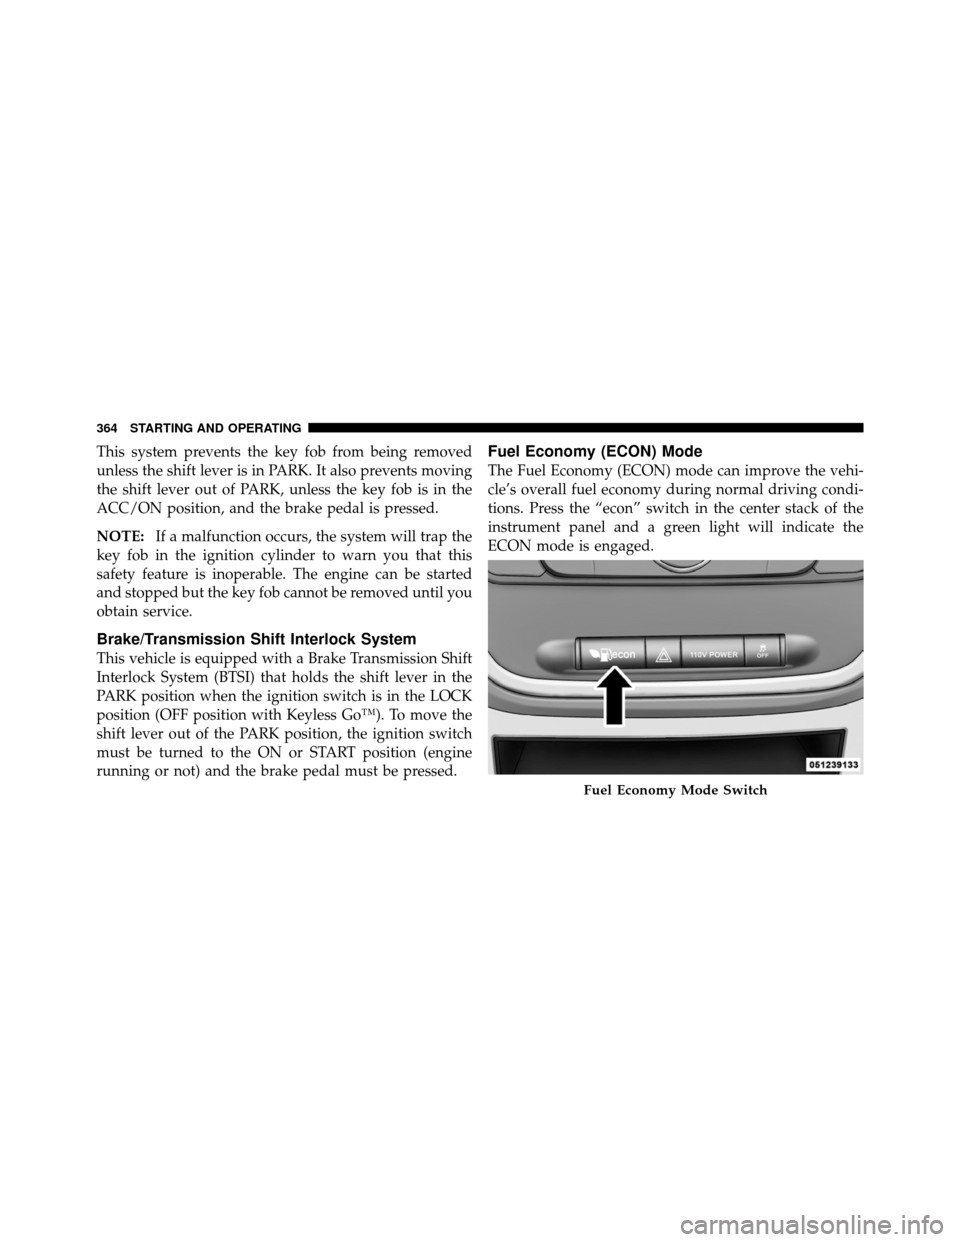
Fuel Economy (ECON) Mode
The Fuel Economy (ECON) mode can improve the vehi-
cle’s overall fuel economy during normal driving condi-
tions. Press the “econ” switch in the center stack of the
instrument panel and a green light will indicate the
ECON mode is engaged.
Fuel Economy Mode Switch
364 STARTING AND OPERATING