Page 357 of 505

To fix a Non-FFV vehicle inadvertently fueled once with
E-85 perform the following:
•change the engine oil and oil filter
•disconnect and reconnect the battery
•drain the fuel tank (see your authorized dealer)
More extensive repairs will be required for prolonged
exposure to E-85 fuel.
MMT In Gasoline
MMT is a manganese-containing metallic additive that is
blended into some gasoline to increase octane. Gasoline
blended with MMT provides no performance advantage
beyond gasoline of the same octane number without
MMT. Gasoline blended with MMT reduces spark plug
life and reduces emissions system performance in some
vehicles. The manufacturer recommends that gasoline
without MMT be used in your vehicle. The MMT content
of gasoline may not be indicated on the gasoline pump, therefore, you should ask your gasoline retailer whether
the gasoline contains MMT. It is even more important to
look for gasoline without MMT in Canada, because MMT
can be used at levels higher than those allowed in the
United States. MMT is prohibited in Federal and Califor-
nia reformulated gasoline.
Materials Added To Fuel
All gasoline sold in the United States is required to
contain effective detergent additives. Use of additional
detergents or other additives is not needed under normal
conditions and they would result in additional cost.
Therefore, you should not have to add anything to the
fuel.
5
STARTING AND OPERATING 355
Page 403 of 505
MAINTAINING YOUR VEHICLE
CONTENTS
�Engine Compartment — 2.4L ............. 403
� Engine Compartment — 3.6L ............. 404
� Onboard Diagnostic System — OBD II ...... 405
▫ Loose Fuel Filler Cap Message ........... 405
� Emissions Inspection And Maintenance
Programs ............................ 406
� Replacement Parts ..................... 407
� Dealer Service ........................ 407 �
Maintenance Procedures ................. 408
▫ Engine Oil ......................... 409
▫ Engine Oil Filter ..................... 412
▫ Engine Air Cleaner Filter ............... 413
▫ Maintenance-Free Battery .............. 413
▫ Air Conditioner Maintenance ............ 415
▫ A/C Air Filter – If Equipped ............ 416
▫ Body Lubrication .................... 417
▫ Windshield Wiper Blades ............... 418
7
Page 405 of 505
ENGINE COMPARTMENT — 2.4L
1 — Engine Coolant Reservoir7 — Air Cleaner Filter
2 — Power Steering Fluid Reservoir 8 — Engine Oil Fill
3 — Automatic Transmission Dipstick 9 — Coolant Pressure Cap
4 — Brake Fluid Reservoir 10 — Engine Oil Dipstick
5 — Integrated Power Module (Fuses) 11 — Washer Fluid Reservoir
6 — Power Distribution Center (Fuses)
7
MAINTAINING YOUR VEHICLE 403
Page 406 of 505
ENGINE COMPARTMENT — 3.6L
1 — Engine Coolant Reservoir5 — Air Cleaner Filter
2 — Power Steering Fluid Reservoir 6 — Engine Oil Dipstick
3 — Brake Fluid Reservoir 7 — Engine Oil Fill
4 — Totally Integrated Power Module (Fuses) 8 — Washer Fluid Reservoir
404 MAINTAINING YOUR VEHICLE
Page 414 of 505

Lubricants which do not have both, the engine oil certi-
fication mark and the correct SAE viscosity grade num-
ber should not be used.
Synthetic Engine Oils
You may use synthetic engine oils provided the recom-
mended oil quality requirements are met, and the recom-
mended maintenance intervals for oil and filter changes
are followed.
Materials Added To Engine Oils
Do not add any supplemental materials, other than leak
detection dyes, to your engine oil. Engine oil is an
engineered product and it’s performance may be im-
paired by supplemental additives.
Disposing Of Used Engine Oil And Oil Filters
Care should be taken in disposing of used engine oil and
oil filters from your vehicle. Used oil and oil filters,
indiscriminately discarded, can present a problem to the
environment. Contact your authorized dealer, servicestation, or governmental agency for advice on how and
where used oil and oil filters can be safely discarded in
your area.
Engine Oil Filter
The engine oil filter should be replaced with a new filter
at every engine oil change.
Engine Oil Filter Selection
All of this manufacturer’s engines have a full-flow type
disposable oil filter. Use a filter of this type for replace-
ment. The quality of replacement filters varies consider-
ably. Only high quality filters should be used to assure
most efficient service. MOPAR�
engine oil filters are high
quality oil filters and are recommended.
412 MAINTAINING YOUR VEHICLE
Page 418 of 505

Refrigerant Recovery And Recycling
R-134a air conditioning refrigerant is a hydrofluoro-
carbon (HFC) that is endorsed by the Environmental
Protection Agency and is an ozone-saving product. How-
ever, the manufacturer recommends that air conditioning
service be performed by authorized dealers or other
service facilities using recovery and recycling equipment.
NOTE:Use only manufacturer approved A/C System
Sealers, Stop Leak Products, Seal Conditioners, Compres-
sor Oil, and Refrigerants.
A/C Air Filter – If Equipped
Refer to the “Maintenance Schedule” for the proper
maintenance intervals.
WARNING!
Do not remove the A/C Air Filter while the blower is
operating or personal injury may result. The A/C Air Filter is located in the fresh air inlet behind
the glove box. Perform the following procedure to re-
place the filter:
1. Open the glove box and remove all contents.
2. Push in on the sides of the glove box and lower the
door.
3. Disconnect the glove box door dampener from the slot
on the side of the box. This is done by grasping the
dampener connector (on the outside of the box) and the
end of the connector pin (on the inside of the box) with
your thumb and forefinger and pulling outward while
lightly lifting upward on the door with your other hand.
Once disconnected, the dampener will retract under-
neath the instrument panel if you release it.
4. Pivot the glove box downward.
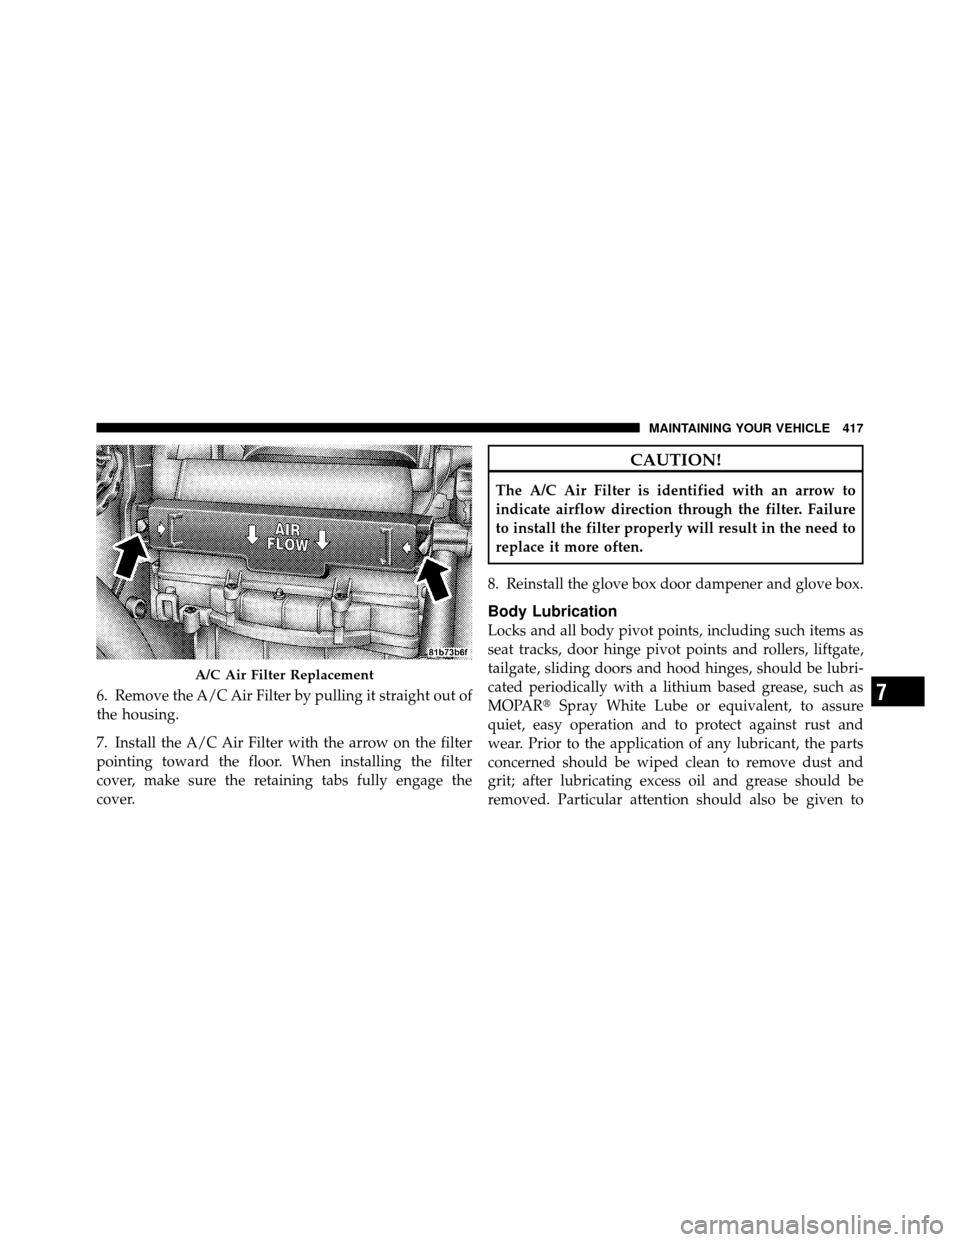
5. Disengage the two retaining tabs that secure the filter
cover to the HVAC housing and remove the cover.
416 MAINTAINING YOUR VEHICLE
Page 419 of 505

6. Remove the A/C Air Filter by pulling it straight out of
the housing.
7. Install the A/C Air Filter with the arrow on the filter
pointing toward the floor. When installing the filter
cover, make sure the retaining tabs fully engage the
cover.
CAUTION!
The A/C Air Filter is identified with an arrow to
indicate airflow direction through the filter. Failure
to install the filter properly will result in the need to
replace it more often.
8. Reinstall the glove box door dampener and glove box.
Body Lubrication
Locks and all body pivot points, including such items as
seat tracks, door hinge pivot points and rollers, liftgate,
tailgate, sliding doors and hood hinges, should be lubri-
cated periodically with a lithium based grease, such as
MOPAR� Spray White Lube or equivalent, to assure
quiet, easy operation and to protect against rust and
wear. Prior to the application of any lubricant, the parts
concerned should be wiped clean to remove dust and
grit; after lubricating excess oil and grease should be
removed. Particular attention should also be given to
A/C Air Filter Replacement
7
MAINTAINING YOUR VEHICLE 417
Page 453 of 505
License Plate Lamp
1. Using a small screwdriver, press inward the locking
tab on the side of the lamp assembly and pull down on
the lamp assembly for removal.2. Pull bulb from socket, replace, and reinstall the lamp
assembly into place ensuring the locking tab is secure.
FLUID CAPACITIES
U.S.
Metric
Fuel (Approximate)
All Engines — (Except 2.4L PZEV) 16.9 Gallons64 Liters
2.4L PZEV (Partial Zero Emissions Vehicle) 18.5 Gallons70 Liters
Engine Oil with Filter
2.4L Engine (SAE 5W-20, API Certified) 4.5 Quarts4.4 Liters
3.6L Engine (SAE 5W-30, API Certified) 6 Quarts5.6 Liters
Cooling System*
2.4L Engine (MOPAR� Antifreeze/Coolant 5
Year/100,000 Mile Formula or equivalent) 7.7 Quarts
7.3 Liters
3.6L Engine (MOPAR� Antifreeze/Coolant 5
Year/100,000 Mile Formula or equivalent) 11.6 Quarts
11 Liters
* Includes heater and coolant recovery bottle filled to MAX level.
7
MAINTAINING YOUR VEHICLE 451