Page 114 of 505

Uconnect™ Phone allows you to transfer calls between
the system and your mobile phone as you enter or exit
your vehicle and enables you to mute the system’s
microphone for private conversation.
The Uconnect™ Phone is driven through your
Bluetooth�“Hands-Free Profile” mobile phone.
Uconnect™ features Bluetooth� technology - the global
standard that enables different electronic devices to con-
nect to each other without wires or a docking station, so
Uconnect™ Phone works no matter where you stow your
mobile phone (be it your purse, pocket, or briefcase), as
long as your phone is turned on and has been paired to
the vehicle’s Uconnect™ Phone. The Uconnect™ Phone
allows up to seven mobile phones to be linked to the
system. Only one linked (or paired) mobile phone can be
used with the system at a time. The system is available in
English, Spanish, or French languages.WARNING!
Any voice commanded system should be used only
in safe driving conditions following local laws and
phone use. All attention should be kept on the
roadway ahead. Failure to do so may result in a
collision causing serious injury or death.
Uconnect™ Phone Button The radio or steering wheel controls (if
equipped) will contain the two control buttons
(Uconnect™ Phone
button and Voice
Command
button) that will enable you
to access the system. When you press the button you will
hear the word Uconnect™ followed by a BEEP. The beep
is your signal to give a command.
112 UNDERSTANDING THE FEATURES OF YOUR VEHICLE
Page 129 of 505

Barge In — Overriding Prompts
The “Voice Command” button can be used when you
wish to skip part of a prompt and issue your voice
command immediately. For example, if a prompt is
asking “Would you like to pair a phone, clear a...,” you
could press the
button and say, “Pair a Phone” to
select that option without having to listen to the rest of
the voice prompt.
Turning Confirmation Prompts ON/OFF
Turning confirmation prompts off will stop the system
from confirming your choices (e.g., the Uconnect™
Phone will not repeat a phone number before you dial it).
•Press thebutton to begin.
•After the “Ready” prompt and the following beep, say
one of the following:
�“Setup Confirmation Prompts On”
�“Setup Confirmation Prompts Off”
Phone And Network Status Indicators
If available on the radio and/or on a premium display
such as the instrument panel cluster, and supported by
your mobile phone, the Uconnect™ Phone will provide
notification to inform you of your phone and network
status when you are attempting to make a phone call
using Uconnect™ Phone. The status is given for network
signal strength, phone battery strength, etc.
Dialing Using The Mobile Phone Keypad
You can dial a phone number with your mobile phone
keypad and still use the Uconnect™ Phone (while dialing
via the mobile phone keypad, the user must exercise
caution and take precautionary safety measures). By
dialing a number with your paired Bluetooth� mobile
phone, the audio will be played through your vehicle’s
audio system. The Uconnect™ Phone will work the same
as if you dial the number using Voice Command.
3
UNDERSTANDING THE FEATURES OF YOUR VEHICLE 127
Page 159 of 505
CAUTION!
To prevent possible damage, do not slam the hood to
close it. Use a firm downward push at the center of
the hood to ensure that both latches engage.
WARNING!
Be sure the hood is fully latched before driving your
vehicle. If the hood is not fully latched, it could open
when the vehicle is in motion and block your vision.
Failure to follow this warning could result in serious
injury or death.
LIGHTS
Multifunction Lever
The multifunction lever on the left side of the steering
column controls the operation of the headlights, parkinglights, turn signal lights, instrument panel lights, instru-
ment panel light dimming, interior lights and fog lights
(if equipped).
Multifunction Lever
3
UNDERSTANDING THE FEATURES OF YOUR VEHICLE 157
Page 163 of 505
NOTE:The front fog lights will only operate with the
headlights on low beam. Selecting high beam headlights
will turn off the front fog lights.
Daytime Running Lights — If Equipped
The high beam headlights will turn on as Daytime
Running Lights (DRL) and operate at lower intensity
whenever the ignition is ON, the engine is running, the
headlight switch is off, the parking brake is released and
the shift lever is in any position except PARK.
NOTE: The Daytime Running Lights will turn off
automatically when a turn signal is in operation and turn
on again when the turn signal is not operating.
Front Fog Light Control
3
UNDERSTANDING THE FEATURES OF YOUR VEHICLE 161
Page 164 of 505

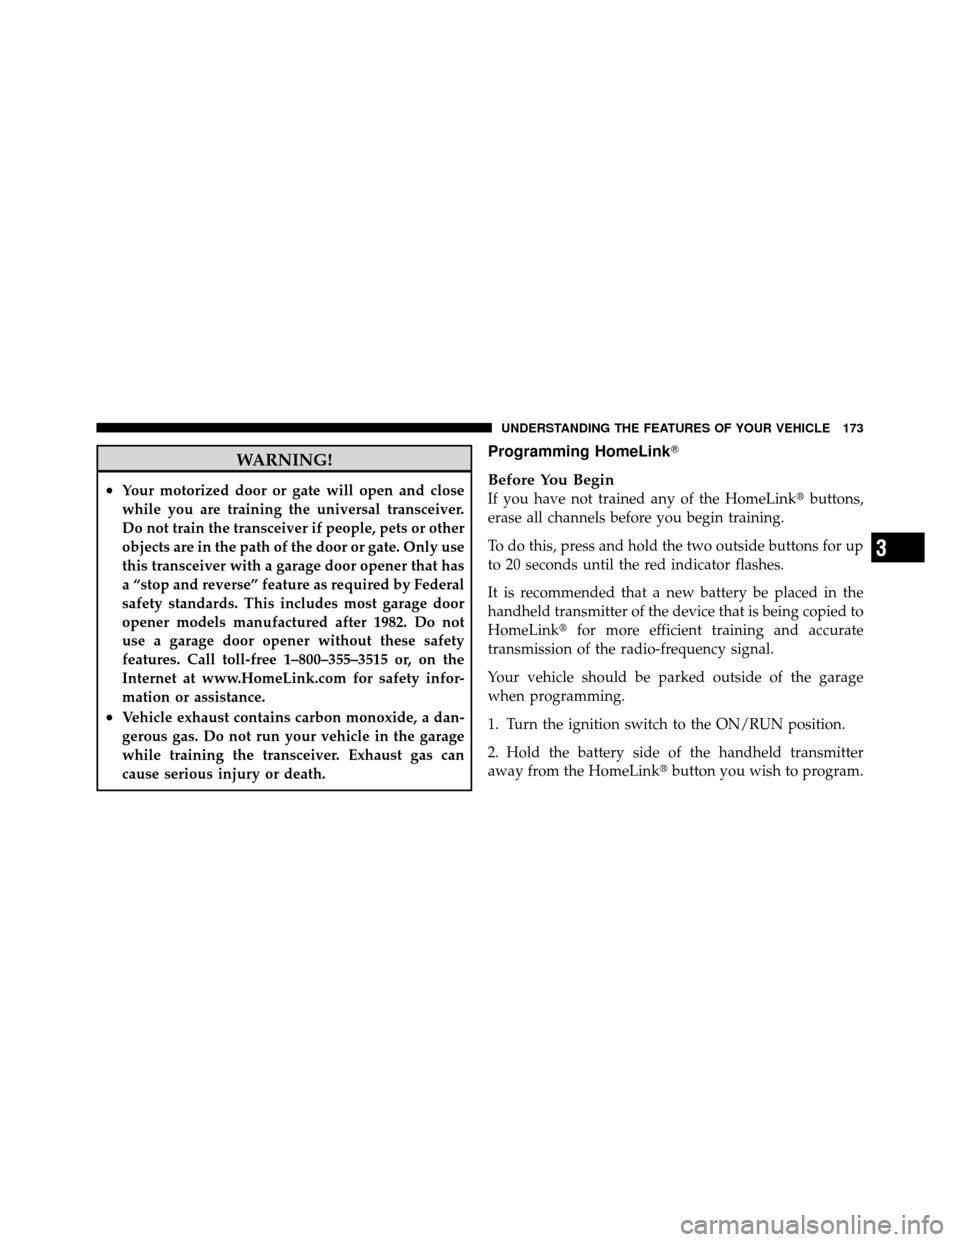
Turn Signals
Move the multifunction lever up or down and the arrows
on each side of the instrument cluster flash to show
proper operation of the front and rear turn signal lights.
Lane Change Assist
Tap the lever up or down once, without moving beyond
the detent, and the turn signal (right or left) will flash
three times then automatically turn off.
High/Low Beam Switch
Push the multifunction lever away from you to switch
the headlights to high beam. Pull the multifunction lever
toward you, to switch the headlights back to low beam.
Flash-To-Pass
You can signal another vehicle with your headlights by
lightly pulling the multifunction lever toward you. This
will cause the headlights to turn on at high beam and
remain on until the lever is released.
NOTE:If the multifunction lever is held in the Flash-
To-Pass position for more than 15 seconds, the high
beams will shut off. If this occurs, wait 30 seconds before
activating the Flash-To-Pass function again.
Turn Signal Control
162 UNDERSTANDING THE FEATURES OF YOUR VEHICLE
Page 175 of 505

WARNING!
•Your motorized door or gate will open and close
while you are training the universal transceiver.
Do not train the transceiver if people, pets or other
objects are in the path of the door or gate. Only use
this transceiver with a garage door opener that has
a “stop and reverse” feature as required by Federal
safety standards. This includes most garage door
opener models manufactured after 1982. Do not
use a garage door opener without these safety
features. Call toll-free 1–800–355–3515 or, on the
Internet at www.HomeLink.com for safety infor-
mation or assistance.
•Vehicle exhaust contains carbon monoxide, a dan-
gerous gas. Do not run your vehicle in the garage
while training the transceiver. Exhaust gas can
cause serious injury or death.
Programming HomeLink�
Before You Begin
If you have not trained any of the HomeLink�buttons,
erase all channels before you begin training.
To do this, press and hold the two outside buttons for up
to 20 seconds until the red indicator flashes.
It is recommended that a new battery be placed in the
handheld transmitter of the device that is being copied to
HomeLink� for more efficient training and accurate
transmission of the radio-frequency signal.
Your vehicle should be parked outside of the garage
when programming.
1. Turn the ignition switch to the ON/RUN position.
2. Hold the battery side of the handheld transmitter
away from the HomeLink� button you wish to program.
3
UNDERSTANDING THE FEATURES OF YOUR VEHICLE 173
Page 205 of 505

18. Park/Headlight ON Indicator — If EquippedThis indicator will illuminate when the park
lights or headlights are turned on.
19. Electronic Stability Control (ESC) OFF Indicator
Light — If Equipped This light indicates the Electronic Stability Con-
trol system (ESC) has been turned off by the
driver.
20. Turn Signal Indicators The left or right arrow will flash with the corre-
sponding exterior turn signal lights when the turn
signal lever is operated. A chime will sound if the vehicle
is driven more than 1 mile (1.6 km) with either turn signal
on.
NOTE: If either indicator flashes at a rapid rate, check
for a defective outside light bulb. 21. Front Fog Light Indicator — If Equipped
This indicator will illuminate when the front fog
lights are on.
22. Vehicle Security Light — If Equipped This light will flash rapidly for approximately
16 seconds when the alarm system is arming.
The light will begin to flash slowly indicating
that the system is armed. The light will stop
flashing when the vehicle is disarmed.
23. Anti-Lock Brake (ABS) Light — If Equipped This light monitors the ABS. This light will
come on when the ignition key is turned to the
ON/RUN position and may stay on for ap-
proximately three seconds.
If the ABS light remains on or comes on during driving,
it indicates that the Anti-Lock portion of the brake system
is not functioning and that service is required, however,
4
UNDERSTANDING YOUR INSTRUMENT PANEL 203
Page 210 of 505

CAUTION!
Continuous driving with the Transmission Tempera-
ture Warning Light illuminated will eventually cause
severe transmission damage or transmission failure.
WARNING!
If the Transmission Temperature Warning Light is
illuminated and you continue operating the vehicle,
in some circumstances you could cause the fluid to
boil over, come in contact with hot engine or exhaust
components and cause a fire.
28. High Beam Indicator This light indicates that the headlights are on high
beam. Pull the turn signal lever toward the steer-
ing wheel to switch the headlights to low beam. 29. Electronic Vehicle Information Center (EVIC)
Display — If Equipped
This display shows the EVIC messages when the appro-
priate conditions exist. Refer to “Electronic Vehicle Infor-
mation Center (EVIC)” for further information.
MINI-TRIP COMPUTER — IF EQUIPPED
The Mini-Trip Computer is located in the instrument
cluster and features a driver-interactive trip information
and temperature display.
NOTE:
The system will display the last known outside
temperature when starting the vehicle and may need to
be driven several minutes before the updated tempera-
ture is displayed. Engine temperature can also affect the
displayed temperature; therefore, temperature readings
are not updated when the vehicle is not moving.
208 UNDERSTANDING YOUR INSTRUMENT PANEL