2011 CHEVROLET SUBURBAN warning light
[x] Cancel search: warning lightPage 78 of 542
Black plate (14,1)Chevrolet Tahoe/Suburban Owner Manual - 2011
3-14 Seats and Restraints
Automatic Seat Release Fold
and Tumble Feature
The transmission must be in
P (Park) for this feature to work.
{WARNING
Automatically folding and
tumbling the seat when someone
is sitting in the seat, could cause
injury to the person sitting there.
Always make sure there is no one
sitting in the seat before pressing
the automatic seat release button.
Folding and Tumbling the Second
Row Seat from the Third Row Seat
or Outside
{WARNING
Using the third row seating
position while the second row is
folded, or folded and tumbled,
could cause injury in a sudden (Continued)
WARNING (Continued)
stop or crash. Be sure to return
the seat to the passenger seating
position. Push and pull on the
seat to make sure it is locked into
place.
To fold and tumble the seat from the
third row seat, if equipped:
1. Make sure that there is nothing under, in front of, or on the seat.
Notice: Folding a rear seat with
the safety belts still fastened may
cause damage to the seat or the
safety belts. Always unbuckle the
safety belts and return them to
their normal stowed position
before folding a rear seat.
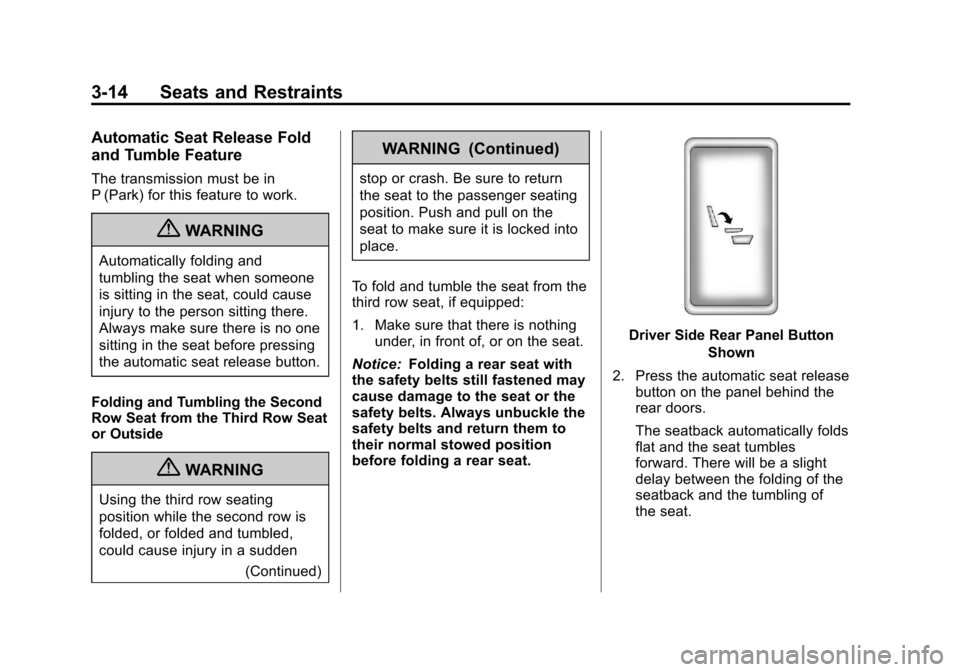
Driver Side Rear Panel Button
Shown
2. Press the automatic seat release button on the panel behind the
rear doors.
The seatback automatically folds
flat and the seat tumbles
forward. There will be a slight
delay between the folding of the
seatback and the tumbling of
the seat.
Page 83 of 542

Black plate (19,1)Chevrolet Tahoe/Suburban Owner Manual - 2011
Seats and Restraints 3-19
Folding and Tumbling the Second
Row Seat from the Third Row Seat
or Outside
{WARNING
Using the third row seating
position while the second row is
folded, or folded and tumbled,
could cause injury in a sudden
stop or crash. Be sure to return
the seat to the passenger seating
position. Push and pull on the
seat to make sure it is locked into
place.
To fold and tumble the seat from the
third row seat, if equipped:
1. Make sure that there is nothing under, in front of, or on the seat.
Notice: Folding a rear seat with
the safety belts still fastened may
cause damage to the seat or the
safety belts. Always unbuckle the
safety belts and return them to
their normal stowed position
before folding a rear seat.
Driver Side Rear Panel Button
Shown
2. Press the automatic seat release button on the panel behind the
rear doors.
The seatback automatically folds
flat and the seat tumbles
forward. There will be a slight
delay between the folding of the
seatback and the tumbling of
the seat.
Returning the Seat to the
Sitting Position
To return the seat to the sitting
position:
1. Pull the seat down until it latchesto the floor. The seatback cannot
be raised if the seat is not
latched to the floor.
{WARNING
If either seatback is not locked, it
could move forward in a sudden
stop or crash. That could cause
injury to the person sitting there.
Always push and pull on the
seatbacks to be sure they are
locked.
2. Lift the seatback and push it rearward. Push and pull on the
seatback to make sure it is
locked.
Page 87 of 542
Black plate (23,1)Chevrolet Tahoe/Suburban Owner Manual - 2011
Seats and Restraints 3-23
Installing the Third Row Seat
To install the seat:
1. Open the liftgate to access therear of the vehicle.
2. Slide the front outboard seat wheels into the track on the floor
and roll the seat forward. The
front latches should lock into
place. If the latches do not lock,
try tilting the rear of the seat
upward slightly.
3. Lower the rear of the seat and push down on the seat to
engage the rear floor latches.
{WARNING
A seat that is not locked into
place properly can move around
in a collision or sudden stop.
People in the vehicle could be
injured. Be sure to lock the seat
into place properly when
installing it. 4. Push and pull on the seat to
make sure it is locked into place.
The seatback cannot be raised
to the upright position unless the
seat is latched to the floor.
5. Raise the seatback to the upright position.
{WARNING
If either seatback is not locked, it
could move forward in a sudden
stop or crash. That could cause
injury to the person sitting there.
Always push and pull on the
seatbacks to be sure they are
locked.
6. Push and pull on the seatback to make sure it is locked.
{WARNING
A safety belt that is improperly
routed, not properly attached,
or twisted will not provide the
protection needed in a crash. The
person wearing the belt could be
seriously injured. After raising the
rear seatback, always check to be
sure that the safety belts are
properly routed and attached, and
are not twisted.
7. Make sure the safety belts are returned to the original position
over the seatbacks.
Page 104 of 542
Black plate (40,1)Chevrolet Tahoe/Suburban Owner Manual - 2011
3-40 Seats and Restraints
Safety Belt Extender
If the vehicle's safety belt will fasten
around you, you should use it.
But if a safety belt is not long
enough, your dealer will order you
an extender. When you go in to
order it, take the heaviest coat you
will wear, so the extender will be
long enough for you. To help avoid
personal injury, do not let someone
else use it, and use it only for the
seat it is made to fit. The extender
has been designed for adults. Never
use it for securing child seats. To
wear it, attach it to the regular safety
belt. For more information, see the
instruction sheet that comes with
the extender.
Safety System Check
Now and then, check that the safety
belt reminder light, safety belts,
buckles, latch plates, retractors, and
anchorages are working properly.
Look for any other loose or
damaged safety belt system parts
that might keep a safety belt systemfrom doing its job. See your dealer
to have it repaired. Torn or frayed
safety belts may not protect you in a
crash. They can rip apart under
impact forces. If a belt is torn or
frayed, get a new one right away.
Make sure the safety belt reminder
light is working. See
Safety Belt
Reminders on page 5‑18 for more
information.
Keep safety belts clean and dry.
See Safety Belt Care on page 3‑40.
Safety Belt Care
Keep belts clean and dry.
{WARNING
Do not bleach or dye safety belts.
It may severely weaken them. In
a crash, they might not be able to
provide adequate protection.
Clean safety belts only with mild
soap and lukewarm water.
Replacing Safety Belt
System Parts After a
Crash
{WARNING
A crash can damage the safety
belt system in the vehicle.
A damaged safety belt system
may not properly protect the
person using it, resulting in
serious injury or even death in a
crash. To help make sure the
safety belt systems are working
properly after a crash, have them
inspected and any necessary
replacements made as soon as
possible.
Page 115 of 542
Black plate (51,1)Chevrolet Tahoe/Suburban Owner Manual - 2011
Seats and Restraints 3-51
The passenger sensing system is
designed to turn off the right front
passenger frontal airbag if:
.The right front passenger seat is
unoccupied.
.The system determines an infant
is present in a child restraint.
.A right front passenger takes
his/her weight off of the seat for
a period of time.
.There is a critical problem with
the airbag system or the
passenger sensing system.
When the passenger sensing
system has turned off the right front
passenger frontal airbag, the off
indicator will light and stay lit as a
reminder that the airbag is off. See
Passenger Airbag Status Indicator
on page 5‑20. The passenger sensing system is
designed to turn on (may inflate) the
right front passenger frontal airbag
anytime the system senses that a
person of adult size is sitting
properly in the right front
passenger seat.
When the passenger sensing
system has allowed the airbag to be
enabled, the on indicator will light
and stay lit as a reminder that the
airbag is active.
For some children, including
children in child restraints, and for
very small adults, the passenger
sensing system may or may not turn
off the right front passenger frontal
airbag, depending upon the
person's seating posture and body
build. Everyone in the vehicle
who has outgrown child restraints
should wear a safety belt
properly
—whether or not there
is an airbag for that person.
{WARNING
If the airbag readiness light ever
comes on and stays on, it means
that something may be wrong
with the airbag system. To help
avoid injury to yourself or others,
have the vehicle serviced right
away. See Airbag Readiness
Light on page 5‑19 for more
information, including important
safety information.
If the On Indicator is Lit for a
Child Restraint
If a child restraint has been installed
and the on indicator is lit:
1. Turn the vehicle off.
2. Remove the child restraint from the vehicle.
3. Remove any additional items from the seat such as blankets,
cushions, seat covers, seat
heaters, or seat massagers.
Page 120 of 542

Black plate (56,1)Chevrolet Tahoe/Suburban Owner Manual - 2011
3-56 Seats and Restraints
Airbag System Check
The airbag system does not need
regularly scheduled maintenance or
replacement. Make sure the airbag
readiness light is working. See
Airbag Readiness Light on
page 5‑19for more information.
Notice: If an airbag covering is
damaged, opened, or broken, the
airbag may not work properly. Do
not open or break the airbag
coverings. If there are any
opened or broken airbag covers,
have the airbag covering and/or
airbag module replaced. For the
location of the airbag modules,
see What Makes an Airbag
Inflate? on page 3‑47. See your
dealer for service.
Replacing Airbag System
Parts After a Crash
{WARNING
A crash can damage the
airbag systems in your vehicle.
A damaged airbag system
may not work properly and may
not protect you and your
passenger(s) in a crash, resulting
in serious injury or even death.
To help make sure your airbag
systems are working properly
after a crash, have them
inspected and any necessary
replacements made as soon as
possible. If an airbag inflates, you will need to
replace airbag system parts. See
your dealer for service.
If the airbag readiness light stays on
after the vehicle is started or comes
on when you are driving, the airbag
system may not work properly. Have
the vehicle serviced right away. See
Airbag Readiness Light on
page 5‑19
for more information.
Page 147 of 542
Black plate (3,1)Chevrolet Tahoe/Suburban Owner Manual - 2011
Storage 4-3
To put the cover in the vehicle:
1. Make sure the cover slot in theholder faces rearward with the
round surface facing down.
2. Then, hold the cover at an angle and place the cover end cap into
the slot in the passenger side
trim panel.
3. Move the other end of the cover forward and hold it next to the
driver side trim panel slot.
4. Press the end caps in, to allow the cover to fit into the trim slot.
5. Pull lightly on the cover holder to make sure it is secure.
On extended wheelbase models
there are two cover positions.
The slots furthest forward allow
the cover to be used if the third
seat is removed or folded down.
The cover can be installed and
removed from either side.Roof Rack System
{WARNING
If something is carried on top of
the vehicle that is longer or wider
than the roof rack— like paneling,
plywood, or a mattress— the wind
can catch it while the vehicle is
being driven. The item being
carried could be violently torn off,
and this could cause a collision,
and damage the vehicle. Never
carry something longer or wider
than the roof rack on top of the
vehicle unless using a GM
Certified accessory carrier.
For vehicles with a roof rack, the
rack can be used to load items. For
roof racks that do not have
crossrails included, GM Certified
crossrails can be purchased as an
accessory. See your dealer for
additional information. Notice:
Loading cargo on the
roof rack that weighs more than
91 kg (200 lbs) or hangs over the
rear or sides of the vehicle may
damage the vehicle. Load cargo
so that it rests evenly between
the crossrails, making sure to
fasten cargo securely.
To prevent damage or loss of cargo
when driving, check to make sure
crossrails and cargo are securely
fastened. Loading cargo on the roof
rack will make the vehicle’ s center
of gravity higher. Avoid high speeds,
sudden starts, sharp turns, sudden
braking or abrupt maneuvers,
otherwise it may result in loss of
control. If driving for a long distance,
on rough roads, or at high speeds,
occasionally stop the vehicle to
make sure the cargo remains in its
place.
Page 149 of 542

Black plate (1,1)Chevrolet Tahoe/Suburban Owner Manual - 2011
Instruments and Controls 5-1
Instruments and
Controls
Controls
Steering Wheel Adjustment . . . 5-2
Steering Wheel Controls . . . . . . 5-3
Horn . . . . . . . . . . . . . . . . . . . . . . . . . . 5-5
Windshield Wiper/Washer . . . . . 5-5
Rear Window Wiper/Washer . . . . . . . . . . . . . . . . . . . . . . 5-6
Compass . . . . . . . . . . . . . . . . . . . . . 5-7
Clock . . . . . . . . . . . . . . . . . . . . . . . . . 5-9
Power Outlets . . . . . . . . . . . . . . . 5-10
Warning Lights, Gauges, and
Indicators
Warning Lights, Gauges, and Indicators . . . . . . . . . . . . . . . . . . 5-12
Instrument Cluster . . . . . . . . . . . 5-13
Speedometer . . . . . . . . . . . . . . . . 5-14
Odometer . . . . . . . . . . . . . . . . . . . . 5-14
Trip Odometer . . . . . . . . . . . . . . . 5-14
Tachometer . . . . . . . . . . . . . . . . . . 5-14
Fuel Gauge . . . . . . . . . . . . . . . . . . 5-15
Engine Oil Pressure Gauge . . . . . . . . . . . . . . . . . . . . . . 5-16 Engine Coolant Temperature
Gauge . . . . . . . . . . . . . . . . . . . . . . 5-17
Voltmeter Gauge . . . . . . . . . . . . . 5-18
Safety Belt Reminders . . . . . . . 5-18
Airbag Readiness Light . . . . . . 5-19
Passenger Airbag Status Indicator . . . . . . . . . . . . . . . . . . . . 5-20
Charging System Light . . . . . . 5-21
Malfunction Indicator Lamp . . . . . . . . . . . . . 5-22
Brake System Warning Light . . . . . . . . . . . . . . . . . . . . . . . 5-24
Antilock Brake System (ABS) Warning Light . . . . . . . . . . . . . . 5-25
Tow/Haul Mode Light . . . . . . . . 5-26
StabiliTrak
®Indicator Light . . . 5-26
Tire Pressure Light . . . . . . . . . . 5-26
Engine Oil Pressure Light . . . . 5-27
Low Fuel Warning Light . . . . . . 5-28
Security Light . . . . . . . . . . . . . . . . 5-28
High-Beam on Light . . . . . . . . . 5-28
Front Fog Lamp Light . . . . . . . . 5-28
Cruise Control Light . . . . . . . . . 5-29
Information Displays
Driver Information Center (DIC) . . . . . . . . . . . . . . . 5-29
Vehicle Messages
Vehicle Messages . . . . . . . . . . . 5-38
Battery Voltage and ChargingMessages . . . . . . . . . . . . . . . . . . 5-38
Brake System Messages . . . . 5-39
Door Ajar Messages . . . . . . . . . 5-39
Engine Cooling System Messages . . . . . . . . . . . . . . . . . . 5-40
Engine Oil Messages . . . . . . . . 5-41
Engine Power Messages . . . . 5-42
Fuel System Messages . . . . . . 5-42
Key and Lock Messages . . . . . 5-43
Lamp Messages . . . . . . . . . . . . . 5-43
Object Detection System Messages . . . . . . . . . . . . . . . . . . 5-43
Ride Control System Messages . . . . . . . . . . . . . . . . . . 5-44
Airbag System Messages . . . . 5-45
Anti-Theft Alarm System Messages . . . . . . . . . . . . . . . . . . 5-46
Tire Messages . . . . . . . . . . . . . . . 5-46
Transmission Messages . . . . . 5-47
Vehicle Reminder Messages . . . . . . . . . . . . . . . . . . 5-47
Washer Fluid Messages . . . . . 5-48