Page 463 of 588

Black plate (41,1)Chevrolet Silverado Owner Manual - 2011
Vehicle Care 10-41
The vehicle should:
.Be placed so the headlamps
are 7.6 m (25 ft) from a
light‐colored wall.
.Have all four tires on a level
surface which is level all the way
to the wall.
.Be placed so it is perpendicular
to the wall.
.Not have any snow, ice, or mud
on it.
.Be fully assembled and all other
work stopped while headlamp
aiming is being performed.
.Be loaded with a full tank of
fuel and one person or 75 kg
(160 lbs) sitting on the
driver seat.
.Have the tires properly inflated.
.Have the spare tire in its proper
location in the vehicle.Headlamp aiming is done with the
vehicle's low-beam headlamps.
The high-beam headlamps will be
correctly aimed if the low-beam
headlamps are aimed properly.
To adjust the vertical aim:
1. Open the hood. See
Hood
on
page 10‑5
2. Locate the aim dot on the lens of the low‐beam headlamp. 3. Record the distance from the
ground to the aim dot on the
low‐beam headlamp.
4. At a wall, measure from the
ground upward (A) to the
recorded distance from
Step 3 and mark it.
Page 490 of 588

Black plate (68,1)Chevrolet Silverado Owner Manual - 2011
10-68 Vehicle Care
SeeVehicle Load Limitson
page 9‑23, for an example of
the Tire and Loading Information
label and its location on your
vehicle. Also see Tire Pressure
on
page 10‑63.
Your vehicle's TPMS can warn you
about a low tire pressure condition
but it does not replace normal tire
maintenance. See Tire Inspection
on page 10‑71,Tire Rotationon
page 10‑71and Tires on
page 10‑55.
Notice: Tire sealant materials are
not all the same. A non-approved
tire sealant could damage the Tire
Pressure Monitor System (TPMS)
sensors. TPMS sensor damage
caused by using an incorrect tire
sealant is not covered by the
vehicle warranty. Always use only
the GM approved tire sealant
available through your dealer
or included in the vehicle.
TPMS Malfunction Light and
Message
The TPMS will not function properly
if one or more of the TPMS sensors
are missing or inoperable. When the
system detects a malfunction, the
low tire warning light flashes for
about one minute and then stays
on for the remainder of the ignition
cycle. A DIC warning message is
also displayed. The low tire warning
light and DIC warning message
come on at each ignition cycle until
the problem is corrected. Some of
the conditions that can cause the
malfunction light and DIC message
to come on are:
.One of the road tires has been
replaced with the spare tire.
The spare tire does not have
a TPMS sensor. The TPMS
malfunction light and DIC
message should go off once
you re‐install the road tire
containing the TPMS sensor.
.The TPMS sensor matching
process was started but not
completed or not completed
successfully after rotating the
vehicle's tires. The DIC message
and TPMS malfunction light
should go off once the TPMS
sensor matching process
is performed successfully.
See “TPMS Sensor Matching
Process” later in this section.
.One or more TPMS sensors
are missing or damaged.
The DIC message and the
TPMS malfunction light should
go off when the TPMS sensors
are installed and the sensor
matching process is performed
successfully. See your dealer
for service.
Page 493 of 588

Black plate (71,1)Chevrolet Silverado Owner Manual - 2011
Vehicle Care 10-71
Tire Inspection
We recommend that you
regularly inspect your vehicle's
tires, including the spare tire,
if the vehicle has one, for signs
of wear or damage at least once
a month.
Always remove the tires if
any of the following statements
are true:
.You can see the indicators at
three or more places around
the tire.
.You can see cord or fabric
showing through the tire's
rubber.
.The tread or sidewall is
cracked, cut, or snagged
deep enough to show cord
or fabric.
.The tire has a bump, bulge,
or split.
.The tire has a puncture, cut,
or other damage that cannot
be repaired well because of
the size or location of the
damage.
Tire Rotation
Tires should be rotated every
12 000 km (7,500 miles).
SeeScheduled Maintenance
on
page 11‑2
.
The purpose of a regular tire
rotation is to achieve a uniform
wear for all tires on the vehicle.
This will ensure that your vehicle
continues to perform most like it
did when the tires were new.
Any time you notice unusual
wear, rotate your tires as soon
as possible and check wheel
alignment. Also check for
damaged tires or wheels. See
When It Is Time for New
Tires
on page 10‑74and Wheel
Replacement
on page 10‑80.
If your vehicle has dual rear
wheels, also see Dual Tire
Rotation
on page 10‑73.
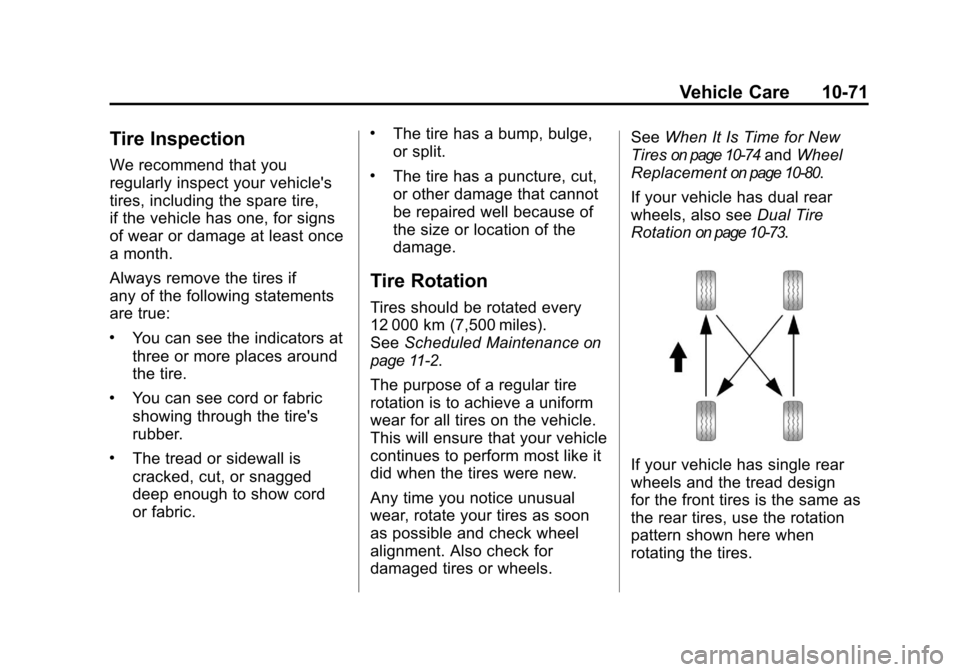
If your vehicle has single rear
wheels and the tread design
for the front tires is the same as
the rear tires, use the rotation
pattern shown here when
rotating the tires.
Page 511 of 588

Black plate (89,1)Chevrolet Silverado Owner Manual - 2011
Vehicle Care 10-89
Rear Position–All Other Models
For all other models, position the
jack under the rear axle between
the spring anchor and the shock
absorber bracket.
If you have added a snow plow
to the front of your vehicle, lower
the snow plow fully before
raising the vehicle.
Make sure that the jack head is
positioned so that the rear axle
is resting securely between
the grooves that are on the
jack head.
{WARNING
Getting under a vehicle when it is
jacked up is dangerous. If the
vehicle slips off the jack, you
could be badly injured or killed.
Never get under a vehicle when
it is supported only by a jack.
{WARNING
Raising your vehicle with the
jack improperly positioned can
damage the vehicle and even
make the vehicle fall. To help
avoid personal injury and vehicle
damage, be sure to fit the jack
lift head into the proper location
before raising the vehicle. 6. Turn the wheel wrench
clockwise to raise the vehicle.
Raise the vehicle far enough off
the ground so there is enough
room for the spare tire to fit
under the wheel well.
7. Remove all the wheel nuts andtake off the flat tire.
Page 516 of 588

Black plate (94,1)Chevrolet Silverado Owner Manual - 2011
10-94 Vehicle Care
7. Make sure the tire is storedsecurely. Push, pull (A), and then
try to turn (B) the tire. If the tire
moves, use the wheel wrench to
tighten the cable.
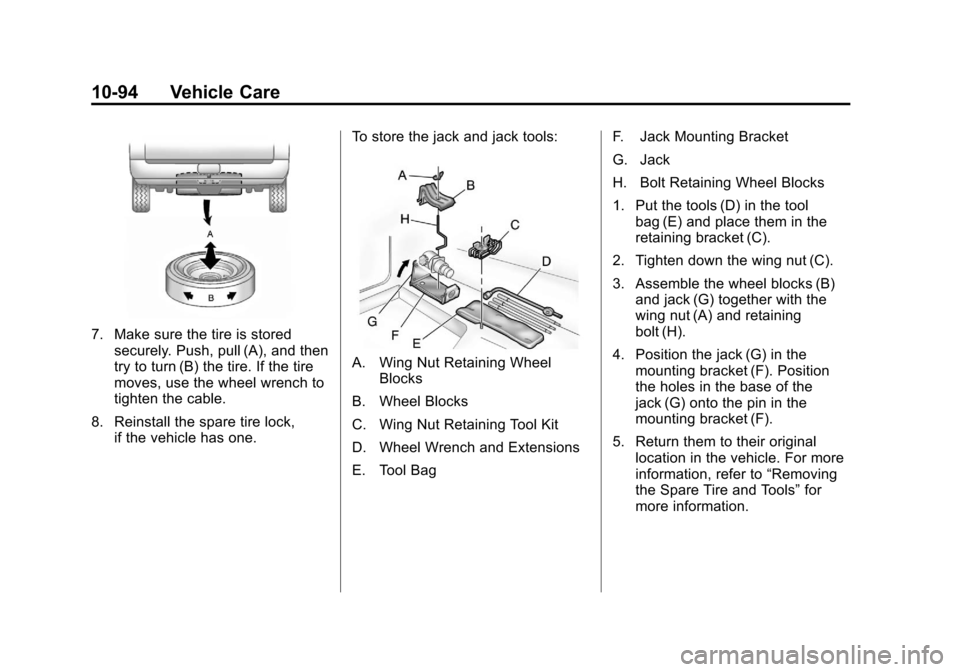
8. Reinstall the spare tire lock, if the vehicle has one. To store the jack and jack tools:
A. Wing Nut Retaining Wheel
Blocks
B. Wheel Blocks
C. Wing Nut Retaining Tool Kit
D. Wheel Wrench and Extensions
E. Tool Bag F. Jack Mounting Bracket
G. Jack
H. Bolt Retaining Wheel Blocks
1. Put the tools (D) in the tool
bag (E) and place them in the
retaining bracket (C).
2. Tighten down the wing nut (C).
3. Assemble the wheel blocks (B) and jack (G) together with the
wing nut (A) and retaining
bolt (H).
4. Position the jack (G) in the mounting bracket (F). Position
the holes in the base of the
jack (G) onto the pin in the
mounting bracket (F).
5. Return them to their original location in the vehicle. For more
information, refer to “Removing
the Spare Tire and Tools” for
more information.