2011 CHEVROLET MALIBU display
[x] Cancel search: displayPage 174 of 382
Black plate (20,1)Chevrolet Malibu Owner Manual - 2011
7-20 Infotainment System
Root Directory
The root directory is treated as a
folder. Files are stored in the root
directory when the disc or storage
device does not contain folders.
Files accessed from the root
directory of a USB device display
as F1 ROOT.
Empty Folder
Folders that do not contain files are
skipped, and the player advances to
the next folder that contains files.
File Naming
The song name that displays is the
song name that is contained in the
ID3 tag. If the song name is not
present in the ID3 tag, then the
radio displays the file name without
the file extension as the track name.
Track names longer than
32 characters or four pages are
shortened. The display does not
show parts of words on the last
page of text and the extension of
the filename is not displayed.Preprogrammed Playlists
Playlists that have an .m3u or .pls
file extension and are stored on a
USB device may be supported by
the radio with a USB port.
Order of Play
Tracks are played in the following
order:
.Play begins from the first track
in the first playlist and continues
sequentially through all tracks in
each playlist. When the last
track of the last playlist has
played, play continues from the
first track of the first playlist.
.Play begins from the first track in
the first folder and continues
sequentially through all tracks in
each folder. When the last track
of the last folder has played,
play continues from the first
track of the first folder.
When play enters a new folder, the
display does not automatically show
the new folder name unless the folder mode has been chosen as
the default display. The new track
name displays.
Connecting a USB Storage
Device or iPod
The radio buttons, knobs and
softkeys are used to control a USB
storage device or an iPod when it is
connected to the USB port.
To connect a USB storage device,
connect the device to the USB port
located on the front of the radio.
To connect an iPod, connect one
end of the USB cable that came
with the iPod to the iPod’s dock
connector and connect the other
end to the USB port located on the
front of the radio. If the vehicle is on
and the USB connection works,
“OK
to disconnect” and a GM logo may
appear on the iPod and iPod
appears on the radio's display.
The iPod charges while it is
connected to the USB port if the
ingition is in the ACC/ACCESSORY
or ON/RUN position. When the
Page 175 of 382
Black plate (21,1)Chevrolet Malibu Owner Manual - 2011
Infotainment System 7-21
ignition is turned OFF, the iPod
automatically powers off and will
not charge or draw power from the
vehicle's battery.
Older iPod's that are not supported
can still be used by connecting it to
the 3.5 mm (1/8 in) auxiliary input
jack using a 3.5 mm (1/8 in) cable.
Using a USB Storage Device
or iPod
The buttons and knobs on the radio
and the softkeys below the radio
display are used to control a USB
storage device or an iPod.
Buttons and Knobs
The buttons and knobs on the
radio control the following features.
f(Tune):Turn to select files.
©SEEK:Press to go to the start
of the track, if more than ten
seconds have played. Press and
hold
©SEEK or press it multiple
times to continue moving backward
through tracks.
¨SEEK: Press to go to the next
track. Press and hold
¨SEEK or
press it multiple times to continue
moving forward through tracks.
sREV (Reverse): Press and hold
to reverse playback quickly. Sound
is heard at a reduced volume.
Release
sREV to resume playing.
\FWD (Fast Forward): Press
and hold to advance playback
quickly. Sound is heard at a reduced
volume. Release
\FWD to
resume playing.
4(Information): Press to display
additional information about the
selected track.
Softkeys
The five softkeys below the radio
display are used to control functions
that display as tabs.
To use the softkeys, press a softkey
below any tab that is displayed, or if
no tabs are displayed, press the first
or last softkey below the radio
display to display the tabs. The softkeys below the radio display
control the following features.
j(Pause):
Press the softkey
below
jto pause the track. The
tab appears raised when pause is
being used. Press the softkey below
jagain to resume playback.
Back: Press the softkey below the
back tab to go back to the main
display screen on an iPod, or the
root directory on a USB storage
device.
c(Folder View): Press the
softkey below
cto view the
contents of the current folder on
the USB drive.
To browse and select files:
1. Press the softkey below
c.
2. Turn
fto scroll through the list
of folders.
3. Press
fto select the desired
folder. If there is more then one
folder, repeat Steps 1 and 2 until
the desired folder is reached.
Page 189 of 382
Black plate (5,1)Chevrolet Malibu Owner Manual - 2011
Climate Controls 8-5
Automatic Climate Control System
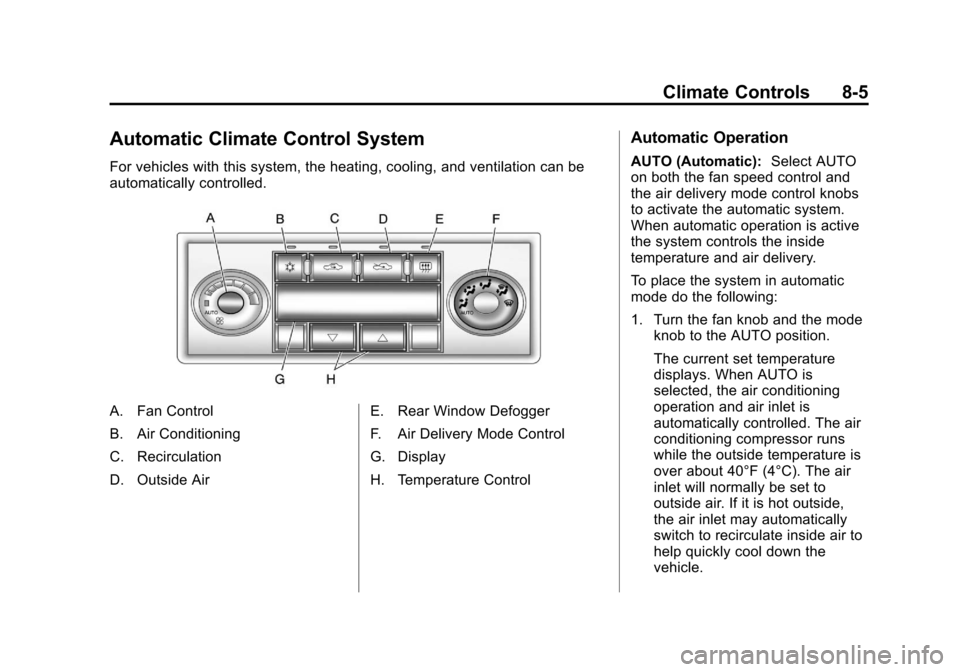
For vehicles with this system, the heating, cooling, and ventilation can be
automatically controlled.
A. Fan Control
B. Air Conditioning
C. Recirculation
D. Outside AirE. Rear Window Defogger
F. Air Delivery Mode Control
G. Display
H. Temperature Control
Automatic Operation
AUTO (Automatic):
Select AUTO
on both the fan speed control and
the air delivery mode control knobs
to activate the automatic system.
When automatic operation is active
the system controls the inside
temperature and air delivery.
To place the system in automatic
mode do the following:
1. Turn the fan knob and the mode knob to the AUTO position.
The current set temperature
displays. When AUTO is
selected, the air conditioning
operation and air inlet is
automatically controlled. The air
conditioning compressor runs
while the outside temperature is
over about 40°F (4°C). The air
inlet will normally be set to
outside air. If it is hot outside,
the air inlet may automatically
switch to recirculate inside air to
help quickly cool down the
vehicle.
Page 192 of 382
Black plate (8,1)Chevrolet Malibu Owner Manual - 2011
8-8 Climate Controls
When the weather is cool or damp,
operating the system in recirculation
for extended periods of time can
cause fogging of the vehicle's
windows. To clear the fog, select
either defog or defrost. Make sure
the air conditioning is on. Allow the
air conditioning to run automatically
to help dehumidify the air.
Rear Window Defogger
The rear window defogger uses a
warming grid to remove fog from the
rear window.
<(Rear):Press to turn the rear
window defogger on or off. An
indicator light comes on to show
that the rear window defogger is on.
If driving below 80 km/h (50 mph),
the rear window defogger turns off
about 15 minutes after the button is
pressed. If additional warming time
is needed, press the button again. If the vehicle's speed is maintained
above 80 km/h (50 mph), the rear
window defogger remains on once
the button is pressed.
For vehicles with heated outside
mirrors, the surface of the outside
mirrors will also heat when the rear
window defogger is activated. See
Heated Mirrors on page 2‑15.
Notice:
Do not use a razor blade
or sharp object to clear the inside
rear window. Do not adhere
anything to the defogger grid
lines in the rear glass. These
actions may damage the rear
defogger. Repairs would not be
covered by your warranty. Remote Start Climate Control
Operation
For vehicles with remote start, when
it is activated the climate control
system heats and cools the inside of
the vehicle using the previous
system settings before the vehicle
was turned off. The climate control
knobs will remain active during a
remote start. However, the climate
control buttons will be inactive until
the ignition is turned on by the key.
If the fan is off, the climate control
system will not operate during
remote start.
With the automatic climate control
system, the climate control displays
“RS”
in place of the temperature to
indicate that remote start is
activated. For best performance,
turn both the fan and mode knobs to
AUTO. If the temperature is cold
enough and the mode knob is set to
AUTO, the system begins in defrost
to clear the windows. See Remote
Keyless Entry (RKE) System
Operation on page 2‑3.
Page 213 of 382
Black plate (19,1)Chevrolet Malibu Owner Manual - 2011
Driving and Operating 9-19
The steering can bind with the
wheels turned off center. If this
happens, move the steering wheel
from right to left while turning the
key to ACC/ACCESSORY. If this
doesn't work, the vehicle needs
service.
ACC (ACC/ACCESSORY):This
position lets you use things like the
radio and windshield wipers while
the engine is not running.
R (ON/RUN): This position can be
used to operate the electrical
accessories and to display some
instrument panel warning lights. The
switch will stay in this position while
the engine is running. If you leave the key in the ACC/
ACCESSORY or ON/RUN position
with the engine off, the battery could
be drained. You may not be able to
start the vehicle if the battery is
allowed to drain for an extended
period of time.
/
(START): This position starts the
engine. When the engine starts,
release the key. The ignition switch
will return to the ON/RUN position
for driving.
A warning tone will sound when the
driver door is opened, the ignition is
in ACC/ACCESSORY or LOCK/OFF
and the key is in the ignition.Retained Accessory
Power (RAP)
These vehicle accessories can be
used for up to 10 minutes after the
engine is turned off:
.Audio System
.Power Windows
.Heated Seats (if equipped)
.Sunroof (if equipped)
These features continue to work up
to 10 minutes after the ignition is
turned to LOCK/OFF.
The power windows, heated seats,
and sunroof will work until any door
is opened.
The radio continues to work until the
driver door is opened.
All these features operate when the
key is in the ON/RUN or ACC/
ACCESSORY.
Page 221 of 382
Black plate (27,1)Chevrolet Malibu Owner Manual - 2011
Driving and Operating 9-27
Notice:Shifting out of P (Park) or
N (Neutral) with the engine
running at high speed may
damage the transmission. The
repairs would not be covered by
the vehicle warranty. Be sure the
engine is not running at high
speed when shifting the vehicle.
D (Drive): This position is for
normal driving. It provides the best
fuel economy. If you need more
power for passing, and you are:
.Going less than 56 km/h
(35 mph), push the accelerator
pedal about halfway down.
.Going about 56 km/h (35 mph) or
more, push the accelerator all
the way down.
M (Manual Mode): This position,
allows you to change gears similar
to a manual transmission. If the
vehicle has this feature, see Driver
Shift Control (DSC).
Manual Mode
Driver Shift Control (DSC)
To use this feature, do the following:
1. Move the shift lever from
D (Drive) rearward to
M (Manual).
While driving in manual mode,
the transmission will remain in
the driver selected gear. When
coming to a stop in the manual
position, the vehicle will
automatically shift into
2 (Second) gear.
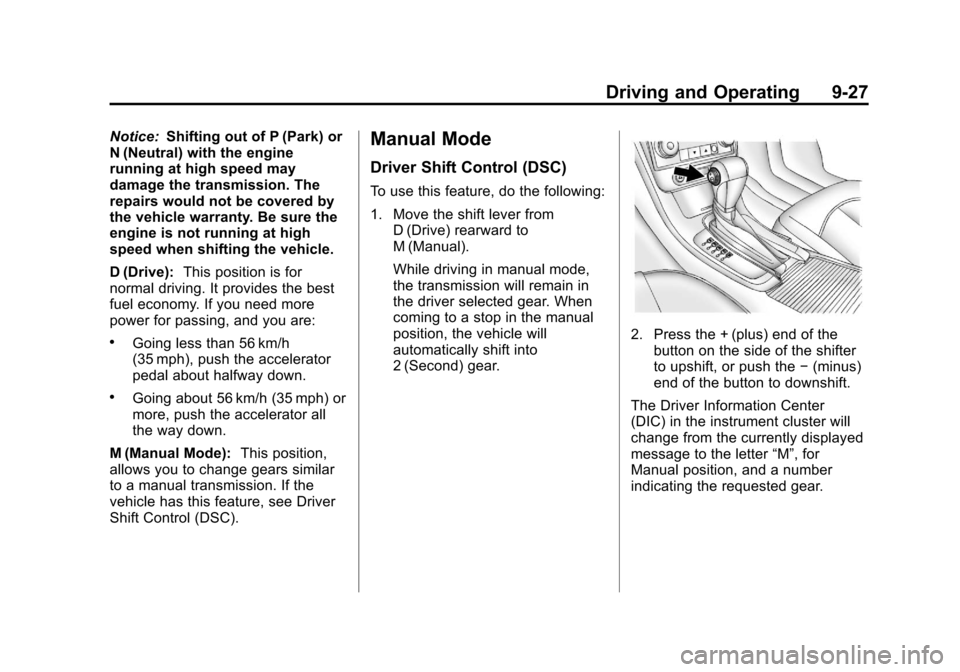
2. Press the + (plus) end of thebutton on the side of the shifter
to upshift, or push the −(minus)
end of the button to downshift.
The Driver Information Center
(DIC) in the instrument cluster will
change from the currently displayed
message to the letter “M”, for
Manual position, and a number
indicating the requested gear.
Page 224 of 382
Black plate (30,1)Chevrolet Malibu Owner Manual - 2011
9-30 Driving and Operating
pedal with your left foot until you
feel the pedal release. If the parking
brake is not released when you
begin to drive, the brake system
warning light comes on and a chime
sounds as a warning that the
parking brake is still on.
The PUSH PARK PEDAL message
will also display in the Driver
Information Center (DIC) as a
reminder to release the parking
brake. SeeDriver Information
Center (DIC) on page 5‑23.
Notice: Driving with the parking
brake on can overheat the brake
system and cause premature
wear or damage to brake system
parts. Make sure that the parking
brake is fully released and the
brake warning light is off before
driving.
If you are towing a trailer and are
parking on a hill, see Driving
Characteristics and Towing Tips
on
page 9‑43.
Brake Assist
This vehicle has a brake assist
feature designed to assist the driver
in stopping or decreasing vehicle
speed in emergency driving
conditions. This feature uses the
stability system hydraulic brake
control module to supplement the
power brake system under
conditions where the driver has
quickly and forcefully applied the
brake pedal in an attempt to quickly
stop or slow down the vehicle. The
stability system hydraulic brake
control module increases brake
pressure at each corner of the
vehicle until the ABS activates.
Minor brake pedal pulsation or
pedal movement during this time is
normal and the driver should
continue to apply the brake pedal as
the driving situation dictates. The
brake assist feature will
automatically disengage when the
brake pedal is released or brake
pedal pressure is quickly
decreased.
Ride Control Systems
Traction Control
System (TCS)
The vehicle may have a Traction
Control System (TCS) that limits
wheel spin. This is especially useful
in slippery road conditions. The
system operates only if it senses
that the front wheels are spinning
too much or are beginning to lose
traction. When this happens, the
system works the front brakes and
reduces engine power by closing
the throttle and managing engine
spark to limit wheel spin.
This light will flash when the traction
control system is limiting wheel spin.
Page 225 of 382
Black plate (31,1)Chevrolet Malibu Owner Manual - 2011
Driving and Operating 9-31
The system may be heard or felt
while it is working, but this is
normal.
If the vehicle is in cruise control
when TCS begins to limit wheel
spin, the cruise control will
automatically disengage. The cruise
control may be re-engaged when
road conditions allow. SeeCruise
Control on page 9‑34.
When this light is on solid and either
the SERVICE TRACTION or
TRACTION OFF message is
displayed, the system will not limit
wheel spin.
Adjust your driving accordingly. See
Ride Control System Messages
on
page 5‑28for more information. The Traction Control System is
automatically enabled whenever the
vehicle is started. To limit wheel
spin, especially in slippery road
conditions, always leave the system
enabled. TCS can be turned off if
needed.
It is recommended to leave the
system on for normal driving
conditions, but it may be necessary
to turn the system off if the vehicle
is stuck in sand, mud, ice or snow,
and you want to
“rock”the vehicle to
attempt to free it. It may also be
necessary to turn off the system
when driving in extreme off-road
conditions where high wheel spin is
required. See If the Vehicle is Stuck
on page 9‑11.
To turn the system off or on, press
and release this button located on
the center console.
The DIC will display the appropriate
message as described previously
when the button is pressed.
Traction Control Operation
Traction control limits wheel spin by
reducing engine power to the
wheels (engine speed management)
and by applying brakes to each
individual wheel (brake-traction
control) as necessary.
The traction control system is
enabled automatically when the
vehicle is started, and it will activate
and flash the ESC/TCS light and
display the LOW TRACTION