2011 CHEVROLET HHR mirror
[x] Cancel search: mirrorPage 1 of 430

Black plate (1,1)Chevrolet HHR Owner Manual - 2011
2011 Chevrolet HHR Owner ManualM
In Brief. . . . . . . . . . . . . . . . . . . . . . . . . . . . . . . . . . . . . . . . . . . . 1-1
Instrument Panel . . . . . . . . . . . . . . . . . . . . . . . . . . . . . . . . . 1-2
Initial Drive Information . . . . . . . . . . . . . . . . . . . . . . . . . . . 1-4
Vehicle Features . . . . . . . . . . . . . . . . . . . . . . . . . . . . . . . . 1-15
Performance and Maintenance . . . . . . . . . . . . . . . . . . 1-20
Seats and Restraint System . . . . . . . . . . . . . . . . . . . . . . 2-1
Head Restraints . . . . . . . . . . . . . . . . . . . . . . . . . . . . . . . . . . 2-2
Front Seats . . . . . . . . . . . . . . . . . . . . . . . . . . . . . . . . . . . . . . . 2-4
Rear Seats . . . . . . . . . . . . . . . . . . . . . . . . . . . . . . . . . . . . . . 2-12
Safety Belts . . . . . . . . . . . . . . . . . . . . . . . . . . . . . . . . . . . . . 2-14
Child Restraints . . . . . . . . . . . . . . . . . . . . . . . . . . . . . . . . . 2-34
Airbag System . . . . . . . . . . . . . . . . . . . . . . . . . . . . . . . . . . 2-58
Restraint System Check . . . . . . . . . . . . . . . . . . . . . . . . . 2-73
Features and Controls . . . . . . . . . . . . . . . . . . . . . . . . . . . . 3-1
Keys . . . . . . . . . . . . . . . . . . . . . . . . . . . . . . . . . . . . . . . . . . . . . 3-3
Doors and Locks . . . . . . . . . . . . . . . . . . . . . . . . . . . . . . . . . 3-8
Windows . . . . . . . . . . . . . . . . . . . . . . . . . . . . . . . . . . . . . . . . 3-15
Theft-Deterrent Systems . . . . . . . . . . . . . . . . . . . . . . . . 3-17
Starting and Operating Your Vehicle . . . . . . . . . . . . . 3-20 Mirrors . . . . . . . . . . . . . . . . . . . . . . . . . . . . . . . . . . . . . . . . . . 3-36
Object Detection Systems . . . . . . . . . . . . . . . . . . . . . . . 3-39
Storage Areas . . . . . . . . . . . . . . . . . . . . . . . . . . . . . . . . . . . 3-42
Sunroof . . . . . . . . . . . . . . . . . . . . . . . . . . . . . . . . . . . . . . . . . 3-48
Instrument Panel . . . . . . . . . . . . . . . . . . . . . . . . . . . . . . . . . 4-1
Instrument Panel Overview . . . . . . . . . . . . . . . . . . . . . . . 4-3
Climate Controls . . . . . . . . . . . . . . . . . . . . . . . . . . . . . . . . 4-18
Warning Lights, Gauges, and Indicators . . . . . . . . . 4-22
Driver Information Center (DIC) . . . . . . . . . . . . . . . . . 4-38
Audio System(s) . . . . . . . . . . . . . . . . . . . . . . . . . . . . . . . . 4-50
Driving Your Vehicle . . . . . . . . . . . . . . . . . . . . . . . . . . . . . . 5-1
Your Driving, the Road, and the Vehicle . . . . . . . . . . 5-2
Towing . . . . . . . . . . . . . . . . . . . . . . . . . . . . . . . . . . . . . . . . . . 5-28
Service and Appearance Care . . . . . . . . . . . . . . . . . . . 6-1
Service . . . . . . . . . . . . . . . . . . . . . . . . . . . . . . . . . . . . . . . . . . . 6-3
Fuel . . . . . . . . . . . . . . . . . . . . . . . . . . . . . . . . . . . . . . . . . . . . . . 6-5
Checking Things Under the Hood . . . . . . . . . . . . . . . 6-12
Headlamp Aiming . . . . . . . . . . . . . . . . . . . . . . . . . . . . . . . 6-38
Page 7 of 430
Black plate (1,1)Chevrolet HHR Owner Manual - 2011
Section 1 In Brief
Instrument Panel. . . . . . . . . . . . . . . . . . . . . . . . . . . . . . . . . . . 1-2
Initial Drive Information . . . . . . . . . . . . . . . . . . . . . . . . . . . 1-4
Remote Keyless Entry (RKE) System . . . . . . . . . . . 1-4
Remote Vehicle Start . . . . . . . . . . . . . . . . . . . . . . . . . . . 1-4
Door Locks . . . . . . . . . . . . . . . . . . . . . . . . . . . . . . . . . . . . . 1-5
Liftgate . . . . . . . . . . . . . . . . . . . . . . . . . . . . . . . . . . . . . . . . . . 1-5
Windows . . . . . . . . . . . . . . . . . . . . . . . . . . . . . . . . . . . . . . . . 1-6
Seat Adjustment . . . . . . . . . . . . . . . . . . . . . . . . . . . . . . . . 1-6
Second Row Seats . . . . . . . . . . . . . . . . . . . . . . . . . . . . . 1-8
Heated Seats . . . . . . . . . . . . . . . . . . . . . . . . . . . . . . . . . . . 1-9
Head Restraint Adjustment . . . . . . . . . . . . . . . . . . . . . . 1-9
Safety Belt . . . . . . . . . . . . . . . . . . . . . . . . . . . . . . . . . . . . . . 1-9
Sensing System for Passenger Airbag . . . . . . . . . 1-10
Mirror Adjustment . . . . . . . . . . . . . . . . . . . . . . . . . . . . . . 1-10
Steering Wheel Adjustment . . . . . . . . . . . . . . . . . . . . 1-11
Interior Lighting . . . . . . . . . . . . . . . . . . . . . . . . . . . . . . . . 1-12
Exterior Lighting . . . . . . . . . . . . . . . . . . . . . . . . . . . . . . . 1-12
Windshield Wiper/Washer . . . . . . . . . . . . . . . . . . . . . . 1-13
Climate Controls . . . . . . . . . . . . . . . . . . . . . . . . . . . . . . . 1-14
Vehicle Features . . . . . . . . . . . . . . . . . . . . . . . . . . . . . . . . . . 1-15
Radio(s) . . . . . . . . . . . . . . . . . . . . . . . . . . . . . . . . . . . . . . . 1-15
Satellite Radio . . . . . . . . . . . . . . . . . . . . . . . . . . . . . . . . . 1-16 Portable Audio Devices (Auxiliary Input or
USB Port) . . . . . . . . . . . . . . . . . . . . . . . . . . . . . . . . . . . 1-16
Steering Wheel Controls . . . . . . . . . . . . . . . . . . . . . . . 1-17
Bluetooth
®. . . . . . . . . . . . . . . . . . . . . . . . . . . . . . . . . . . . . 1-17
Driver Information Center (DIC) . . . . . . . . . . . . . . . . 1-17
Cruise Control . . . . . . . . . . . . . . . . . . . . . . . . . . . . . . . . . 1-18
Storage Compartments . . . . . . . . . . . . . . . . . . . . . . . . 1-19
Power Outlets . . . . . . . . . . . . . . . . . . . . . . . . . . . . . . . . . 1-20
Performance and Maintenance . . . . . . . . . . . . . . . . . .1-20
Traction Control System (TCS) . . . . . . . . . . . . . . . . 1-20
Electronic Stability Control (ESC) . . . . . . . . . . . . . . 1-20
Tire Pressure Monitor . . . . . . . . . . . . . . . . . . . . . . . . . . 1-21
Tire Sealant and Compressor Kit . . . . . . . . . . . . . . 1-21
Engine Oil Life System . . . . . . . . . . . . . . . . . . . . . . . . 1-21
Fuel E85 (85% Ethanol) . . . . . . . . . . . . . . . . . . . . . . . 1-22
Driving for Better Fuel Economy . . . . . . . . . . . . . . . 1-22
Battery . . . . . . . . . . . . . . . . . . . . . . . . . . . . . . . . . . . . . . . . . 1-23
Roadside Assistance Program . . . . . . . . . . . . . . . . . 1-23
OnStar
®. . . . . . . . . . . . . . . . . . . . . . . . . . . . . . . . . . . . . . . 1-23
1-1
Page 16 of 430
Black plate (10,1)Chevrolet HHR Owner Manual - 2011
Sensing System for Passenger
Airbag
The passenger sensing system, if equipped, will turn off
the right front passenger frontal airbag under certain
conditions. The driver airbags and roof‐rail airbags are
not affected by this.
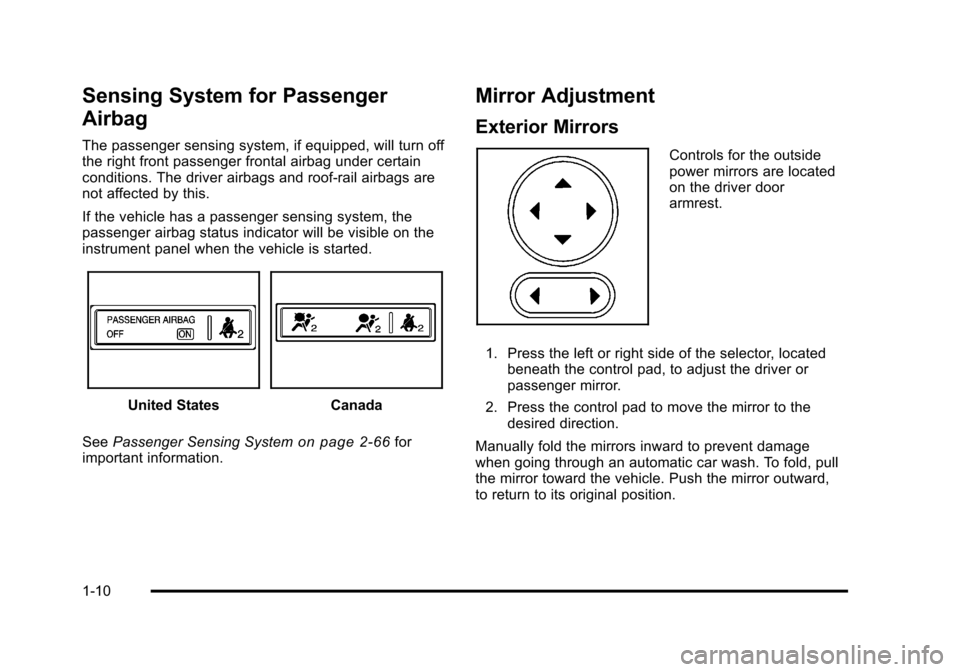
If the vehicle has a passenger sensing system, the
passenger airbag status indicator will be visible on the
instrument panel when the vehicle is started.
United StatesCanada
See Passenger Sensing System
on page 2‑66for
important information.
Mirror Adjustment
Exterior Mirrors
Controls for the outside
power mirrors are located
on the driver door
armrest.
1. Press the left or right side of the selector, located beneath the control pad, to adjust the driver or
passenger mirror.
2. Press the control pad to move the mirror to the desired direction.
Manually fold the mirrors inward to prevent damage
when going through an automatic car wash. To fold, pull
the mirror toward the vehicle. Push the mirror outward,
to return to its original position.
1-10
Page 17 of 430
Black plate (11,1)Chevrolet HHR Owner Manual - 2011
Interior Mirror
Vehicles with a manual rearview mirror can be adjusted
by holding the mirror in the center to move it for a
clearer view behind the vehicle. To avoid glare from the
headlamps behind you, push the tab, located at the
base of the mirror, toward you for daytime use and pull
it for nighttime use.
Vehicles with an automatic dimming rearview mirror will
automatically reduce the glare from the headlamps of
the vehicle behind. The dimming feature comes on and
the indicator light illuminates each time the ignition is
turned to start.
SeeAutomatic Dimming Rearview Mirror on page 3‑36.
Steering Wheel Adjustment
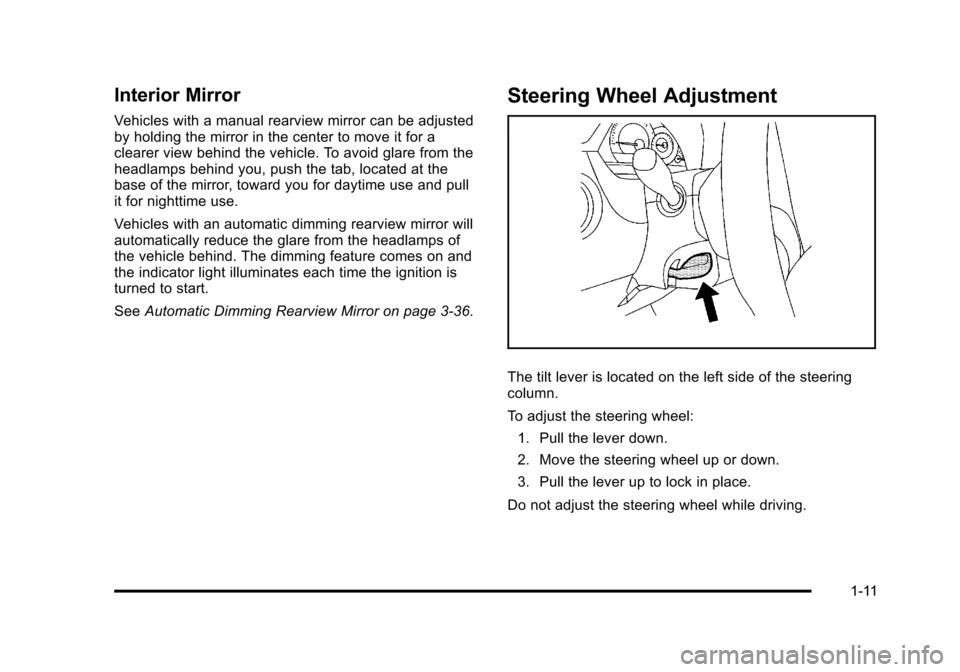
The tilt lever is located on the left side of the steering
column.
To adjust the steering wheel:
1. Pull the lever down.
2. Move the steering wheel up or down.
3. Pull the lever up to lock in place.
Do not adjust the steering wheel while driving.
1-11
Page 108 of 430
Black plate (2,1)Chevrolet HHR Owner Manual - 2011
Section 3 Features and Controls
Mirrors. . . . . . . . . . . . . . . . . . . . . . . . . . . . . . . . . . . . . . . . . . . . 3-36
Manual Rearview Mirror . . . . . . . . . . . . . . . . . . . . . . . . 3-36
Automatic Dimming Rearview Mirror . . . . . . . . . . . 3-36
Compass . . . . . . . . . . . . . . . . . . . . . . . . . . . . . . . . . . . . . . 3-36
Outside Power Mirrors . . . . . . . . . . . . . . . . . . . . . . . . . 3-38
Outside Convex Mirror . . . . . . . . . . . . . . . . . . . . . . . . . 3-38
Object Detection Systems . . . . . . . . . . . . . . . . . . . . . . .3-39
Rear Vision Camera (RVC) . . . . . . . . . . . . . . . . . . . . 3-39
Storage Areas . . . . . . . . . . . . . . . . . . . . . . . . . . . . . . . . . . . . 3-42
Glove Box . . . . . . . . . . . . . . . . . . . . . . . . . . . . . . . . . . . . . 3-42
Cupholders . . . . . . . . . . . . . . . . . . . . . . . . . . . . . . . . . . . . 3-42 Instrument Panel Storage . . . . . . . . . . . . . . . . . . . . . 3-42
Floor Console Storage Area . . . . . . . . . . . . . . . . . . . 3-42
Floor Mats . . . . . . . . . . . . . . . . . . . . . . . . . . . . . . . . . . . . . 3-42
Rear Storage Area . . . . . . . . . . . . . . . . . . . . . . . . . . . . . 3-43
Rear Compartment Storage Panel/Cover . . . . . . 3-44
Roof Rack System . . . . . . . . . . . . . . . . . . . . . . . . . . . . . 3-46
Convenience Net . . . . . . . . . . . . . . . . . . . . . . . . . . . . . . 3-46
Hideaway Rear Storage Bins . . . . . . . . . . . . . . . . . . 3-47
Sunroof . . . . . . . . . . . . . . . . . . . . . . . . . . . . . . . . . . . . . . . . . . . 3-48
3-2
Page 123 of 430
Black plate (17,1)Chevrolet HHR Owner Manual - 2011
Express-Down Window
The driver's window switch has an express-down
feature that allows the window to be lowered without
holding the switch. Press the switch part way, and the
driver's window will open a small amount. Press the
switch down all the way, release it, and the window will
go down automatically.
To stop the window while it is lowering, press and
release the top of, or pull up on the switch.
Window Lockout
o(Window Lockout): Your vehicle has a lockout
feature to prevent rear seat passengers from operating
the windows. Press the lockout button, located with the
power window switches, to turn the feature on and off.
When the red band on the button is showing, the
lockout feature is off.
Sun Visors
To block out glare, swing down the visor(s). The sun
visors can also be detached from the center mount and
swung out to cover the side windows. They can also be
slid along the rod to cover different areas of the front
window.
Visor Vanity Mirrors
Your vehicle has visor vanity mirrors. Swing down the
sun visor and lift the cover to expose the mirror.
Theft-Deterrent Systems
This vehicle has theft-deterrent features, however, they
do not make it impossible to steal.
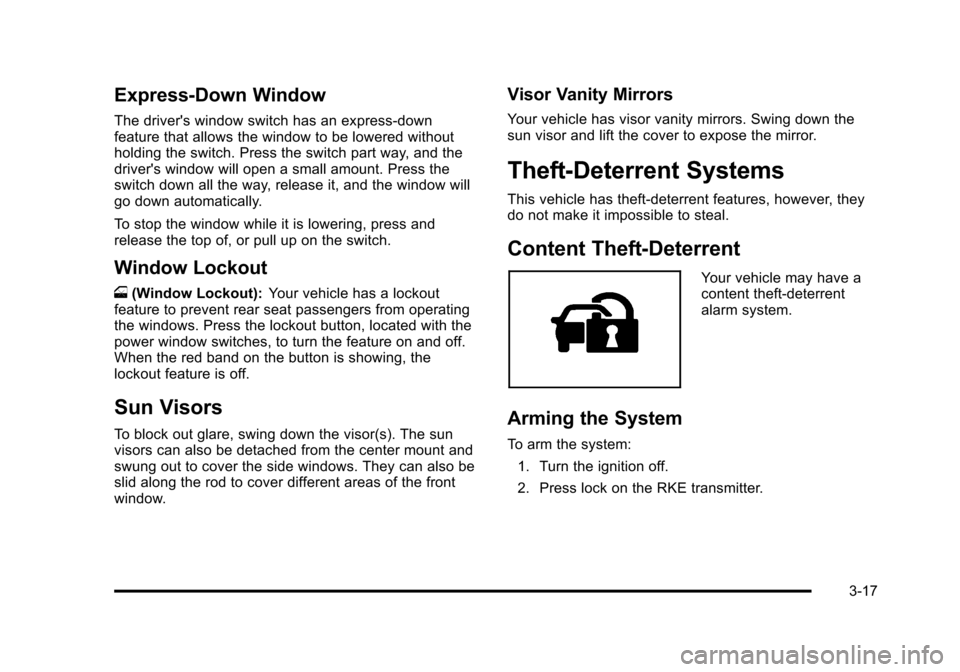
Content Theft-Deterrent
Your vehicle may have a
content theft-deterrent
alarm system.
Arming the System
To arm the system:
1. Turn the ignition off.
2. Press lock on the RKE transmitter.
3-17
Page 142 of 430
Black plate (36,1)Chevrolet HHR Owner Manual - 2011
Mirrors
Manual Rearview Mirror
Hold the inside rearview mirror in the center to move it
for a clearer view behind your vehicle. Adjust the mirror
to avoid glare from the headlamps behind you. Push the
tab forward for daytime use and pull it for nighttime use.
If the vehicle has map lamps, press the buttons located
at the bottom of the mirror to turn them on or off.
Automatic Dimming Rearview Mirror
The vehicle may have an automatic dimming inside
rearview mirror with a compass and map lights and/or
OnStar
®.
Vehicles with OnStar have three additional control
buttons located at the bottom of the mirror. See your
dealer for more information on the system and how to
subscribe to OnStar
®. See the OnStar®owners guide
for more information about the services OnStar
provides.
Press the buttons located at the bottom of the mirror to
turn the map lights on or off.
O(On/Off): Press to turn the dimming feature on or off.
Automatic Dimming Mirror Operation
Automatic dimming reduces the glare of lights from
behind the vehicle. The dimming feature comes on and
the indicator light illuminates each time the vehicle is
started.
Cleaning the Mirror
Do not spray glass cleaner directly on the mirror. Use a
soft towel dampened with water.
Compass
Compass Operation
Y
/O(On/Off): If the vehicle has one of these buttons,
press to turn the compass on or off.
With the compass feature on, each time the vehicle is
started, the compass displays the current compass
direction after a few seconds.
Compass Calibration
If after a few seconds the display does not show a
compass direction, (N for North for example), there may
be a strong magnetic field interfering with the compass.
Interference can be caused by a magnetic antenna
mount, note pad holder, or similar object. If CAL
appears in the compass window, the compass may
need to be reset or calibrated.
3-36
Page 143 of 430
Black plate (37,1)Chevrolet HHR Owner Manual - 2011
To calibrate the compass:1. Make sure CAL is displayed. If CAL is not displayed, press and hold the compass button until
CAL displays.
2. While CAL displays, drive the vehicle in circles at 5 mph (8 km/h) or less until the display reads a
direction.
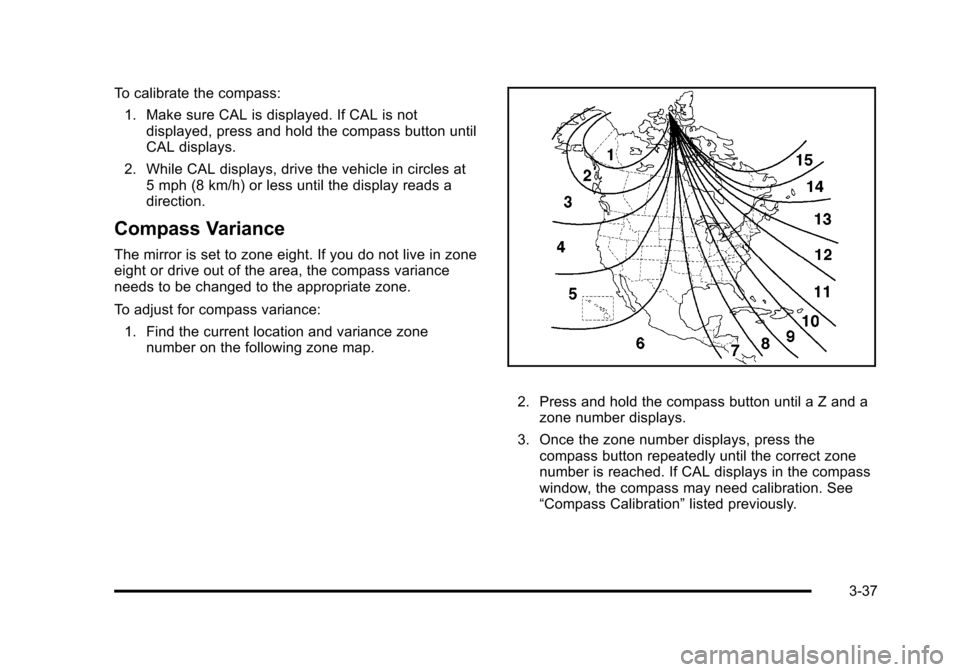
Compass Variance
The mirror is set to zone eight. If you do not live in zone
eight or drive out of the area, the compass variance
needs to be changed to the appropriate zone.
To adjust for compass variance:
1. Find the current location and variance zone number on the following zone map.
2. Press and hold the compass button until a Z and a
zone number displays.
3. Once the zone number displays, press the compass button repeatedly until the correct zone
number is reached. If CAL displays in the compass
window, the compass may need calibration. See
“Compass Calibration” listed previously.
3-37