2011 CHEVROLET HHR warning light
[x] Cancel search: warning lightPage 137 of 430
Black plate (31,1)Chevrolet HHR Owner Manual - 2011
WARNING: (Continued)
or others could be injured. Move your hand lower
on the lever or raise the seat back so that you can
set the brake.
To set the parking brake, hold the brake pedal down
and pull up on the parking brake lever. If the ignition is
on, the brake system warning light will come on. See
Brake System Warning Light on page 4‑29.
To release the parking brake, hold the brake pedal
down. Pull the parking brake lever up until you can
press the release button. Hold the release button in as
you move the brake lever all the way down.
If you forget to release your parking brake, a chime will
sound and a warning message will be displayed when
the parking brake is applied and the vehicle is moving
faster than 5 mph (8 km/h). See DIC Warnings and
Messages on page 4‑40.
Notice: Driving with the parking brake on can
overheat the brake system and cause premature
wear or damage to brake system parts. Make sure
that the parking brake is fully released and the
brake warning light is off before driving. If parking on a hill and pulling a trailer, see
Towing a
Trailer (Automatic Transmission)
on page 5‑31or
Towing a Trailer (Manual Transmission) on page 5‑37.
Shifting Into Park (Automatic
Transmission)
{WARNING:
It can be dangerous to get out of the vehicle if the
shift lever is not fully in P (Park) with the parking
brake firmly set. The vehicle can roll. If you have
left the engine running, the vehicle can move
suddenly. You or others could be injured. To be
sure the vehicle will not move, even when you are
on fairly level ground, use the steps that follow.
If you are pulling a trailer, see Towing a Trailer
(Automatic Transmission)
on page 5‑31or
Towing a Trailer (Manual Transmission)
on
page 5‑37
.
To shift into P (Park): 1. Hold the brake pedal down and set the parking brake. See Parking Brake
on page 3‑30for more
information.
3-31
Page 145 of 430
Black plate (39,1)Chevrolet HHR Owner Manual - 2011
Object Detection Systems
Rear Vision Camera (RVC)
The vehicle may have a Rear Vision Camera system.
Read this entire section before using it.
{WARNING:
The Rear Vision Camera (RVC) system does not
replace driver vision. RVC does not:
.Detect objects that are outside the camera's
field of view, below the bumper, or underneath
the vehicle.
.Detect children, pedestrians, bicyclists,
or pets.
Do not back the vehicle by only looking at the
RVC screen, or use the screen during longer,
higher speed backing maneuvers or where there
could be cross-traffic. Your judged distances using
the screen will differ from actual distances.
If you do not use proper care before backing up,
you could hit a vehicle, child, pedestrian, bicyclist,
or pet, resulting in vehicle damage, injury, (Continued)
WARNING: (Continued)
or death. Even though the vehicle has the RVC
system, always check carefully before backing up
by checking behind and around the vehicle.
The rear vision camera system is designed to help the
driver when backing up by displaying a view of the area
behind the vehicle. When the key is in the ON/RUN
position and the driver shifts the vehicle into
R (Reverse), the video image automatically appears on
the inside rear view mirror. Once the driver shifts out of
R (Reverse), the video image automatically disappears
from the inside rear view mirror.
Turning the Rear Vision Camera System Off
or On
To turn off the rear vision camera system, press and
hold
z, located on the inside rearview mirror, until the
left indicator light turns off. The rear vision camera
display is now disabled.
To turn the rear vision camera system on again, press
and hold
zuntil the left indicator light illuminates. The
rear vision camera system display is now enabled and
the display will appear in the mirror normally.
3-39
Page 157 of 430
Black plate (1,1)Chevrolet HHR Owner Manual - 2011
Section 4 Instrument Panel
Instrument Panel Overview. . . . . . . . . . . . . . . . . . . . . . . .4-3
Hazard Warning Flashers . . . . . . . . . . . . . . . . . . . . . . . 4-3
Horn . . . . . . . . . . . . . . . . . . . . . . . . . . . . . . . . . . . . . . . . . . . . 4-3
Tilt Wheel . . . . . . . . . . . . . . . . . . . . . . . . . . . . . . . . . . . . . . . 4-3
Turn Signal/Multifunction Lever . . . . . . . . . . . . . . . . . . 4-4
Turn and Lane-Change Signals . . . . . . . . . . . . . . . . . 4-4
Headlamp High/Low-Beam Changer . . . . . . . . . . . . 4-5
Flash-to-Pass . . . . . . . . . . . . . . . . . . . . . . . . . . . . . . . . . . . 4-5
Windshield Wipers . . . . . . . . . . . . . . . . . . . . . . . . . . . . . . 4-5
Windshield Washer . . . . . . . . . . . . . . . . . . . . . . . . . . . . . 4-6
Rear Window Wiper/Washer . . . . . . . . . . . . . . . . . . . . 4-7
Cruise Control . . . . . . . . . . . . . . . . . . . . . . . . . . . . . . . . . . 4-8
Headlamps . . . . . . . . . . . . . . . . . . . . . . . . . . . . . . . . . . . . 4-11
Wiper Activated Headlamps . . . . . . . . . . . . . . . . . . . 4-12
Headlamps on Reminder . . . . . . . . . . . . . . . . . . . . . . 4-12
Daytime Running Lamps (DRL) . . . . . . . . . . . . . . . . 4-12
Automatic Headlamp System . . . . . . . . . . . . . . . . . . 4-13
Fog Lamps . . . . . . . . . . . . . . . . . . . . . . . . . . . . . . . . . . . . 4-13
Instrument Panel Brightness . . . . . . . . . . . . . . . . . . . 4-14
Dome Lamp . . . . . . . . . . . . . . . . . . . . . . . . . . . . . . . . . . . 4-14
Entry/Exit Lighting . . . . . . . . . . . . . . . . . . . . . . . . . . . . . 4-14
Reading Lamps . . . . . . . . . . . . . . . . . . . . . . . . . . . . . . . . 4-14
Electric Power Management . . . . . . . . . . . . . . . . . . . 4-15
Battery Run-Down Protection . . . . . . . . . . . . . . . . . . 4-15
Accessory Power Outlet(s) . . . . . . . . . . . . . . . . . . . . . 4-15
Ashtray(s) and Cigarette Lighter . . . . . . . . . . . . . . . 4-17 Climate Controls
. . . . . . . . . . . . . . . . . . . . . . . . . . . . . . . . . . 4-18
Climate Control System . . . . . . . . . . . . . . . . . . . . . . . . 4-18
Outlet Adjustment . . . . . . . . . . . . . . . . . . . . . . . . . . . . . . 4-20
Passenger Compartment Air Filter . . . . . . . . . . . . . 4-21
Warning Lights, Gauges, and Indicators . . . . . . . .4-22
Instrument Panel Cluster . . . . . . . . . . . . . . . . . . . . . . . 4-23
Speedometer and Odometer . . . . . . . . . . . . . . . . . . . 4-24
Tachometer . . . . . . . . . . . . . . . . . . . . . . . . . . . . . . . . . . . . 4-24
Safety Belt Reminders . . . . . . . . . . . . . . . . . . . . . . . . . 4-25
Airbag Readiness Light . . . . . . . . . . . . . . . . . . . . . . . . 4-26
Passenger Airbag Status Indicator . . . . . . . . . . . . . 4-27
Charging System Light . . . . . . . . . . . . . . . . . . . . . . . . 4-28
Up-Shift Light . . . . . . . . . . . . . . . . . . . . . . . . . . . . . . . . . . 4-28
Brake System Warning Light . . . . . . . . . . . . . . . . . . . 4-29
Antilock Brake System (ABS) Warning Light . . . 4-30
Enhanced Traction System (ETS) Indicator/ Warning Light . . . . . . . . . . . . . . . . . . . . . . . . . . . . . . . . 4-30
Electronic Stability Control (ESC)/Traction Control System (TCS) Indicator/Warning
Light . . . . . . . . . . . . . . . . . . . . . . . . . . . . . . . . . . . . . . . . . 4-31
Engine Coolant Temperature Warning Light . . . . 4-32
Engine Coolant Temperature Gauge . . . . . . . . . . . 4-32
Tire Pressure Light . . . . . . . . . . . . . . . . . . . . . . . . . . . . 4-33
Malfunction Indicator Lamp . . . . . . . . . . . . . . . . . . . . 4-33
Oil Pressure Light . . . . . . . . . . . . . . . . . . . . . . . . . . . . . 4-36
Security Light . . . . . . . . . . . . . . . . . . . . . . . . . . . . . . . . . . 4-36
4-1
Page 158 of 430
Black plate (2,1)Chevrolet HHR Owner Manual - 2011
Section 4 Instrument Panel
Front Fog Lamp Light . . . . . . . . . . . . . . . . . . . . . . . . . . 4-36
Highbeam On Light . . . . . . . . . . . . . . . . . . . . . . . . . . . . 4-37
Fuel Gauge . . . . . . . . . . . . . . . . . . . . . . . . . . . . . . . . . . . . 4-37
Driver Information Center (DIC) . . . . . . . . . . . . . . . . . .4-38
DIC Operation and Displays . . . . . . . . . . . . . . . . . . . 4-38
DIC Warnings and Messages . . . . . . . . . . . . . . . . . . 4-40
DIC Vehicle Personalization . . . . . . . . . . . . . . . . . . . 4-45
Audio System(s) . . . . . . . . . . . . . . . . . . . . . . . . . . . . . . . . . . 4-50
Setting the Clock . . . . . . . . . . . . . . . . . . . . . . . . . . . . . . 4-51
Radio(s) . . . . . . . . . . . . . . . . . . . . . . . . . . . . . . . . . . . . . . . 4-53 Using an MP3 . . . . . . . . . . . . . . . . . . . . . . . . . . . . . . . . . 4-63
XM Radio Messages . . . . . . . . . . . . . . . . . . . . . . . . . . . 4-70
Bluetooth
®. . . . . . . . . . . . . . . . . . . . . . . . . . . . . . . . . . . . . 4-71
Theft-Deterrent Feature . . . . . . . . . . . . . . . . . . . . . . . . 4-79
Audio Steering Wheel Controls . . . . . . . . . . . . . . . . 4-79
Radio Reception . . . . . . . . . . . . . . . . . . . . . . . . . . . . . . . 4-80
Fixed Mast Antenna . . . . . . . . . . . . . . . . . . . . . . . . . . . 4-81
XM™ Satellite Radio Antenna System . . . . . . . . . 4-81
Chime Level Adjustment . . . . . . . . . . . . . . . . . . . . . . . 4-81
4-2
Page 164 of 430
Black plate (8,1)Chevrolet HHR Owner Manual - 2011
Cruise Control
With cruise control, a speed of about 40 km (25 mph) or
more can be maintained without keeping your foot on
the accelerator. Cruise control does not work at speeds
below 40 km (25 mph).
The brake must be applied at least one time, after the
vehicle has been started, before cruise control will
function.
{WARNING:
Cruise control can be dangerous where you
cannot drive safely at a steady speed. So, do not
use the cruise control on winding roads or in
heavy traffic.
Cruise control can be dangerous on slippery
roads. On such roads, fast changes in tire traction
can cause excessive wheel slip, and you could
lose control. Do not use cruise control on slippery
roads.
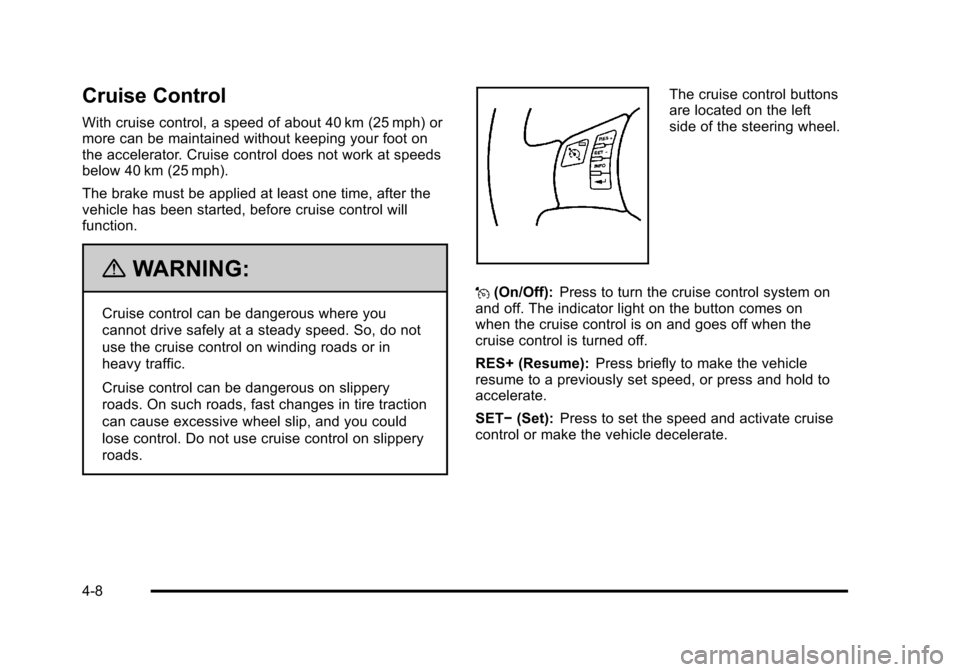
The cruise control buttons
are located on the left
side of the steering wheel.
J (On/Off): Press to turn the cruise control system on
and off. The indicator light on the button comes on
when the cruise control is on and goes off when the
cruise control is turned off.
RES+ (Resume): Press briefly to make the vehicle
resume to a previously set speed, or press and hold to
accelerate.
SET− (Set): Press to set the speed and activate cruise
control or make the vehicle decelerate.
4-8
Page 168 of 430
Black plate (12,1)Chevrolet HHR Owner Manual - 2011
Wiper Activated Headlamps
The headlamps and parking lamps are activated
15 seconds after the windshield wipers are turned on.
For this feature to work, automatic lighting must be
enabled. SeeHeadlamps
on page 4‑11for additional
information.
When the ignition is turned off, the wiper-activated
headlamps will immediately turn off. They also turn off
15 seconds after the windshield wiper control is
turned off.
Headlamps on Reminder
If the drivers door is opened with the ignition off and the
lamps on, a warning chime will sound. This indicates
that the headlamps are still on.
Daytime Running Lamps (DRL)
Daytime Running Lamps (DRL) can make it easier for
others to see the front of your vehicle during the day.
Fully functional daytime running lamps are required on
all vehicles first sold in Canada. The vehicle has a light sensor on top of the instrument
panel. Do not cover this sensor or the headlamps will
come on when they are not needed.
The DRL system will make the headlamps come on at
reduced brightness when the following conditions
are met:
.The ignition is on.
.The exterior lamp control is turned to AUTO.
.The light sensor detects daytime light.
.The shift lever is not in P (Park).
While the DRL system is on, the taillamps, sidemarker
lamps, and instrument panel lights will not be on.
For vehicles with an Automatic Transmission, the
DRL system is off any time the vehicle is in P (Park).
For vehicles with a Manual Transmission, the DRL
system will be off when the vehicle is first started, the
park brake is applied, and the vehicle has not moved.
The DRL system on U.S. vehicles can also be turned
off by using the off/on switch for one ignition cycle.
The regular headlamp system should be turned on
when needed.
4-12
Page 173 of 430
Black plate (17,1)Chevrolet HHR Owner Manual - 2011
This plug can be used to supply power to commercial
converters and contains four different circuits. The
functions of these circuits are as follows; a 40 Amp
battery service, a 10 Amp Accessory or Run service, a
15 Amp Delayed Accessory service and a Ground
circuit.
{WARNING:
Power is always supplied to the outlets. Do not
leave electrical equipment plugged in when the
vehicle is not in use because the vehicle could
catch fire and cause injury or death.
Notice: Leaving electrical equipment plugged in for
an extended period of time while the vehicle is off
will drain the battery. Power is always supplied to
the outlets. Always unplug electrical equipment
when not in use and do not plug in equipment that
exceeds the maximum 40 ampere rating.
When adding electrical equipment, be sure to follow the
installation instructions included with the equipment.
See Add-On Electrical Equipment on page 6‑100. Notice:
Hanging heavy equipment from the power
outlet can cause damage not covered by the vehicle
warranty. The power outlets are designed for
accessory power plugs only, such as cell phone
charge cords.
Ashtray(s) and Cigarette Lighter
The vehicle may have an ashtray and cigarette lighter.
To use the lighter, located on the instrument panel
below the climate controls, push it in all the way and let
go. When it is ready, it will pop back out by itself.
Notice: Holding a cigarette lighter in while it is
heating will not allow the lighter to back away from
the heating element when it is hot. Damage from
overheating may occur to the lighter or heating
element, or a fuse could be blown. Do not hold a
cigarette lighter in while it is heating. Do not use
equipment exceeding maximum amperage rating of
15 amperes.
To clean the center console ashtray, remove the entire
ashtray and empty it.
Notice: If papers, pins, or other flammable items are
put in the ashtray, hot cigarettes or other smoking
materials could ignite them and possibly damage
the vehicle. Never put flammable items in the
ashtray.
4-17
Page 178 of 430
Black plate (22,1)Chevrolet HHR Owner Manual - 2011
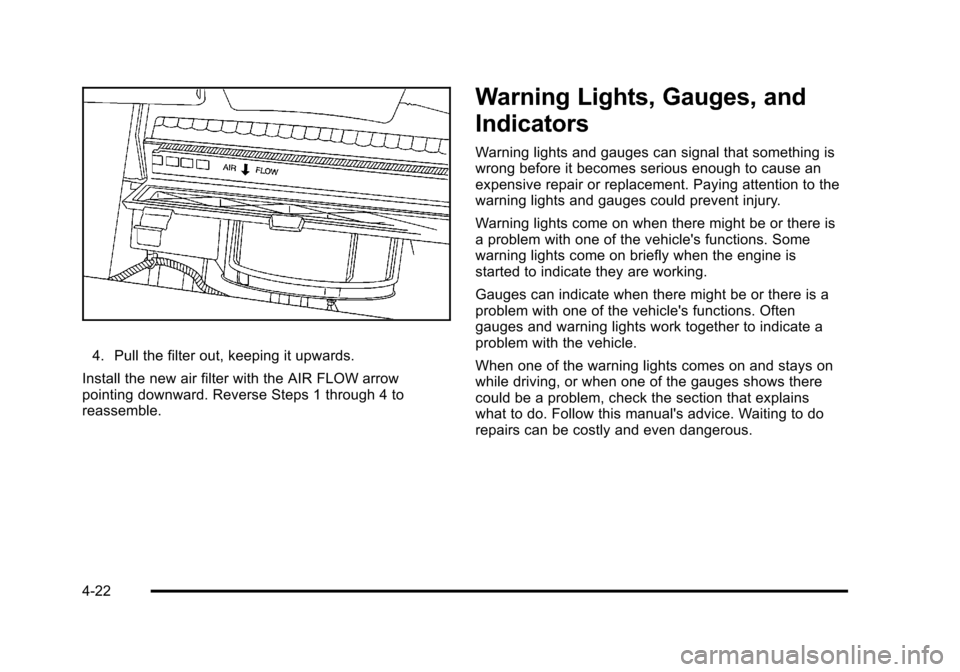
4. Pull the filter out, keeping it upwards.
Install the new air filter with the AIR FLOW arrow
pointing downward. Reverse Steps 1 through 4 to
reassemble.
Warning Lights, Gauges, and
Indicators
Warning lights and gauges can signal that something is
wrong before it becomes serious enough to cause an
expensive repair or replacement. Paying attention to the
warning lights and gauges could prevent injury.
Warning lights come on when there might be or there is
a problem with one of the vehicle's functions. Some
warning lights come on briefly when the engine is
started to indicate they are working.
Gauges can indicate when there might be or there is a
problem with one of the vehicle's functions. Often
gauges and warning lights work together to indicate a
problem with the vehicle.
When one of the warning lights comes on and stays on
while driving, or when one of the gauges shows there
could be a problem, check the section that explains
what to do. Follow this manual's advice. Waiting to do
repairs can be costly and even dangerous.
4-22