2011 CHEVROLET EQUINOX keyless entry
[x] Cancel search: keyless entryPage 43 of 446
Black plate (7,1)Chevrolet Equinox Owner Manual - 2011
Keys, Doors and Windows 2-7
WARNING (Continued)
.Outsiders can easily enter
through an unlocked door
when slowing or stopping the
vehicle. Lock the doors to
help prevent this from
happening.
To lock or unlock a door from the
outside of the vehicle, use the
Remote Keyless Entry (RKE)
transmitter. Pull the handle once
from the inside to unlock the door,
and a second time to open it.
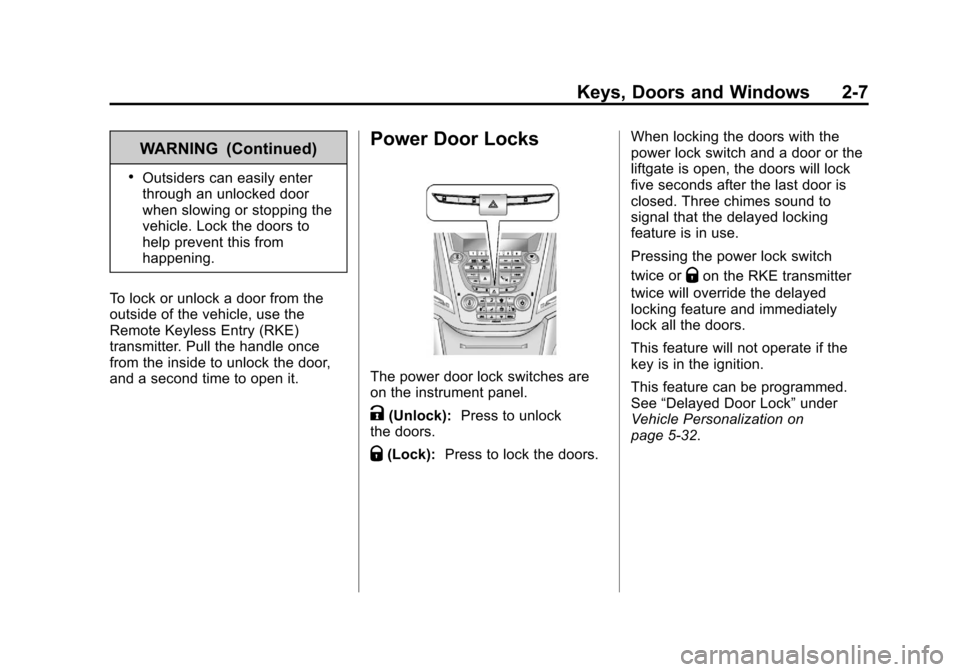
Power Door Locks
The power door lock switches are
on the instrument panel.
K(Unlock): Press to unlock
the doors.
Q(Lock): Press to lock the doors. When locking the doors with the
power lock switch and a door or the
liftgate is open, the doors will lock
five seconds after the last door is
closed. Three chimes sound to
signal that the delayed locking
feature is in use.
Pressing the power lock switch
twice or
Qon the RKE transmitter
twice will override the delayed
locking feature and immediately
lock all the doors.
This feature will not operate if the
key is in the ignition.
This feature can be programmed.
See “Delayed Door Lock” under
Vehicle Personalization on
page 5‑32.
Page 46 of 446
Black plate (10,1)Chevrolet Equinox Owner Manual - 2011
2-10 Keys, Doors and Windows
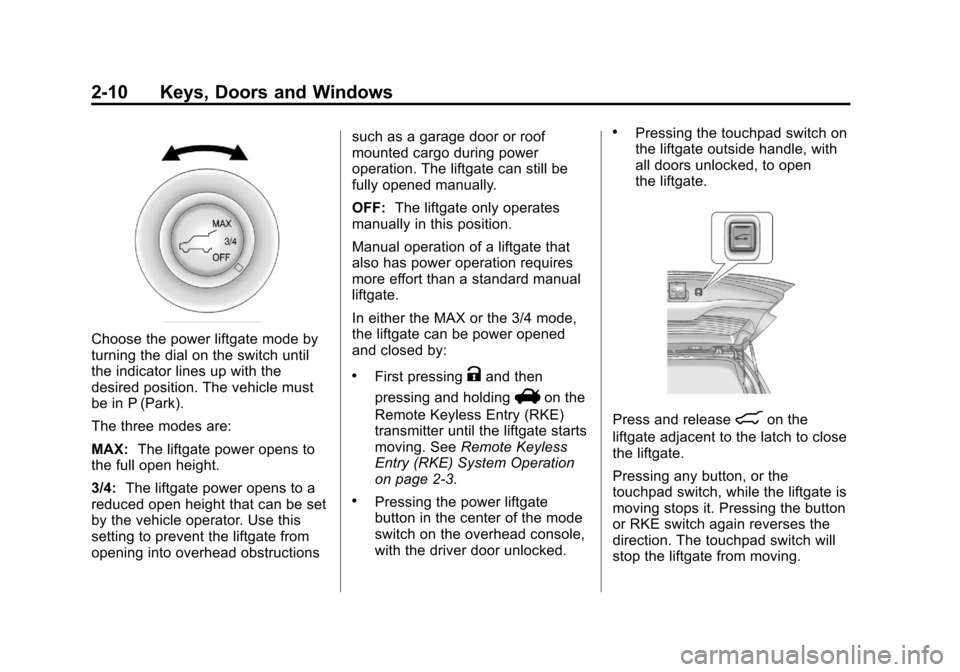
Choose the power liftgate mode by
turning the dial on the switch until
the indicator lines up with the
desired position. The vehicle must
be in P (Park).
The three modes are:
MAX:The liftgate power opens to
the full open height.
3/4: The liftgate power opens to a
reduced open height that can be set
by the vehicle operator. Use this
setting to prevent the liftgate from
opening into overhead obstructions such as a garage door or roof
mounted cargo during power
operation. The liftgate can still be
fully opened manually.
OFF:
The liftgate only operates
manually in this position.
Manual operation of a liftgate that
also has power operation requires
more effort than a standard manual
liftgate.
In either the MAX or the 3/4 mode,
the liftgate can be power opened
and closed by:
.First pressingKand then
pressing and holding
Von the
Remote Keyless Entry (RKE)
transmitter until the liftgate starts
moving. See Remote Keyless
Entry (RKE) System Operation
on page 2‑3.
.Pressing the power liftgate
button in the center of the mode
switch on the overhead console,
with the driver door unlocked.
.Pressing the touchpad switch on
the liftgate outside handle, with
all doors unlocked, to open
the liftgate.
Press and release&on the
liftgate adjacent to the latch to close
the liftgate.
Pressing any button, or the
touchpad switch, while the liftgate is
moving stops it. Pressing the button
or RKE switch again reverses the
direction. The touchpad switch will
stop the liftgate from moving.
Page 60 of 446
Black plate (4,1)Chevrolet Equinox Owner Manual - 2011
3-4 Seats and Restraints
To adjust the lumbar support, see
Lumbar Adjustment on page 3‑6.
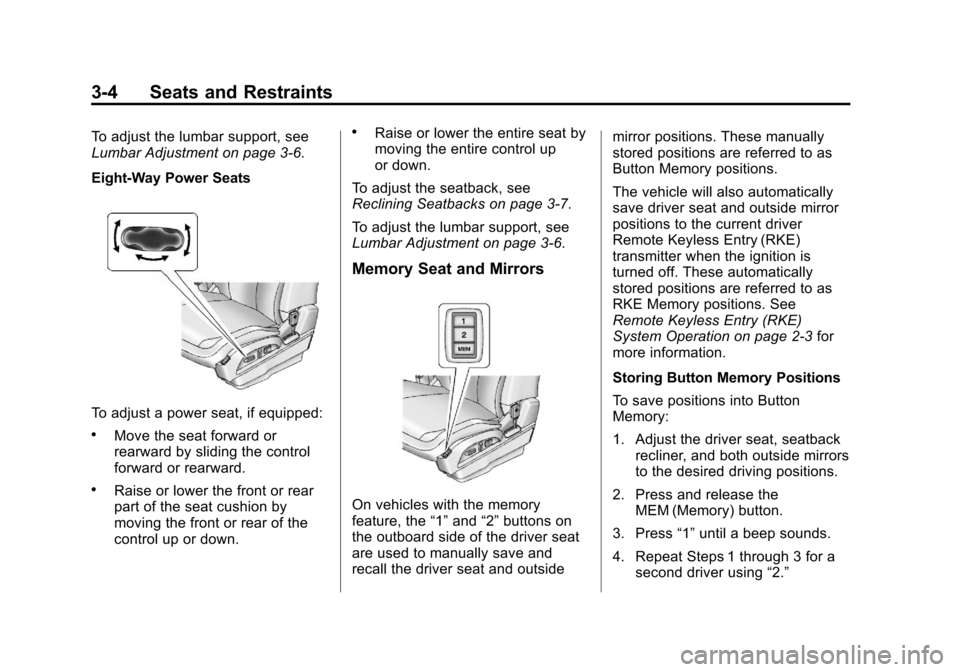
Eight‐Way Power Seats
To adjust a power seat, if equipped:
.Move the seat forward or
rearward by sliding the control
forward or rearward.
.Raise or lower the front or rear
part of the seat cushion by
moving the front or rear of the
control up or down.
.Raise or lower the entire seat by
moving the entire control up
or down.
To adjust the seatback, see
Reclining Seatbacks on page 3‑7.
To adjust the lumbar support, see
Lumbar Adjustment on page 3‑6.
Memory Seat and Mirrors
On vehicles with the memory
feature, the “1”and “2”buttons on
the outboard side of the driver seat
are used to manually save and
recall the driver seat and outside mirror positions. These manually
stored positions are referred to as
Button Memory positions.
The vehicle will also automatically
save driver seat and outside mirror
positions to the current driver
Remote Keyless Entry (RKE)
transmitter when the ignition is
turned off. These automatically
stored positions are referred to as
RKE Memory positions. See
Remote Keyless Entry (RKE)
System Operation on page 2‑3
for
more information.
Storing Button Memory Positions
To save positions into Button
Memory:
1. Adjust the driver seat, seatback recliner, and both outside mirrors
to the desired driving positions.
2. Press and release the MEM (Memory) button.
3. Press “1”until a beep sounds.
4. Repeat Steps 1 through 3 for a second driver using “2.”
Page 153 of 446
Black plate (29,1)Chevrolet Equinox Owner Manual - 2011
Instruments and Controls 5-29
Engine Power Messages
ENGINE POWER IS REDUCED
This message displays when the
vehicle's engine power is reduced.
Reduced engine power can affect
the vehicle's ability to accelerate.
If this message is on, but there is no
reduction in performance, proceed
to your destination. The
performance may be reduced the
next time the vehicle is driven. The
vehicle may be driven at a reduced
speed while this message is on, but
maximum acceleration and speed
may be reduced. Anytime this
message stays on, the vehicle
should be taken to your dealer for
service as soon as possible.
Fuel System Messages
ECO MODE ON
On some models, this message
displays when the fuel economy
mode has been turned on by
pressing the eco button near the
shift lever. SeeFuel Economy Mode
on page 9‑38 for more information.
FUEL LEVEL LOW
This message displays when the
vehicle is low on fuel. Refuel as
soon as possible.
TIGHTEN GAS CAP
This message displays when the
fuel cap is not on tight. Tighten the
fuel cap.
Key and Lock Messages
REPLACE BATTERY IN
REMOTE KEY
This message displays when the
battery in the Remote Keyless
Entry (RKE) transmitter needs to
be replaced.
Object Detection System
Messages
PARK ASSIST OFF
This message is displayed when the
park assist system has been turned
off. SeeUltrasonic Parking Assist
on page 9‑46.
SERVICE PARK ASSIST
This message is displayed if there is
a problem with the park assist
system. Take the vehicle to your
dealer for service.
Page 166 of 446
Black plate (4,1)Chevrolet Equinox Owner Manual - 2011
6-4 Lighting
Interior Lighting
Instrument Panel
Illumination Control
This control is located on the
instrument panel, to the left of the
steering column.
D(Instrument Panel
Brightness): Turn clockwise or
counterclockwise to brighten or
dim the lights.
Dome Lamps
There are front and rear dome
lamps.
The dome lamp controls are located
in the overhead console. To change
the settings, press the following:
*(Dome Lamp Override): Turns
the lamps off, even when a door
is open.
1(Door): The lamps come on
automatically when a door is
opened.
+(On): Turns the dome lamps on.
The dome lamps can also be turned
on and off by pressing the buttons
next to the lamps.
Reading Lamps
The reading lamps are located on
the overhead console. These lamps
come on automatically when any
door is opened.
For manual operation, press the
button next to each lamp to turn it
on or off.
Lighting Features
Entry Lighting
The dome lamp, cargo lamp, and
foot lamp inside the vehicle come
on when any door is opened, if the
dome lamp is in the door position.
In addition, these lamps come on
when the Remote Keyless Entry
(RKE) unlock button is pressed.
They stay on for 20 seconds or until
a door is opened. After the door is
opened and then closed, the light
remains on for 20 seconds, or until
the ignition is turned to ON/RUN.
Page 309 of 446
Black plate (3,1)Chevrolet Equinox Owner Manual - 2011
Vehicle Care 10-3
California Proposition
65 Warning
Most motor vehicles, including this
one, contain and/or emit chemicals
known to the State of California to
cause cancer and birth defects or
other reproductive harm. Engine
exhaust, many parts and systems,
many fluids, and some component
wear by-products contain and/or
emit these chemicals.
California Perchlorate
Materials Requirements
Certain types of automotive
applications, such as airbag
initiators, seat belt pretensioners,
and lithium batteries contained in
Remote Keyless Entry transmitters,
may contain perchlorate materials.
Special handling may be necessary.
For additional information, see
www.dtsc.ca.gov/hazardouswaste/
perchlorate.
Accessories and
Modifications
Adding non‐dealer accessories to
the vehicle can affect vehicle
performance and safety, including
such things as airbags, braking,
stability, ride and handling,
emissions systems, aerodynamics,
durability, and electronic systems
like antilock brakes, traction control,
and stability control. Some of these
accessories could even cause
malfunction or damage not covered
by the vehicle warranty.
Damage to vehicle components
resulting from the installation or use
of non‐GM certified parts, including
control module modifications, is not
covered under the terms of the
vehicle warranty and may affect
remaining warranty coverage for
affected parts.GM Accessories are designed to
complement and function with other
systems on the vehicle. Your GM
dealer can accessorize the vehicle
using genuine GM Accessories.
When you go to your GM dealer and
ask for GM Accessories, you will
know that GM-trained and
supported service technicians will
perform the work using genuine
GM Accessories.
Also, see
Adding Equipment to the
Airbag-Equipped Vehicle on
page 3‑40.
Page 387 of 446
Black plate (81,1)Chevrolet Equinox Owner Manual - 2011
Vehicle Care 10-81
10. Connect the other end of thenegative (−) cable away from
the dead battery, but not near
engine parts that move.
11. Start the vehicle with the good battery and run the engine.
12. Press the unlock symbol on the remote keyless entry
transmitter to disarm the
security system, if equipped.
13. Try to start the vehicle that had the dead battery. If it will not
start after a few tries, it needs
service.
Notice: If the jumper cables are
connected or removed in the
wrong order, electrical shorting
may occur and damage the
vehicle. The repairs would not be
covered by the vehicle warranty.
Always connect and remove the
jumper cables in the correct
order, making sure that the
cables do not touch each other or
other metal.
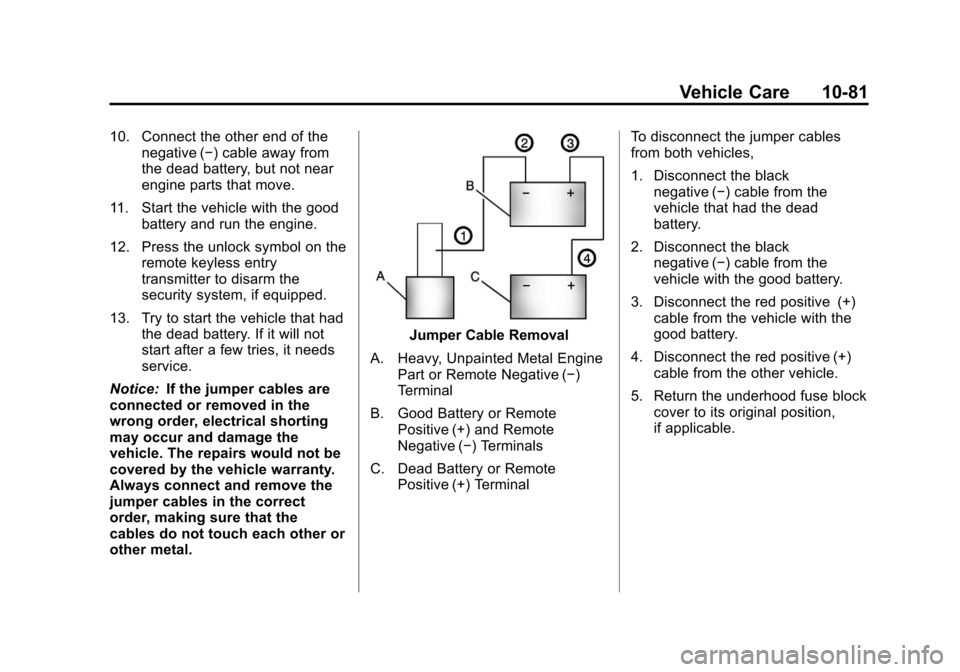
Jumper Cable Removal
A. Heavy, Unpainted Metal Engine Part or Remote Negative (−)
Terminal
B. Good Battery or Remote Positive (+) and Remote
Negative (−) Terminals
C. Dead Battery or Remote Positive (+) Terminal To disconnect the jumper cables
from both vehicles,
1. Disconnect the black
negative (−) cable from the
vehicle that had the dead
battery.
2. Disconnect the black negative (−) cable from the
vehicle with the good battery.
3. Disconnect the red positive (+) cable from the vehicle with the
good battery.
4. Disconnect the red positive (+) cable from the other vehicle.
5. Return the underhood fuse block cover to its original position,
if applicable.
Page 440 of 446

Black plate (6,1)Chevrolet Equinox Owner Manual - 2011
i-6 INDEX
Headlamps (cont.)High-Beam On Light . . . . . . . . . . 5-21
High/Low Beam Changer . . . . . . 6-2
Lamps On Reminder . . . . . . . . . 5-22
Heated Front Seats . . . . . . . . . . . . . 3-9
Heated Mirrors . . . . . . . . . . . . . . . . . 2-15
Heater Engine Coolant . . . . . . . . . . . . . . . 9-32
Heating and Air
Conditioning . . . . . . . . . . . . . . . 8-1, 8-3
High-Beam On Light . . . . . . . . . . . 5-21
Highway Hypnosis . . . . . . . . . . . . . 9-19
Hill and Mountain Roads . . . . . . . 9-19
Hill Start Assist (HSA) . . . . . . . . . 9-41
Hood . . . . . . . . . . . . . . . . . . . . . . . . . . 10-4
Horn . . . . . . . . . . . . . . . . . . . . . . . . . . . . 5-3
How to Wear Safety Belts Properly . . . . . . . . . . . . . . . . . . . . . . 3-15
I
Ignition Positions . . . . . . . . . . . . . . 9-28
Ignition Transmission Lock
Check . . . . . . . . . . . . . . . . . . . . . . . 10-30
Immobilizer . . . . . . . . . . . . . . . . . . . . 2-13
Infants and Young Children, Restraints . . . . . . . . . . . . . . . . . . . . 3-45 Instrument Cluster . . . . . . . . . . . . . . 5-9
Instrument Panel
Storage Area . . . . . . . . . . . . . . . . . . 4-1
Introduction . . . . . . . . . . . . . . . . . . .iii, 7-1
J
Jump Starting . . . . . . . . . . . . . . . . . 10-78
K
Key and Lock Messages . . . . . . . 5-29
Keyless Entry Remote (RKE) System . . . . . . . . 2-3
Keys . . . . . . . . . . . . . . . . . . . . . . . . . . . . 2-2
L
Labeling, Tire Sidewall . . . . . . . . 10-47
Lamps Daytime Running (DRL) . . . . . . . 6-2
Dome . . . . . . . . . . . . . . . . . . . . . . . . . . 6-4
Exterior Controls . . . . . . . . . . . . . . . 6-1
License Plate . . . . . . . . . . . . . . . 10-38
Malfunction Indicator . . . . . . . . . 5-14
On Reminder . . . . . . . . . . . . . . . . . 5-22
Reading . . . . . . . . . . . . . . . . . . . . . . . 6-4
Lap-Shoulder Belt . . . . . . . . . . . . . 3-20 LATCH System
Replacing Parts After a
Crash . . . . . . . . . . . . . . . . . . . . . . . 3-57
Latch, Lower Anchors and Tethers for Children . . . . . . . . . . 3-52
Liftgate Carbon Monoxide . . . . . . . . . 2-8, 2-9
Lighting Entry . . . . . . . . . . . . . . . . . . . . . . . . . . 6-4
Illumination Control . . . . . . . . . . . . 6-4
Lights
Airbag Readiness . . . . . . . . . . . . . 5-12
Antilock Brake System(ABS) Warning . . . . . . . . . . . . . . 5-17
Brake System Warning . . . . . . . 5-16
Charging System . . . . . . . . . . . . . 5-13
Cruise Control . . . . . . . . . . . . . . . . 5-22
Engine Oil Pressure . . . . . . . . . . 5-20
Flash-to-Pass . . . . . . . . . . . . . . . . . . 6-2
Front Fog Lamps . . . . . . . . . . . . . 5-21
Fuel Economy . . . . . . . . . . . . . . . . 5-20
High-Beam On . . . . . . . . . . . . . . . . 5-21
High/Low Beam Changer . . . . . . 6-2
Low Fuel Warning . . . . . . . . . . . . 5-21
Safety Belt Reminders . . . . . . . . 5-11
Security . . . . . . . . . . . . . . . . . . . . . . 5-21