Page 348 of 446
Black plate (42,1)Chevrolet Equinox Owner Manual - 2011
10-42 Vehicle Care
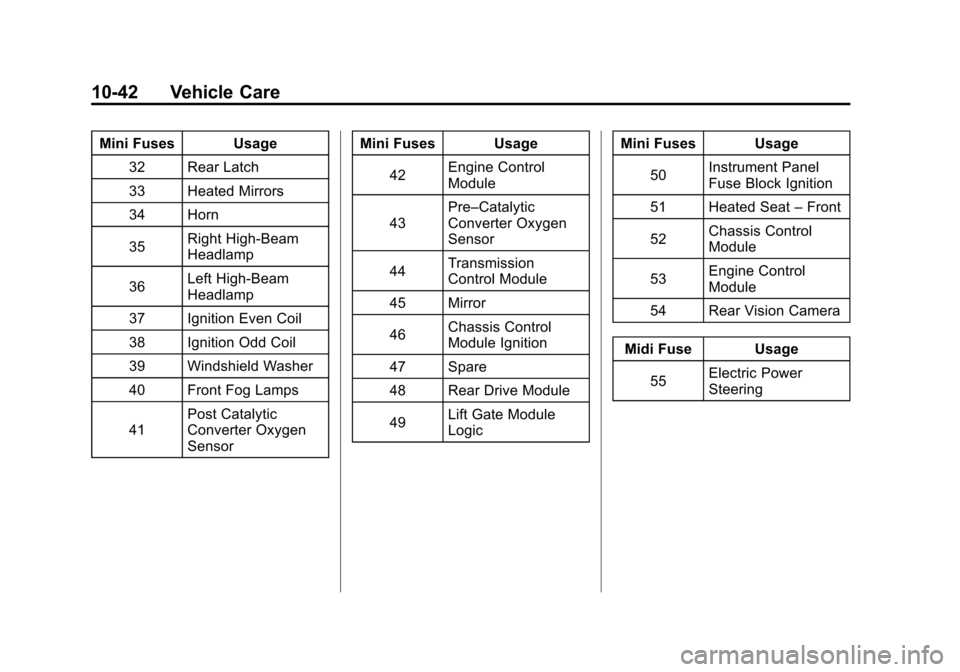
Mini Fuses Usage32 Rear Latch
33 Heated Mirrors
34 Horn
35 Right High‐Beam
Headlamp
36 Left High‐Beam
Headlamp
37 Ignition Even Coil
38 Ignition Odd Coil
39 Windshield Washer
40 Front Fog Lamps
41 Post Catalytic
Converter Oxygen
Sensor Mini Fuses Usage
42 Engine Control
Module
43 Pre–Catalytic
Converter Oxygen
Sensor
44 Transmission
Control Module
45 Mirror
46 Chassis Control
Module Ignition
47 Spare
48 Rear Drive Module
49 Lift Gate Module
Logic Mini Fuses Usage
50 Instrument Panel
Fuse Block Ignition
51 Heated Seat –Front
52 Chassis Control
Module
53 Engine Control
Module
54 Rear Vision Camera
Midi Fuse Usage 55 Electric Power
Steering
Page 364 of 446
Black plate (58,1)Chevrolet Equinox Owner Manual - 2011
10-58 Vehicle Care
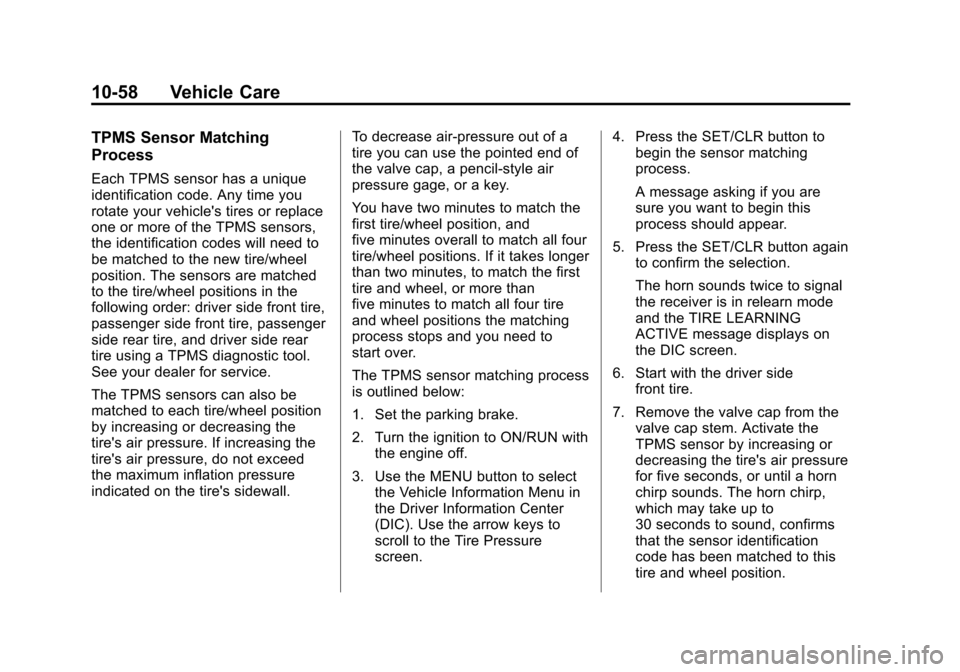
TPMS Sensor Matching
Process
Each TPMS sensor has a unique
identification code. Any time you
rotate your vehicle's tires or replace
one or more of the TPMS sensors,
the identification codes will need to
be matched to the new tire/wheel
position. The sensors are matched
to the tire/wheel positions in the
following order: driver side front tire,
passenger side front tire, passenger
side rear tire, and driver side rear
tire using a TPMS diagnostic tool.
See your dealer for service.
The TPMS sensors can also be
matched to each tire/wheel position
by increasing or decreasing the
tire's air pressure. If increasing the
tire's air pressure, do not exceed
the maximum inflation pressure
indicated on the tire's sidewall.To decrease air-pressure out of a
tire you can use the pointed end of
the valve cap, a pencil-style air
pressure gage, or a key.
You have two minutes to match the
first tire/wheel position, and
five minutes overall to match all four
tire/wheel positions. If it takes longer
than two minutes, to match the first
tire and wheel, or more than
five minutes to match all four tire
and wheel positions the matching
process stops and you need to
start over.
The TPMS sensor matching process
is outlined below:
1. Set the parking brake.
2. Turn the ignition to ON/RUN with
the engine off.
3. Use the MENU button to select the Vehicle Information Menu in
the Driver Information Center
(DIC). Use the arrow keys to
scroll to the Tire Pressure
screen. 4. Press the SET/CLR button to
begin the sensor matching
process.
A message asking if you are
sure you want to begin this
process should appear.
5. Press the SET/CLR button again to confirm the selection.
The horn sounds twice to signal
the receiver is in relearn mode
and the TIRE LEARNING
ACTIVE message displays on
the DIC screen.
6. Start with the driver side front tire.
7. Remove the valve cap from the valve cap stem. Activate the
TPMS sensor by increasing or
decreasing the tire's air pressure
for five seconds, or until a horn
chirp sounds. The horn chirp,
which may take up to
30 seconds to sound, confirms
that the sensor identification
code has been matched to this
tire and wheel position.
Page 365 of 446
Black plate (59,1)Chevrolet Equinox Owner Manual - 2011
Vehicle Care 10-59
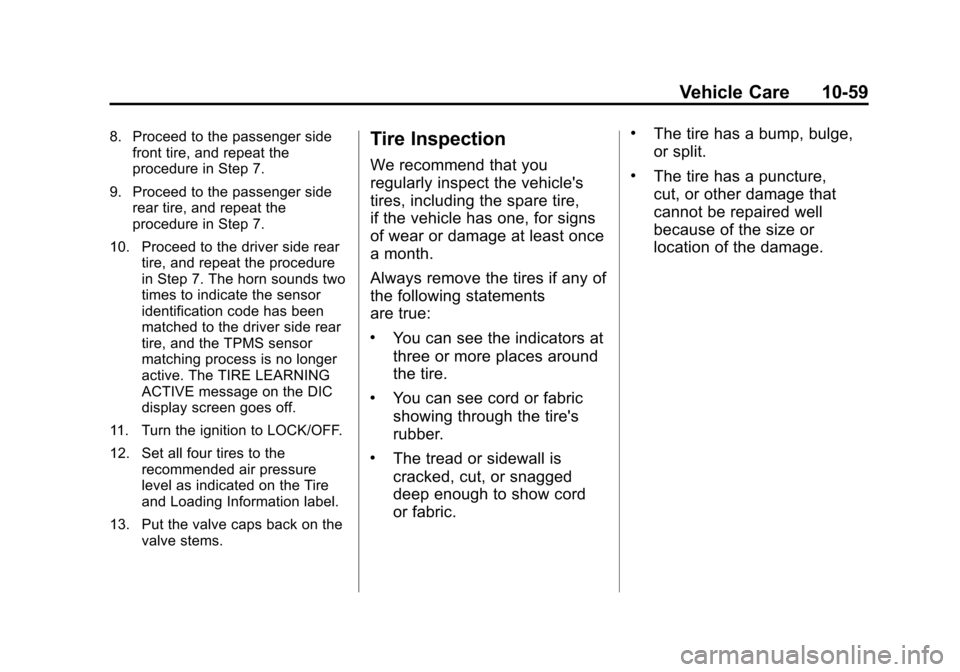
8. Proceed to the passenger sidefront tire, and repeat the
procedure in Step 7.
9. Proceed to the passenger side rear tire, and repeat the
procedure in Step 7.
10. Proceed to the driver side rear tire, and repeat the procedure
in Step 7. The horn sounds two
times to indicate the sensor
identification code has been
matched to the driver side rear
tire, and the TPMS sensor
matching process is no longer
active. The TIRE LEARNING
ACTIVE message on the DIC
display screen goes off.
11. Turn the ignition to LOCK/OFF.
12. Set all four tires to the recommended air pressure
level as indicated on the Tire
and Loading Information label.
13. Put the valve caps back on the valve stems.Tire Inspection
We recommend that you
regularly inspect the vehicle's
tires, including the spare tire,
if the vehicle has one, for signs
of wear or damage at least once
a month.
Always remove the tires if any of
the following statements
are true:
.You can see the indicators at
three or more places around
the tire.
.You can see cord or fabric
showing through the tire's
rubber.
.The tread or sidewall is
cracked, cut, or snagged
deep enough to show cord
or fabric.
.The tire has a bump, bulge,
or split.
.The tire has a puncture,
cut, or other damage that
cannot be repaired well
because of the size or
location of the damage.
Page 440 of 446

Black plate (6,1)Chevrolet Equinox Owner Manual - 2011
i-6 INDEX
Headlamps (cont.)High-Beam On Light . . . . . . . . . . 5-21
High/Low Beam Changer . . . . . . 6-2
Lamps On Reminder . . . . . . . . . 5-22
Heated Front Seats . . . . . . . . . . . . . 3-9
Heated Mirrors . . . . . . . . . . . . . . . . . 2-15
Heater Engine Coolant . . . . . . . . . . . . . . . 9-32
Heating and Air
Conditioning . . . . . . . . . . . . . . . 8-1, 8-3
High-Beam On Light . . . . . . . . . . . 5-21
Highway Hypnosis . . . . . . . . . . . . . 9-19
Hill and Mountain Roads . . . . . . . 9-19
Hill Start Assist (HSA) . . . . . . . . . 9-41
Hood . . . . . . . . . . . . . . . . . . . . . . . . . . 10-4
Horn . . . . . . . . . . . . . . . . . . . . . . . . . . . . 5-3
How to Wear Safety Belts Properly . . . . . . . . . . . . . . . . . . . . . . 3-15
I
Ignition Positions . . . . . . . . . . . . . . 9-28
Ignition Transmission Lock
Check . . . . . . . . . . . . . . . . . . . . . . . 10-30
Immobilizer . . . . . . . . . . . . . . . . . . . . 2-13
Infants and Young Children, Restraints . . . . . . . . . . . . . . . . . . . . 3-45 Instrument Cluster . . . . . . . . . . . . . . 5-9
Instrument Panel
Storage Area . . . . . . . . . . . . . . . . . . 4-1
Introduction . . . . . . . . . . . . . . . . . . .iii, 7-1
J
Jump Starting . . . . . . . . . . . . . . . . . 10-78
K
Key and Lock Messages . . . . . . . 5-29
Keyless Entry Remote (RKE) System . . . . . . . . 2-3
Keys . . . . . . . . . . . . . . . . . . . . . . . . . . . . 2-2
L
Labeling, Tire Sidewall . . . . . . . . 10-47
Lamps Daytime Running (DRL) . . . . . . . 6-2
Dome . . . . . . . . . . . . . . . . . . . . . . . . . . 6-4
Exterior Controls . . . . . . . . . . . . . . . 6-1
License Plate . . . . . . . . . . . . . . . 10-38
Malfunction Indicator . . . . . . . . . 5-14
On Reminder . . . . . . . . . . . . . . . . . 5-22
Reading . . . . . . . . . . . . . . . . . . . . . . . 6-4
Lap-Shoulder Belt . . . . . . . . . . . . . 3-20 LATCH System
Replacing Parts After a
Crash . . . . . . . . . . . . . . . . . . . . . . . 3-57
Latch, Lower Anchors and Tethers for Children . . . . . . . . . . 3-52
Liftgate Carbon Monoxide . . . . . . . . . 2-8, 2-9
Lighting Entry . . . . . . . . . . . . . . . . . . . . . . . . . . 6-4
Illumination Control . . . . . . . . . . . . 6-4
Lights
Airbag Readiness . . . . . . . . . . . . . 5-12
Antilock Brake System(ABS) Warning . . . . . . . . . . . . . . 5-17
Brake System Warning . . . . . . . 5-16
Charging System . . . . . . . . . . . . . 5-13
Cruise Control . . . . . . . . . . . . . . . . 5-22
Engine Oil Pressure . . . . . . . . . . 5-20
Flash-to-Pass . . . . . . . . . . . . . . . . . . 6-2
Front Fog Lamps . . . . . . . . . . . . . 5-21
Fuel Economy . . . . . . . . . . . . . . . . 5-20
High-Beam On . . . . . . . . . . . . . . . . 5-21
High/Low Beam Changer . . . . . . 6-2
Low Fuel Warning . . . . . . . . . . . . 5-21
Safety Belt Reminders . . . . . . . . 5-11
Security . . . . . . . . . . . . . . . . . . . . . . 5-21