2011 CHEVROLET CRUZE ignition
[x] Cancel search: ignitionPage 307 of 394
Black plate (55,1)Chevrolet Cruze Owner Manual - 2011
Vehicle Care 10-55
could prevent the TPMS from
functioning properly. SeeBuying
New Tires on page 10‑59.
.Operating electronic devices or
being near facilities using radio
wave frequencies similar to the
TPMS could cause the TPMS
sensors to malfunction.
If the TPMS is not functioning it
cannot detect or signal a low tire
condition. See your dealer for
service if the TPMS malfunction
light and DIC message come on
and stay on.
TPMS Sensor Matching
Process
Each TPMS sensor has a unique
identification code. Any time you
rotate your vehicle's tires or replace
one or more of the TPMS sensors,
the identification codes need to be
matched to the new tire/wheel
position. Also, the TPMS sensor
matching process should be
performed after replacing a spare
tire with a road tire containing the
TPMS sensor in order for the malfunction light and the DIC
message to go off at the next
ignition cycle. The sensors are
matched to the tire/wheel positions
in the following order: driver side
front tire, passenger side front tire,
passenger side rear tire, and driver
side rear tire using a TPMS
diagnostic tool. See your dealer for
service.
The TPMS sensors can also be
matched to each tire/wheel position
by increasing or decreasing the
tire's air pressure. If increasing the
tire's air pressure, do not exceed
the maximum inflation pressure
indicated on the tire's sidewall.
To decrease air pressure out of a
tire you can use the pointed end of
the valve cap, a pencil-style air
pressure gauge, or a key.
You have two minutes to match the
first tire/wheel position, and
five minutes overall to match all four
tire/wheel positions. If it takes longer
than two minutes to match the first
tire and wheel, or more than
five minutes to match all four tire
and wheel positions, the matching
process stops and you need to
start over.
The TPMS sensor matching process
is outlined below:
1. Set the parking brake.
2. Turn the ignition to ON/RUN with
the engine off.
3. Use the MENU button to select the Vehicle Information menu in
the Driver Information
Center (DIC).
4. Use the thumbwheel to scroll to the Tire Pressure menu item
screen.
5. Press the SET/CLR button to begin the sensor matching
process.
A message asking if you are
sure you want to begin this
process should appear.
Page 308 of 394
Black plate (56,1)Chevrolet Cruze Owner Manual - 2011
10-56 Vehicle Care
6. Press the SET/CLR button againto confirm the selection.
The horn sounds twice to signal
the receiver is in relearn mode
and the TIRE LEARNING
ACTIVE message displays on
the DIC screen.
7. Start with the driver side front tire.
8. Remove the valve cap from the valve cap stem. Activate the
TPMS sensor by increasing or
decreasing the tire's air pressure
for five seconds, or until a horn
chirp sounds. The horn chirp,
which may take up to
30 seconds to sound, confirms
that the sensor identification
code has been matched to this
tire and wheel position.
9. Proceed to the passenger side front tire, and repeat the
procedure in Step 8. 10. Proceed to the passenger side
rear tire, and repeat the
procedure in Step 8.
11. Proceed to the driver side rear tire, and repeat the procedure
in Step 8. The horn sounds
two times to indicate the
sensor identification code has
been matched to the driver
side rear tire, and the TPMS
sensor matching process is no
longer active. The TIRE
LEARNING ACTIVE message
on the DIC display screen
goes off.
12. Turn the ignition to LOCK/OFF.
13. Set all four tires to the recommended air pressure
level as indicated on the Tire
and Loading Information label.
14. Put the valve caps back on the valve stems.Tire Inspection
We recommend that you
regularly inspect the vehicle's
tires, including the spare tire,
if the vehicle has one, for signs
of wear or damage at least once
a month.
Always remove the tires if any of
the following statements
are true:
.You can see the indicators at
three or more places around
the tire.
.You can see cord or fabric
showing through the tire's
rubber.
.The tread or sidewall is
cracked, cut, or snagged
deep enough to show cord or
fabric.
Page 337 of 394
Black plate (85,1)Chevrolet Cruze Owner Manual - 2011
Vehicle Care 10-85
3. Set the parking brake firmly andput the shift lever in P (Park)
with an automatic transmission,
or neutral with a manual
transmission. See Shifting Into
Park (Automatic Transmission)
on page 9‑22 with an automatic
transmission, or Parking on
page 9‑24 with a manual
transmission.
Notice: If the radio or other
accessories are left on during the
jump starting procedure, they
could be damaged. The repairs
would not be covered by the
warranty. Always turn off the
radio and other accessories when
jump starting the vehicle.
4. Turn the ignition to LOCK/OFF. Turn off all lights and
accessories in both vehicles,
except the hazard warning
flashers if needed.{WARNING
An electric fan can start up even
when the engine is not running
and can injure you. Keep hands,
clothing and tools away from any
underhood electric fan.
{WARNING
Using a match near a battery can
cause battery gas to explode.
People have been hurt doing this,
and some have been blinded.
Use a flashlight if you need more
light.
Be sure the battery has enough
water. You do not need to add
water to the battery installed in
your new vehicle. But if a battery
has filler caps, be sure the right
amount of fluid is there. If it is low,
(Continued)
WARNING (Continued)
add water to take care of that
first. If you don't, explosive gas
could be present.
Battery fluid contains acid that
can burn you. Do not get it on
you. If you accidentally get it in
your eyes or on your skin, flush
the place with water and get
medical help immediately.
{WARNING
Fans or other moving engine
parts can injure you badly. Keep
your hands away from moving
parts once the engine is running.
Page 340 of 394
Black plate (88,1)Chevrolet Cruze Owner Manual - 2011
10-88 Vehicle Care
.Does the vehicle have the
proper towing equipment. See
your dealer or trailering
professional for additional advice
and equipment
recommendations.
.Is the vehicle ready to be towed.
Just as preparing the vehicle for
a long trip, make sure the
vehicle is prepared to be towed.
Dinghy Towing
When dinghy towing a vehicle with
an automatic transmission, the
vehicle should be run at the
beginning of each day and at each
RV fuel stop for about five minutes.
This will ensure proper lubrication of
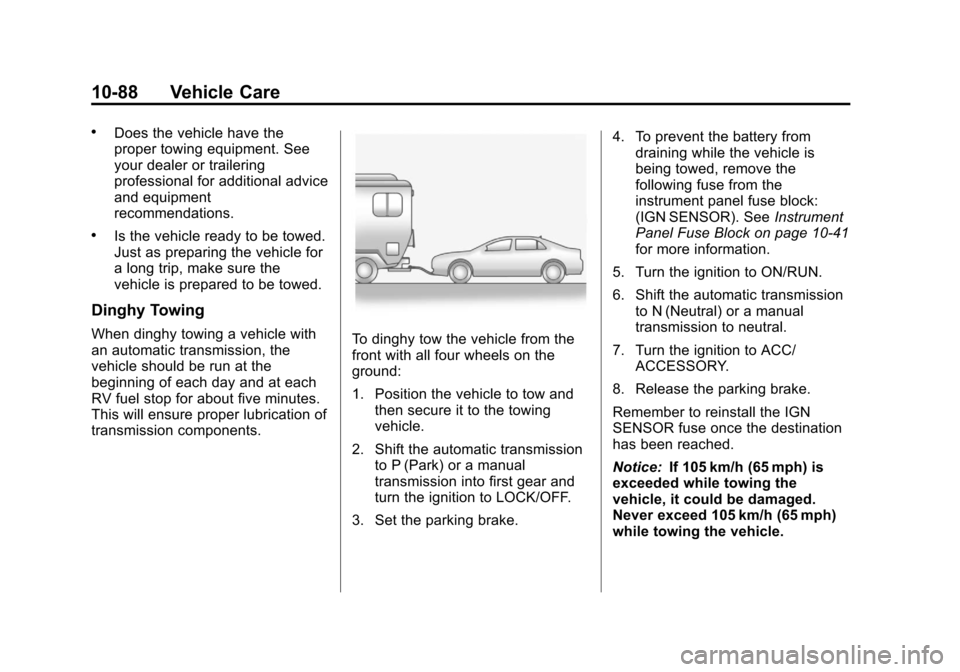
transmission components.To dinghy tow the vehicle from the
front with all four wheels on the
ground:
1. Position the vehicle to tow andthen secure it to the towing
vehicle.
2. Shift the automatic transmission to P (Park) or a manual
transmission into first gear and
turn the ignition to LOCK/OFF.
3. Set the parking brake. 4. To prevent the battery from
draining while the vehicle is
being towed, remove the
following fuse from the
instrument panel fuse block:
(IGN SENSOR). See Instrument
Panel Fuse Block on page 10‑41
for more information.
5. Turn the ignition to ON/RUN.
6. Shift the automatic transmission to N (Neutral) or a manual
transmission to neutral.
7. Turn the ignition to ACC/ ACCESSORY.
8. Release the parking brake.
Remember to reinstall the IGN
SENSOR fuse once the destination
has been reached.
Notice: If 105 km/h (65 mph) is
exceeded while towing the
vehicle, it could be damaged.
Never exceed 105 km/h (65 mph)
while towing the vehicle.
Page 341 of 394
Black plate (89,1)Chevrolet Cruze Owner Manual - 2011
Vehicle Care 10-89
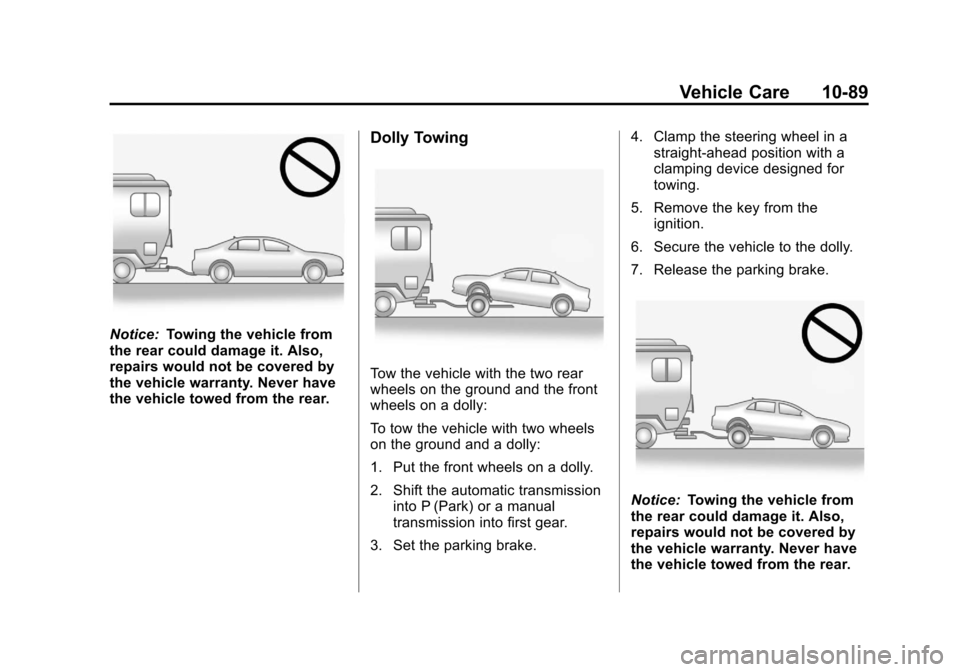
Notice:Towing the vehicle from
the rear could damage it. Also,
repairs would not be covered by
the vehicle warranty. Never have
the vehicle towed from the rear.
Dolly Towing
Tow the vehicle with the two rear
wheels on the ground and the front
wheels on a dolly:
To tow the vehicle with two wheels
on the ground and a dolly:
1. Put the front wheels on a dolly.
2. Shift the automatic transmission into P (Park) or a manual
transmission into first gear.
3. Set the parking brake. 4. Clamp the steering wheel in a
straight-ahead position with a
clamping device designed for
towing.
5. Remove the key from the ignition.
6. Secure the vehicle to the dolly.
7. Release the parking brake.
Notice: Towing the vehicle from
the rear could damage it. Also,
repairs would not be covered by
the vehicle warranty. Never have
the vehicle towed from the rear.
Page 354 of 394
Black plate (4,1)Chevrolet Cruze Owner Manual - 2011
11-4 Service and Maintenance
.Restraint system component
check. SeeSafety System
Check on page 3‑23.
.Fuel system inspection for
damage or leaks.
.Exhaust system and nearby heat
shields inspection for loose or
damaged components.
Additional Required Services
Every 12 000 km/7,500 Miles
.Rotate tires. Tires should be
rotated every 12 000 km/
7,500 mi. See Tire Rotation on
page 10‑57. At Each Fuel Stop
.Engine oil level check. See
Engine Oil on page 10‑9.
.Engine coolant level check. See
Engine Coolant on page 10‑17.
.Windshield washer fluid level
check. See
Washer Fluid on
page 10‑22.
Once a Month
.Tire inflation check. See Tire
Pressure on page 10‑50.
.Tire wear inspection. See Tire
Inspection on page 10‑56.
.Sunroof track and seal
inspection, if equipped. See
Sunroof on page 2‑17. Once a Year
.See
Starter Switch Check on
page 10‑26.
.See Automatic Transmission
Shift Lock Control Function
Check on page 10‑27.
.See Ignition Transmission Lock
Check on page 10‑28.
.See Park Brake and P (Park)
Mechanism Check on
page 10‑28.
.Accelerator pedal check for
damage, high effort, or binding.
Replace if needed.
.If the vehicle has a Tire Sealant
and Compressor Kit, check the
sealant expiration date printed
on the instruction label of the kit.
See Tire Sealant and
Compressor Kit on page 10‑68.
Page 382 of 394
Black plate (16,1)Chevrolet Cruze Owner Manual - 2011
13-16 Customer Information
OnStar®
If the vehicle is equipped with an
active OnStar system, that system
may also record data in crash or
near crash‐like situations. The
OnStar Terms and Conditions
provides information on data
collection and use and is available
in the OnStar glove box kit, at
www.onstar.com (U.S.) or
www.onstar.ca (Canada), or by
pressing the
Qbutton and
speaking to an advisor.
Navigation System
If the vehicle has a navigation
system, use of the system may
result in the storage of destinations,
addresses, telephone numbers, and
other trip information. Refer to the
navigation system operating manual
for information on stored data and
for deletion instructions.
Radio Frequency
Identification (RFID)
RFID technology is used in some
vehicles for functions such as tire
pressure monitoring and ignition
system security, as well as in
connection with conveniences such
as key fobs for remote door locking/
unlocking and starting, and
in-vehicle transmitters for garage
door openers. RFID technology in
GM vehicles does not use or record
personal information or link with any
other GM system containing
personal information.
Radio Frequency
Statement
This vehicle has systems that
operate on a radio frequency that
comply with Part 15 of the Federal
Communications Commission (FCC)
rules and with Industry Canada
Standards RSS‐210/220/310.
Operation is subject to the following
two conditions:
1. The device may not cause interference.
2. The device must accept any interference received, including
interference that may cause
undesired operation of the
device.
Changes or modifications to any of
these systems by other than an
authorized service facility could void
authorization to use this equipment.
Page 384 of 394

Black plate (2,1)Chevrolet Cruze Owner Manual - 2011
i-2 INDEX
Bluetooth . . . . . . . . . . 7-23, 7-24, 7-28
Brake System Warning Light . . . 5-16
Brakes . . . . . . . . . . . . . . . . . . . . . . . . 10-23Antilock . . . . . . . . . . . . . . . . . . . . . . . 9-31
Assist . . . . . . . . . . . . . . . . . . . . . . . . . 9-33
Fluid . . . . . . . . . . . . . . . . . . . . . . . . 10-24
Parking . . . . . . . . . . . . . . . . . . . . . . . 9-32
System Messages . . . . . . . . . . . . 5-29
Braking . . . . . . . . . . . . . . . . . . . . . . . . . 9-3
Break-In, New Vehicle . . . . . . . . . 9-17
Bulb Replacement . . . . . . . . . . . . 10-36 Headlamp Aiming . . . . . . . . . . . 10-30
Headlamps . . . . . . . . . . . . . . . . . 10-30
Headlamps, Front TurnSignal, Sidemarker, and
Parking Lamps . . . . . . . . . . . . 10-30
License Plate Lamps . . . . . . . 10-35
Taillamps, Turn Signal, Sidemarker, Stoplamps,
and Backup Lamps . . . . . . . . 10-32
Buying New Tires . . . . . . . . . . . . . 10-59C
Calibration . . . . . . . . . . . . . . . . . . . . . . 5-4
California
Fuel Requirements . . . . . . . . . . . 9-41
Perchlorate MaterialsRequirements . . . . . . . . . . . . . . . 10-3
Warning . . . . . . . . . . . . . . . . . . . . . . 10-3
Canadian Vehicle Owners . . . . . . . . iii
Capacities and Specifications . . . . . . . . . . . . . . . . 12-2
Carbon Monoxide
Engine Exhaust . . . . . . . . . . . . . . . 9-24
Trunk . . . . . . . . . . . . . . . . . . . . . . . . . . 2-8
Winter Driving . . . . . . . . . . . . . . . . . 9-9
Cargo Tie Downs . . . . . . . . . . . . . . . . . . . . . 4-2
Cautions, Danger, and Warnings . . . . . . . . . . . . . . . . . . . . . . . . iv
CD Player . . . . . . . . . . . . . . . . . . . . . 7-18
Center Console Storage . . . . . . . . 4-2
Chains, Tire . . . . . . . . . . . . . . . . . . 10-65
Charging System Light . . . . . . . . . . . . . . . . . 5-13 Check
Engine Light . . . . . . . . . . . . . . . . . . 5-13
Ignition
Transmission Lock . . . . . . . . 10-28
Child Restraints Infants and YoungChildren . . . . . . . . . . . . . . . . . . . . . 3-43
Lower Anchors and Tethers for Children . . . . . . . . . 3-49
Older Children . . . . . . . . . . . . . . . . 3-40
Securing . . . . . . . . . . . . . . . . 3-56, 3-58
Systems . . . . . . . . . . . . . . . . . . . . . . 3-45
Cigarette Lighter . . . . . . . . . . . . . . . . 5-6
Circuit Breakers . . . . . . . . . . . . . . 10-37
Cleaning Exterior Care . . . . . . . . . . . . . . . 10-90
Interior Care . . . . . . . . . . . . . . . . 10-94
Climate Control Systems . . . . . . . 8-1 Air Conditioning . . . . . . . . . . . . . . . 8-1
Automatic . . . . . . . . . . . . . . . . . . . . . . 8-3
Heating . . . . . . . . . . . . . . . . . . . . . . . . 8-1
Clock . . . . . . . . . . . . . . . . . . . . . . . . . . . 5-5
Cluster, Instrument . . . . . . . . . . . . . 5-8