2011 CHEVROLET CRUZE ECO mode
[x] Cancel search: ECO modePage 248 of 394
Black plate (48,1)Chevrolet Cruze Owner Manual - 2011
9-48 Driving and Operating
Making Turns
Notice:Making very sharp turns
while trailering could cause the
trailer to come in contact with the
vehicle. The vehicle could be
damaged. Avoid making very
sharp turns while trailering.
When turning with a trailer, make
wider turns than normal. Do this so
the trailer won't strike soft
shoulders, curbs, road signs, trees
or other objects. Avoid jerky or
sudden maneuvers. Signal well in
advance.
Turn Signals When Towing a
Trailer
The arrows on the instrument panel
flash whenever signaling a turn or
lane change. Properly hooked up,
the trailer lamps also flash, telling
other drivers the vehicle is turning,
changing lanes, or stopping. When towing a trailer, the arrows on
the instrument panel flash for turns
even if the bulbs on the trailer are
burned out. For this reason you may
think other drivers are seeing the
signal when they are not. It is
important to check occasionally to
be sure the trailer bulbs are still
working.
Driving On Grades
Reduce speed and shift to a lower
gear before starting down a long or
steep downgrade. If the
transmission is not shifted down, the
brakes might have to be used so
much that they would get hot and no
longer work well.
Vehicles with an automatic
transmission can tow in D (Drive)
but M (Manual Mode) is
recommended. Shift the
transmission to a lower gear if the
transmission shifts too often under
heavy loads and/or hilly conditions.
For vehicles with a manual
transmission, it is better not to use
the highest gear.When towing at high altitude on
steep uphill grades, consider the
following: Engine coolant will boil at
a lower temperature than at normal
altitudes. If the engine is turned off
immediately after towing at high
altitude on steep uphill grades, the
vehicle may show signs similar to
engine overheating. To avoid this,
let the engine run while parked,
preferably on level ground, with the
automatic transmission in P (Park)
for a few minutes before turning the
engine off. For vehicles with manual
transmissions, let the engine run
while parked, preferably on level
ground, with the transmission out of
gear and the parking brake applied,
for a few minutes before turning the
engine off. If the overheat warning
comes on, see
Engine Overheating
on page 10‑20.
Page 250 of 394
Black plate (50,1)Chevrolet Cruze Owner Manual - 2011
9-50 Driving and Operating
Trailer Towing (Except
Fuel Economy Model)
Before pulling a trailer, there are
three important considerations that
have to do with weight:
.The weight of the trailer.
.The weight of the trailer tongue.
.The total weight on your
vehicle's tires.
Weight of the Trailer
How heavy can a trailer safely be?
It should never weigh more than
454 kg (1,000 lbs). But even that
can be too heavy.
It depends on how the rig is used.
For example, speed, altitude, road
grades, outside temperature and
how much the vehicle is used to pull
a trailer are all important. It can
depend on any special equipment
on the vehicle, and the amount of
tongue weight the vehicle can carry.See
“Weight of the Trailer Tongue”
later in this section for more
information.
Maximum trailer weight is calculated
assuming only the driver is in the
tow vehicle and it has all the
required trailering equipment. The
weight of additional optional
equipment, passengers and cargo in
the tow vehicle must be subtracted
from the maximum trailer weight.
Ask your dealer for trailering
information or advice, or write us at
our Customer Assistance Offices.
See Customer Assistance Offices
on page 13‑3 for more information.
Weight of the Trailer Tongue
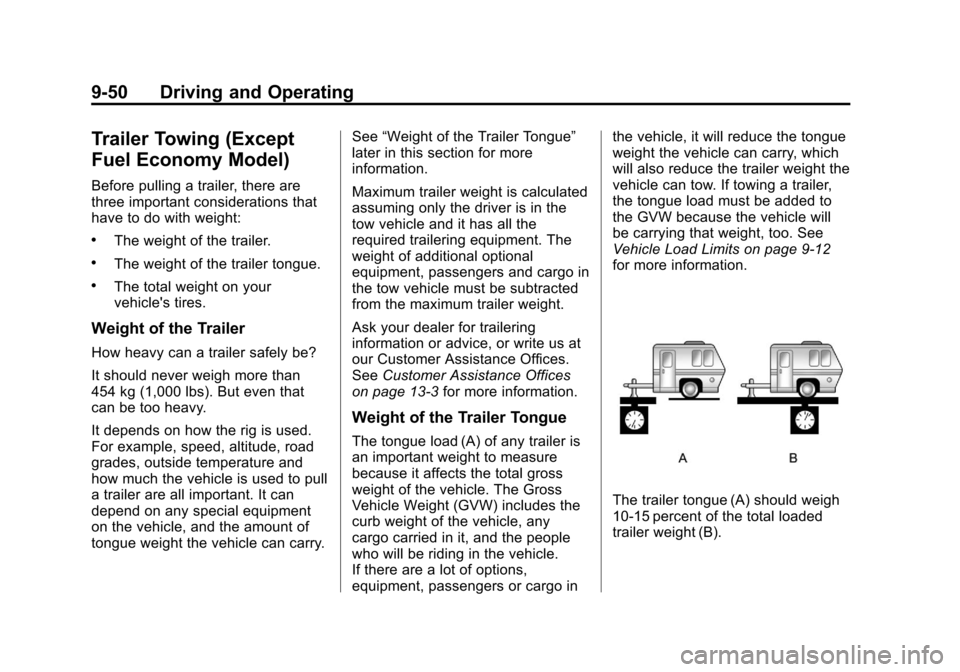
The tongue load (A) of any trailer is
an important weight to measure
because it affects the total gross
weight of the vehicle. The Gross
Vehicle Weight (GVW) includes the
curb weight of the vehicle, any
cargo carried in it, and the people
who will be riding in the vehicle.
If there are a lot of options,
equipment, passengers or cargo in the vehicle, it will reduce the tongue
weight the vehicle can carry, which
will also reduce the trailer weight the
vehicle can tow. If towing a trailer,
the tongue load must be added to
the GVW because the vehicle will
be carrying that weight, too. See
Vehicle Load Limits on page 9‑12
for more information.
The trailer tongue (A) should weigh
10‐15 percent of the total loaded
trailer weight (B).
Page 251 of 394
Black plate (51,1)Chevrolet Cruze Owner Manual - 2011
Driving and Operating 9-51
After loading the trailer, weigh the
trailer and then the tongue,
separately, to see if the weights are
proper. If they are not, adjustments
might be made by moving some
items around in the trailer.
Total Weight on Your Vehicle's
Tires
Be sure the vehicle's tires are
inflated to the upper limit for cold
tires. These numbers can be found
on the Tire-Loading Information
label. SeeVehicle Load Limits on
page 9‑12. Make sure not to go over
the GVW limit for the vehicle,
including the weight of the trailer
tongue.
Trailer Towing (Fuel
Economy Model)
The vehicle is neither designed nor
intended to tow a trailer.
Towing Equipment
Hitches
Use the correct hitch equipment.
See your dealer or a hitch dealer for
assistance.
.The rear bumper on the vehicle
is not intended for hitches. Do
not attach rental hitches or other
bumper-type hitches to it. Use
only a frame-mounted hitch that
does not attach to the bumper.
.Will any holes be made in the
body of the vehicle when the
trailer hitch is installed? If there
are, seal the holes when the
hitch is removed. If the holes are
not sealed, dirt, water, and
deadly carbon monoxide (CO)
from the exhaust can get into the
vehicle. See Engine Exhaust on
page 9‑24.
Safety Chains
Always attach chains between the
vehicle and the trailer. Cross the
safety chains under the tongue of
the trailer to help prevent the tongue
from contacting the road if it
becomes separated from the hitch.
Leave enough slack so the rig can
turn. Never allow safety chains to
drag on the ground.
Trailer Brakes
Does the trailer have its own
brakes? Be sure to read and follow
the instructions for the trailer brakes
so they are installed, adjusted, and
maintained properly.
Because the vehicle has antilock
brakes, do not tap into the vehicle's
brake system. If this is done, both
brake systems will not work well,
or at all.
Page 301 of 394

Black plate (49,1)Chevrolet Cruze Owner Manual - 2011
Vehicle Care 10-49
Maximum Inflation Pressure:
The maximum air pressure to
which a cold tire can be inflated.
The maximum air pressure is
molded onto the sidewall.
Maximum Load Rating
:The
load rating for a tire at the
maximum permissible inflation
pressure for that tire.
Maximum Loaded Vehicle
Weight
:The sum of curb
weight, accessory weight,
vehicle capacity weight, and
production options weight.
Normal Occupant Weight
:The
number of occupants a vehicle
is designed to seat multiplied by
68 kg (150 lbs). See Vehicle
Load Limits on page 9‑12.
Occupant Distribution
:
Designated seating positions. Outward Facing Sidewall
:The
side of an asymmetrical tire that
has a particular side that faces
outward when mounted on a
vehicle. The side of the tire that
contains a whitewall, bears
white lettering, or bears
manufacturer, brand, and/or
model name molding that is
higher or deeper than the same
moldings on the other sidewall
of the tire.
Passenger (P-Metric) Tire
:A
tire used on passenger cars and
some light duty trucks and
multipurpose vehicles.
Recommended Inflation
Pressure
:Vehicle
manufacturer's recommended
tire inflation pressure as shown
on the tire placard. See Tire
Pressure on page 10‑50
andVehicle Load Limits on
page 9‑12. Radial Ply Tire
:A pneumatic
tire in which the ply cords that
extend to the beads are laid at
90 degrees to the centerline of
the tread.
Rim
:A metal support for a tire
and upon which the tire beads
are seated.
Sidewall
:The portion of a tire
between the tread and the bead.
Speed Rating
:An
alphanumeric code assigned to
a tire indicating the maximum
speed at which a tire can
operate.
Traction
:The friction between
the tire and the road surface.
The amount of grip provided.
Page 308 of 394
Black plate (56,1)Chevrolet Cruze Owner Manual - 2011
10-56 Vehicle Care
6. Press the SET/CLR button againto confirm the selection.
The horn sounds twice to signal
the receiver is in relearn mode
and the TIRE LEARNING
ACTIVE message displays on
the DIC screen.
7. Start with the driver side front tire.
8. Remove the valve cap from the valve cap stem. Activate the
TPMS sensor by increasing or
decreasing the tire's air pressure
for five seconds, or until a horn
chirp sounds. The horn chirp,
which may take up to
30 seconds to sound, confirms
that the sensor identification
code has been matched to this
tire and wheel position.
9. Proceed to the passenger side front tire, and repeat the
procedure in Step 8. 10. Proceed to the passenger side
rear tire, and repeat the
procedure in Step 8.
11. Proceed to the driver side rear tire, and repeat the procedure
in Step 8. The horn sounds
two times to indicate the
sensor identification code has
been matched to the driver
side rear tire, and the TPMS
sensor matching process is no
longer active. The TIRE
LEARNING ACTIVE message
on the DIC display screen
goes off.
12. Turn the ignition to LOCK/OFF.
13. Set all four tires to the recommended air pressure
level as indicated on the Tire
and Loading Information label.
14. Put the valve caps back on the valve stems.Tire Inspection
We recommend that you
regularly inspect the vehicle's
tires, including the spare tire,
if the vehicle has one, for signs
of wear or damage at least once
a month.
Always remove the tires if any of
the following statements
are true:
.You can see the indicators at
three or more places around
the tire.
.You can see cord or fabric
showing through the tire's
rubber.
.The tread or sidewall is
cracked, cut, or snagged
deep enough to show cord or
fabric.
Page 333 of 394
Black plate (81,1)Chevrolet Cruze Owner Manual - 2011
Vehicle Care 10-81
14. Reinstall the wheel nuts.Tighten each nut by hand until
the wheel is held against
the hub.
15. Lower the vehicle by turning the jack handle
counterclockwise.
{WARNING
Wheel nuts that are improperly or
incorrectly tightened can cause
the wheels to become loose or
come off. The wheel nuts should
be tightened with a torque wrench
to the proper torque specification
after replacing. Follow the torque
specification supplied by the
aftermarket manufacturer when
using accessory locking wheel
nuts. See Capacities and
Specifications on page 12‑2 for
original equipment wheel nut
torque specifications. Notice:
Improperly tightened
wheel nuts can lead to brake
pulsation and rotor damage. To
avoid expensive brake repairs,
evenly tighten the wheel nuts in
the proper sequence and to the
proper torque specification. See
Capacities and Specifications on
page 12‑2 for the wheel nut
torque specification.
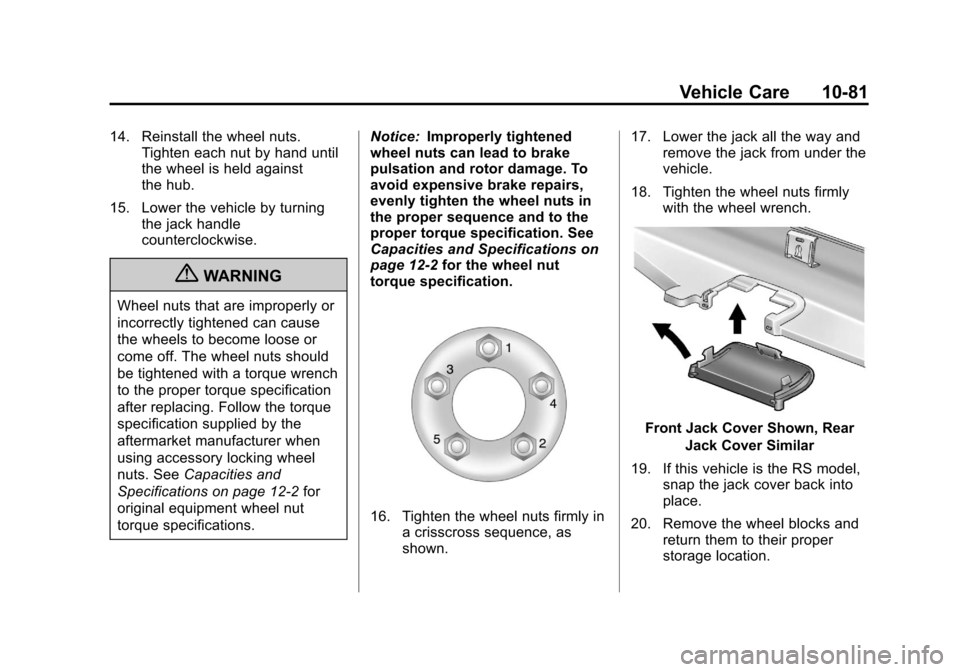
16. Tighten the wheel nuts firmly in a crisscross sequence, as
shown. 17. Lower the jack all the way and
remove the jack from under the
vehicle.
18. Tighten the wheel nuts firmly with the wheel wrench.
Front Jack Cover Shown, Rear
Jack Cover Similar
19. If this vehicle is the RS model, snap the jack cover back into
place.
20. Remove the wheel blocks and return them to their proper
storage location.
Page 364 of 394
Black plate (2,1)Chevrolet Cruze Owner Manual - 2011
12-2 Technical Data
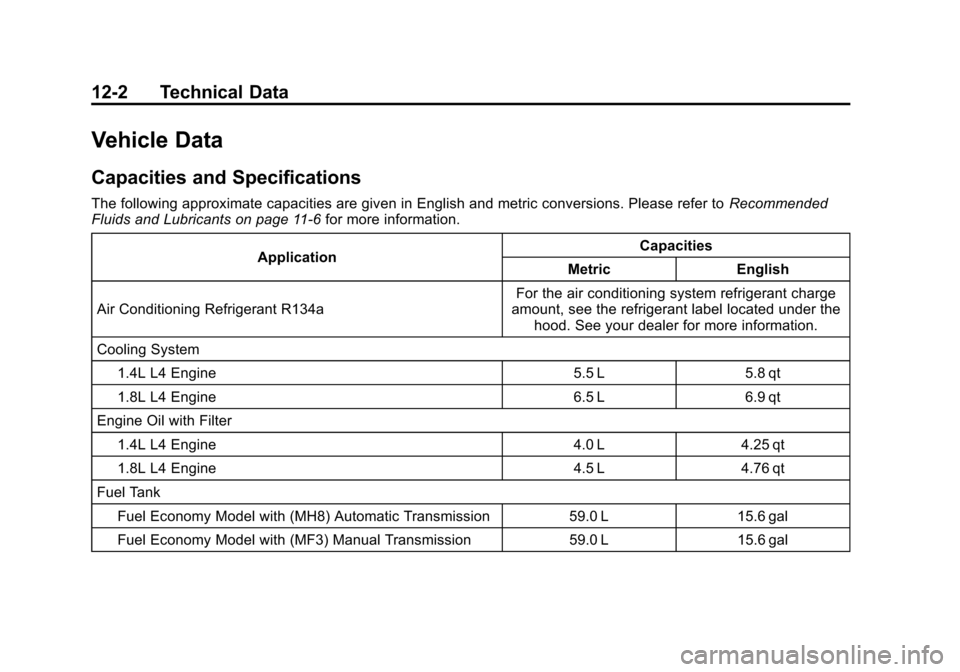
Vehicle Data
Capacities and Specifications
The following approximate capacities are given in English and metric conversions. Please refer toRecommended
Fluids and Lubricants on page 11‑6 for more information.
Application Capacities
Metric English
Air Conditioning Refrigerant R134a For the air conditioning system refrigerant charge
amount, see the refrigerant label located under the hood. See your dealer for more information.
Cooling System 1.4L L4 Engine 5.5 L 5.8 qt
1.8L L4 Engine 6.5 L 6.9 qt
Engine Oil with Filter 1.4L L4 Engine 4.0 L4.25 qt
1.8L L4 Engine 4.5 L4.76 qt
Fuel Tank Fuel Economy Model with (MH8) Automatic Transmission 59.0 L15.6 gal
Fuel Economy Model with (MF3) Manual Transmission 59.0 L15.6 gal
Page 365 of 394
Black plate (3,1)Chevrolet Cruze Owner Manual - 2011
Technical Data 12-3
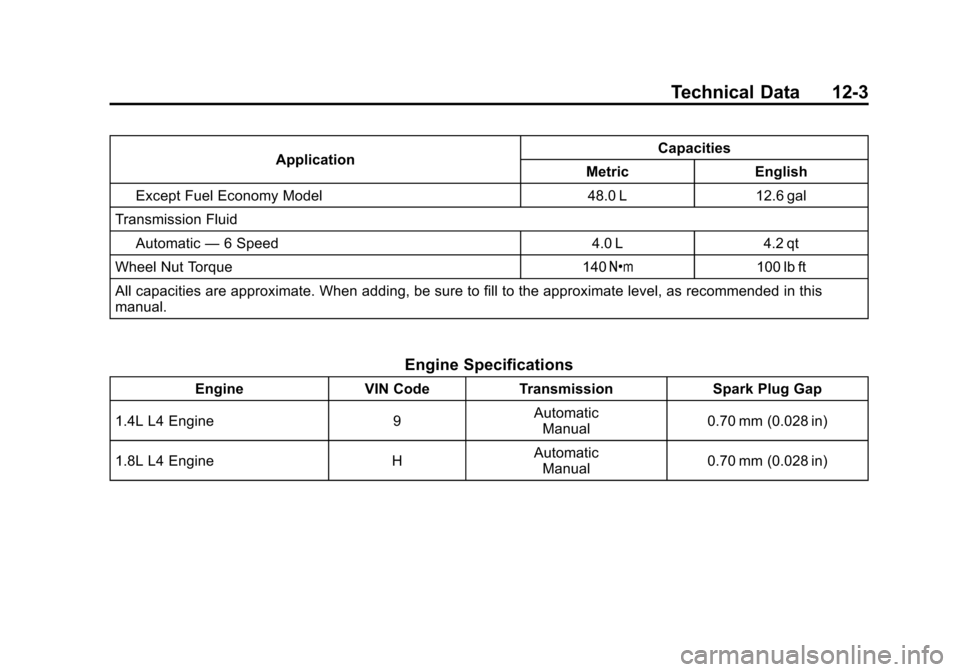
ApplicationCapacities
Metric English
Except Fuel Economy Model 48.0 L 12.6 gal
Transmission Fluid Automatic —6 Speed 4.0 L 4.2 qt
Wheel Nut Torque 140 Y100 lb ft
All capacities are approximate. When adding, be sure to fill to the approximate level, as recommended in this
manual.
Engine Specifications
Engine VIN CodeTransmission Spark Plug Gap
1.4L L4 Engine 9Automatic
Manual 0.70 mm (0.028 in)
1.8L L4 Engine HAutomatic
Manual 0.70 mm (0.028 in)