2011 CHEVROLET CORVETTE key battery
[x] Cancel search: key batteryPage 7 of 428

Black plate (1,1)Chevrolet Corvette Owner Manual - 2011
In Brief 1-1
In Brief
Instrument Panel
Instrument Panel . . . . . . . . . . . . . . 1-2
Initial Drive Information
Initial Drive Information . . . . . . . . 1-4
Remote Keyless Entry (RKE)System . . . . . . . . . . . . . . . . . . . . . . 1-4
Door Locks . . . . . . . . . . . . . . . . . . . 1-5
Trunk Release . . . . . . . . . . . . . . . . 1-6
Windows . . . . . . . . . . . . . . . . . . . . . . 1-6
Seat Adjustment . . . . . . . . . . . . . . 1-6
Memory Features . . . . . . . . . . . . . 1-8
Safety Belt . . . . . . . . . . . . . . . . . . . 1-10
Sensing System for Passenger Airbag . . . . . . . . . . 1-10
Mirror Adjustment . . . . . . . . . . . . 1-11
Steering Wheel Adjustment . . . . . . . . . . . . . . . . . 1-11 Interior Lighting . . . . . . . . . . . . . . 1-12
Exterior Lighting . . . . . . . . . . . . . 1-13
Windshield Wiper/Washer . . . . 1-13
Climate Controls . . . . . . . . . . . . . 1-14
Transmission . . . . . . . . . . . . . . . . 1-15
Vehicle Features
Radio(s) . . . . . . . . . . . . . . . . . . . . . 1-16
Satellite Radio . . . . . . . . . . . . . . . 1-17
Portable Audio Devices . . . . . . 1-17
Bluetooth
®. . . . . . . . . . . . . . . . . . . 1-18
Steering Wheel Controls . . . . . 1-18
Cruise Control . . . . . . . . . . . . . . . 1-19
Navigation System . . . . . . . . . . . 1-19
Driver Information Center (DIC) . . . . . . . . . . . . . . . 1-19
Power Outlets . . . . . . . . . . . . . . . 1-20
Roof Panel . . . . . . . . . . . . . . . . . . 1-20
Convertible . . . . . . . . . . . . . . . . . . 1-21
Performance and Maintenance
Traction Control
System (TCS) . . . . . . . . . . . . . . 1-21
Towing . . . . . . . . . . . . . . . . . . . . . . . 1-21
Tire Pressure Monitor . . . . . . . . 1-22
Z06, Z16, and ZR1 Features . . . . . . . . . . . . . . . . . . . 1-22
Engine Oil Life System . . . . . . 1-23
Driving for Better Fuel Economy . . . . . . . . . . . . . . . . . . . 1-23
Battery . . . . . . . . . . . . . . . . . . . . . . . 1-24
Roadside Assistance Program . . . . . . . . . . . . . . . . . . . . 1-24
OnStar
®. . . . . . . . . . . . . . . . . . . . . 1-25
Page 11 of 428

Black plate (5,1)Chevrolet Corvette Owner Manual - 2011
In Brief 1-5
Door Locks
From the outside, press theQorK
button on the keyless access
transmitter.
When you have the transmitter with
you, you may also unlock and open
the door by squeezing the door
handle sensor (A).From the inside, use the power door
lock switch (B), located at the top of
the door panel, near both windows.
K(Unlock):
Press to unlock the
doors.
Q(Lock): Press to lock the doors.
To open a door from the inside after
it is locked, press the button (C) in
front of the door handle and push
the door open.
See Power Door Locks on page 2‑9.
Loss of Vehicle Electrical
Power
If the vehicle has lost battery power,
the driver door can be opened
manually. Inside the Vehicle
Pull the door release handle located
on the floor next to the seat.
Page 35 of 428

Black plate (3,1)Chevrolet Corvette Owner Manual - 2011
Keys, Doors and Windows 2-3
Notice:If you ever lose your
transmitter(s) and/or key, it
could be difficult to get into your
vehicle. You may even have to
damage your vehicle to get in.
Be sure you have a spare
transmitter and/or key.
If you are locked out of the vehicle,
contact Roadside Assistance.
See Roadside Assistance Program
(United States and Canada) on
page 13‑8 orRoadside Assistance
Program (Mexico) on page 13‑10.
Remote Keyless Entry
(RKE) System
See Radio Frequency Statement on
page 13‑19 for information
regarding Part 15 of the Federal
Communications Commission
(FCC) rules and Industry Canada
Standards RSS-210/220/310. If there is a decrease in the RKE
operating range:
.Check the distance.
The transmitter may be
too far from the vehicle.
.Check the location. Other
vehicles or objects may be
blocking the signal.
.Check the transmitter's battery.
See
“Battery Replacement” later
in this section.
.If the transmitter is still not
working correctly, see your
dealer or a qualified technician
for service.
Remote Keyless Entry
(RKE) System Operation
The Keyless Access System
transmitter functions work up to
30 m (100 feet) away from the
vehicle.
Keyless Unlocking
Press the door handle sensor to
unlock and open the doors if the
keyless access transmitter is within
range. See Door Locks on page 2‑8
and “Passive Door Unlock” under
Vehicle Personalization on
page 5‑55 for additional information.
Page 39 of 428

Black plate (7,1)Chevrolet Corvette Owner Manual - 2011
Keys, Doors and Windows 2-7
13. A beep sounds onceprogramming in complete.
The DIC displays READY
FOR FOB #2.
To program additional
transmitters, take transmitter 1
out of the transmitter pocket
and place transmitter 2 in
the pocket. Up to four
transmitters can be
programmed. The DIC then
displays MAXIMUM NUMBER
OF FOBS LEARNED and exits
the programming mode.
Press Acc. on the ignition
switch to complete the process.
14. Press Acc. on the ignition switch if programming is
complete.
15. Press
Kon each newly
programmed transmitter to
complete the process.
Starting the Vehicle with a Low
Transmitter Battery
If the transmitter battery is weak,
the DIC may display NO FOBS
DETECTED when trying to start the
vehicle. To start the vehicle, place
the transmitter in the glove box
transmitter pocket with the buttons
facing the passenger side. Then,
with the vehicle in P (Park) for an
automatic transmission, press the
brake pedal and
/. If the vehicle
has a manual transmission, press
the clutch and
/. Replace the
transmitter battery as soon as
possible. Change the transmitter
battery if the DIC displays
FOB BATTERY LOW.
Battery Replacement
Notice: When replacing the
battery, do not touch any of
the circuitry on the transmitter.
Static from your body could
damage the transmitter.
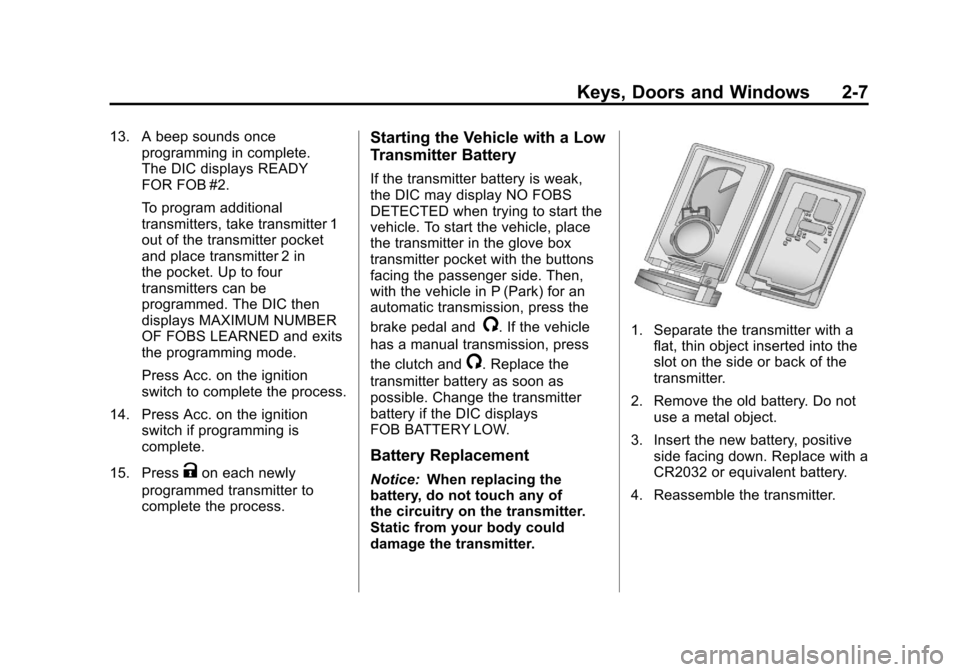
1. Separate the transmitter with a
flat, thin object inserted into the
slot on the side or back of the
transmitter.
2. Remove the old battery. Do not use a metal object.
3. Insert the new battery, positive side facing down. Replace with a
CR2032 or equivalent battery.
4. Reassemble the transmitter.
Page 43 of 428

Black plate (11,1)Chevrolet Corvette Owner Manual - 2011
Keys, Doors and Windows 2-11
WARNING (Continued)
.Adjust the Climate Control
system to a setting that
brings in only outside air
and set the fan speed to the
highest setting. See Climate
Control System in the Index.
.If the vehicle is equipped with
a power liftgate, disable the
power liftgate function.
For more information about
carbon monoxide, see Engine
Exhaust on page 9‑26.
Notice: Closing the hatch/trunk
lid forcefully or from the sides
can cause damage to the glass,
the defogger or the weather
stripping. Be sure objects will fit
in the hatch/trunk area before
closing the hatch/trunk lid. When
closing the hatch/trunk lid, gently
pull down from the center. Notice:
Do not store heavy or
sharp objects in the rear storage
compartments located in the
hatch/trunk area. The objects
could damage the underbody.
Hatch/Trunk Lid Release
There are several ways to release
the hatch/trunk lid. If your vehicle
has an automatic transmission,
the shift lever must be in P (Park).
For manual transmission vehicles,
the parking brake must be set
when the ignition is started for
the hatch/trunk release to operate.
The parking brake does not need
to be set when the ignition is off for
the hatch/trunk release to operate.
See Parking Brake on page 9‑35.
V(Hatch/Trunk) : Press this
button, located on the instrument
panel to the left of the steering
wheel. The theft-deterrent alarm
system must not be armed.
}(Hatch/Trunk) : Press this
button on the keyless access
transmitter. See Remote Keyless
Entry (RKE) System on page 2‑3.
Press the hatch/trunk release button
located on the rear of the hatch/
trunk lid above the license plate, as
long as you have your transmitter
with you.
If your vehicle has lost battery
power, open the hatch/trunk using
the vehicle key. See Keys on
page 2‑2 for more information.
The key lock cylinder is located on
the rear of the hatch/trunk lid above
the license plate. Turn the vehicle
key clockwise in the lock.
Page 45 of 428

Black plate (13,1)Chevrolet Corvette Owner Manual - 2011
Keys, Doors and Windows 2-13
Arming the System
To arm the system:
.PressQon the keyless access
transmitter.
.Open the door and lock the
door with the power door lock
switch. The security light should
flash. Remove the keyless
access transmitter from inside
the vehicle and close the door.
The security light stops flashing
and stays on. After 30 seconds,
the light should turn off.
The vehicle can be programmed
to automatically lock the doors
and arm the theft-deterrent
system when you exit the
vehicle. See Vehicle
Personalization on page 5‑55.
If a door or the hatch/trunk is
opened without using the keyless
access transmitter, the alarm
goes off. The horn sounds for
two minutes, then goes off to save battery power. The vehicle will not
start without a keyless access
transmitter present.
The theft-deterrent system does not
arm if the driver door is locked with
the power door lock switch after the
doors are closed.
If the keyless access transmitter is
removed from the vehicle while a
passenger is in it, have them lock
the doors after they are closed.
The alarm will not arm, so the
passenger will not set it off.
Testing the Alarm
To test the system:
1. Make sure the trunk lid/hatch is
latched.
2. Lower the window on the driver door.
3. Manually arm the system.
4. Close the doors and wait 30 seconds. 5. Reach through the open window
and manually pull the release
lever on the floor.
6. Press the unlock button on the transmitter to turn off the alarm.
If the alarm does not sound, check
to see if the horn works. The horn
fuse may be blown. See Fuses and
Circuit Breakers on page 10‑51.
If the horn works, but the alarm
does not go off, see your dealer.
Disarming the System
Press the unlock button on the
keyless access transmitter or
squeeze the door handle sensor
while the transmitter is near the
vehicle to unlock a door. Unlocking
a door any other way sets off the
alarm. If the alarm sounds, press
the unlock button on the keyless
access transmitter to disarm it.
Do not leave the key or device that
disarms or deactivates the theft
deterrent system in the vehicle.
Page 50 of 428

Black plate (18,1)Chevrolet Corvette Owner Manual - 2011
2-18 Keys, Doors and Windows
Express-Down Window
Press the front of the switch to
the second position to activate the
express-down feature. If you want
to stop the window as it is lowering,
press the switch again.
Window Indexing
This feature automatically lowers
the window a small amount when
the door is opened. When the door
is closed, the window will raise to
its full up position. If either window
does not index properly, it could
be due to loss of power. Before
returning to your dealer for service,
perform the power window initialize
procedure.
Power Window Initialize
After a power reconnect such as
battery replacement, the window
index‐up feature will not function
until the system is initialized.
Once power is restored:
1. Close the door.
2. Raise the window and hold theswitch up for three seconds after
the window is closed.
3. Release the switch, then hold the switch up again for
three seconds and release.
Sun Visors
Pull the visor toward you, or move it
to the side to help reduce glare.
To use the lighted mirror, lift the
cover.
Roof
Roof Panel
On vehicles with a removable roof
panel, follow the procedures when
removing or installing it.
Removing the Roof Panel
{WARNING
Do not try to remove a roof panel
while the vehicle is moving.
Trying to remove the roof panel
while the vehicle is moving could
cause an accident. The panel
could fall into the vehicle and
cause you to lose control, or it
could fly off and strike another
vehicle. You or others could be
injured. Remove the roof panel
only when the vehicle is parked.
Page 57 of 428

Black plate (25,1)Chevrolet Corvette Owner Manual - 2011
Keys, Doors and Windows 2-25
If the vehicle has lost battery
power, the tonneau cover (C)
can still be opened using the
manual release cable.
The tonneau cover emergency
manual release cable is located
underneath the carpeting behind
the passenger's seat head
restraint, on the underside
forward edge of the tonneau
cover. To access the cable,
lift and pull back the carpeting.
Also, seeHatch on page 2‑10
for information on the
emergency trunk release
handle.
Notice: If you lower the
convertible top into the storage
compartment and the rear edge
of the top is not in the full-down
position, you could damage the
top. Always verify that the rear
edge of the convertible top is in
the full-down position before
lowering the top into the storage
compartment.
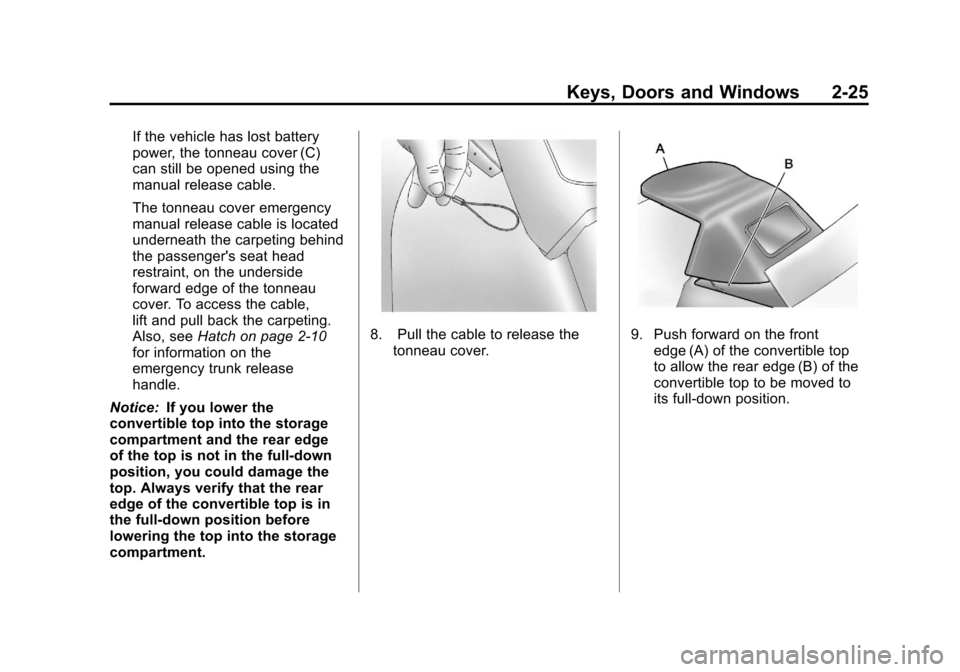
8. Pull the cable to release the tonneau cover.9. Push forward on the frontedge (A) of the convertible top
to allow the rear edge (B) of the
convertible top to be moved to
its full-down position.