2011 CHEVROLET CAMARO clock
[x] Cancel search: clockPage 302 of 414

Black plate (40,1)Chevrolet Camaro Owner Manual - 2011
10-40 Vehicle Care
5. Push the new bulb into thesocket and reinstall the socket
into the headlamp assembly by
turning it clockwise.
6. Reconnect the electrical connector.
7. Pull the duct back out of the air cleaner/filter housing until the
tabs snap the duct back into
position.
Headlamps, Front Turn
Signal and Parking
Lamps (Up-Level Vehicle)
The up‐level model vehicle has a
HID headlamp and a turn signal
lamp on the headlamp assembly.
The park lamp is also the function
of the HID headlamp. See High
Intensity Discharge (HID) Lighting
on page 10‑38 for more information. To replace the turn signal bulb:
1. Open the hood. See
Hood on
page 10‑5.2. Press in on the tabs located on the sides of the duct and then
push the duct rearward into the
air cleaner/filter housing.
3. Disconnect the wiring harnessand turn the bulb socket
counterclockwise to remove it
from the headlamp assembly.
4. Pull the bulb straight out from the socket.
5. Push the new bulb into the socket and reinstall the socket
into the headlamp assembly by
turning it clockwise.
6. Reconnect the electrical connector.
7. Pull the duct back out of the air cleaner/filter housing until the
tabs snap the duct back into
position.
Page 304 of 414

Black plate (42,1)Chevrolet Camaro Owner Manual - 2011
10-42 Vehicle Care
3. Push in the new bulb assemblyto lock it into place.
4. Reconnect the electrical connector to the bulb assembly.
The up‐level vehicle will not be
equipped with fog lamps.
Taillamps, Turn Signal,
and Stoplamps
To replace a taillamp, turn signal,
or stoplamp bulb:
1. Open the trunk. See Trunk on
page 2‑9.
2. Remove the close out panel retainers to gain access to the
bulb socket connectors.
3. Turn the bulb socket counterclockwise to remove it.
4. Pull the old bulb straight out of the bulb socket.
5. Push the new bulb straight into the bulb socket until it clicks.
6. Turn the bulb socket clockwise to reinstall.
License Plate Lamp
To replace one of these bulbs:
1. Unclip the license plate lampfrom the facia opening.
2. Pull the license plate lamp down through the facia opening.
3. Turn the bulb socket counterclockwise and pull
the bulb straight out of the
lamp socket.
4. Install the new bulb.
Page 305 of 414

Black plate (43,1)Chevrolet Camaro Owner Manual - 2011
Vehicle Care 10-43
5. Push the bulb straight into thesocket and turn clockwise to
reinstall.
6. Reinstall the license plate lamp by lifting it through the facia
opening until the clip is in place.
Replacement Bulbs
Exterior Lamp Bulb
Number
Daytime Running
Lamp (Up-level
vehicles) P13W
Fog Lamp PS24W
Front Park and Turn
Signal Lamp 3457NAK
Halogen Headlamp H13
License Plate Lamp W5W
Rear Turn Signal
and Taillamps 3157K
For replacement bulbs not listed
here, contact your dealer.
Electrical System
Electrical System
Overload
The vehicle has fuses and circuit
breakers to protect against an
electrical system overload.
When the current electrical load is
too heavy, the circuit breaker opens
and closes, protecting the circuit
until the current load returns to
normal or the problem is fixed.
This greatly reduces the chance
of circuit overload and fire caused
by electrical problems. Fuses and circuit breakers protect
the following in the vehicle:
.Headlamp Wiring
.Windshield Wiper Motor
.Power Windows and Other
Power Accessories
Replace a bad fuse with a new one
of the identical size and rating.
If there is a problem on the road
and a fuse needs to be replaced,
the same amperage fuse can be
borrowed. Choose some feature of
the vehicle that is not needed to use
and replace it as soon as possible.
Page 342 of 414

Black plate (80,1)Chevrolet Camaro Owner Manual - 2011
10-80 Vehicle Care
If a tire goes flat, avoid further tire
and wheel damage by driving slowly
to a level place. Turn on the hazard
warning flashers. SeeHazard
Warning Flashers on page 6‑5.
See If a Tire Goes Flat on
page 10‑75 for other important
safety warnings.
Do not remove any objects that
have penetrated the tire.
1. Remove the tire sealant and compressor kit from its storage
location. See Storing the Tire
Sealant and Compressor Kit on
page 10‑84.
2. Unwrap the sealant/air hose (F) and the power plug (G).
3. Place the kit on the ground. Make sure the tire valve stem is
positioned close to the ground
so the hose will reach it.
4. Remove the valve stem cap from the flat tire by turning it
counterclockwise. 5. Attach the sealant/air hose (F)
onto the tire valve stem. Turn it
clockwise until it is tight.
6. Plug the power plug (G) into the accessory power outlet in the
vehicle. Unplug all items from
other accessory power outlets.
See Power Outlets on page 5‑5.
If the vehicle has an accessory
power outlet, do not use the
cigarette lighter.
If the vehicle only has a cigarette
lighter, use the cigarette lighter.
Do not pinch the power plug
cord in the door or window.
7. Start the vehicle. The vehicle must be running while using the
air compressor.
8. Turn the selector switch (B) clockwise to the Sealant + Air
position. 9. Press the on/off (A) button
to turn the tire sealant and
compressor kit on.
The compressor will inject
sealant and air into the tire.
The pressure gauge (D) will
initially show a high pressure
while the compressor pushes the
sealant into the tire. Once the
sealant is completely dispersed
into the tire, the pressure will
quickly drop and start to rise
again as the tire inflates with
air only.
10. Inflate the tire to the recommended inflation
pressure using the pressure
gauge (D). The recommended
inflation pressure can be
found on the Tire and Loading
Information label. See Tire
Pressure on page 10‑58.
Page 343 of 414

Black plate (81,1)Chevrolet Camaro Owner Manual - 2011
Vehicle Care 10-81
The pressure gauge (D) may
read higher than the actual tire
pressure while the compressor
is on. Turn the compressor off
to get an accurate pressure
reading. The compressor may
be turned on/off until the
correct pressure is reached.
Notice: If the recommended
pressure cannot be reached after
approximately 25 minutes, the
vehicle should not be driven
farther. The tire is too severely
damaged and the tire sealant and
compressor kit cannot inflate the
tire. Remove the power plug from
the accessory power outlet and
unscrew the inflating hose from
the tire valve. See Roadside
Assistance Program (U.S. and
Canada) on page 13‑7 or
Roadside Assistance Program
(Mexico) on page 13‑10. 11. Press the on/off button (A)
to turn the tire sealant and
compressor kit off.
The tire is not sealed and
will continue to leak air until
the vehicle is driven and the
sealant is distributed in the tire;
therefore, Steps 12 through 18
must be done immediately after
Step 11.
Be careful while handling the
tire sealant and compressor
kit as it could be warm after
usage.
12. Unplug the power plug (G) from the accessory power outlet in
the vehicle.
13. Turn the sealant/air hose (F) counterclockwise to remove it
from the tire valve stem.
14. Replace the tire valve stem cap. 15. Return the sealant/air hose (F)
and the power plug (G) back in
their original locations.
16. If the flat tire was able to
inflate to the recommended
inflation pressure, remove the
maximum speed label from
the sealant canister and place
it in a highly visible location.
Do not exceed the speed on
this label until the damaged
tire is repaired or replaced.
17. Return the equipment to its original storage location in the
vehicle.
18. Immediately drive the vehicle 8 km (5 miles) to distribute the
sealant in the tire.
Page 345 of 414

Black plate (83,1)Chevrolet Camaro Owner Manual - 2011
Vehicle Care 10-83
SeeIf a Tire Goes Flat on
page 10‑75 for other important
safety warnings.
1. Remove the tire sealant and compressor kit from its storage
location. See Storing the Tire
Sealant and Compressor Kit on
page 10‑84.
2. Unwrap the air only hose (E) and the power plug (G).
3. Place the kit on the ground. Make sure the tire valve stem is
positioned close to the ground
so the hose will reach it.
4. Remove the tire valve stem cap from the flat tire by turning it
counterclockwise.
5. Attach the air only hose (E) onto the tire valve stem by turning it
clockwise until it is tight. 6. Plug the power plug (G) into the
accessory power outlet in the
vehicle. Unplug all items from
other accessory power outlets.
See Power Outlets on page 5‑5.
If the vehicle has an accessory
power outlet, do not use the
cigarette lighter.
If the vehicle only has a cigarette
lighter, use the cigarette lighter.
Do not pinch the power plug
cord in the door or window.
7. Start the vehicle. The vehicle must be running while using the
air compressor.
8. Turn the selector switch (B) counterclockwise to the Air Only
position.
9. Press the on/off (A) button to turn the compressor on.
The compressor will inflate the
tire with air only. 10. Inflate the tire to the
recommended inflation
pressure using the pressure
gauge (D). The recommended
inflation pressure can be
found on the Tire and Loading
Information label. See Tire
Pressure on page 10‑58.
The pressure gauge (D) may
read higher than the actual tire
pressure while the compressor
is on. Turn the compressor
off to get an accurate reading.
The compressor may be turned
on/off until the correct pressure
is reached. If the tire is inflated
higher than the recommended
pressure, press the pressure
relief button (C), if equipped,
until the proper pressure
reading is reached. This option
is only functional when using
the air only hose (E).
Page 346 of 414

Black plate (84,1)Chevrolet Camaro Owner Manual - 2011
10-84 Vehicle Care
11. Press the on/off button (A) toturn the tire sealant and
compressor kit off.
Be careful while handling the
tire sealant and compressor
kit as it could be warm after
usage.
12. Unplug the power plug (G) from the accessory power outlet in
the vehicle.
13. Disconnect the air only hose (E) from the tire
valve stem, by turning it
counterclockwise, and replace
the tire valve stem cap.
14. Return the air only hose (E) and the power plug (G) back
to their original locations.
15. Return the equipment to its original storage location in the
vehicle.Removal and Installation of the
Sealant Canister
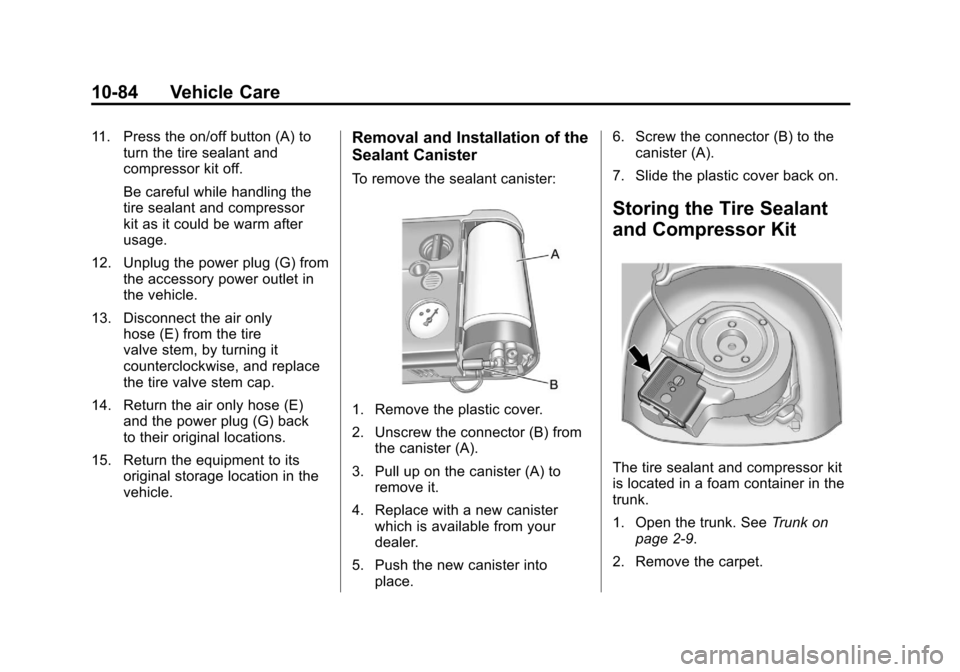
To remove the sealant canister:
1. Remove the plastic cover.
2. Unscrew the connector (B) from
the canister (A).
3. Pull up on the canister (A) to remove it.
4. Replace with a new canister which is available from your
dealer.
5. Push the new canister into place. 6. Screw the connector (B) to the
canister (A).
7. Slide the plastic cover back on.
Storing the Tire Sealant
and Compressor Kit
The tire sealant and compressor kit
is located in a foam container in the
trunk.
1. Open the trunk. See Trunk on
page 2‑9.
2. Remove the carpet.
Page 347 of 414

Black plate (85,1)Chevrolet Camaro Owner Manual - 2011
Vehicle Care 10-85
3. Turn the center retainercounterclockwise to remove
the cover.
4. Remove the tire sealant and compressor kit from the foam
container.
To store the tire sealant and
compressor kit, reverse the steps.
Tire Changing
Removing the Spare Tire and
Tools
Spare Tire
1. Open the trunk. See Trunk on
page 2‑9.
2. Remove the carpet.
3. Turn the center retainer counterclockwise to remove
the spare tire cover.
4. Remove the spare tire and place it next to the tire being changed. Tools
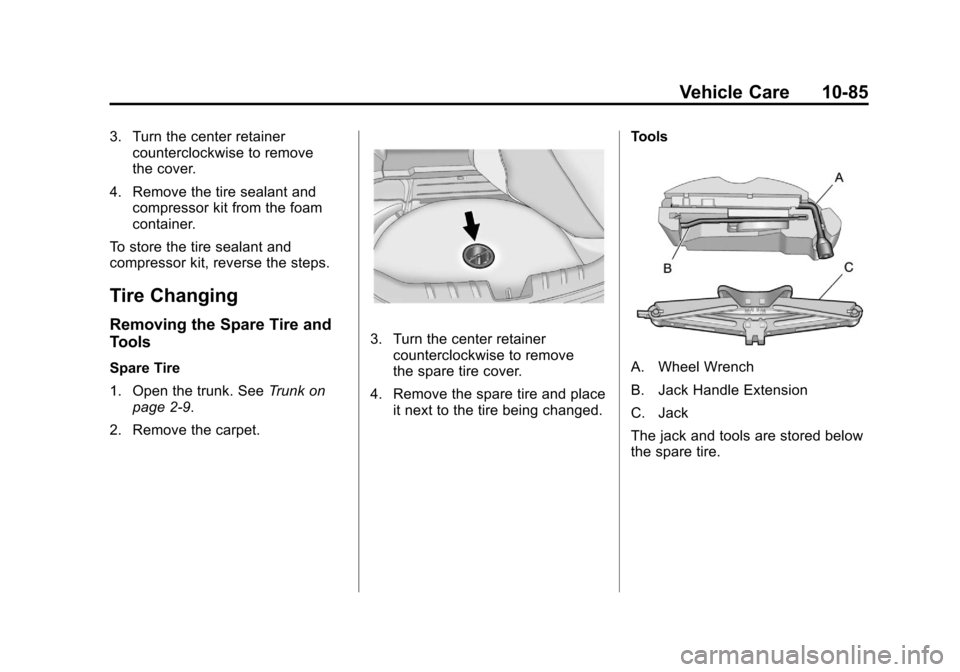
A. Wheel Wrench
B. Jack Handle Extension
C. Jack
The jack and tools are stored below
the spare tire.