2011 CHEVROLET AVEO remote start
[x] Cancel search: remote startPage 5 of 328

Black plate (5,1)Chevrolet Aveo Owner Manual - 2011
Introduction v
Vehicle Symbol Chart
Here are some additional symbols
that may be found on the vehicle
and what they mean. For more
information on the symbol, refer to
the Index.
9:Airbag Readiness Light
#:Air Conditioning
!:Antilock Brake System (ABS)
g:Audio Steering Wheel Controls
or OnStar®
$: Brake System Warning Light
":Charging System
I:Cruise Control
B: Engine Coolant Temperature
O:Exterior Lamps
#:Fog Lamps
.: Fuel Gauge
+:Fuses
3: Headlamp High/Low-Beam
Changer
j: LATCH System Child
Restraints
*: Malfunction Indicator Lamp
::Oil Pressure
}:Power
/:Remote Vehicle Start
>:Safety Belt Reminders
7:Tire Pressure Monitor
d:Traction Control
M:Windshield Washer Fluid
Page 7 of 328

Black plate (1,1)Chevrolet Aveo Owner Manual - 2011
In Brief 1-1
In Brief
Instrument Panel
Instrument Panel . . . . . . . . . . . . . . 1-2
Initial Drive Information
Initial Drive Information . . . . . . . . 1-3
Starting the Engine . . . . . . . . . . . 1-4
Remote Keyless Entry (RKE)System . . . . . . . . . . . . . . . . . . . . . . 1-4
Door Locks . . . . . . . . . . . . . . . . . . . 1-5
Liftgate . . . . . . . . . . . . . . . . . . . . . . . . 1-5
Trunk Release . . . . . . . . . . . . . . . . 1-6
Windows . . . . . . . . . . . . . . . . . . . . . . 1-6
Seat Adjustment . . . . . . . . . . . . . . 1-7
Second Row Seats . . . . . . . . . . . 1-8
Head Restraint Adjustment . . . . 1-8
Safety Belts . . . . . . . . . . . . . . . . . . . 1-9 Sensing System for Passenger
Airbag . . . . . . . . . . . . . . . . . . . . . . . 1-9
Mirror Adjustment . . . . . . . . . . . . 1-10
Steering Wheel Adjustment . . . . . . . . . . . . . . . . . 1-11
Interior Lighting . . . . . . . . . . . . . . 1-11
Exterior Lighting . . . . . . . . . . . . . 1-11
Windshield Wiper/Washer . . . . 1-12
Climate Controls . . . . . . . . . . . . . 1-13
Transmission . . . . . . . . . . . . . . . . 1-14
Vehicle Features
Radio(s) . . . . . . . . . . . . . . . . . . . . . 1-16
Satellite Radio . . . . . . . . . . . . . . . 1-17
Portable Audio Devices . . . . . . 1-18
Steering Wheel Controls . . . . . 1-18
Cruise Control . . . . . . . . . . . . . . . 1-19
Trip Computer (US Only) . . . . 1-19
Power Outlets . . . . . . . . . . . . . . . 1-20
Sunroof . . . . . . . . . . . . . . . . . . . . . . 1-20
Performance and Maintenance
Tire Pressure Monitor . . . . . . . . 1-21
Engine Oil Life System . . . . . . 1-21
Hood Release . . . . . . . . . . . . . . . 1-22
Driving for Better Fuel Economy . . . . . . . . . . . . . . . . . . . 1-22
Roadside Assistance Program . . . . . . . . . . . . . . . . . . . . 1-23
OnStar
®. . . . . . . . . . . . . . . . . . . . . 1-24
Page 10 of 328

Black plate (4,1)Chevrolet Aveo Owner Manual - 2011
1-4 In Brief
Starting the Engine
The vehicle has a
Computer-Controlled Cranking
System. It assists in starting the
engine and protects components.
If the ignition key is turned to
START and then released when the
engine begins cranking, the engine
will continue cranking for a few
seconds or until the engine starts.
If the engine does not start and the
key is held in START, cranking will
be stopped after 15 seconds to
prevent damage. To prevent gear
damage, cranking is not allowed if
the engine is running. Engine
cranking can be stopped by
turning the ignition key to ACC/
ACCESSORY or LOCK/OFF. See
Starting the Engine on page 9‑19.
Remote Keyless Entry
(RKE) System
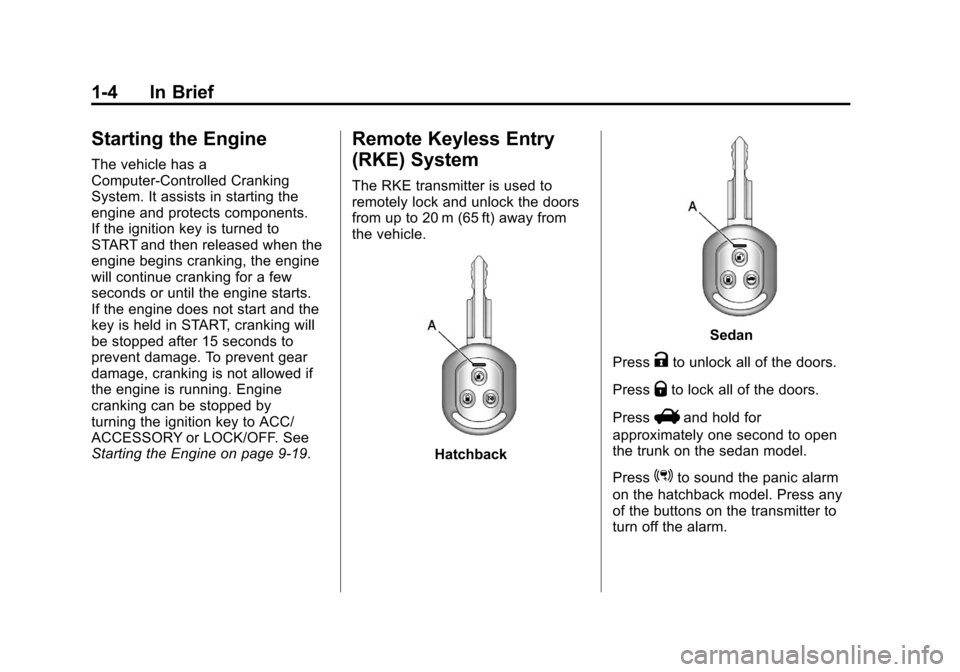
The RKE transmitter is used to
remotely lock and unlock the doors
from up to 20 m (65 ft) away from
the vehicle.
Hatchback
Sedan
Press
Kto unlock all of the doors.
Press
Qto lock all of the doors.
Press
Vand hold for
approximately one second to open
the trunk on the sedan model.
Press
3to sound the panic alarm
on the hatchback model. Press any
of the buttons on the transmitter to
turn off the alarm.
Page 273 of 328

Black plate (71,1)Chevrolet Aveo Owner Manual - 2011
Vehicle Care 10-71
3. Turn off the ignition on bothvehicles. Unplug unnecessary
accessories plugged into the
cigarette lighter or the accessory
power outlet. Turn off the radio
and all lamps that are not
needed. This will avoid sparks
and help save both batteries.
And it could save the radio!
4. Open the hoods and locate the batteries. Find the positive (+)
and negative (−) terminal
locations on each vehicle. See
Engine Compartment Overview
on page 10‑8 for more
information on location.
{WARNING
An electric fan can start up even
when the engine is not running
and can injure you. Keep hands,
clothing and tools away from any
underhood electric fan.
{WARNING
Using a match near a battery can
cause battery gas to explode.
People have been hurt doing this,
and some have been blinded.
Use a flashlight if you need more
light.
Be sure the battery has enough
water. You do not need to add
water to the battery installed in
your new vehicle. But if a battery
has filler caps, be sure the right
amount of fluid is there. If it is low,
add water to take care of that
first. If you don't, explosive gas
could be present.
Battery fluid contains acid that
can burn you. Do not get it on
you. If you accidentally get it in
your eyes or on your skin, flush
the place with water and get
medical help immediately.
{WARNING
Fans or other moving engine
parts can injure you badly. Keep
your hands away from moving
parts once the engine is running.
5. Check that the jumper cables do not have loose or missing
insulation. If they do, you could
get a shock. The vehicles could
be damaged too.
Before you connect the
cables, here are some things
you should know. Positive (+) will
go to positive (+) or to a remote
positive (+) terminal if the vehicle
has one. Negative (−) will go to a
heavy, unpainted metal engine
part or to a remote negative (−)
terminal if the vehicle has one.
Page 275 of 328

Black plate (73,1)Chevrolet Aveo Owner Manual - 2011
Vehicle Care 10-73
9. Connect the other end of thenegative (−) cable at least 45 cm
(18 in) away from the dead
battery, but not near engine
parts that move.
The electrical connection is just
as good there, and the chance
of sparks getting back to the
battery is much less.
10. Now start the vehicle with the good battery and run the
engine for a while.
11. Try to start the vehicle that had the dead battery. If it will not
start after a few tries, it
probably needs service.
Notice: If the jumper cables are
connected or removed in the
wrong order, electrical shorting
may occur and damage the
vehicle. The repairs would not be
covered by the vehicle warranty.
Always connect and remove the
jumper cables in the correct
order, making sure that the
cables do not touch each other
or other metal.
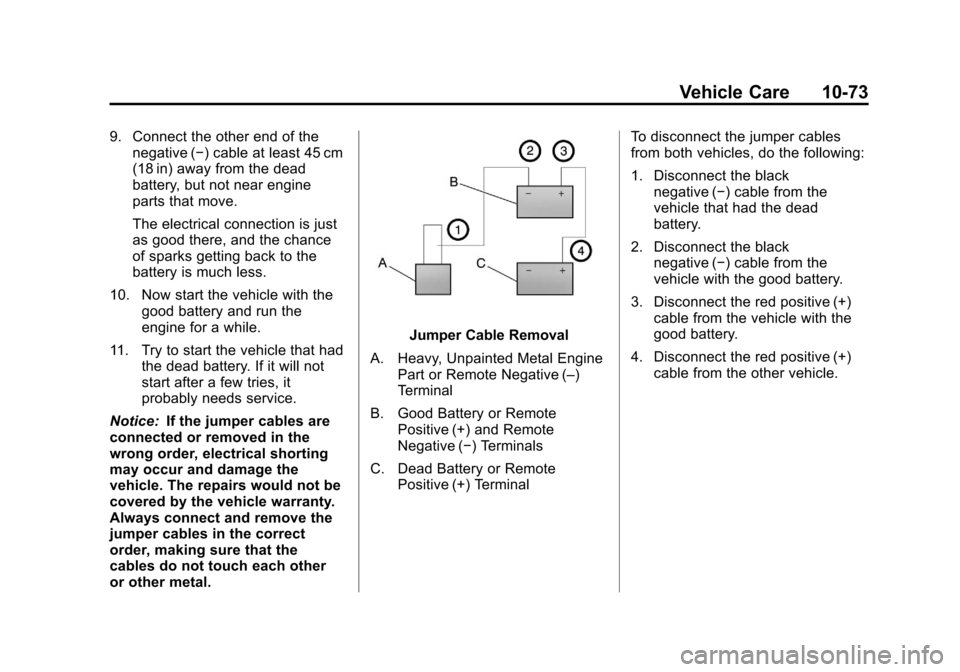
Jumper Cable Removal
A. Heavy, Unpainted Metal Engine Part or Remote Negative (–)
Terminal
B. Good Battery or Remote Positive (+) and Remote
Negative (−) Terminals
C. Dead Battery or Remote Positive (+) Terminal To disconnect the jumper cables
from both vehicles, do the following:
1. Disconnect the black
negative (−) cable from the
vehicle that had the dead
battery.
2. Disconnect the black negative (−) cable from the
vehicle with the good battery.
3. Disconnect the red positive (+) cable from the vehicle with the
good battery.
4. Disconnect the red positive (+) cable from the other vehicle.
Page 318 of 328

Black plate (16,1)Chevrolet Aveo Owner Manual - 2011
13-16 Customer Information
GM will not access this data or
share it with others except: with the
consent of the vehicle owner or,
if the vehicle is leased, with the
consent of the lessee; in response
to an official request by police or
similar government office; as part of
GM's defense of litigation through
the discovery process; or, as
required by law. Data that GM
collects or receives may also be
used for GM research needs or may
be made available to others for
research purposes, where a need is
shown and the data is not tied to a
specific vehicle or vehicle owner.
OnStar®
If the vehicle is equipped with an
active OnStar system, that system
may also record data in crash or
near crash‐like situations. The
OnStar Terms and Conditions
provides information on datacollection and use and is available
in the OnStar glove box kit, at
www.onstar.com (U.S.) or
www.onstar.ca (Canada), or by
pressing the
Qbutton and
speaking to an advisor.
Radio Frequency
Identification (RFID)
RFID technology is used in some
vehicles for functions such as tire
pressure monitoring and ignition
system security, as well as in
connection with conveniences
such as key fobs for remote door
locking/unlocking and starting, and
in-vehicle transmitters for garage
door openers. RFID technology in
GM vehicles does not use or record
personal information or link with any
other GM system containing
personal information.
Radio Frequency
Statement
This vehicle has systems that
operate on a radio frequency that
comply with Part 15 of the Federal
Communications Commission (FCC)
rules and with Industry Canada
Standards RSS‐210/220/310.
Operation is subject to the following
two conditions:
1. The device may not cause interference.
2. The device must accept any interference received, including
interference that may cause
undesired operation of the
device.
Changes or modifications to any of
these systems by other than an
authorized service facility could void
authorization to use this equipment.
Page 323 of 328

Black plate (5,1)Chevrolet Aveo Owner Manual - 2011
INDEX i-5
General InformationService and Maintenance . . . . . 11-1
Towing . . . . . . . . . . . . . . . . . . . . . . . . 9-39
Vehicle Care . . . . . . . . . . . . . . . . . . 10-3
Glove Box . . . . . . . . . . . . . . . . . . . . . . 4-1
GM Mobility Reimbursement Program . . . . . . . . . . . . . . . . . . . . . . 13-5
H
Halogen Bulbs . . . . . . . . . . . . . . . . 10-31
Hazard Warning Flashers . . . . . . . 6-3
Head Restraints . . . . . . . . . . . . . . . . 3-2
Headlamps . . . . . . . . . . . . . . . . . . . 10-31
Aiming . . . . . . . . . . . . . . . . . . . . . . 10-30
Bulb Replacement . . . . . . . . . . 10-31
Daytime RunningLamps (DRL) . . . . . . . . . . . . . . . . . 6-2
Daytime Running Lamps
(DRL) Indicator Light . . . . . . . . 5-20
Flash-to-Pass . . . . . . . . . . . . . . . . . . 6-2
High-Beam On Light . . . . . . . . . . 5-20
High/Low Beam Changer . . . . . . 6-2
Heated Mirrors . . . . . . . . . . . . . . . . . 2-14
Heater
Engine . . . . . . . . . . . . . . . . . . . . . . . . 9-20 Heating and Air Conditioning . . . 8-1
High-Beam On Light . . . . . . . . . . . 5-20
Highway Hypnosis . . . . . . . . . . . . . . 9-8
Hill and Mountain Roads . . . . . . . . 9-8
Hold Mode Light . . . . . . . . . . . . . . . 5-18
Hood . . . . . . . . . . . . . . . . . . . . . . . . . . 10-6
Horn . . . . . . . . . . . . . . . . . . . . . . . . . . . . 5-3
How to Wear Safety Belts
Properly . . . . . . . . . . . . . . . . . . . . . . 3-14
Hydraulic Clutch . . . . . . . . . . . . . . 10-15
I
Ignition Positions . . . . . . . . . . . . . . 9-17
Ignition Transmission Lock Check . . . . . . . . . . . . . . . . . . . . . . . 10-29
Immobilizer . . . . . . . . . . . . . . . . . . . . 2-12
Inadvertent Power Battery Saver . . . . . . . . . . . . . . . . . . . . . . . . . 6-5
Infants and Young Children, Restraints . . . . . . . . . . . . . . . . . . . . 3-41
Infotainment . . . . . . . . . . . . . . . . . . . . 7-1
Instrument Cluster . . . . . . . . . . . . . . 5-8
Introduction . . . . . . . . . . . . . . . . . . . . . . . iii
J
Jump Starting . . . . . . . . . . . . . . . . . 10-70
K
Keyless Entry Remote (RKE) System . . . . . . . . 2-3
Keys . . . . . . . . . . . . . . . . . . . . . . . . . . . . 2-2
L
Labeling, Tire Sidewall . . . . . . . . 10-42
Lamps Daytime Running (DRL) . . . . . . . 6-2
Dome . . . . . . . . . . . . . . . . . . . . . . . . . . 6-5
Exterior Controls . . . . . . . . . . . . . . . 6-1
License Plate . . . . . . . . . . . . . . . 10-35
Malfunction Indicator . . . . . . . . . 5-14
Lap-Shoulder Belt . . . . . . . . . . . . . 3-20
LATCH System Replacing Parts After aCrash . . . . . . . . . . . . . . . . . . . . . . . 3-55
Latch, Lower Anchors and Tethers for Children . . . . . . . . . . 3-48
Liftgate Carbon Monoxide . . . . . . . . . . . . . . 2-9