Page 223 of 328
Black plate (21,1)Chevrolet Aveo Owner Manual - 2011
Vehicle Care 10-21
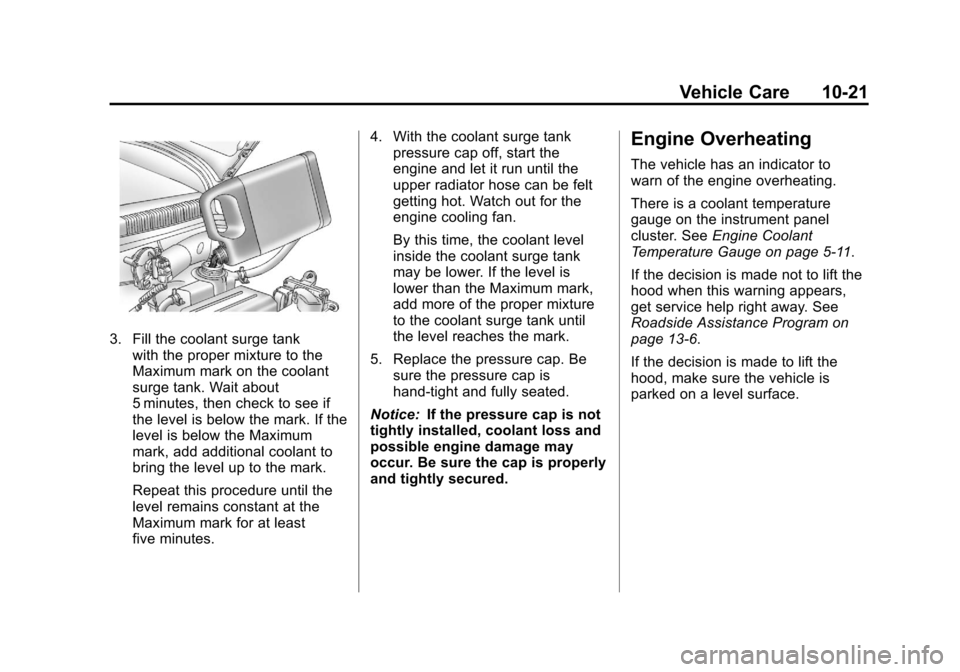
3. Fill the coolant surge tankwith the proper mixture to the
Maximum mark on the coolant
surge tank. Wait about
5 minutes, then check to see if
the level is below the mark. If the
level is below the Maximum
mark, add additional coolant to
bring the level up to the mark.
Repeat this procedure until the
level remains constant at the
Maximum mark for at least
five minutes. 4. With the coolant surge tank
pressure cap off, start the
engine and let it run until the
upper radiator hose can be felt
getting hot. Watch out for the
engine cooling fan.
By this time, the coolant level
inside the coolant surge tank
may be lower. If the level is
lower than the Maximum mark,
add more of the proper mixture
to the coolant surge tank until
the level reaches the mark.
5. Replace the pressure cap. Be sure the pressure cap is
hand-tight and fully seated.
Notice: If the pressure cap is not
tightly installed, coolant loss and
possible engine damage may
occur. Be sure the cap is properly
and tightly secured.
Engine Overheating
The vehicle has an indicator to
warn of the engine overheating.
There is a coolant temperature
gauge on the instrument panel
cluster. See Engine Coolant
Temperature Gauge on page 5‑11.
If the decision is made not to lift the
hood when this warning appears,
get service help right away. See
Roadside Assistance Program on
page 13‑6.
If the decision is made to lift the
hood, make sure the vehicle is
parked on a level surface.
Page 239 of 328
Black plate (37,1)Chevrolet Aveo Owner Manual - 2011
Vehicle Care 10-37
Engine Compartment
Fuse Block
The engine compartment fuse block
is located on the driver side of the
vehicle, near the battery. See
Engine Compartment Overview on
page 10‑8for more information on
location.
Notice: Spilling liquid on any
electrical component on the
vehicle may damage it. Always
keep the covers on any electrical
component.
To access the fuses, press in the
side flaps to release the cover. To
reinstall the cover, push the cover
until it is secure.
Fuses Usage
FAN HI Cooling Fan HI
Relay
ABS‐1 EBCM Fuses
Usage
ABS‐2 EBCM
SJB BATT Instrument Panel
Fuse Block
Page 240 of 328
Black plate (38,1)Chevrolet Aveo Owner Manual - 2011
10-38 Vehicle Care
FusesUsage
ACC/IG1 IGN1 Relay
IG2/ST IGN2 Relay, Starter
Relay
ACC/RAP Instrument Panel
Fuse Block
P/
WINDOW‐2 Power Window
Switch
P/W
WINDOW‐1 Power Window
Switch
FAN LOW Cooling Fan LOW
Relay
A/CON A/C Compressor
Relay Fuses
Usage
PKLP LH Tail Lamp (LH),
Side Marker (LH),
Turn Signal &
Parking Lamp (LH),
License Lamp
PKLP RH Tail Lamp (RH),
Side Marker (RH),
Turn Signal &
Parking Lamp
(RH), License
Lamp, I/P Fuse
Block
ECU ECM, TCM
FRT FOG Front Fog Lamp
Relay Fuses
Usage
F/PUMP Fuel Pump Relay
HAZARD Hazard Switch,
Hood Contact
Switch
HDLP HI LH Head Lamp
(LH), IPC
HDLP HI RH Head Lamp (RH) IPC IPC
HDLP LO LH Head Lamp (LH),
I/P Fuse Block
HDLP LO RH Head Lamp (RH) EMS‐1 ECM, InjectorDLIS Ignition Switch
Page 242 of 328
Black plate (40,1)Chevrolet Aveo Owner Manual - 2011
10-40 Vehicle Care
Instrument Panel Fuse
Block
The instrument panel fuse block is
located on the end of the instrument
panel on the driver side of the
vehicle.
To access the fuses, open the fuse
panel door by pulling the door out.
To reinstall the door, first insert the
rear edge of the fuse panel door,
then push the front of the door into
the end of the instrument panel to
secure it.
FusesUsage
AUDIO Audio, Clock,
Immobilizer
AUDIO/RKE A/C Switch, Clock,
Power Mirror Unit,
Audio, Anti-Theft
Module, TPMS Fuses
Usage
B/UP LAMP PNP Switch,
Reverse Lamp
Switch
BLANK Not Used
BLANK Not Used
Page 263 of 328
Black plate (61,1)Chevrolet Aveo Owner Manual - 2011
Vehicle Care 10-61
Used Replacement Wheels
{WARNING
Replacing a wheel with a used
one is dangerous. How it has
been used or how far it has been
driven may be unknown. It could
fail suddenly and cause a crash.
When replacing wheels, use a
new GM original equipment
wheel.
Tire Chains
Notice:Use tire chains only
where legal and only when you
must. Use only SAE Class“S”
type chains that are the proper
size for your tires. Install them on
the front tires and tighten them
as tightly as possible with the
ends securely fastened. Drive
slowly and follow the chain
manufacturer's instructions.
If you can hear the chains
contacting your vehicle, stop
and retighten them. If the
contact continues, slow down
until it stops. Driving too fast or
spinning the wheels with chains
on will damage your vehicle.
If a Tire Goes Flat
It is unusual for a tire to blowout
while you are driving, especially if
you maintain the vehicle's tires
properly. If air goes out of a tire, it is
much more likely to leak out slowly.
But if you should ever have a
blowout, here are a few tips about
what to expect and what to do:
If a front tire fails, the flat tire
creates a drag that pulls the vehicle
toward that side. Take your foot off
the accelerator pedal and grip the
steering wheel firmly. Steer to
maintain lane position, and then
gently brake to a stop, well off the
road, if possible.
Page 270 of 328
Black plate (68,1)Chevrolet Aveo Owner Manual - 2011
10-68 Vehicle Care
15. Lower the vehicle byturning the wheel wrench
counterclockwise. Lower the
jack completely.
{WARNING
Wheel nuts that are improperly or
incorrectly tightened can cause
the wheels to become loose or
come off. The wheel nuts should
be tightened with a torque wrench
to the proper torque specification
after replacing. Follow the torque
specification supplied by the
aftermarket manufacturer when
using accessory locking wheel
nuts. See Capacities and
Specifications on page 12‑2 for
original equipment wheel nut
torque specifications.
Notice: Improperly tightened
wheel nuts can lead to brake
pulsation and rotor damage. To
avoid expensive brake repairs,
evenly tighten the wheel nuts in the proper sequence and to the
proper torque specification. See
Capacities and Specifications on
page 12‑2
for the wheel nut
torque specification.
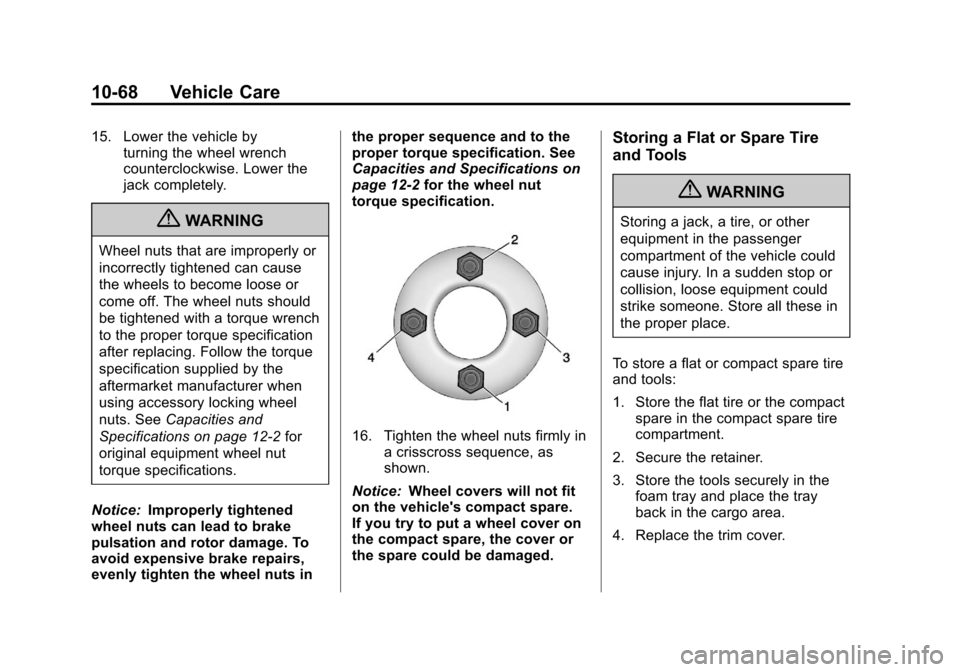
16. Tighten the wheel nuts firmly in a crisscross sequence, as
shown.
Notice: Wheel covers will not fit
on the vehicle's compact spare.
If you try to put a wheel cover on
the compact spare, the cover or
the spare could be damaged.
Storing a Flat or Spare Tire
and Tools
{WARNING
Storing a jack, a tire, or other
equipment in the passenger
compartment of the vehicle could
cause injury. In a sudden stop or
collision, loose equipment could
strike someone. Store all these in
the proper place.
To store a flat or compact spare tire
and tools:
1. Store the flat tire or the compact spare in the compact spare tire
compartment.
2. Secure the retainer.
3. Store the tools securely in the foam tray and place the tray
back in the cargo area.
4. Replace the trim cover.
Page 277 of 328
Black plate (75,1)Chevrolet Aveo Owner Manual - 2011
Vehicle Care 10-75
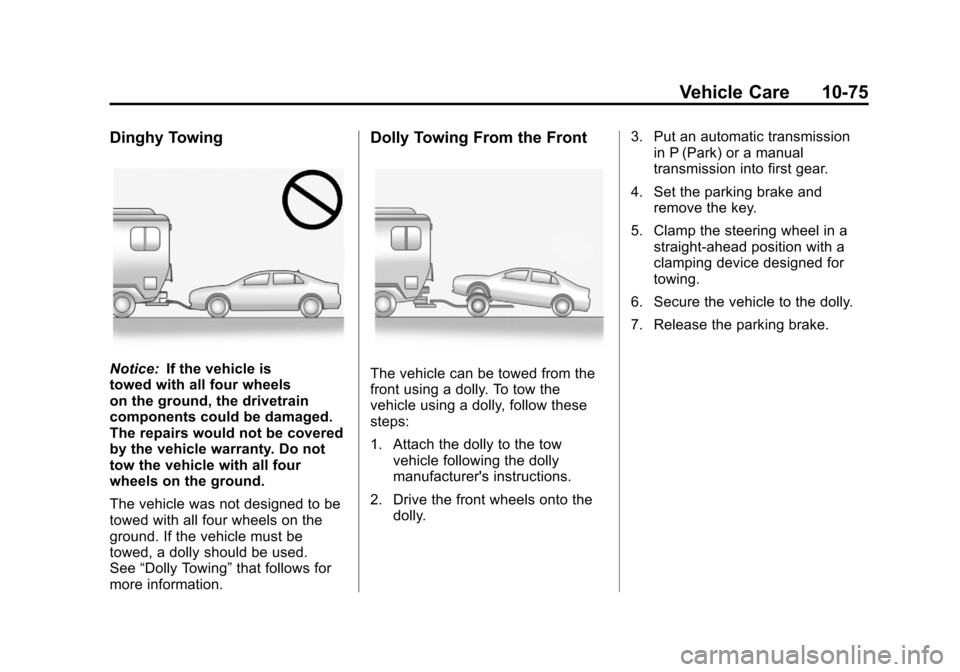
Dinghy Towing
Notice:If the vehicle is
towed with all four wheels
on the ground, the drivetrain
components could be damaged.
The repairs would not be covered
by the vehicle warranty. Do not
tow the vehicle with all four
wheels on the ground.
The vehicle was not designed to be
towed with all four wheels on the
ground. If the vehicle must be
towed, a dolly should be used.
See “Dolly Towing” that follows for
more information.
Dolly Towing From the Front
The vehicle can be towed from the
front using a dolly. To tow the
vehicle using a dolly, follow these
steps:
1. Attach the dolly to the tow vehicle following the dolly
manufacturer's instructions.
2. Drive the front wheels onto the dolly. 3. Put an automatic transmission
in P (Park) or a manual
transmission into first gear.
4. Set the parking brake and remove the key.
5. Clamp the steering wheel in a straight-ahead position with a
clamping device designed for
towing.
6. Secure the vehicle to the dolly.
7. Release the parking brake.
Page 285 of 328
Black plate (83,1)Chevrolet Aveo Owner Manual - 2011
Vehicle Care 10-83
Floor Mats
{WARNING
If a floor mat is the wrong size or
is not properly installed, it can
interfere with the accelerator
pedal and/or brake pedal.
Interference with the pedals can
cause unintended acceleration
and/or increased stopping
distance which can cause a crash
and injury. Make sure the floor
mat does not interfere with the
accelerator or brake pedal.Use the following guidelines for
proper floor mat usage.
.The original equipment floor
mats were designed for your
vehicle. If the floor mats need
replacing, it is recommended
that GM certified floor mats be
purchased. Non-GM floor mats
may not fit properly and may
interfere with the accelerator or
brake pedal. Always check that
the floor mats do not interfere
with the pedals.
.Use the floor mat with the
correct side up. Do not turn
it over.
.Do not place anything on top of
the driver side floor mat.
.Use only a single floor mat on
the driver side.
.Do not place one floor mat on
top of another.
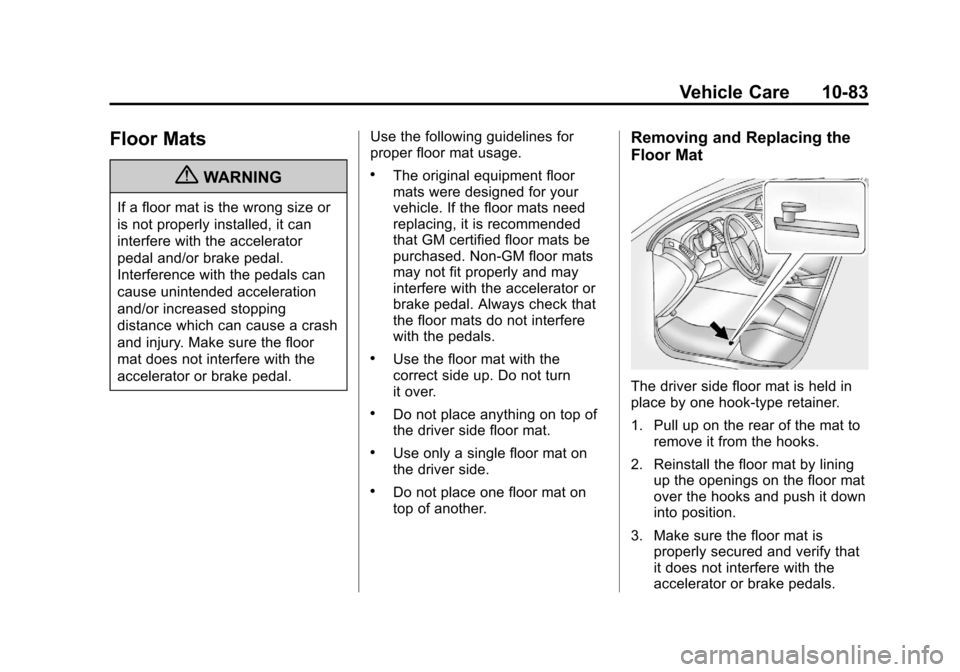
Removing and Replacing the
Floor Mat
The driver side floor mat is held in
place by one hook-type retainer.
1. Pull up on the rear of the mat to
remove it from the hooks.
2. Reinstall the floor mat by lining up the openings on the floor mat
over the hooks and push it down
into position.
3. Make sure the floor mat is properly secured and verify that
it does not interfere with the
accelerator or brake pedals.