2011 CADILLAC ESCALADE wheel
[x] Cancel search: wheelPage 437 of 558

Black plate (33,1)Cadillac Escalade/Escalade ESV Owner Manual - 2011
Vehicle Care 10-33
.For All-Wheel-Drive vehicles, the
proper level is from 1.0 mm to
19.0 mm (0.04 in to 0.75 in)
below the bottom of the filler
plug hole, located on the rear
axle. Add only enough fluid to
reach the proper level.
What to Use
Refer toRecommended Fluids
and Lubricants on page 11‑7 to
determine what kind of lubricant
to use.
Starter Switch Check
{WARNING
When you are doing this
inspection, the vehicle could
move suddenly. If the vehicle
moves, you or others could be
injured.
1. Before starting this check, be sure there is enough room
around the vehicle. 2. Firmly apply both the parking
brake and the regular brake.
See Parking Brake on
page 9‑46.
Do not use the accelerator
pedal, and be ready to turn off
the engine immediately if it
starts.
3. Try to start the engine in each gear. The vehicle should start
only in P (Park) or N (Neutral).
If the vehicle starts in any other
position, contact your dealer for
service.
Page 452 of 558

Black plate (48,1)Cadillac Escalade/Escalade ESV Owner Manual - 2011
10-48 Vehicle Care
Pull off the cover to access the fuse block.
The vehicle may not be equipped
with all of the fuses, relays, and
features shown.Fuses Usage
1 Rear Seats
2 Rear Accessory
Power Outlet
3 Steering Wheel
Controls Backlight Fuses Usage
4 Driver Door Module
5 Dome Lamps, Driver
Side Turn Signal
6 Driver Side Turn
Signal, Stoplamp
7 Instrument Panel
Back Lighting
8 Passenger Side Turn
Signal, Stoplamp
9 Passenger Door
Module, Driver Unlock
10 Power Door Lock 2
(Unlock Feature)
11 Power Door Lock 2
(Lock Feature)
12 Stoplamps, Center
High‐
Mounted
Stoplamp
13 Rear Climate Controls
14 Power Mirror
Page 454 of 558

Black plate (50,1)Cadillac Escalade/Escalade ESV Owner Manual - 2011
10-50 Vehicle Care
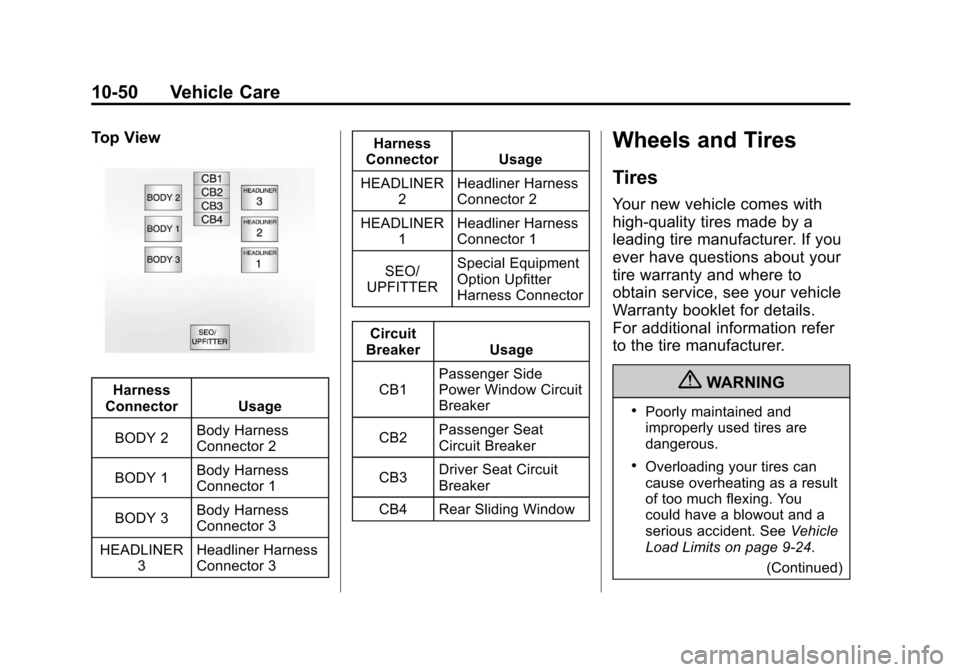
Top View
Harness
Connector Usage
BODY 2 Body Harness
Connector 2
BODY 1 Body Harness
Connector 1
BODY 3 Body Harness
Connector 3
HEADLINER 3 Headliner Harness
Connector 3 Harness
Connector Usage
HEADLINER 2 Headliner Harness
Connector 2
HEADLINER 1 Headliner Harness
Connector 1
SEO/
UPFITTER Special Equipment
Option Upfitter
Harness Connector
Circuit
Breaker Usage
CB1 Passenger Side
Power Window Circuit
Breaker
CB2 Passenger Seat
Circuit Breaker
CB3 Driver Seat Circuit
Breaker
CB4 Rear Sliding Window
Wheels and Tires
Tires
Your new vehicle comes with
high-quality tires made by a
leading tire manufacturer. If you
ever have questions about your
tire warranty and where to
obtain service, see your vehicle
Warranty booklet for details.
For additional information refer
to the tire manufacturer.
{WARNING
.Poorly maintained and
improperly used tires are
dangerous.
.Overloading your tires can
cause overheating as a result
of too much flexing. You
could have a blowout and a
serious accident. See Vehicle
Load Limits on page 9‑24.
(Continued)
Page 455 of 558

Black plate (51,1)Cadillac Escalade/Escalade ESV Owner Manual - 2011
Vehicle Care 10-51
WARNING (Continued)
.Under inflated tires pose the
same danger as overloaded
tires. The resulting crash
could cause serious injury.
Check all tires frequently to
maintain the recommended
pressure. Tire pressure
should be checked when
your tires are cold.
.Over inflated tires are more
likely to be cut, punctured,
or broken by a sudden
impact—such as when you
hit a pothole. Keep tires at
the recommended pressure.
.Worn or old tires can cause a
crash. If your tread is badly
worn, replace them.
.Replace any tires that have
been damaged by impacts
with potholes, curbs, etc.
(Continued)
WARNING (Continued)
.Improperly repaired tires can
cause a crash. Only your
dealer or an authorized tire
service center should repair,
replace, dismount, and mount
the tires.
.Do not spin the tires in
excess of 55 km/h (35 mph)
on slippery surfaces such
as snow, mud, ice, etc.
Excessive spinning may
cause the tires to explode.
See Tire Pressure for High-Speed
Operation on page 10‑58 for
inflation pressure adjustment
for high speed driving.
22‐Inch Tires
If your vehicle has the optional
22‐inch P285/45R22 size tires,
they are classified as touring
tires and are designed for
on‐road use. The low‐profile, wide tread design is not
recommended for off‐road
driving. See
Off-Road Driving on
page 9‑7, for additional
information.
Notice: If the vehicle has
low‐profile tires, they are more
susceptible to damage from
road hazards or curb impact
than standard profile tires.
Tire and/or wheel assembly
damage can occur when
coming into contact with
road hazards like, potholes,
or sharp edged objects,
or when sliding into a curb.
The vehicle warranty does
not cover this type of damage.
Keep tires set to the correct
inflation pressure and, when
possible avoid contact with
curbs, potholes, and other
road hazards.
Page 457 of 558

Black plate (53,1)Cadillac Escalade/Escalade ESV Owner Manual - 2011
Vehicle Care 10-53
(F) Uniform Tire Quality
Grading (UTQG)
:Tire
manufacturers are required
to grade tires based on
three performance factors:
treadwear, traction, and
temperature resistance.
For more information, see
Uniform Tire Quality Grading on
page 10‑69.
(G) Maximum Cold Inflation
Load Limit
:Maximum load
that can be carried and the
maximum pressure needed
to support that load. For
information on recommended
tire pressure see Tire Pressure
on page 10‑57 andVehicle
Load Limits on page 9‑24.
Tire Designations
Tire Size
The following examples show
the different parts of a tire size.
Passenger (P‐Metric) Tire
(A) Passenger (P‐Metric) Tire:
The United States version of
a metric tire sizing system. The
letter P as the first character in
the tire size means a passenger
vehicle tire engineered to
standards set by the U.S.
Tire and Rim Association.
(B) Tire Width
:The three‐digit
number indicates the tire
section width in millimeters
from sidewall to sidewall. (C) Aspect Ratio
:A two‐digit
number that indicates the tire
height‐to‐width measurements.
For example, if the tire size
aspect ratio is 75, as shown
in item C of the light truck
(LT‐Metric) tire illustration,
it would mean that the tire's
sidewall is 75% as high as it
is wide.
(D) Construction Code
:A
letter code is used to indicate
the type of ply construction in
the tire. The letter R means
radial ply construction; the
letter D means diagonal or
bias ply construction; and the
letter B means belted‐bias ply
construction.
(E) Rim Diameter
:Diameter of
the wheel in inches.
Page 464 of 558

Black plate (60,1)Cadillac Escalade/Escalade ESV Owner Manual - 2011
10-60 Vehicle Care
wheels on the vehicle that prevent
the TPMS from functioning properly.
Always check the TPMS malfunction
telltale after replacing one or more
tires or wheels on your vehicle to
ensure that the replacement or
alternate tires and wheels allow
the TPMS to continue to function
properly.
SeeTire Pressure Monitor
Operation on page 10‑60 for
additional information.
Federal Communications
Commission (FCC) and
Industry Canada
See Radio Frequency Statement on
page 13‑19 for information
regarding Part 15 of the Federal
Communications Commission
(FCC) rules and Industry Canada
Standards RSS-210/220/310.
Tire Pressure Monitor
Operation
If the vehicle is a hybrid, see
the hybrid supplement for more
information.
This vehicle may have a Tire
Pressure Monitor System (TPMS).
The TPMS is designed to warn the
driver when a low tire pressure
condition exists. TPMS sensors are
mounted onto each tire and wheel
assembly, excluding the spare tire
and wheel assembly. The TPMS
sensors monitor the air pressure in
the vehicle's tires and transmit the
tire pressure readings to a receiver
located in the vehicle.
When a low tire pressure condition
is detected, the TPMS illuminates
the low tire pressure warning light
located on the instrument panel
cluster. If the warning light comes
on, stop as soon as possible and
inflate the tires to the recommended
pressure shown on the tire loading
information label. See Vehicle Load
Limits on page 9‑24.
Page 466 of 558

Black plate (62,1)Cadillac Escalade/Escalade ESV Owner Manual - 2011
10-62 Vehicle Care
.The TPMS sensor matching
process was started but not
completed or not completed
successfully after rotating the
vehicle's tires. The DIC message
and TPMS malfunction light
should go off once the TPMS
sensor matching process is
performed successfully.
See“TPMS Sensor Matching
Process” later in this section.
.One or more TPMS sensors
are missing or damaged.
The DIC message and the
TPMS malfunction light should
go off when the TPMS sensors
are installed and the sensor
matching process is performed
successfully. See your dealer
for service.
.Replacement tires or wheels do
not match your vehicle's original
equipment tires or wheels. Tires
and wheels other than those
recommended for your vehicle
could prevent the TPMS from
functioning properly. See Buying
New Tires on page 10‑66.
.Operating electronic devices or
being near facilities using radio
wave frequencies similar to the
TPMS could cause the TPMS
sensors to malfunction.
If the TPMS is not functioning it
cannot detect or signal a low tire
condition. See your dealer for
service if the TPMS malfunction
light and DIC message comes on
and stays on.
TPMS Sensor Matching
Process
Each TPMS sensor has a unique
identification code. Any time you
rotate your vehicle's tires or replace
one or more of the TPMS sensors,
the identification codes will need to
be matched to the new tire/wheel
position. The sensors are matched
to the tire/wheel positions in the
following order: driver side front tire,
passenger side front tire, passenger
side rear tire, and driver side rear
tire using a TPMS diagnostic tool.
See your dealer for service.
The TPMS sensors can also be
matched to each tire/wheel position
by increasing or decreasing the
tire's air pressure. If increasing the
tire's air pressure, do not exceed
the maximum inflation pressure
indicated on the tire's sidewall.
Page 467 of 558

Black plate (63,1)Cadillac Escalade/Escalade ESV Owner Manual - 2011
Vehicle Care 10-63
To decrease air-pressure out of a
tire you can use the pointed end of
the valve cap, a pencil-style air
pressure gauge, or a key.
You have two minutes to match
the first tire/wheel position, and
five minutes overall to match all
four tire/wheel positions. If it takes
longer than two minutes, to match
the first tire and wheel, or more than
five minutes to match all four tire
and wheel positions the matching
process stops and you need to
start over.
The TPMS sensor matching process
is outlined below:
1. Set the parking brake.
2. Turn the ignition switch toON/RUN with the engine off. 3. PressQandKon the
Remote Keyless Entry (RKE)
transmitter at the same time
for approximately five seconds.
The horn sounds twice to signal
the receiver is in relearn mode
and TIRE LEARNING ACTIVE
message displays on the DIC
screen.
4. Start with the driver side front tire.
5. Remove the valve cap from the valve cap stem. Activate the
TPMS sensor by increasing
or decreasing the tire's air
pressure for five seconds,
or until a horn chirp sounds.
The horn chirp, which may
take up to 30 seconds to
sound, confirms that the sensor
identification code has been
matched to this tire and wheel
position.
6. Proceed to the passenger side front tire, and repeat the
procedure in Step 5. 7. Proceed to the passenger
side rear tire, and repeat the
procedure in Step 5.
8. Proceed to the driver side rear tire, and repeat the procedure in
Step 5. The horn sounds two
times to indicate the sensor
identification code has been
matched to the driver side rear
tire, and the TPMS sensor
matching process is no longer
active. The TIRE LEARNING
ACTIVE message on the DIC
display screen goes off.
9. Turn the ignition switch to LOCK/OFF.
10. Set all four tires to the recommended air pressure
level as indicated on the Tire
and Loading Information label.
11. Put the valve caps back on the valve stems.