2011 BUICK REGAL Brake
[x] Cancel search: BrakePage 308 of 368

Black plate (68,1)Buick Regal Owner Manual - 2011
10-68 Vehicle Care
{WARNING
Wheel nuts that are improperly or
incorrectly tightened can cause
the wheels to become loose or
come off. The wheel nuts should
be tightened with a torque wrench
to the proper torque specification
after replacing. Follow the torque
specification supplied by the
aftermarket manufacturer when
using accessory locking wheel
nuts. SeeCapacities and
Specifications on page 12‑2 for
original equipment wheel nut
torque specifications.
Notice: Improperly tightened
wheel nuts can lead to brake
pulsation and rotor damage. To
avoid expensive brake repairs,
evenly tighten the wheel nuts in
the proper sequence and to the
proper torque specification. See
Capacities and Specifications on
page 12‑2 for the wheel nut
torque specification.
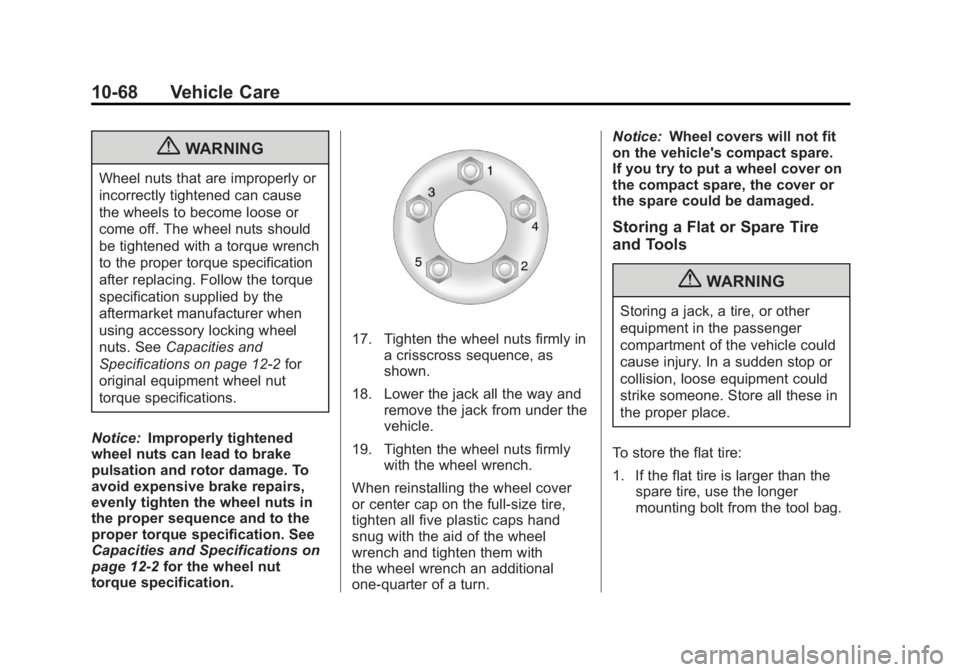
17. Tighten the wheel nuts firmly in a crisscross sequence, as
shown.
18. Lower the jack all the way and remove the jack from under the
vehicle.
19. Tighten the wheel nuts firmly with the wheel wrench.
When reinstalling the wheel cover
or center cap on the full-size tire,
tighten all five plastic caps hand
snug with the aid of the wheel
wrench and tighten them with
the wheel wrench an additional
one‐quarter of a turn. Notice:
Wheel covers will not fit
on the vehicle's compact spare.
If you try to put a wheel cover on
the compact spare, the cover or
the spare could be damaged.
Storing a Flat or Spare Tire
and Tools
{WARNING
Storing a jack, a tire, or other
equipment in the passenger
compartment of the vehicle could
cause injury. In a sudden stop or
collision, loose equipment could
strike someone. Store all these in
the proper place.
To store the flat tire:
1. If the flat tire is larger than the spare tire, use the longer
mounting bolt from the tool bag.
Page 311 of 368

Black plate (71,1)Buick Regal Owner Manual - 2011
Vehicle Care 10-71
2.0L Engine Shown, 2.4L Similar
The jump start positive (B) is
located under a trim cover in the
engine compartment on the driver
side of the vehicle.2.0L Engine Shown, 2.4L Similar
These locations are used instead of
a direct connection to the battery.
1. Check the other vehicle. It must have a 12-volt battery with a
negative ground system.
Notice: Only use a vehicle that
has a 12-volt system with a
negative ground for jump
starting. If the other vehicle does
not have a 12-volt system with a
negative ground, both vehicles
can be damaged. 2. Position the two vehicles so that
they are not touching.
3. To avoid the possibility of the vehicles rolling, set the parking
brake firmly on both vehicles
involved in the jump start
procedure. Put an automatic
transmission in P (Park) or a
manual transmission in Neutral
before setting the parking brake.
Notice: If the radio or other
accessories are left on during the
jump starting procedure, they
could be damaged. The repairs
would not be covered by the
warranty. Always turn off the
radio and other accessories when
jump starting the vehicle.
4. Turn the ignition to LOCK/OFF and switch off all lights and
accessories in both vehicles,
except the hazard warning
flashers if needed.
Page 315 of 368

Black plate (75,1)Buick Regal Owner Manual - 2011
Vehicle Care 10-75
.Is the proper towing equipment
going to be used? See your
dealer or trailering professional
for additional advice and
equipment recommendations.
.Is the vehicle ready to be
towed? Just as preparing the
vehicle for a long trip, make sure
the vehicle is prepared to be
towed.
Dinghy Towing from the Front
(With 2.0L Engine and
Automatic Transmission)
Notice:If the vehicle is towed
with all four wheels on the
ground, the drivetrain
components could be damaged.
The repairs would not be covered
by the vehicle warranty. Do not
tow the vehicle with all four
wheels on the ground.
Vehicles with the 2.0L engine and
an automatic transmission should
not be towed with all four wheels on
the ground.
Dinghy Towing from the Front
(All Except 2.0L Engine and
Automatic Transmission)
When dinghy towing a vehicle with
an automatic transmission, the
vehicle should be run at the
beginning of each day and at each
RV fuel stop for about five minutes.
This will ensure proper lubrication of
transmission components.
Use the following procedure to
dinghy tow the vehicle from the front
with all four wheels on the ground:
1. Position the vehicle being towed behind the tow vehicle.
2. Shift the automatic transmission to P (Park) or a manual
transmission into 1 (First) gear
and turn the engine off.
3. Set the parking brake.
4. Following the manufacturer's instructions, attach the vehicle
being towed to the tow vehicle.
5. Shift the automatic transmission to N (Neutral) or a manual
transmission to Neutral.
6. Release the parking brake.
When towing the vehicle for
extended periods of time, start the
vehicle as often as possible to
prevent battery drain. This should
be done when the tow vehicle is
parked.
Page 316 of 368

Black plate (76,1)Buick Regal Owner Manual - 2011
10-76 Vehicle Care
Dinghy Towing from the Rear
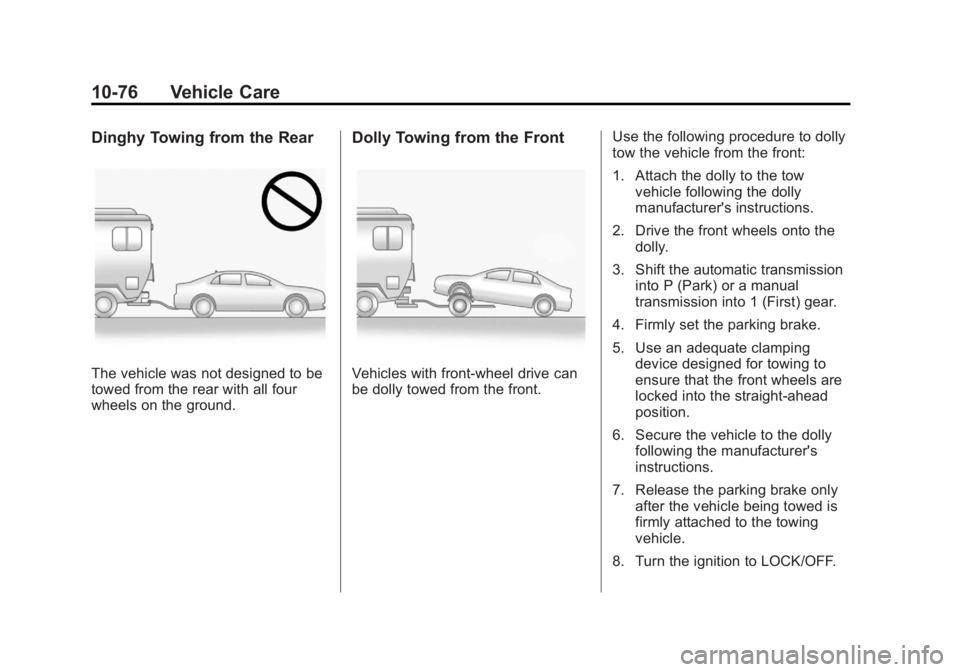
The vehicle was not designed to be
towed from the rear with all four
wheels on the ground.
Dolly Towing from the Front
Vehicles with front-wheel drive can
be dolly towed from the front.Use the following procedure to dolly
tow the vehicle from the front:
1. Attach the dolly to the tow
vehicle following the dolly
manufacturer's instructions.
2. Drive the front wheels onto the dolly.
3. Shift the automatic transmission into P (Park) or a manual
transmission into 1 (First) gear.
4. Firmly set the parking brake.
5. Use an adequate clamping device designed for towing to
ensure that the front wheels are
locked into the straight-ahead
position.
6. Secure the vehicle to the dolly following the manufacturer's
instructions.
7. Release the parking brake only after the vehicle being towed is
firmly attached to the towing
vehicle.
8. Turn the ignition to LOCK/OFF.
Page 323 of 368

Black plate (83,1)Buick Regal Owner Manual - 2011
Vehicle Care 10-83
Some commercial products may
increase gloss on the instrument
panel. The increase in gloss may
cause annoying reflections in the
windshield and even make it difficult
to see through the windshield under
certain conditions.
Notice:Air fresheners contain
solvents that may cause damage
to plastics and painted surfaces.
Follow the manufacturer ’s
instructions when using air
fresheners in the vehicle. If air
freshener comes in contact with
paint or a plastic surface, blot
immediately with a soft cloth.
Damage caused by using air
fresheners would not be covered
by the vehicle warranty.Care of Safety Belts
Keep belts clean and dry.
{WARNING
Do not bleach or dye safety belts.
It may severely weaken them. In
a crash, they might not be able to
provide adequate protection.
Clean safety belts only with mild
soap and lukewarm water.
Floor Mats
{WARNING
If a floor mat is the wrong size or
is not properly installed, it can
interfere with the accelerator
pedal and/or brake pedal.
Interference with the pedals can
cause unintended acceleration
and/or increased stopping
distance which can cause a crash
(Continued)
WARNING (Continued)
and injury. Make sure the floor
mat does not interfere with the
accelerator or brake pedal.
Use the following guidelines for
proper floor mat usage:
.The original equipment floor
mats were designed for your
vehicle. If the floor mats need
replacing, it is recommended
that GM certified floor mats be
purchased. Non-GM floor mats
may not fit properly and may
interfere with the accelerator or
brake pedal. Always check that
the floor mats do not interfere
with the pedals.
.Use the floor mat with the
correct side up. Do not turn
it over.
Page 324 of 368

Black plate (84,1)Buick Regal Owner Manual - 2011
10-84 Vehicle Care
.Do not place anything on top of
the driver side floor mat.
.Use only a single floor mat on
the driver side.
.Do not place one floor mat on
top of another.
Removing and Replacing the
Floor Mats
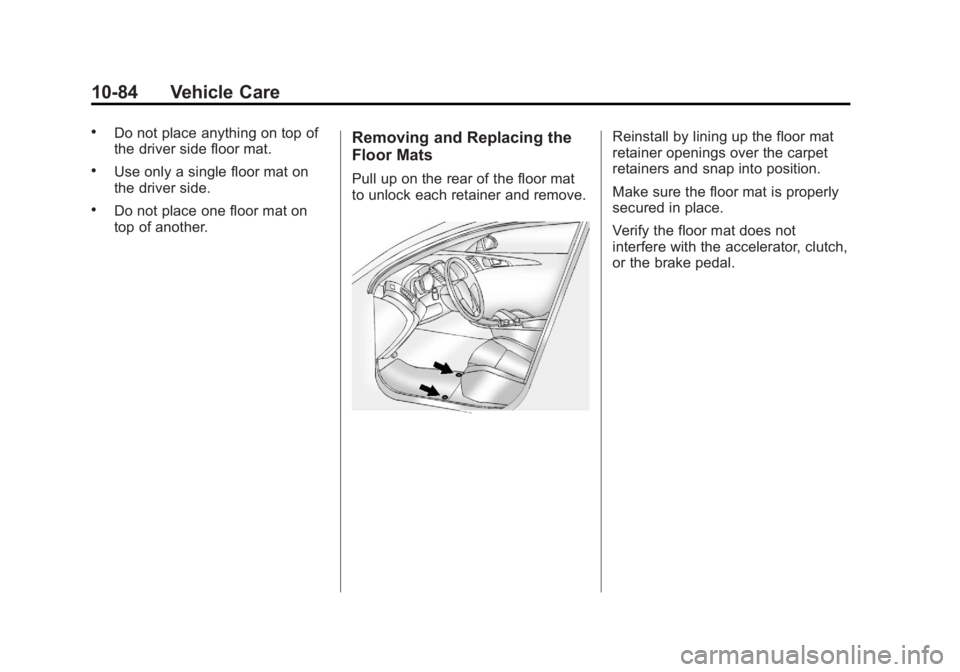
Pull up on the rear of the floor mat
to unlock each retainer and remove.
Reinstall by lining up the floor mat
retainer openings over the carpet
retainers and snap into position.
Make sure the floor mat is properly
secured in place.
Verify the floor mat does not
interfere with the accelerator, clutch,
or the brake pedal.
Page 327 of 368

Black plate (3,1)Buick Regal Owner Manual - 2011
Service and Maintenance 11-3
system whenever the oil is changed.
SeeEngine Oil Life System on
page 10‑13.
Every Engine Oil Change
.Change engine oil and filter.
Reset oil life system. See
Engine Oil on page 10‑9 and
Engine Oil Life System on
page 10‑13. An Emission
Control Service.
.Engine coolant level check. See
Engine Coolant on page 10‑18.
.Engine cooling system
inspection. Visual inspection of
hoses, pipes, fittings, and
clamps and replacement,
if needed.
.Windshield washer fluid level
check. See Washer Fluid on
page 10‑24.
.Windshield wiper blade
inspection for wear, cracking,
or contamination and windshield
and wiper blade cleaning,
if contaminated. See Exterior
Care on page 10‑77. Worn or damaged wiper blade
replacement. See
Wiper Blade
Replacement on page 10‑30.
.Tire inflation pressures check.
See Tire Pressure on
page 10‑49.
.Tire wear inspection. See Tire
Inspection on page 10‑55.
.Rotate tires if necessary. See
Tire Rotation on page 10‑55.
.Fluids visual leak check (or
every 12 months, whichever
occurs first). A leak in any
system must be repaired and the
fluid level checked.
.Engine air cleaner filter
inspection. See Engine Air
Cleaner/Filter on page 10‑15.
.Brake system inspection (or
every 12 months, whichever
occurs first).
.Steering and suspension
inspection. Visual inspection for
damaged, loose, or missing
parts or signs of wear.
.Body hinges and latches, key
lock cylinders, folding seat
hardware, and sunroof (if
equipped) lubrication. See
Recommended Fluids and
Lubricants on page 11‑6. More
frequent lubrication may be
required when the vehicle is
exposed to a corrosive
environment. Applying silicone
grease on weatherstrips with a
clean cloth makes them last
longer, seal better, and not stick
or squeak.
.Restraint system component
check. See Safety System
Check on page 3‑26.
.Fuel system inspection for
damage or leaks.
.Exhaust system and nearby heat
shields inspection for loose or
damaged components.
Page 328 of 368

Black plate (4,1)Buick Regal Owner Manual - 2011
11-4 Service and Maintenance
Additional Required Services
Every 12 000 km/7,500 Miles
.Rotate tires. Tires should be
rotated every 12 000 km/
7,500 miles. SeeTire Rotation
on page 10‑55.
At Each Fuel Stop
.Engine oil level check. See
Engine Oil on page 10‑9.
.Engine coolant level check. See
Engine Coolant on page 10‑18.
.Windshield washer fluid level
check. See Washer Fluid on
page 10‑24.
Once a Month
.Tire inflation check. See Tire
Pressure on page 10‑49.
.Tire wear inspection. See Tire
Inspection on page 10‑55.
.Sunroof track and seal
inspection, if equipped. See
Sunroof on page 2‑15. Once a Year
.See
Starter Switch Check on
page 10‑28.
.See Automatic Transmission
Shift Lock Control Function
Check on page 10‑28.
.See Ignition Transmission Lock
Check on page 10‑29.
.See Park Brake and P (Park)
Mechanism Check on
page 10‑29.
.Accelerator pedal check for
damage, high effort, or binding.
Replace if needed.
.Underbody flushing service.
.Hood/Decklid/Liftgate/Liftglass
Support Gas Strut Service:
Visually inspect gas strut,
if equipped, for signs of wear,
cracks, or other damage. Check
the hold open ability of the gas
strut. Contact your dealer if
service is required. Once Every Two Years
.Vehicles using DOT 4 brake fluid
only: Change brake/clutch
hydraulic fluid at a regular
maintenance service every
two years.
First Engine Oil Change After
Every 40 000 km/25,000 Miles
.Passenger compartment air
filter replacement (or every
24 months, whichever occurs
first). More frequent replacement
may be needed if you drive in
areas with heavy traffic, areas
with poor air quality, or areas
with high dust levels.
Replacement may also be
needed if you notice reduced air
flow, windows fogging up,
or odors. Your dealer can help
you determine when it is the
right time to replace the filter.