2011 BMW X5 XDRIVE 50I rear entertainment
[x] Cancel search: rear entertainmentPage 119 of 312

Controls
117Reference
At a glance
Driving tips
Communications
Navigation
Entertainment
Mobility
Automatic climate control with 2-zone control
1Seat heating and ventilation, driver's
side50
2Temperature, left side of passenger com-
partment
3AUTO program
4Temperature, right side of passenger com-
partment
5Maximum cooling
6Seat heating
and ventilation, front passen-
ger side50
7Passenger side
>Air distribution, manual
>Accessing setting for ventilation tem-
perature on the Control Display
8Switching cooling function on and off man-
ually9AUC Automatic recirculated-air control/
recirculated-air mode
10Manual air volume, switching off automatic
climate control, residual heat
11Rear window defroster
12Defrosting windows and removing conden-
sation
13Air grill for interior temperature sensor –
please keep clear and unobstructed
14Driver's side
>Air distribution, manual
>Accessing setting for ventilation tem-
perature on the Control Display
The current setting for manual air distribution is
displayed on the Control Display.
A congenial climate
The AUTO program offers the optimum air dis-
tribution and air volume for virtually all condi-
tions, refer to AUTO program below. Now you
only need to select an interior temperature
comfortable for you.
The following sections contain more detailed
information on the available setting options.
Most settings are stored for the remote control
currently in use, also refer to Personal Profile
settings on page26.AUTO program
The AUTO program handles the
adjustment of air volume and air
distribution to the windshield and
side windows, in the direction of
the upper body and in the footwell.
It also adapts your instructions for the tempera-
ture to outside influences throughout the year.
The cooling is switched on automatically with
the AUTO program. At the same time, a con-
densation sensor controls the program in such
a way that window condensation is prevented
as much as possible.
Page 123 of 312
Controls
121Reference
At a glance
Driving tips
Communications
Navigation
Entertainment
Mobility
to recirculate the air within the vehicle, e.g. at
high temperatures. To do this, turn the
thumbwheel1 toward the rear and switch on
the blower, button2.<
Microfilter/activated-charcoal filter
The microfilter removes dust and pollen from
the incoming air. The activated-charcoal filter
provides additional protection by filtering gas-
eous pollutants from the outside air. This com-
bined filter is changed during maintenance by
your BMW Sports Activity Vehicle Center.
You can select a display of more detailed infor-
mation on the Control Display, refer to page79.
Automatic climate control
with 4-zone control*
Front operation
Corresponds to the operation of the automatic
climate control with 2-zone control, refer to
page117.
Rear operation
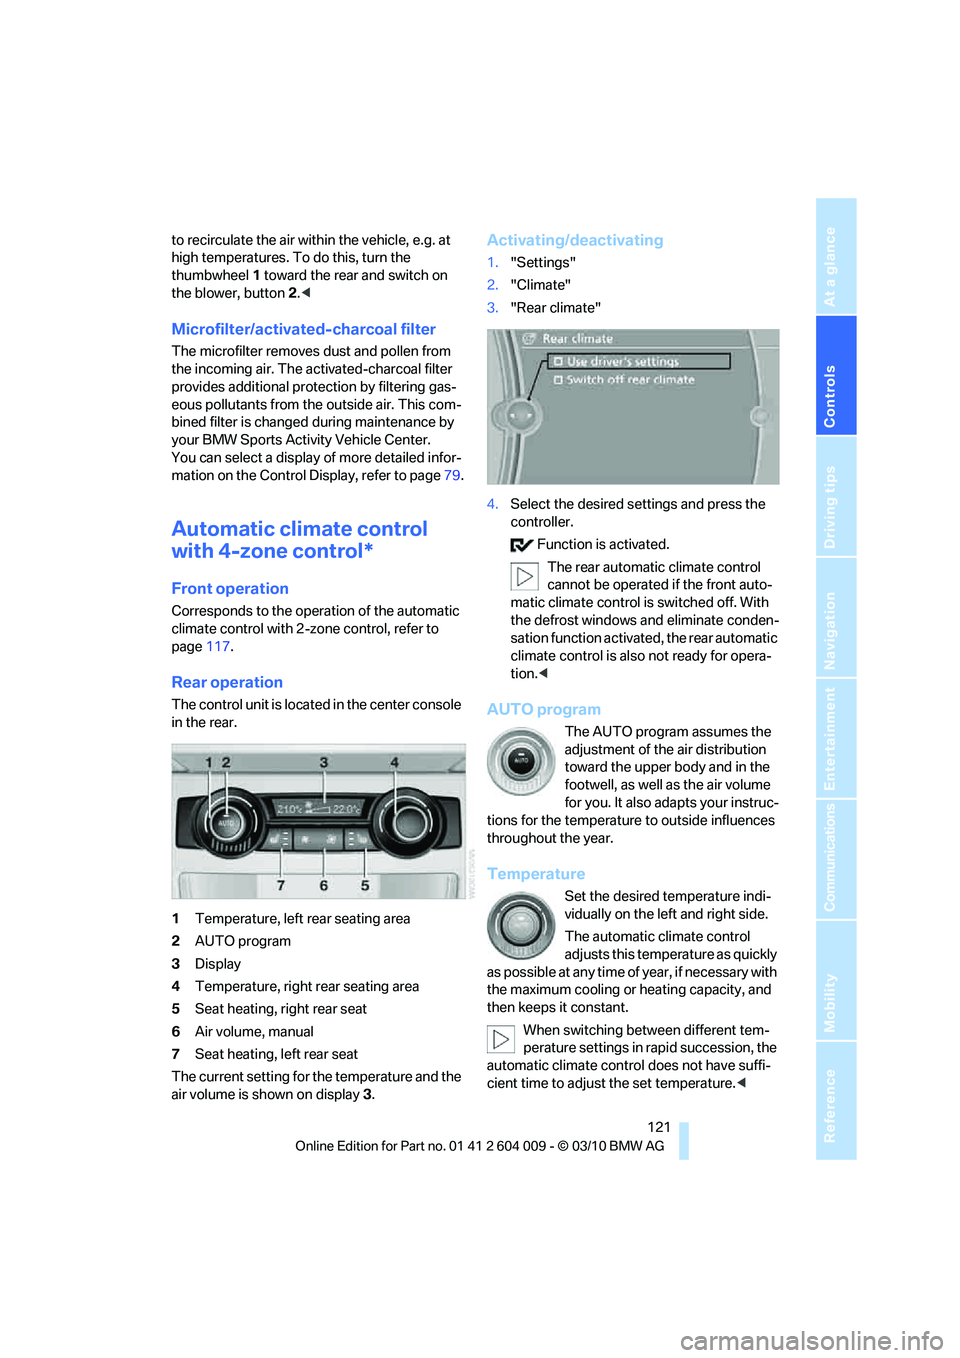
The control unit is located in the center console
in the rear.
1Temperature, left rear seating area
2AUTO program
3Display
4Temperature, right rear seating area
5Seat heating, right rear seat
6Air volume, manual
7Seat heating, left rear seat
The current setting for the temperature and the
air volume is shown on display3.
Activating/deactivating
1."Settings"
2."Climate"
3."Rear climate"
4.Select the desired settings and press the
controller.
Function is activated.
The rear automatic climate control
cannot be operated if the front auto-
matic climate control is switched off. With
the defrost windows and eliminate conden-
sation function activated, the rear automatic
climate control is also not ready for opera-
tion.<
AUTO program
The AUTO program assumes the
adjustment of the air distribution
toward the upper body and in the
footwell, as well as the air volume
for you. It also adapts your instruc-
tions for the temperature to outside influences
throughout the year.
Temperature
Set the desired temperature indi-
vidually on the left and right side.
The automatic climate control
adjusts this temperature as quickly
as possible at any time of year, if necessary with
the maximum cooling or heating capacity, and
then keeps it constant.
When switching between different tem-
perature settings in rapid succession, the
automatic climate control does not have suffi-
cient time to adjust the set temperature.<
Page 129 of 312

Controls
127Reference
At a glance
Driving tips
Communications
Navigation
Entertainment
Mobility
Procedure
1.Make sure that there are no large metal
objects or overhead power lines in the vicin-
ity of your vehicle and that you have enough
space to drive in a circle.
2.Enter the currently applicable compass
zone.
3.Press the adjustment button for approx. 6-
7 seconds to display C. Then drive in a
complete circle at least once at a maximum
speed of 4 mph/7 km/h.
If the calibration is successful, display C is
replaced with the points of the compass.
Setting right/left-hand drive vehicle
Your digital compass is already set to right or
left-hand drive vehicle to match your vehicle at
the factory.
Setting language
You can set the language of the display:
Press the adjustment button for approx. 12-
13 seconds. Briefly press the adjustment but-
ton again to change between English "E" and
German "O".
The setting is automatically stored after approx.
10 seconds.
Roller sun blinds for rear side
windows*
Pull the loop of the roller sun blind and hook
onto bracket.
Do not open the window with the roller
blind raised, as otherwise there is a dan-
ger of damage, and therefore a danger of inju-
ries at higher speeds.<
Glove compartment
Opening
Press the button. The covers open upward and
downward and the lighting in the glove com-
partment switches on.
To prevent injury in the event of an acci-
dent while the vehicle is being driven,
close the glove compartment immediately after
use.<
Closing
Press one of the two covers closed.
USB interface for data transmission
Port for importing and exporting data on USB
devices, e.g. music collections, refer to
page187.
Observe the following when connecting:
>Do not use force when plugging the con-
nector into the USB audio interface.
>Do not connect devices such as fans or
lamps to the USB audio interface.
>Do not connect USB hard drives.
>Do not use the USB interface to recharge
external devices.
Page 131 of 312
Controls
129Reference
At a glance
Driving tips
Communications
Navigation
Entertainment
Mobility
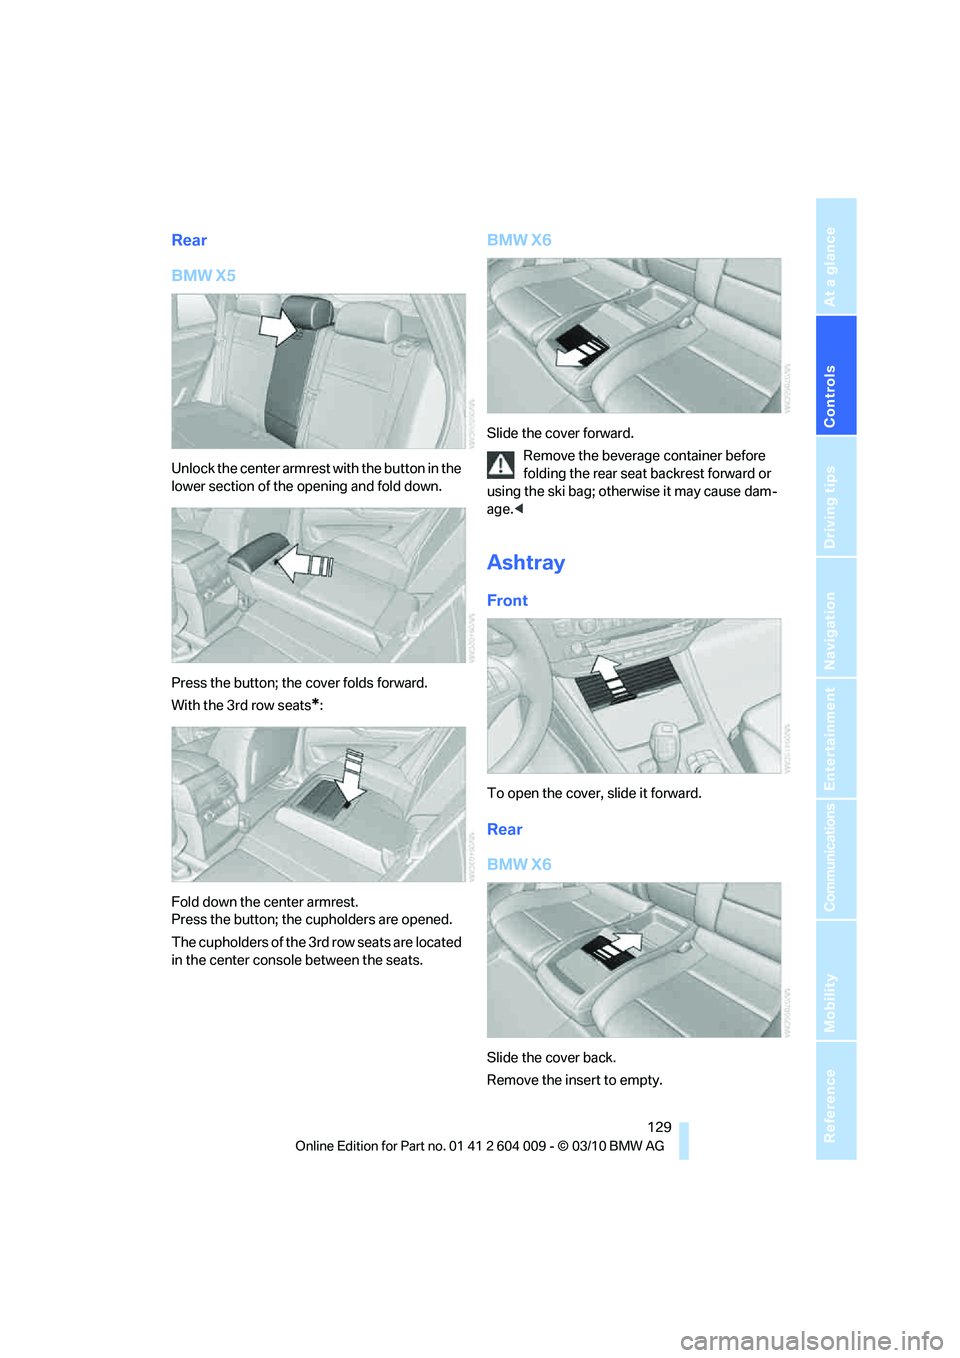
Rear
BMW X5
Unlock the center armrest with the button in the
lower section of the opening and fold down.
Press the button; the cover folds forward.
With the 3rd row seats
*:
Fold down the center armrest.
Press the button; the cupholders are opened.
The cupholders of the 3rd row seats are located
in the center console between the seats.
BMW X6
Slide the cover forward.
Remove the beverage container before
folding the rear seat backrest forward or
using the ski bag; otherwise it may cause dam-
age.<
Ashtray
Front
To open the cover, slide it forward.
Rear
BMW X6
Slide the cover back.
Remove the insert to empty.
Page 133 of 312
Controls
131Reference
At a glance
Driving tips
Communications
Navigation
Entertainment
Mobility
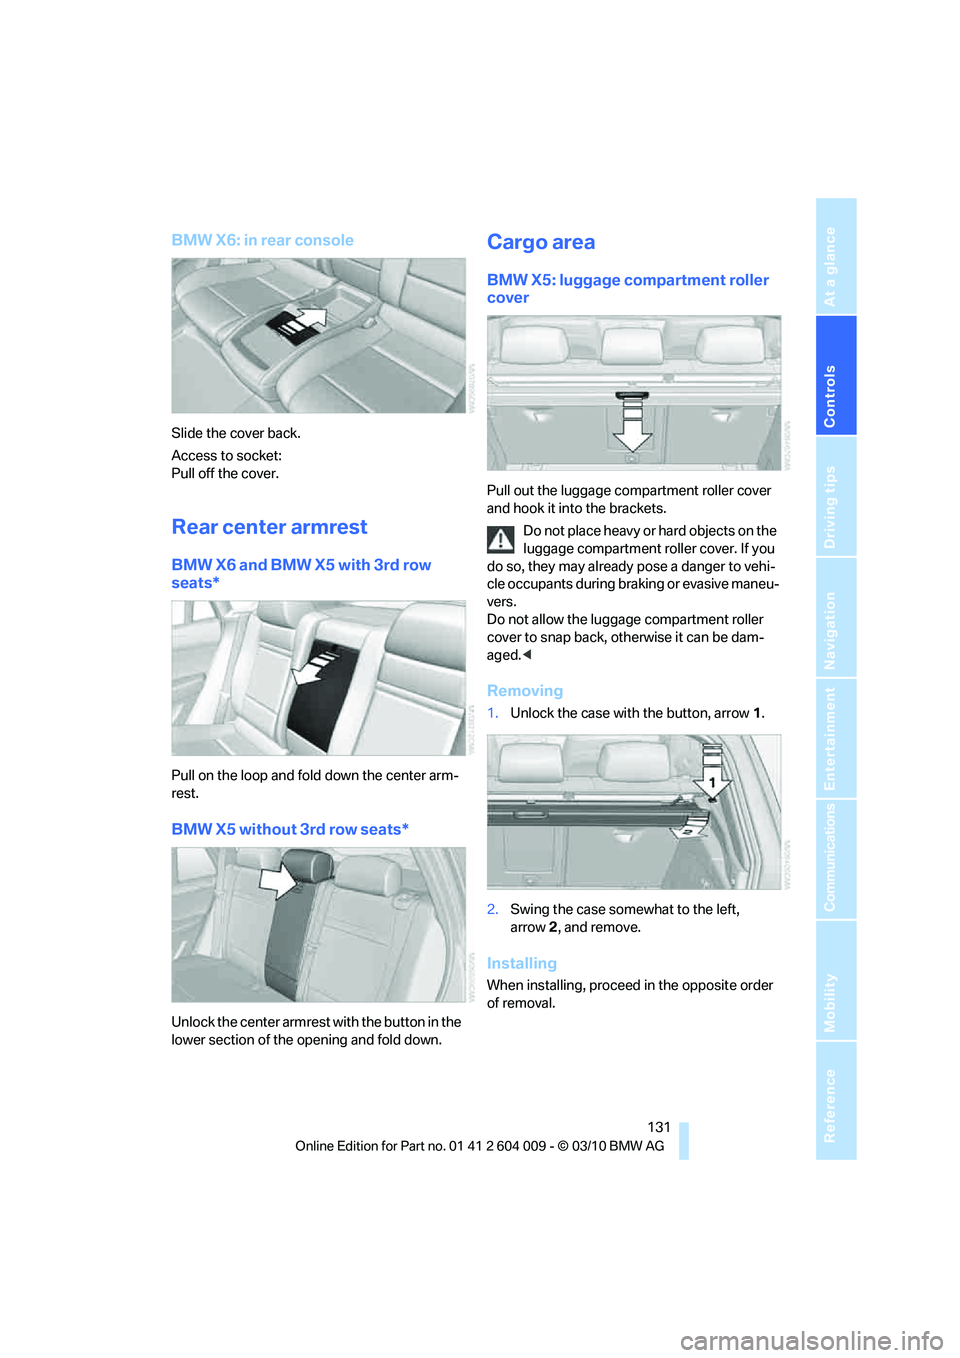
BMW X6: in rear console
Slide the cover back.
Access to socket:
Pull off the cover.
Rear center armrest
BMW X6 and BMW X5 with 3rd row
seats*
Pull on the loop and fold down the center arm-
rest.
BMW X5 without 3rd row seats*
Unlock the center armrest with the button in the
lower section of the opening and fold down.
Cargo area
BMW X5: luggage compartment roller
cover
Pull out the luggage compartment roller cover
and hook it into the brackets.
Do not place heavy or hard objects on the
luggage compartment roller cover. If you
do so, they may already pose a danger to vehi-
cle occupants during braking or evasive maneu-
vers.
Do not allow the luggage compartment roller
cover to snap back, otherwise it can be dam-
aged.<
Removing
1.Unlock the case with the button, arrow1.
2.Swing the case somewhat to the left,
arrow2, and remove.
Installing
When installing, proceed in the opposite order
of removal.
Page 135 of 312
Controls
133Reference
At a glance
Driving tips
Communications
Navigation
Entertainment
Mobility
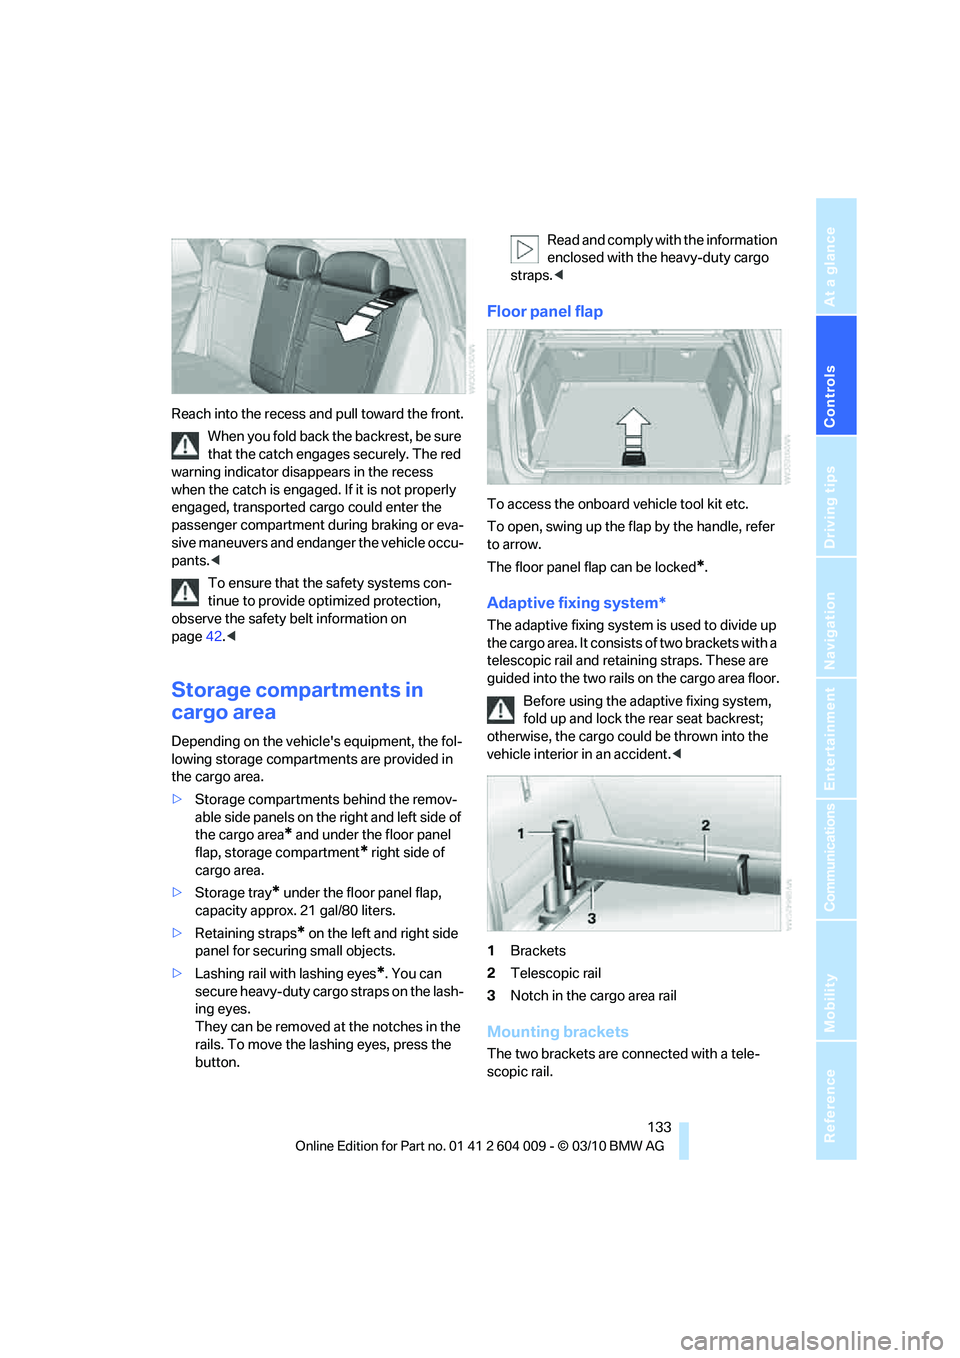
Reach into the recess and pull toward the front.
When you fold back the backrest, be sure
that the catch engages securely. The red
warning indicator disappears in the recess
when the catch is engaged. If it is not properly
engaged, transported cargo could enter the
passenger compartment during braking or eva-
sive maneuvers and endanger the vehicle occu-
pants.<
To ensure that the safety systems con-
tinue to provide optimized protection,
observe the safety belt information on
page42.<
Storage compartments in
cargo area
Depending on the vehicle's equipment, the fol-
lowing storage compartments are provided in
the cargo area.
>Storage compartments behind the remov-
able side panels on the right and left side of
the cargo area
* and under the floor panel
flap, storage compartment
* right side of
cargo area.
>Storage tray
* under the floor panel flap,
capacity approx. 21 gal/80 liters.
>Retaining straps
* on the left and right side
panel for securing small objects.
>Lashing rail with lashing eyes
*. You can
secure heavy-duty cargo straps on the lash-
ing eyes.
They can be removed at the notches in the
rails. To move the lashing eyes, press the
button.Read and comply with the information
enclosed with the heavy-duty cargo
straps.<
Floor panel flap
To access the onboard vehicle tool kit etc.
To open, swing up the flap by the handle, refer
to arrow.
The floor panel flap can be locked
*.
Adaptive fixing system*
The adaptive fixing system is used to divide up
the cargo area. It consists of two brackets with a
telescopic rail and retaining straps. These are
guided into the two rails on the cargo area floor.
Before using the adaptive fixing system,
fold up and lock the rear seat backrest;
otherwise, the cargo could be thrown into the
vehicle interior in an accident.<
1Brackets
2Telescopic rail
3Notch in the cargo area rail
Mounting brackets
The two brackets are connected with a tele-
scopic rail.
Page 137 of 312
Controls
135Reference
At a glance
Driving tips
Communications
Navigation
Entertainment
Mobility
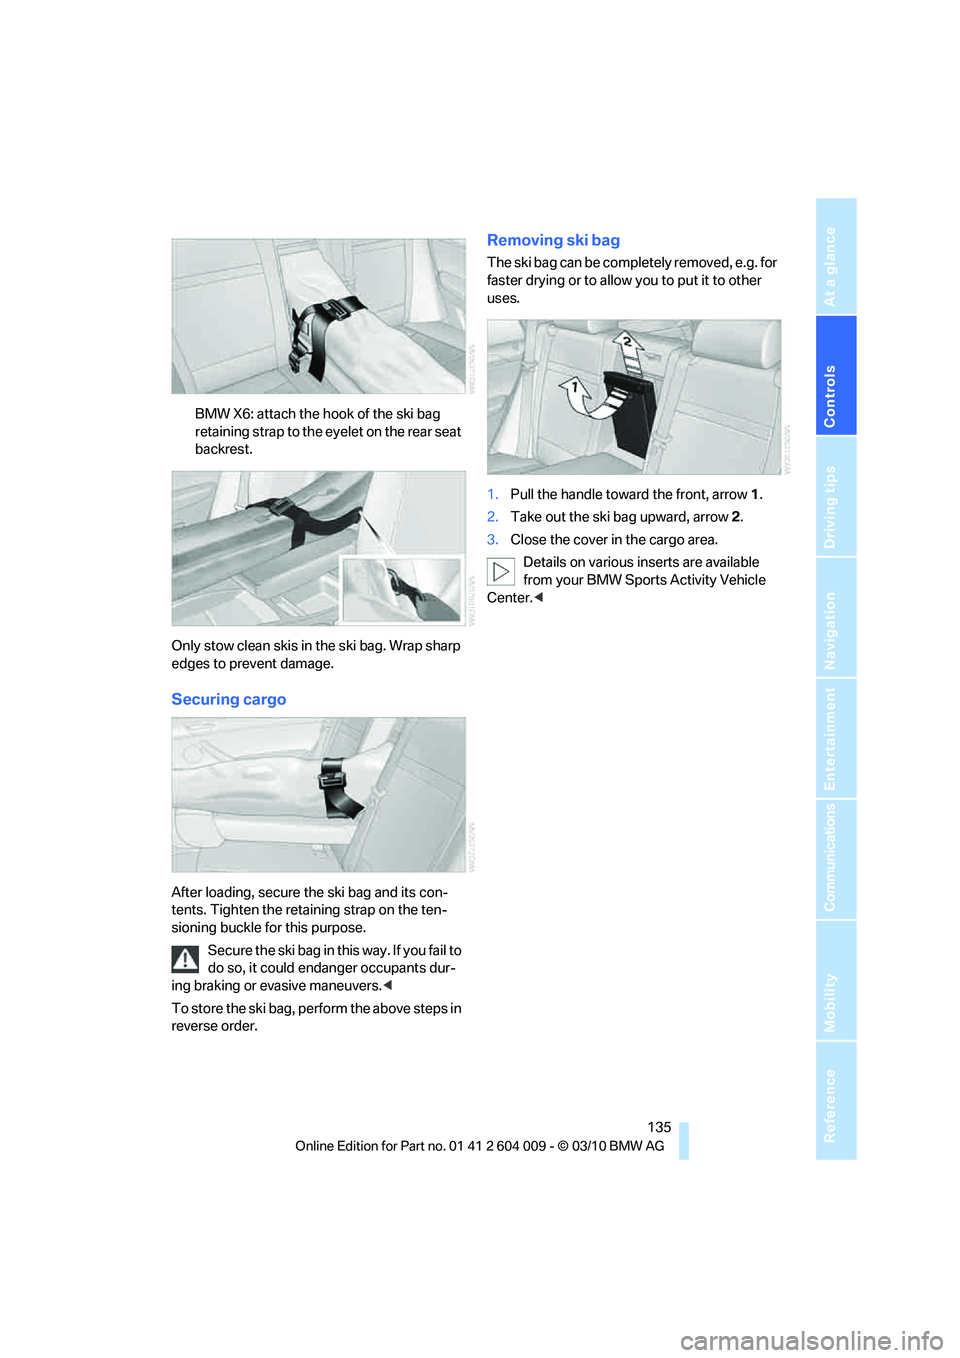
BMW X6: attach the hook of the ski bag
retaining strap to the eyelet on the rear seat
backrest.
Only stow clean skis in the ski bag. Wrap sharp
edges to prevent damage.
Securing cargo
After loading, secure the ski bag and its con-
tents. Tighten the retaining strap on the ten-
sioning buckle for this purpose.
Secure the ski bag in this way. If you fail to
do so, it could endanger occupants dur-
ing braking or evasive maneuvers.<
To store the ski bag, perform the above steps in
reverse order.
Removing ski bag
The ski bag can be completely removed, e.g. for
faster drying or to allow you to put it to other
uses.
1.Pull the handle toward the front, arrow1.
2.Take out the ski bag upward, arrow2.
3.Close the cover in the cargo area.
Details on various inserts are available
from your BMW Sports Activity Vehicle
Center.<
Page 141 of 312
Driving tips
139Reference
At a glance
Controls
Communications
Navigation
Entertainment
Mobility
speed. This is the fastest way for the cold
engine to reach its operating temperature.
Thinking ahead when driving
Avoid unnecessary acceleration and braking.
To do so, maintain the appropriate distance
from the vehicle in front of you. An anticipatory
and smooth driving style reduces fuel con-
sumption.
Avoiding high engine speeds
Driving at a low engine speed reduces fuel con-
sumption and minimizes wear.
Taking advantage of coasting
The flow of fuel is interrupted when coasting.
Switching off engine during longer
stops
Switch off the engine at longer stops such as
traffic signals, railroad crossings, or in traffic
congestions. You achieve fuel savings even if
the standing time is as short as approx.
4seconds.
Switching off functions currently not
required
Functions such as air conditioning, seat heat-
ing, or rear window defrosting consume a lot of
energy and require additional fuel. Their influ-
ence is particularly pronounced in city traffic
and stop & go operation. For this reason, it is a
good idea to switch these functions off when
they are not really needed.
Having maintenance carried out
Have the vehicle serviced regularly in order to
achieve the optimum economy and service life
of your vehicle. BMW recommends having the
maintenance performed by a BMW Sports
Activity Vehicle Center. Also pay attention to
the BMW maintenance system, refer to
page256.
General driving notes
Closing liftgate
Operate the vehicle only when the liftgate
is completely closed. Otherwise, exhaust
fumes could enter into the passenger compart-
ment.<
If it is absolutely necessary to drive with the lift-
gate open:
1.Close all windows as well as the glass sun-
roof
*/panoramic glass sunroof*.
2.Increase the air volume of the automatic cli-
mate control to a high level, refer to
page118.
Hot exhaust system
As in all vehicles, extremely high temper-
atures are generated on the exhaust sys-
tem. Do not remove the heat shields installed
adjacent to it, and never apply undercoating to
them. When driving, standing at idle and while
parking take care to avoid possible contact
between the hot exhaust system and any highly
flammable materials such as hay, leaves, grass,
etc. Such contact could lead to a fire, and with it
the risk of serious property damage as well as
personal injury. Do not touch hot tailpipes, as
otherwise there is a danger of burns.<
Diesel particulate filter*
Soot particles are collected in the diesel partic-
ulate filter and periodically burned away at high
temperatures. This cleaning process lasts a few
minutes. You will notice it sometimes by the
fact that the engine temporarily runs slightly
less smoothly and requires a slightly higher
engine speed to deliver the usual power. You
may also hear sounds and observe a slight
amount of smoke coming from the exhaust up
to even a few moments after the engine is
switched off.
Hydroplaning
When driving on wet or slushy roads,
reduce road speed. If you do not, a wedge
of water can form between tires and road sur-
face. This phenomenon is referred to as hydro-