2011 BMW X3 XDRIVE 28I change time
[x] Cancel search: change timePage 155 of 262

CD/multimediaControls1Change the entertainment source2Eject CD/DVD3CD/DVD* drive4Change station/track5Programmable memory buttons6Volume, on/off
CD/DVD*
Playback
Filling the CD/DVD* player
Insert the CD/DVD with the printed side up.
Playback begins automatically.
Reading can take a few minutes with com‐
pressed audio files.
Starting playback
A CD/DVD is located in the CD/DVD player or
DVD changer*.
1."CD/Multimedia"2."CD/DVD"3.Select the desired CD or DVD.SymbolMeaning CD/DVD* player ... DVD changer*
Playable formats
▷DVD: DVD-ROM, DVD-R, DVD+R, DVD-
RW, DVD+RW, DVD-R DL, DVD+R DL, DVD
audio (video part only), DVD video*.▷CD: CD-ROM, CD-R, CD-RW, CD-DA,
VCD*, SVCD*.▷Compressed audio files: MP3, WMA, AAC*,
M4A*.
Audio playback
Selecting the track using the button Press the button repeatedly until the
desired track is played.
Seite 155155
Online Edition for Part no. 01 40 2 606 190 - 12 10 500
ReferenceMobilityCommunicationEntertainmentNavigationDriving tipsControlsAt a glance
Page 156 of 262

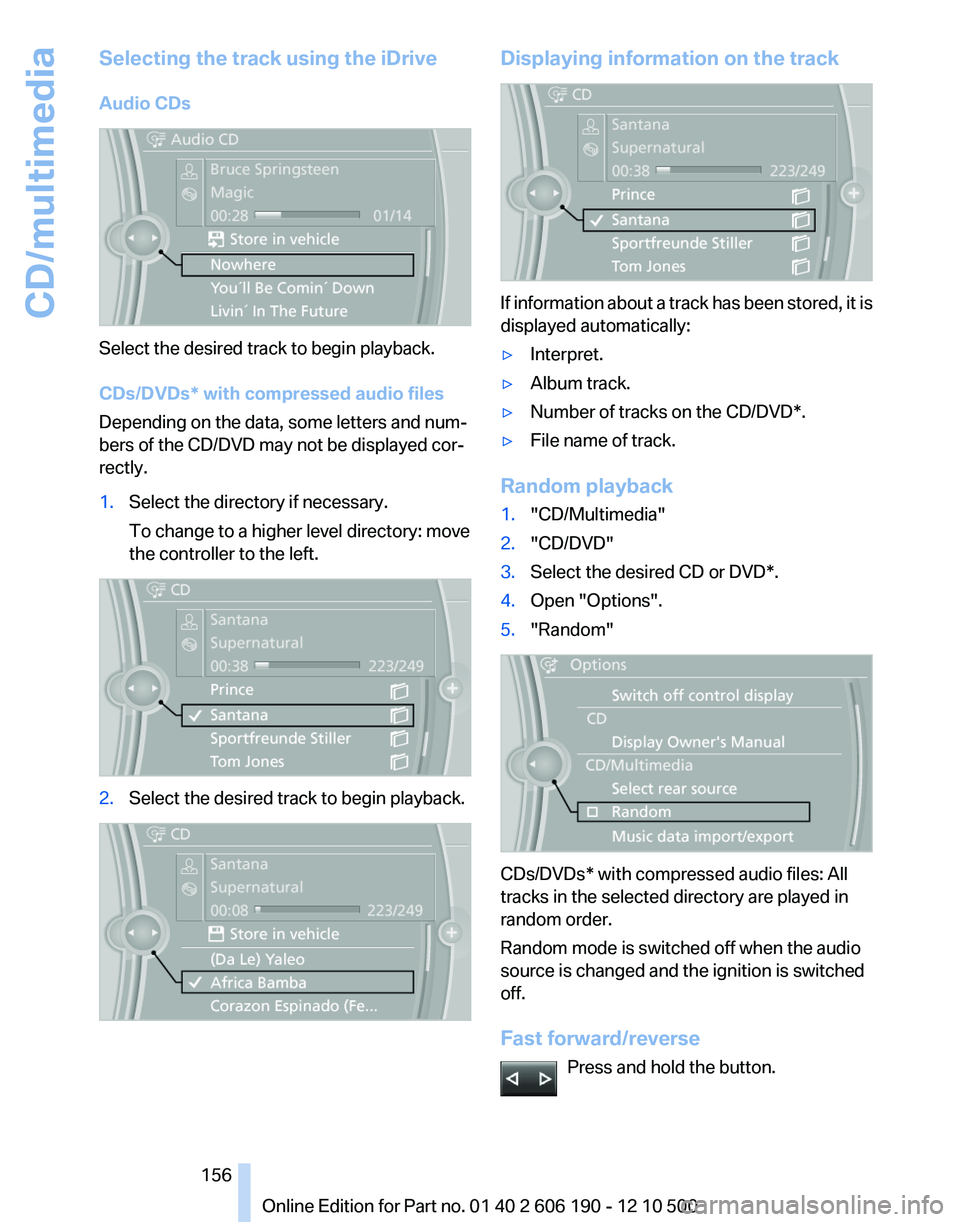
Selecting the track using the iDrive
Audio CDs
Select the desired track to begin playback.
CDs/DVDs* with compressed audio files
Depending on the data, some letters and num‐
bers of the CD/DVD may not be displayed cor‐
rectly.
1.Select the directory if necessary.
To change to a higher level directory: move
the controller to the left.2.Select the desired track to begin playback.Displaying information on the track
If information about a track has been stored, it is
displayed automatically:
▷Interpret.▷Album track.▷Number of tracks on the CD/DVD*.▷File name of track.
Random playback
1."CD/Multimedia"2."CD/DVD"3.Select the desired CD or DVD*.4.Open "Options".5."Random"
CDs/DVDs* with compressed audio files: All
tracks in the selected directory are played in
random order.
Random mode is switched off when the audio
source is changed and the ignition is switched
off.
Fast forward/reverse Press and hold the button.
Seite 156156
Online Edition for Part no. 01 40 2 606 190 - 12 10 500CD/multimedia
Page 158 of 262

2. "DVD menu"
The DVD menu is displayed. The display de‐
pends on the contents of the DVD.3.To select menu items: move the controller
and press it.
To change to the video menu: turn the controller
and press it.
DVD/VCD settings
For some DVDs, settings can only be made via
the DVD menu; refer also to the information on
the DVD.
Selecting the language*
The languages that are available depend on the
DVD.
1.Turn the controller during playback.2.Open "Options".3."Audio/language"4.Select the desired language.
Selecting the subtitles*
The subtitles that are available depend on the
DVD.
1.Turn the controller during playback.2.Open "Options".3."Subtitles"4.Select the desired language or "Do not
display subtitles".
Setting the brightness, contrast and color
1.Turn the controller during playback.2.Open "Options".3."Display settings"4."Brightness", "Contrast" or "Color"5.Turn the controller until the desired setting
is reached and press the controller.
Selecting the zoom
Display the video image on the entire screen.
1.Turn the controller during playback.2.Open "Options".Seite 158158
Online Edition for Part no. 01 40 2 606 190 - 12 10 500CD/multimedia
Page 160 of 262

Sliding in CDs/DVDs
Do not insert the CD/DVD until the LEDs
on the DVD slot are flashing; otherwise, the CD/
DVD or the DVD changer could be damaged.
Do not continue to push on the CD/DVD; this
may cause it to jam and prevent it from being
able to eject again.◀
Filling all empty DVD compartments1. Hold the button down.
The LEDs on the empty CD compartments
flash.2.Wait for the LEDs on the DVD slot to begin
flashing and then insert each CD or DVD into
the center of the slot.
The CDs/DVDs are drawn in automatically
and placed into the vacant compartments.
Sliding in CDs/DVDs
Do not insert the CD/DVD until the LEDs
on the DVD slot are flashing; otherwise, the CD/
DVD or the DVD changer could be damaged.
Do not continue to push on the CD/DVD; this
may cause it to jam and prevent it from being
able to eject again.◀
After they are inserted, it may take several mi‐
nutes for the CDs/DVDs to be read in.
Removing a single CD/DVD
1. Press the button.2.Select the DVD compartment.
The CD/DVD is partially ejected.3.Remove the CD/DVD.
Removing all CDs/DVDs
1. Hold the button down.2.Remove the CDs/DVDs.
Malfunctions
If all LEDs on the DVD changer are flashing rap‐
idly, a malfunction has occurred.
To eliminate the malfunction:1.Press one of the buttons:▷▷
The CD/DVD last inserted is ejected.
2.Remove the CD/DVD.
The DVD changer is functional again after the
LEDs stop flashing rapidly.
Audio playback*
The audio track of a DVD can be played back
even if video playback is not possible in the ve‐
hicle.
Only the main film without the previews or extras
can be played back.
Starting playback
A DVD is located in the DVD changer.
1."CD/Multimedia"2."CD/DVD"3.Select the desired DVD.
Selecting a chapter using the button Press the button repeatedly until the
desired chapter is played.
Selecting a chapter using iDrive
1."CD/Multimedia"2."CD/DVD"3.Select the desired DVD.4.Select the desired chapter.
Fast forward/reverse Press and hold the button.
Selecting the language*
The languages that are available depend on the
DVD.
Seite 160160
Online Edition for Part no. 01 40 2 606 190 - 12 10 500CD/multimedia
Page 161 of 262

1."CD/Multimedia"2."CD/DVD"3.Select the desired DVD.4.Open "Options".5."Audio/language"6.Select the desired language.
Notes
CD/DVD player and changer Do not remove the cover
BMW CD/DVD players and changers are
officially designated Class 1 laser products. Do
not operate if the cover is damaged; otherwise,
severe eye damage may occur.◀
CDs and DVDs Use of CDs/DVDs
▷Do not use self-recorded CDs/DVDs
with labels applied, as these can be‐
come detached during playback due
to heat buildup and can cause irrepar‐
able damage to the device.▷Only use round CDs/DVDs with a standard
diameter of 4.7 in/12 cm and do not play
CDs/DVDs with an adapter, e.g., single CDs;
otherwise, the CDs or the adapter may jam
and no longer eject.▷Do not use combined CDs/DVDs, e.g., DVD
Plus, as the CDs/DVDs can jam and will no
longer eject.◀
General malfunctions
▷CD/DVD changers and players have been
optimized for performance in vehicles. In
some instances they may be more sensitive
to faulty CDs/DVDs than stationary devices
would be.▷If a CD/DVD cannot be played, first check
whether it has been inserted correctly.Humidity
High levels of humidity can lead to condensation
on the CD/DVD or the laser's scan lens, and
temporarily prevent playback.
Malfunctions involving individual CDs/
DVDs
If malfunctions occur only with particular CDs/
DVDs, this can be due to one of the following
causes:
Home-recorded CDs/DVDs▷Possible reasons for malfunctions with
home-recorded CDs/DVDs are inconsistent
data creation or recording processes, or
poor quality or old age of the blank CD/DVD.▷Only label CDs/DVDs on the upper side with
a pen intended for this purpose.
Damage
▷Avoid fingerprints, dust, scratches and
moisture.▷Store CDs/DVDs in a sleeve.▷Do not subject CDs/DVDs to temperatures
over 122 ℉/50 ℃, high humidity or direct
sunlight.
CDs/DVDs with copy protection
CDs/DVDs are often provided with a copy pro‐
tection feature by the manufacturer. This can
mean that some CDs/DVDs cannot be played or
can only be played to a limited extent.
MACROVISION
This product contains copyrighted technology
that is based on multiple registered US patents
and the intellectual property of the Macrovision
Corporation and other manufacturers. The use
of this copy protection must be approved by
Macrovision. Media protected by this product -
unless otherwise agreed with Macrovision - may
only be used for private purposes. Copying of
this technology is prohibited.
Seite 161161
Online Edition for Part no. 01 40 2 606 190 - 12 10 500
ReferenceMobilityCommunicationEntertainmentNavigationDriving tipsControlsAt a glance
Page 165 of 262

The first track is played automatically, if pos‐
sible.4.Change directories if needed to select
tracks.
To go up a level in the directory: move the
controller to the left.
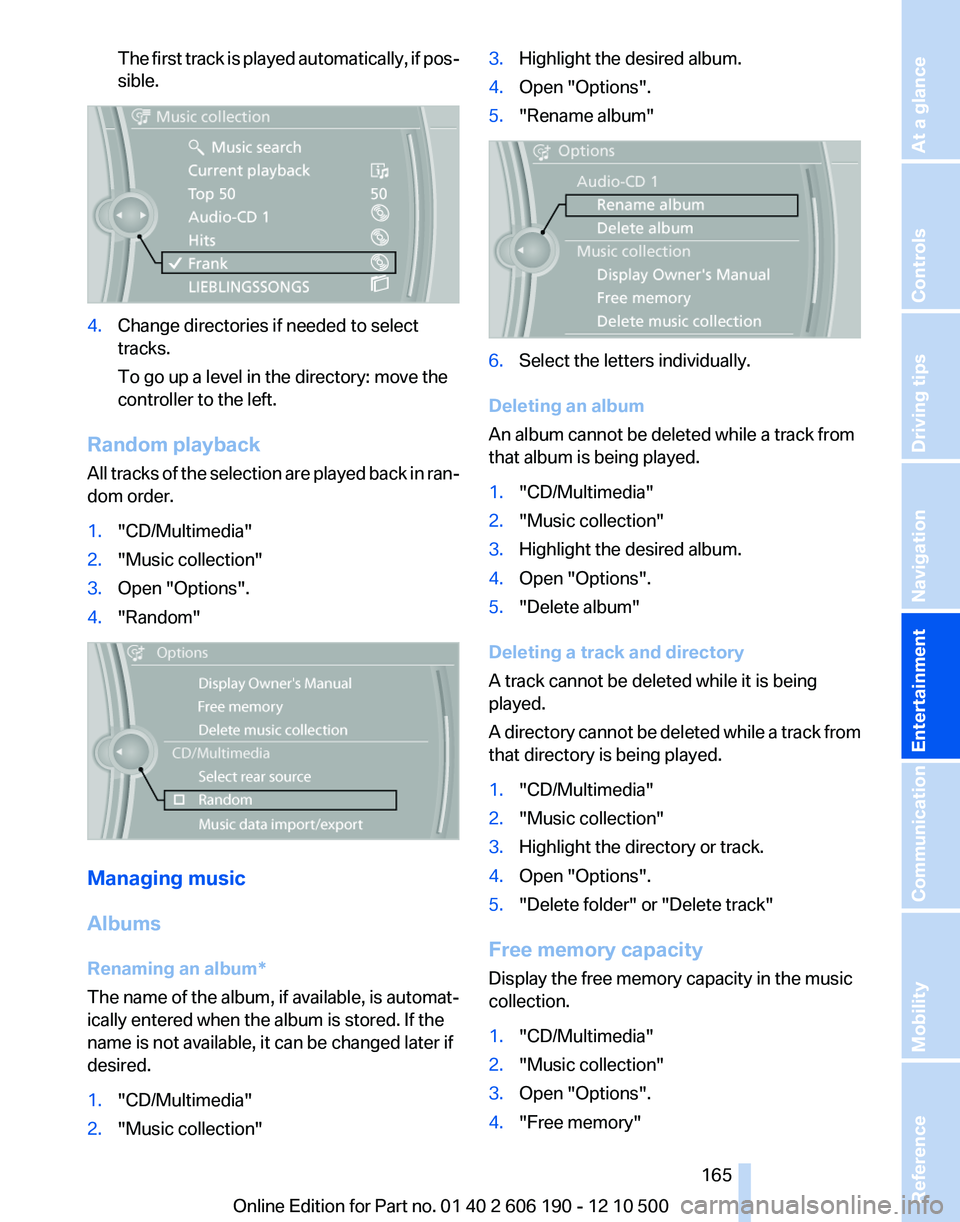
Random playback
All tracks of the selection are played back in ran‐
dom order.
1."CD/Multimedia"2."Music collection"3.Open "Options".4."Random"
Managing music
Albums
Renaming an album*
The name of the album, if available, is automat‐
ically entered when the album is stored. If the
name is not available, it can be changed later if
desired.
1."CD/Multimedia"2."Music collection"3.Highlight the desired album.4.Open "Options".5."Rename album"6.Select the letters individually.
Deleting an album
An album cannot be deleted while a track from
that album is being played.
1."CD/Multimedia"2."Music collection"3.Highlight the desired album.4.Open "Options".5."Delete album"
Deleting a track and directory
A track cannot be deleted while it is being
played.
A directory cannot be deleted while a track from
that directory is being played.
1."CD/Multimedia"2."Music collection"3.Highlight the directory or track.4.Open "Options".5."Delete folder" or "Delete track"
Free memory capacity
Display the free memory capacity in the music
collection.
1."CD/Multimedia"2."Music collection"3.Open "Options".4."Free memory"Seite 165165
Online Edition for Part no. 01 40 2 606 190 - 12 10 500
ReferenceMobilityCommunicationEntertainmentNavigationDriving tipsControlsAt a glance
Page 170 of 262

Requirements▷The device is suitable. Information under
www.bmwusa.com/bluetooth.▷The device is ready for operation.▷The ignition is switched on.▷Bluetooth is activated on the vehicle, refer to
page 177, and on the device.▷Bluetooth presettings must be made on the
device, such as for a connection without
confirmation or visibility; refer to the device
operating instructions.▷A number with at least four and a maximum
of 16 digits is defined as the Bluetooth pass‐
key. It is only required once for pairing.
Pairing and connecting
Pairing a device
To avoid becoming distracted and posing
an unnecessary hazard both to your own vehi‐
cle's occupants and to other road users, only
pair the device while the vehicle is stationary.◀
1."CD/Multimedia"2."Bluetooth (audio)"3.If necessary. "Bluetooth audio".4."Add new phone"
The Bluetooth name of the vehicle is dis‐
played.5.Perform additional steps on the device, refer
to the device operating instructions: for in‐
stance, search for or connect the Bluetooth
device or a new device.
The Bluetooth name of the vehicle appears
on the device display.6.Select the Bluetooth name of the vehicle on
the device display.
Prompt via iDrive or the device to enter the
same Bluetooth passkey.7.Enter the passkey and confirm.8.Select the desired functions with which the
device is to be connected, for instance
"Audio".9."OK"
If pairing was successful, the device is displayed
as connected.
White symbol
: the device is active as an audio
source.
If pairing was unsuccessful: What to do if..., refer
to page 172.
Connecting a specific device
A device that has already been paired can be
connected as an active audio source.
Connecting is not possible when data is ex‐
changed via a mobile phone connected via Blue‐
tooth.
Requirements
If necessary, activate the audio connection of
the desired device from the list of paired devi‐
ces.
Seite 170170
Online Edition for Part no. 01 40 2 606 190 - 12 10 500CD/multimedia
Page 171 of 262

1."CD/Multimedia"2."Bluetooth (audio)"3.If necessary, "Bluetooth audio".4.Select the desired device from the list of
paired devices.5.Open "Options".6."Configure phone"7."Audio"8."OK"
Connecting the device
1."CD/Multimedia"2."Bluetooth (audio)"3.If necessary, "Bluetooth audio".4.Select the desired device from the list of
paired devices.
White symbol : the device is active as an audio
source.
Playback
General information
▷The display of music track information de‐
pends on the device.▷Operation can takes place on the device or
iDrive.▷Playback is interrupted when data is ex‐
changed via a mobile phone connected via
Bluetooth.
Starting playback
1.Connect the device.2."CD/Multimedia"3."External devices"4. Select the symbol.5.Select the desired track from the list, if nec‐
essary.
Playback menu*
Depending on the particular device, some of the
functions may not be available.
SymbolFunction Next track
Fast forward: press and hold the
symbol. Previous music track
Reverse: press and hold the symbol.
Disconnecting the audio connection
1."CD/Multimedia"2."Bluetooth (audio)"3.Highlight the desired device.4.Open "Options".5."Configure phone"6."Audio"7."OK"Seite 171171
Online Edition for Part no. 01 40 2 606 190 - 12 10 500
ReferenceMobilityCommunicationEntertainmentNavigationDriving tipsControlsAt a glance