2011 BMW X3 fuel
[x] Cancel search: fuelPage 5 of 262

ContentsThe fastest way to find information on a partic‐
ular topic or item is by using the index, refer to
page 252.
Using this Owner's Manual6Notes
At a glance
12Cockpit19iDrive25Voice activation system27Integrated Owner's Manual in the vehicle
Controls
32Opening and closing47Adjusting55Transporting children safely58Driving67Displays76Lamps80Safety86Driving stability control systems91Driving comfort101Climate control107Interior equipment114Storage compartments
Driving tips
120Things to remember when driving
Navigation
128Navigation
Entertainment
146Tone148Radio155CD/multimediaCommunication176Professional mobile phone preparation
package185Office193Contacts195BMW Assist
Mobility
204Refueling206Fuel207Wheels and tires215Engine compartment217Engine oil219Maintenance221Replacing components228Breakdown assistance233Care
Reference
238Technical data243Short commands of the voice activation
system252Everything from A to ZSeite 5
Online Edition for Part no. 01 40 2 606 190 - 12 10 500
ReferenceMobilityCommunicationEntertainmentNavigationDriving tipsControlsAt a glance
Page 13 of 262

7Instrument cluster 138Steering wheel buttons, rightEntertainment sourceVolumeVoice activation* 25Telephone* 1769Steering column stalk, rightWindshield wipers 62Rain sensor* 63Clean the windshields and head‐
lamps* 63Rear window wiper 6310Start/stop the engine and switch
the ignition on/off 5811Horn12Steering wheel heating* 5413Adjust the steering wheel 5414Open the tailgate* 3915Unlocking the hood
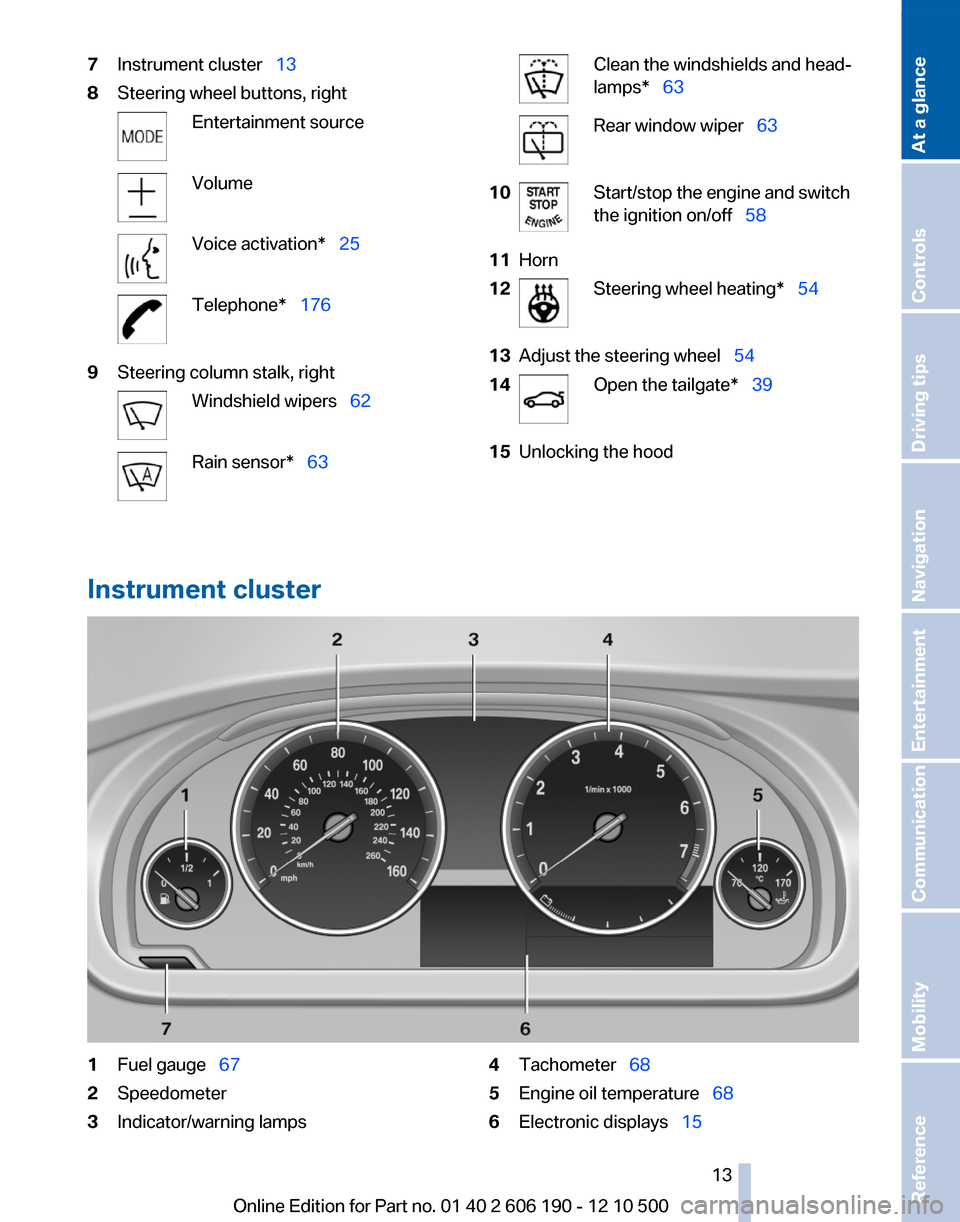
Instrument cluster
1Fuel gauge 672Speedometer3Indicator/warning lamps4Tachometer 685Engine oil temperature 686Electronic displays 15Seite 1313
Online Edition for Part no. 01 40 2 606 190 - 12 10 500
ReferenceMobilityCommunicationEntertainmentNavigationDriving tipsControlsAt a glance
Page 35 of 262

▷Driver's seat position, refer to page 37: au‐
tomatically retrieved after unlocking.▷Programmable memory buttons, refer to
page 23: assignment.▷Head-up Display*, refer to page 99: selec‐
tion, brightness and position of the display.▷Headlamp courtesy delay feature, refer to
page 76: time setting.▷Tone, refer to page 146: tone settings.▷Automatic climate control/Automatic cli‐
mate control with enhanced features *, refer
to page 101: settings.▷Navigation*, refer to page 128: map views,
route criteria, voice output on/off.▷PDC Park Distance Control*: adjusting the
volume of the signal tone, refer to
page 93.▷Radio: stored stations, station listened to
last, special settings, refer to page 148.▷Backup camera*, refer to page 95: selec‐
tion of functions and type of display.▷Language on the Control Display, refer to
page 73.▷Triple turn signal activation, refer to
page 62.▷Daytime running lights*, refer to page 77:
current setting.▷Locking the vehicle, refer to page 36: after
a brief period or after starting to drive.
Central locking system
The concept
The central locking system becomes active
when the driver's door is closed.
The system simultaneously engages and re‐
leases the locks on the following:
▷Doors.▷Tailgate.▷Fuel filler flap.Operating from the outside▷Via the remote control.▷Via the driver's door lock*.▷Via the door handles of the driver's and front
passenger doors*.▷Via the button on the tailgate*.
The following takes place simultaneously when
locking/unlocking the vehicle via the remote
control:
▷Anti-theft protection is switched on/off.
Doors cannot be unlocked using the lock
buttons or the door opener.▷The welcome lamps, interior lamps and
courtesy lamps* are switched on and off.▷The alarm system*, refer to page 42, is
armed or disarmed.
Operating from the inside
Via the button for the central locking system.
If the vehicle has been locked from inside, the
fuel filler flap remains unlocked.
If an accident of a certain severity occurs, the
central locking system unlocks automatically.
The hazard warning system and interior lamps
come on.
Seite 3535
Online Edition for Part no. 01 40 2 606 190 - 12 10 500
ReferenceMobilityCommunicationEntertainmentNavigationDriving tipsControlsAt a glance
Page 36 of 262

Opening and closing: from the
outside
Using the remote control
General information Take the remote control with you
People or animals left unattended in a
parked vehicle can lock the doors from the in‐
side. Always take the remote control with you
when leaving the vehicle so that the vehicle can
then be opened from the outside.◀
Unlocking Press the button.
The vehicle is unlocked.
You can set how the vehicle is to be unlocked.
The setting is stored for the remote control cur‐
rently in use.1."Settings"2."Door locks"3."Unlock button:"4.Select the desired function:▷"Driver's door only"
Only the driver's door and the fuel filler
flap are unlocked. Pressing again un‐
locks the entire vehicle.▷"All doors"
The entire vehicle is unlocked.
Convenient opening
The remote control can be used to simultane‐
ously open the windows and the glass sunroof *.
Press and hold the button on the re‐
mote control.
The windows and the glass sunroof* open.
Releasing the button stops the motion.
Locking Press the button on the remote control.
Do not lock from the outside
Do not lock the vehicle from the outside if
there are people in it, as the vehicle cannot be
unlocked from inside without special knowl‐
edge.◀
Switching on the interior lamps,
courtesy lamps*, and welcome lamps
Press the button on the remote control
with the vehicle locked.
Panic mode*
You can trigger the alarm system if you find
yourself in a dangerous situation.
Press the button on the remote control
for at least 3 seconds.
To switch off the alarm: press any button.
Switching on the headlamp courtesy
delay feature
Briefly press the button on the remote
control.
The duration can be set.
Opening the tailgate Press the button on the remote control
for approx. 1 second and release.
The tailgate opens, regardless of whether it was
previously locked or unlocked.
The tailgate pivots back and up when it opens.
Ensure that adequate clearance is available be‐
fore opening.Seite 3636
Online Edition for Part no. 01 40 2 606 190 - 12 10 500Opening and closing
Page 38 of 262

Any unauthorized modifications or changes to
these devices could void the user's authority to
operate this equipment.
Using the door lock
General information
Do not lock from the outside
Do not lock the vehicle from the outside if
there are people in it, as the vehicle cannot be
unlocked from inside without special knowl‐
edge.◀
Remove the key before pulling the door
handle
Before pulling the outside door handle, remove
the key to avoid damaging the paintwork and the
key.◀
In some country-specific versions, the alarm
system * is triggered if the vehicle is unlocked via
the door lock.
Manual operation
If an electrical malfunction occurs, lock or unlock
the vehicle using a key via the door lock on the
driver's door.
Locking the doors and tailgate at once *
In some vehicle equipment versions, only the
driver's door can be locked via the door lock.
To lock all doors and the tailgate at once:
1.With the doors closed, lock the vehicle using
the button for the central locking system in
the interior.2.Unlock and open the driver's or front pas‐
senger door.3.Lock the vehicle.▷Lock the driver's door using the
integrated key in the door lock, or▷Press down the lock button of the front
passenger door and close the door from
the outside.
The fuel filler flap can only be locked using the
remote control.
Opening and closing: from the
inside
Unlocking and opening*
▷Either unlock the doors together using the
button for the central locking system and
then pull the door handle above the armrest
or▷Pull the door opener twice individually on
each door: the first time unlocks the door,
the second time opens it.
Locking and unlocking
Press the button in the vehicle.
The doors and the tailgate are locked or
unlocked when the front doors are closed, but
they are not secured against theft.
The fuel filler flap remains unlocked.
Automatic locking
The setting is stored for the remote control cur‐
rently in use.
1."Settings"Seite 3838
Online Edition for Part no. 01 40 2 606 190 - 12 10 500Opening and closing
Page 59 of 262

Frequent starting in quick succession
Avoid repeated futile attempts at starting
the car and avoid starting the car frequently in
quick succession. Otherwise, the fuel is not
burned or is inadequately burned, and there is
the danger of overheating and damaging the
catalytic converter.◀
Do not wait for the engine to warm up while the
vehicle remains stationary. Start driving at mod‐
erate engine speeds.
Automatic transmission*
Starting the engine Press on the brake pedal and
press the Start/Stop button.
The ignition is activated automat‐
ically for a brief period and is
stopped as soon as the engine
starts.
Engine stop
General information Take the remote control with you
Take the remote control with you when
leaving the vehicle so that children, for example,
cannot operate the windows and injure them‐
selves.◀
Set the parking brake and further secure
the vehicle as required
Set the parking brake firmly when parking; oth‐
erwise, the vehicle could roll. On steep upward
and downward inclines, further secure the vehi‐
cle, for example, by turning the steering wheel in
the direction of the curb. ◀
Automatic transmission*
Switching off the engine1.Engage transmission position P with the ve‐
hicle stopped.2.Press the Start/Stop button.The engine is switched off.
The radio ready state is switched on.3.Set the parking brake.
Before driving into a car wash
The vehicle is able to roll when the following
steps are adhered to:
1.Depress the brake pedal.2.Engage transmission position N.3.Release the parking brake or deactivate Au‐
tomatic Hold.4.Switch the engine off.
Transmission position P with the ignition
off
When the ignition is switched off, position P is
engaged automatically. When in an automatic
car wash, for example, ensure that the ignition is
not switched off accidentally.◀
Transmission position P is engaged automati‐
cally:
▷When the ignition is switched off.▷After approx. 15 minutes if the vehicle is not
moved.
Parking brake
The concept
The parking brake is primarily intended to pre‐
vent the vehicle from rolling while parked; it
brakes the rear wheels.
In cars with automatic transmission*:
The parking brake can be set manually or auto‐
matically:
▷Manual: by pulling and pushing the switch.▷Automatic: by activating Automatic Hold.Seite 5959
Online Edition for Part no. 01 40 2 606 190 - 12 10 500
ReferenceMobilityCommunicationEntertainmentNavigationDriving tipsControlsAt a glance
Page 67 of 262

Displays
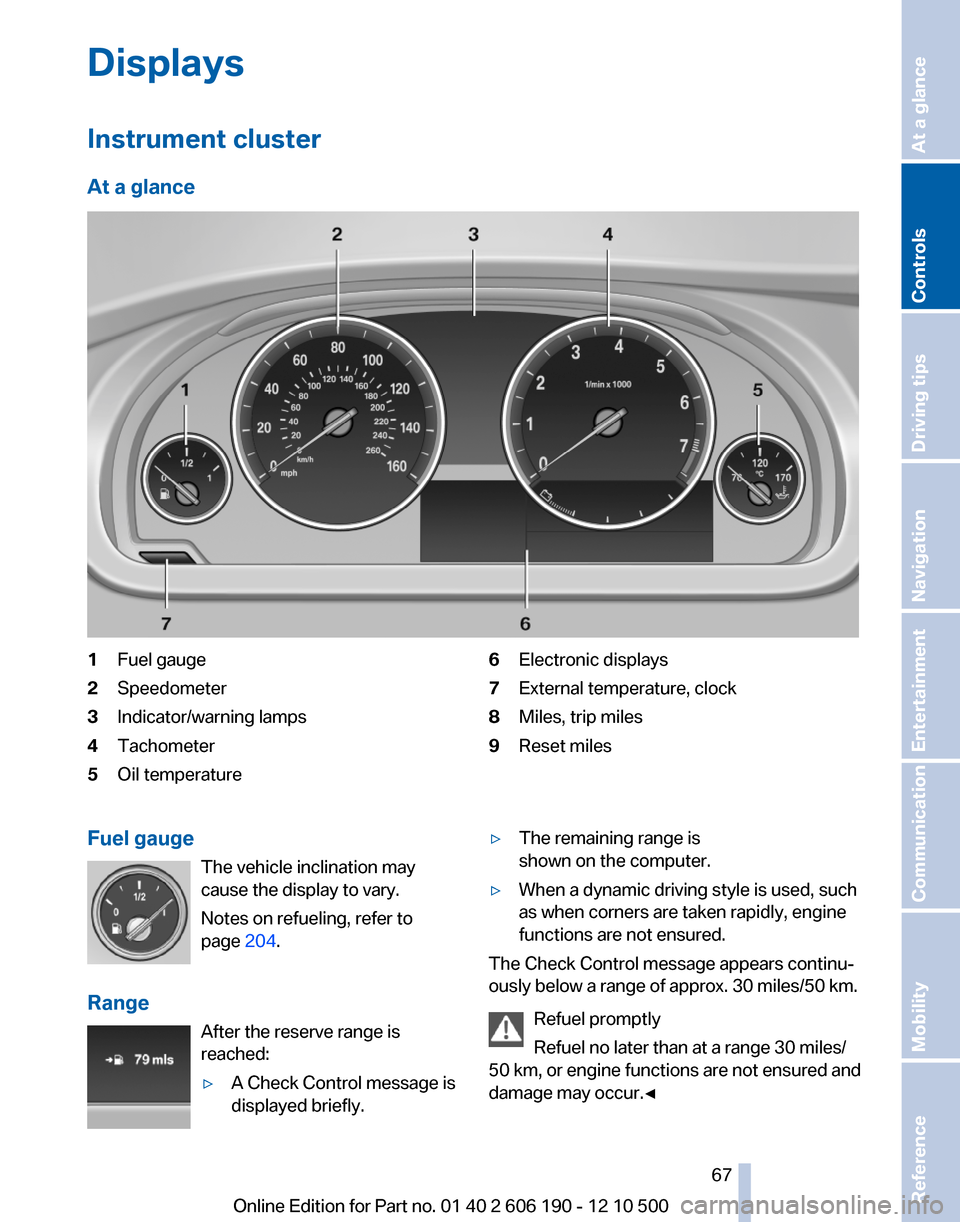
Instrument cluster
At a glance1Fuel gauge2Speedometer3Indicator/warning lamps4Tachometer5Oil temperature6Electronic displays7External temperature, clock8Miles, trip miles9Reset milesFuel gauge The vehicle inclination may
cause the display to vary.
Notes on refueling, refer to
page 204.
Range After the reserve range is
reached:▷A Check Control message is
displayed briefly.▷The remaining range is
shown on the computer.▷When a dynamic driving style is used, such
as when corners are taken rapidly, engine
functions are not ensured.
The Check Control message appears continu‐
ously below a range of approx. 30 miles/50 km.
Refuel promptly
Refuel no later than at a range 30 miles/
50 km, or engine functions are not ensured and
damage may occur.◀
Seite 6767
Online Edition for Part no. 01 40 2 606 190 - 12 10 500
ReferenceMobilityCommunicationEntertainmentNavigationDriving tipsControlsAt a glance
Page 68 of 262

Displaying the cruising range1."Settings"2."Info display"3."Additional indicators"
Tachometer
Always avoid engine speeds in the red warning
field. In this range, the fuel supply is interrupted
to protect the engine.
Current fuel consumption Displays the current fuel con‐
sumption. You can check
whether you are currently driving
in an efficient and environmen‐
tally-friendly manner.
Displaying the current fuel
consumption
1."Settings"2."Info display"3."Additional indicators"
The bar display for the current fuel consumption
is displayed in the instrument cluster.
Energy recovery The energy of motion of the ve‐
hicle is converted to electrical en‐
ergy while coasting. The vehicle
battery is partially charged and
fuel consumption can be low‐
ered.
Engine oil temperature
▷Cold engine: the pointer is at
the low temperature end.
Drive at moderate engine and
vehicle speeds.▷Normal operating tempera‐
ture: the pointer is in the mid‐
dle or in the left half of the
temperature display.▷Hot engine: the pointer is at the high tem‐
perature end. A Check Control message is
displayed in addition.
Odometer and trip odometer
▷Odometer, arrow 1.▷Trip odometer, arrow 2.Seite 6868
Online Edition for Part no. 01 40 2 606 190 - 12 10 500Displays