2011 BMW M3 SEDAN tow
[x] Cancel search: towPage 109 of 278

Controls
107Reference
At a glance
Driving tips
Communications
Navigation
Entertainment
Mobility
Automatic climate control
Comfortable interior climate
AUTO program7 offers the ideal air distribution
and air volume for almost all conditions, refer to
AUTO program below. All you need to do is
select an interior temperature which is comfort-
able for you.
The following sections inform you in detail
about how to adjust the settings.
Most settings are stored for the remote control
currently in use, refer also to Personal Profile
settings on page26.
Adjusting air distribution manually
The air distribution can be
switched on and off manually. The
air is directed to the windshield, to
the upper body area and to the
footwell.
The automatic air distribution can be switched
back on by pressing the AUTO button. The
cooling function is switched on automatically
and the manual air distribution setting is
cleared.
Temperature
Turn to set the desired tempera-
ture.
The automatic climate control
achieves this temperature as
quickly as possible regardless of the season,
using maximum cooling or heating power if nec-
essary, and then maintains it.
Avoid rapid switching between different tem-
perature settings. The automatic climate con-
trol will not have sufficient time to adjust the set
temperature.
Maximum heating power can be obtained with
the highest setting, regardless of the outside
temperature.
The system cools steadily in the lowest setting,
regardless of the outside temperature.
Maximum cooling
Press the button.
The system is set to the lowest
temperature, maximum air volume
and recirculated-air mode.
Air flows out of the vent outlets for the upper
body region. Open them for this purpose.
Air is cooled as quickly as possible:
>Above an outside temperature of approx.
327/06
>When the engine is running
AUTO program
Press the button.
Air volume, air distribution and
temperature are controlled auto-
matically.
Depending on the selected temperature, AUTO
intensity and outside influences, the air is
directed toward the windshield, the side win-
dows, the upper body and the footwell.
Pressing the AUTO button automatically
switches on the cooling function.
At the same time, a condensation sensor con-
trols the program so as to prevent window con-
densation as much as possible.
The program is switched off when the air distri-
bution is set manually or the button is pressed
again.
Intensity of the AUTO program
With the AUTO program switched on, auto-
matic control of the air volume and air distribu-
tion can be adjusted:
Press the left side of the button
to reduce the intensity. Press
the right side of the button to
increase it.
The selected intensity is shown on the display
of the automatic climate control.
Page 111 of 278
Controls
109Reference
At a glance
Driving tips
Communications
Navigation
Entertainment
Mobility
Switching the system on/off
Switching off
With the blower at its lowest
setting, press the left side of the
button to switch off the automatic
climate control.
All displays are cleared except for the rear win-
dow defroster if it is switched on.
The outside air supply is blocked when
the automatic climate control is switched
off. If the air quality deteriorates or the window
fogs over, switch the system back on and
increase the air volume.<
Switching on
Press any button except the ALL or the rear
window defroster button to reactivate the
automatic climate control.
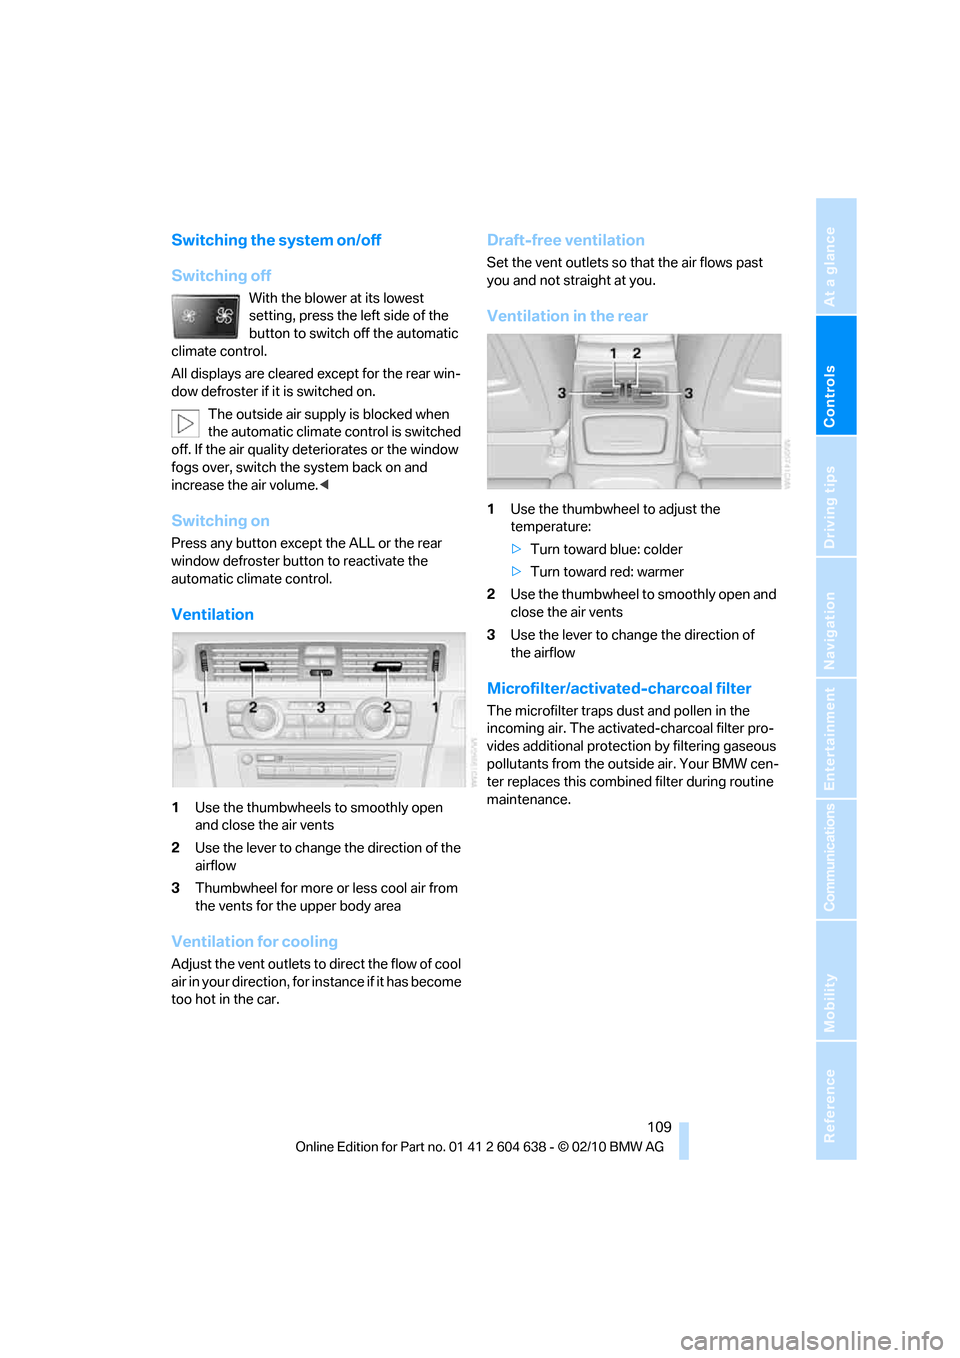
Ventilation
1Use the thumbwheels to smoothly open
and close the air vents
2Use the lever to change the direction of the
airflow
3Thumbwheel for more or less cool air from
the vents for the upper body area
Ventilation for cooling
Adjust the vent outlets to direct the flow of cool
air in your direction, for instance if it has become
too hot in the car.
Draft-free ventilation
Set the vent outlets so that the air flows past
you and not straight at you.
Ventilation in the rear
1Use the thumbwheel to adjust the
temperature:
>Turn toward blue: colder
>Turn toward red: warmer
2Use the thumbwheel to smoothly open and
close the air vents
3Use the lever to change the direction of
the airflow
Microfilter/activated-charcoal filter
The microfilter traps dust and pollen in the
incoming air. The activated-charcoal filter pro-
vides additional protection by filtering gaseous
pollutants from the outside air. Your BMW cen-
ter replaces this combined filter during routine
maintenance.
Page 122 of 278
Practical interior accessories
120
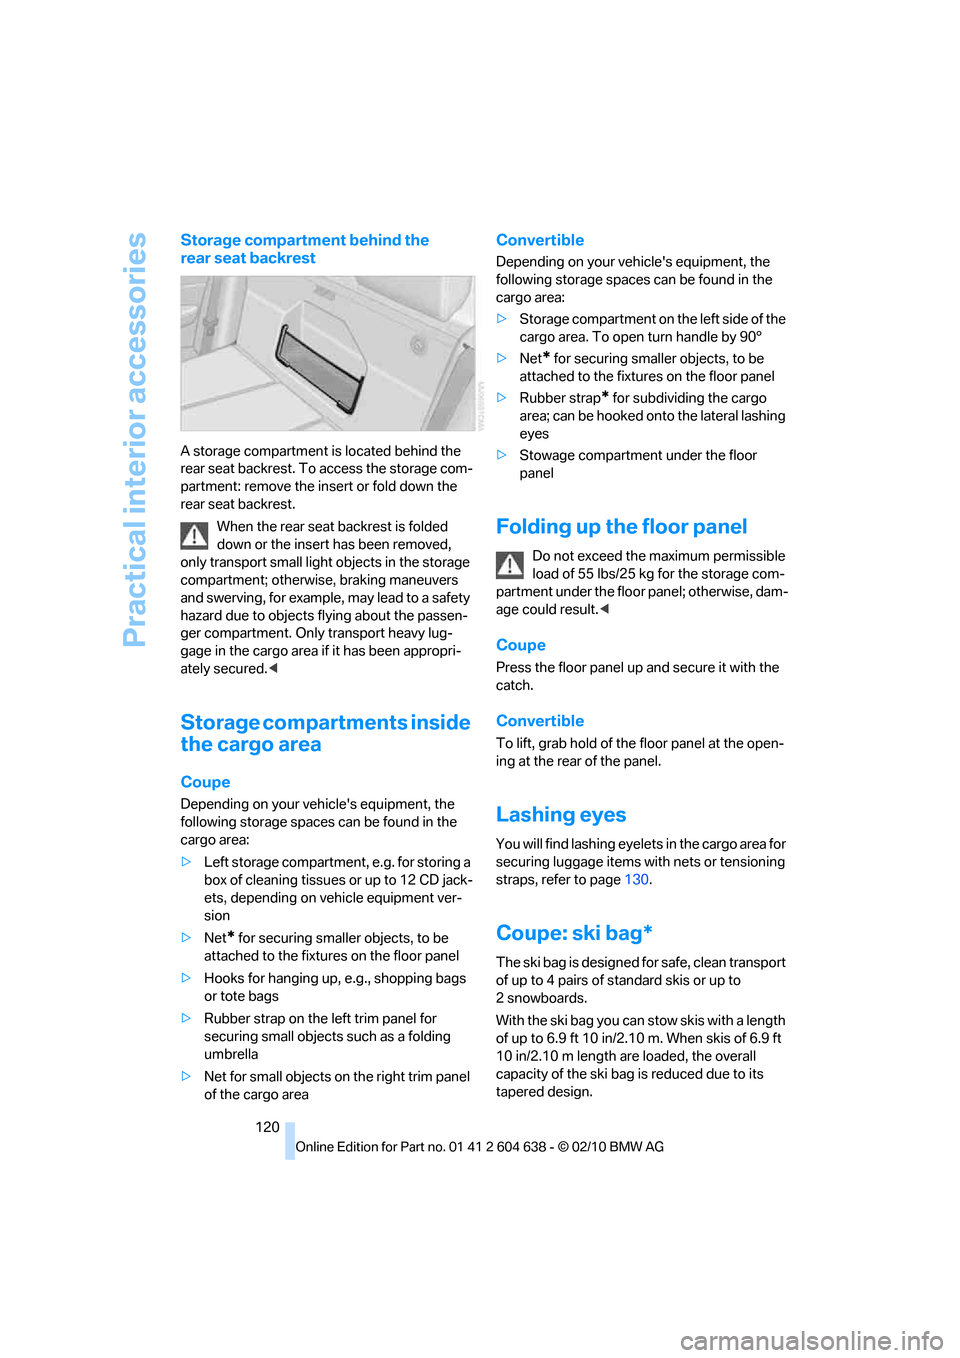
Storage compartment behind the
rear seat backrest
A storage compartment is located behind the
rear seat backrest. To access the storage com-
partment: remove the insert or fold down the
rear seat backrest.
When the rear seat backrest is folded
down or the insert has been removed,
only transport small light objects in the storage
compartment; otherwise, braking maneuvers
and swerving, for example, may lead to a safety
hazard due to objects flying about the passen-
ger compartment. Only transport heavy lug-
gage in the cargo area if it has been appropri-
ately secured.<
Storage compartments inside
the cargo area
Coupe
Depending on your vehicle's equipment, the
following storage spaces can be found in the
cargo area:
>Left storage compartment, e.g. for storing a
box of cleaning tissues or up to 12 CD jack-
ets, depending on vehicle equipment ver-
sion
>Net
* for securing smaller objects, to be
attached to the fixtures on the floor panel
>Hooks for hanging up, e.g., shopping bags
or tote bags
>Rubber strap on the left trim panel for
securing small objects such as a folding
umbrella
>Net for small objects on the right trim panel
of the cargo area
Convertible
Depending on your vehicle's equipment, the
following storage spaces can be found in the
cargo area:
>Storage compartment on the left side of the
cargo area. To open turn handle by 90°
>Net
* for securing smaller objects, to be
attached to the fixtures on the floor panel
>Rubber strap
* for subdividing the cargo
area; can be hooked onto the lateral lashing
eyes
>Stowage compartment under the floor
panel
Folding up the floor panel
Do not exceed the maximum permissible
load of 55 lbs/25 kg for the storage com-
partment under the floor panel; otherwise, dam-
age could result.<
Coupe
Press the floor panel up and secure it with the
catch.
Convertible
To lift, grab hold of the floor panel at the open-
ing at the rear of the panel.
Lashing eyes
You will find lashing eyelets in the cargo area for
securing luggage items with nets or tensioning
straps, refer to page130.
Coupe: ski bag*
The ski bag is designed for safe, clean transport
of up to 4 pairs of standard skis or up to
2snowboards.
With the ski bag you can stow skis with a length
of up to 6.9 ft 10 in/2.10 m. When skis of 6.9 ft
10 in/2.10 m length are loaded, the overall
capacity of the ski bag is reduced due to its
tapered design.
Page 123 of 278
Controls
121Reference
At a glance
Driving tips
Communications
Navigation
Entertainment
Mobility
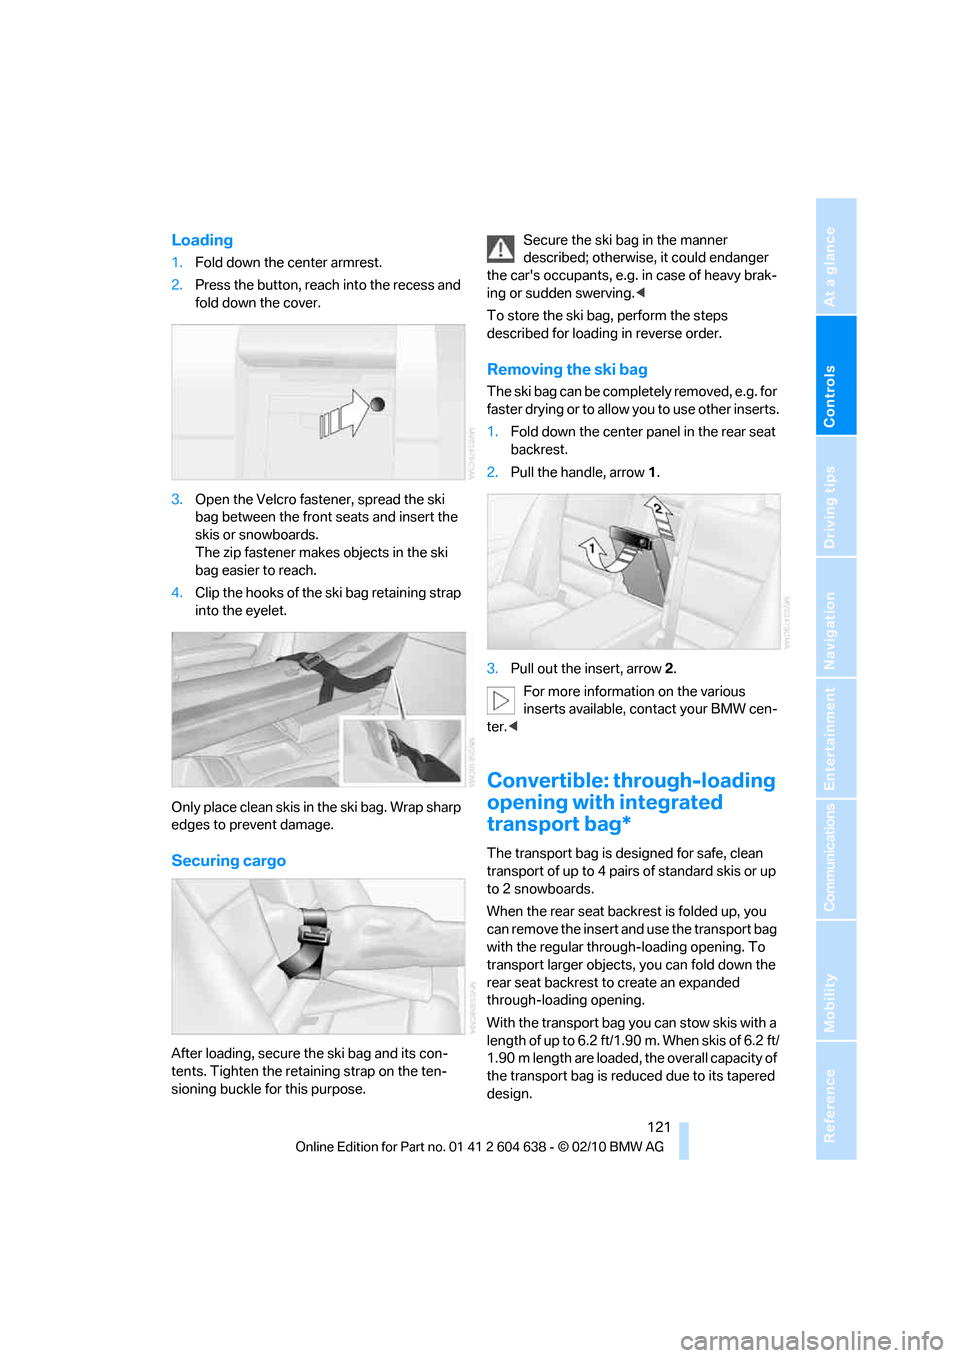
Loading
1.Fold down the center armrest.
2.Press the button, reach into the recess and
fold down the cover.
3.Open the Velcro fastener, spread the ski
bag between the front seats and insert the
skis or snowboards.
The zip fastener makes objects in the ski
bag easier to reach.
4.Clip the hooks of the ski bag retaining strap
into the eyelet.
Only place clean skis in the ski bag. Wrap sharp
edges to prevent damage.
Securing cargo
After loading, secure the ski bag and its con-
tents. Tighten the retaining strap on the ten-
sioning buckle for this purpose.Secure the ski bag in the manner
described; otherwise, it could endanger
the car's occupants, e.g. in case of heavy brak-
ing or sudden swerving.<
To store the ski bag, perform the steps
described for loading in reverse order.
Removing the ski bag
The ski bag can be completely removed, e.g. for
faster drying or to allow you to use other inserts.
1.Fold down the center panel in the rear seat
backrest.
2.Pull the handle, arrow1.
3.Pull out the insert, arrow 2.
For more information on the various
inserts available, contact your BMW cen-
ter.<
Convertible: through-loading
opening with integrated
transport bag*
The transport bag is designed for safe, clean
transport of up to 4 pairs of standard skis or up
to 2 snowboards.
When the rear seat backrest is folded up, you
can remove the insert and use the transport bag
with the regular through-loading opening. To
transport larger objects, you can fold down the
rear seat backrest to create an expanded
through-loading opening.
With the transport bag you can stow skis with a
length of up to 6.2 ft/1.90 m. When skis of 6.2 ft/
1.90 m length are loaded, the overall capacity of
the transport bag is reduced due to its tapered
design.
Page 125 of 278
Controls
123Reference
At a glance
Driving tips
Communications
Navigation
Entertainment
Mobility
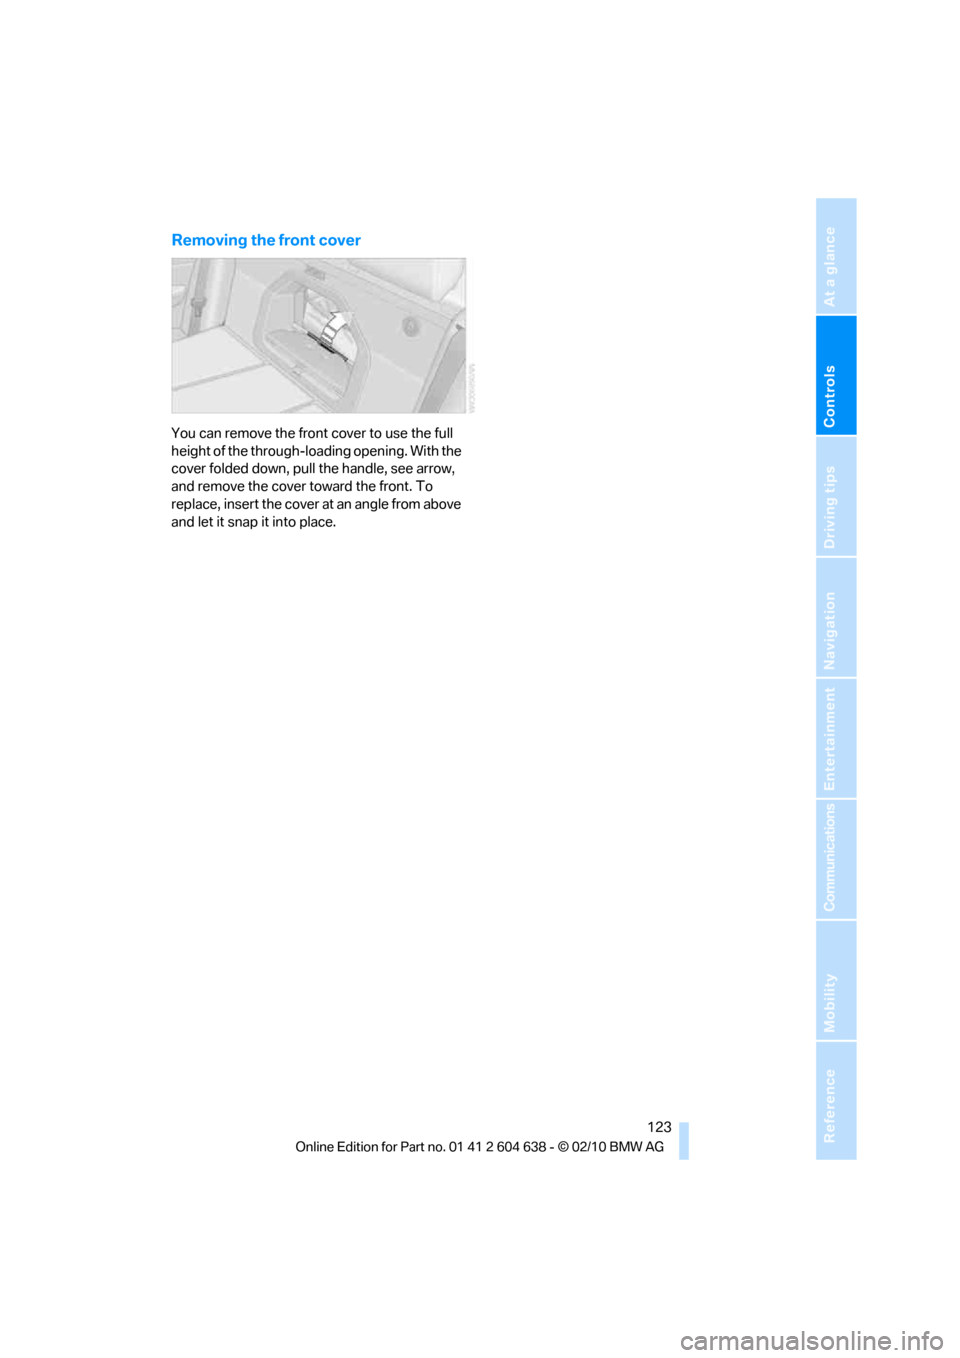
Removing the front cover
You can remove the front cover to use the full
height of the through-loading opening. With the
cover folded down, pull the handle, see arrow,
and remove the cover toward the front. To
replace, insert the cover at an angle from above
and let it snap it into place.
Page 131 of 278
Driving tips
129Reference
At a glance
Controls
Communications
Navigation
Entertainment
Mobility
Cargo loading
To avoid loading the tires beyond their
approved carrying capacity, never over-
load the vehicle. Overloading can lead to over-
heating and increases the rate at which damage
develops inside the tires. In some situations,
this can result in sudden loss of tire pressure.<
Make sure that no liquids are spilled or
leak from their containers in the cargo
area, as this could result in damage to the vehi-
cle.<
Determining loading limit
1.Locate the following statement on your
vehicle's placard
*:
The combined weight of occupants
and cargo should never exceed
XXX kg or YYY lbs. Otherwise, overloading
can result in damage to the vehicle and
unstable driving conditions.<
2.Determine the combined weight of the
driver and passengers that will be riding in
your vehicle.
3.Subtract the combined weight of the driver
and passengers from XXX kilograms or YYY
pounds.
4.The resulting figure equals the available
amount of cargo and luggage load capacity.
For example, if the YYY amount equals
1,400 lbs. and there will be five 150-lb. pas-
sengers in your vehicle, the amount of avail-
able cargo and luggage load capacity is
650 lbs:
1,400 lbs. minus 750 lbs. = 650 lbs.
5.Determine the combined weight of luggage
and cargo being loaded on the vehicle. That weight may not safely exceed the available
cargo and luggage load capacity calculated
in step 4.
6.If your vehicle will be towing a trailer, part of
the load from your trailer will be transferred
to your vehicle. Consult the manual for
transporting a trailer to determine how this
may reduce the available cargo and luggage
load capacity of your vehicle.
Load
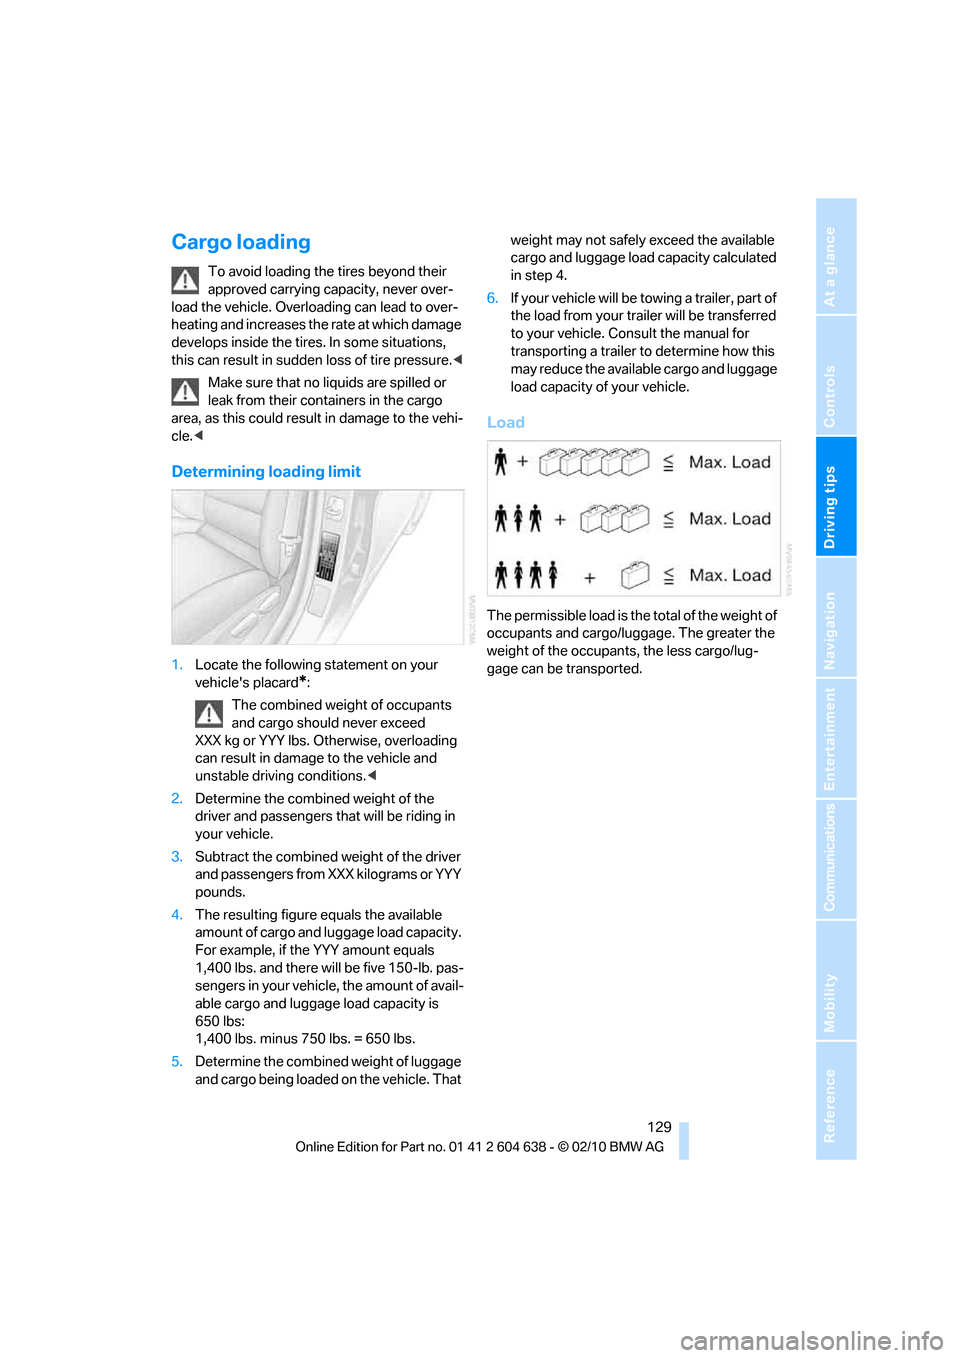
The permissible load is the total of the weight of
occupants and cargo/luggage. The greater the
weight of the occupants, the less cargo/lug-
gage can be transported.
Page 132 of 278
Things to remember when driving
130
Stowing cargo
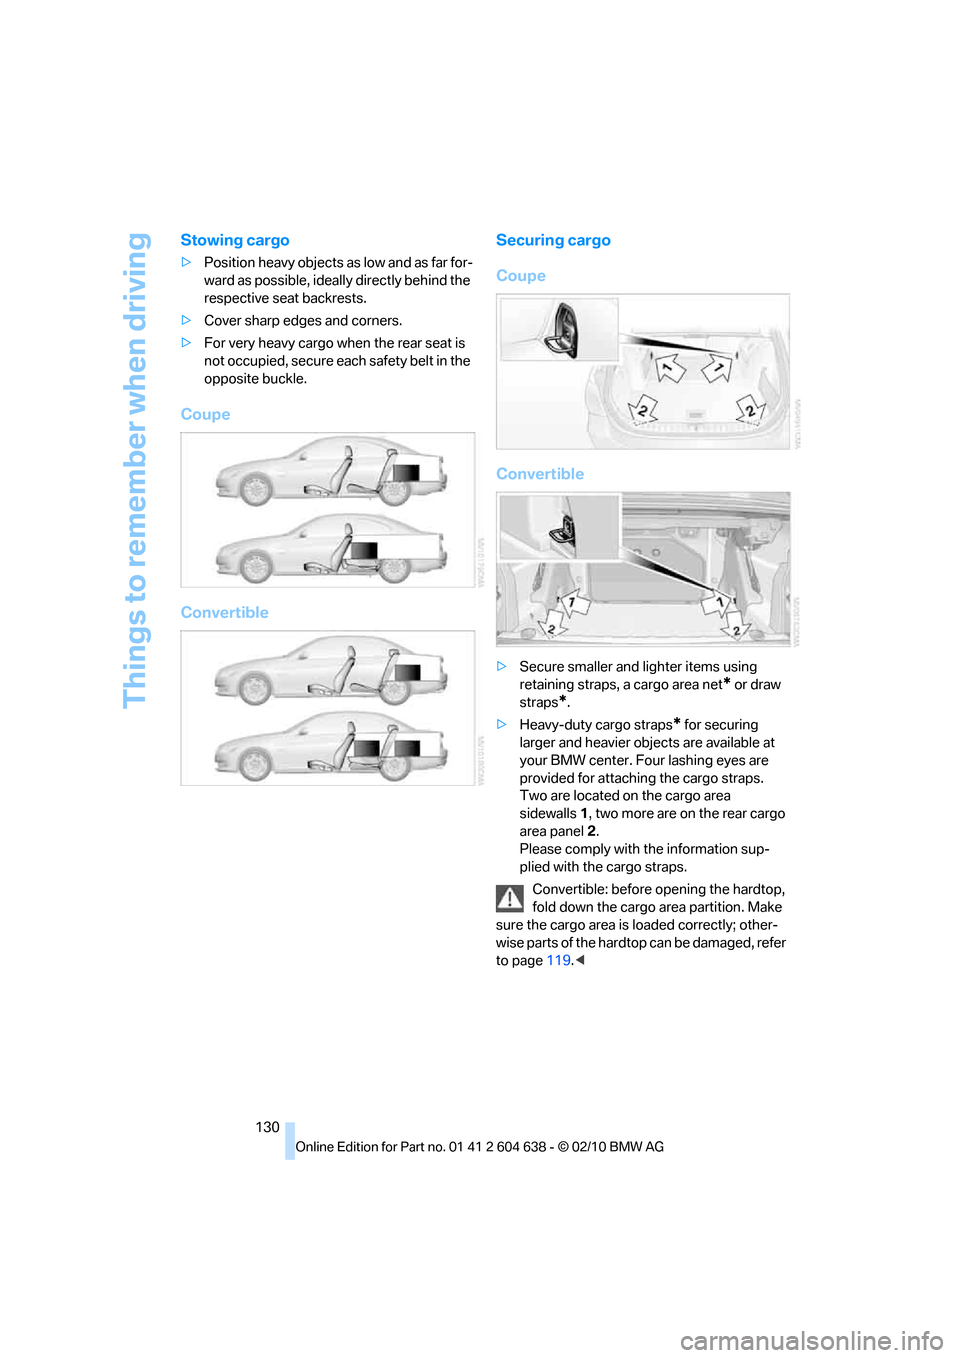
>Position heavy objects as low and as far for-
ward as possible, ideally directly behind the
respective seat backrests.
>Cover sharp edges and corners.
>For very heavy cargo when the rear seat is
not occupied, secure each safety belt in the
opposite buckle.
Coupe
ConvertibleSecuring cargo
Coupe
Convertible
>Secure smaller and lighter items using
retaining straps, a cargo area net
* or draw
straps
*.
>Heavy-duty cargo straps
* for securing
larger and heavier objects are available at
your BMW center. Four lashing eyes are
provided for attaching the cargo straps.
Two are located on the cargo area
sidewalls1, two more are on the rear cargo
area panel2.
Please comply with the information sup-
plied with the cargo straps.
Convertible: before opening the hardtop,
fold down the cargo area partition. Make
sure the cargo area is loaded correctly; other-
wise parts of the hardtop can be damaged, refer
to page119.<
Page 137 of 278
Navigation
Driving tips
135Reference
At a glance
Controls
Communications
Entertainment
Mobility
Destination entry
In entering your destination you can select from
the following options:
>Entering a destination manually, see below
>Selecting destination from address book,
refer to page137
>Last destinations, refer to page138
>Special destinations, refer to page139
>Entering a destination on the map, refer to
page140
>Selecting home address, refer to page138
>Entering a destination by voice com-
mands*, refer to page141
>Destination entry via BMW Assist
*, refer to
page140
You can also store a navigation destination on
the programmable memory keys, refer to
page20.
Enter data only when the vehicle is sta-
tionary, and always give priority to the
applicable traffic regulations in the event of any
contradiction between traffic and road condi-
tions and the instructions issued by the naviga-
tion system. Otherwise, vehicle occupants and
other road users may be endangered.<
Entering a destination
manually
The system's word-matching principle makes it
easier for you to enter the names of streets or
towns, refer to page143. This allows you to
enter different spellings and completes your
entry automatically, so that stored names can
be called up quickly.
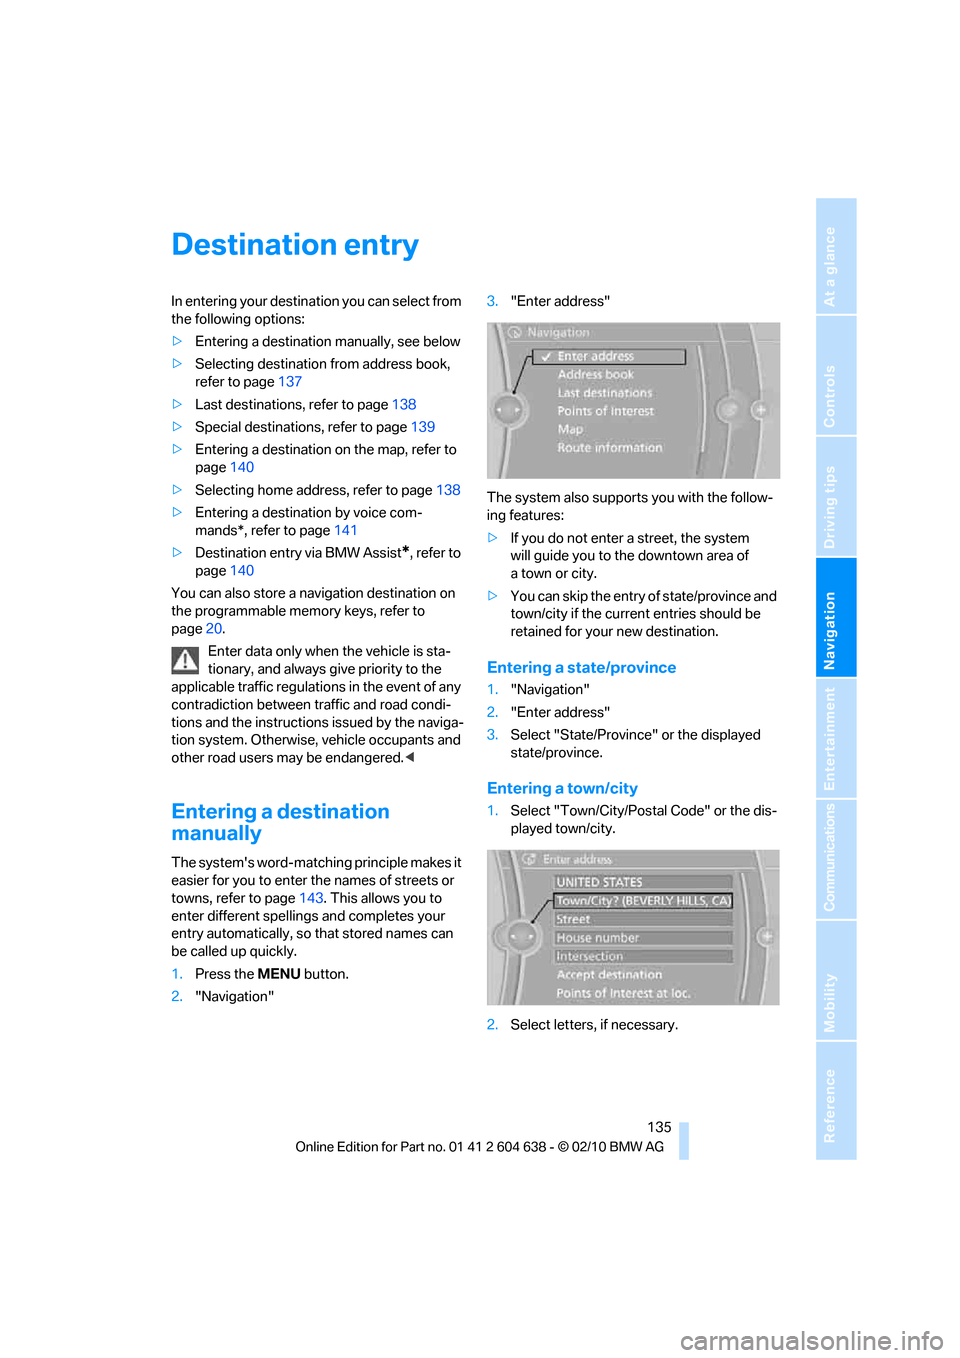
1.Press the MENUbutton.
2."Navigation"3."Enter address"
The system also supports you with the follow-
ing features:
>If you do not enter a street, the system
will guide you to the downtown area of
atown or city.
>You can skip the entry of state/province and
town/city if the current entries should be
retained for your new destination.
Entering a state/province
1."Navigation"
2."Enter address"
3.Select "State/Province" or the displayed
state/province.
Entering a town/city
1.Select "Town/City/Postal Code" or the dis-
played town/city.
2.Select letters, if necessary.