2011 BMW ACTIVEHYBRID X6 warning
[x] Cancel search: warningPage 109 of 312
Controls
107Reference
At a glance
Driving tips
Communications
Navigation
Entertainment
Mobility
Airbags
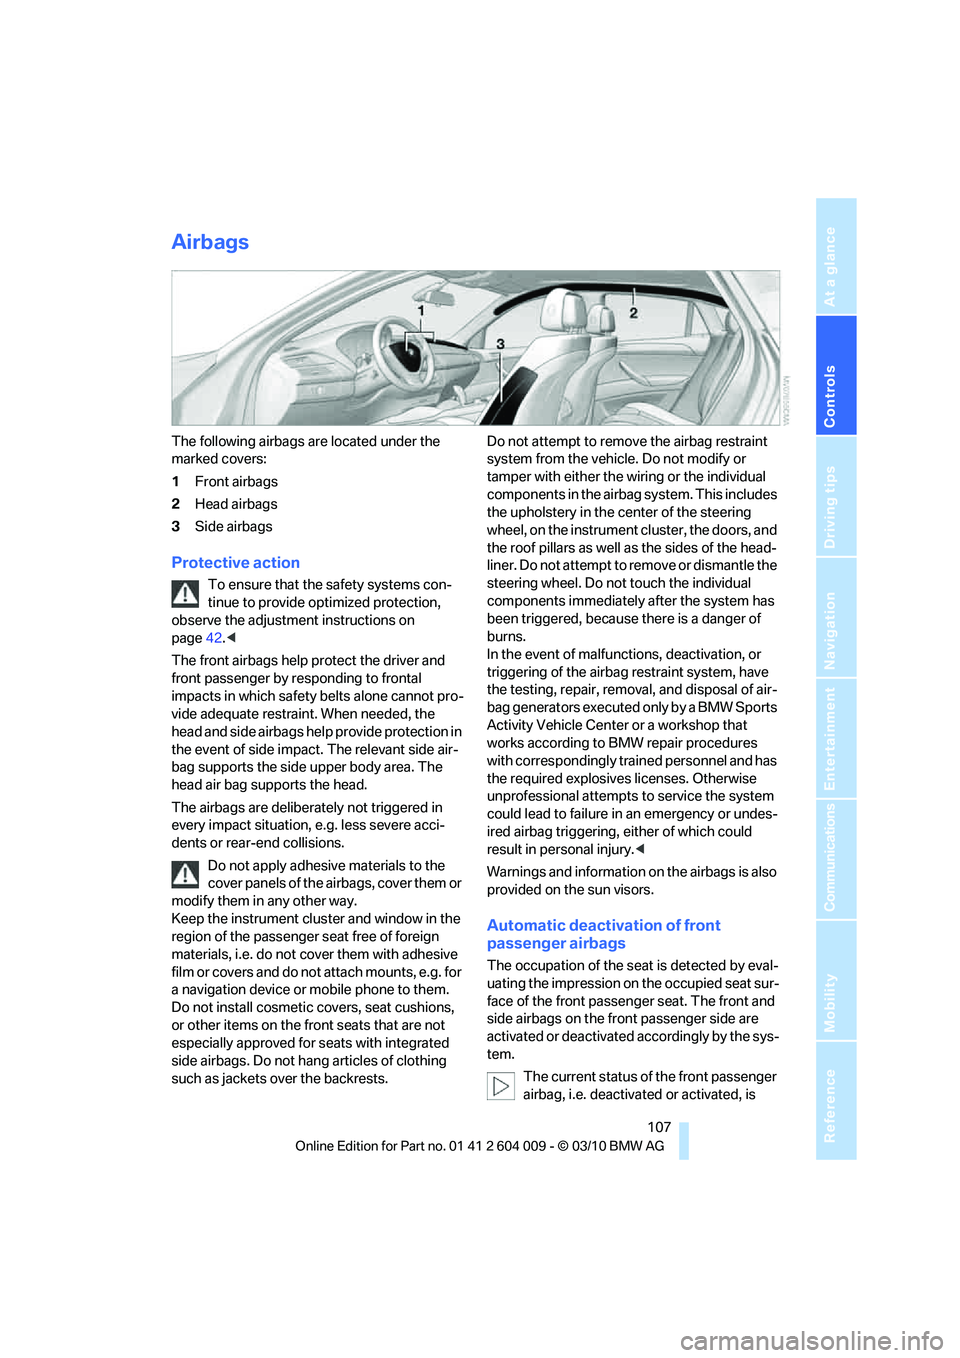
The following airbags are located under the
marked covers:
1Front airbags
2Head airbags
3Side airbags
Protective action
To ensure that the safety systems con-
tinue to provide optimized protection,
observe the adjustment instructions on
page42.<
The front airbags help protect the driver and
front passenger by responding to frontal
impacts in which safety belts alone cannot pro-
vide adequate restraint. When needed, the
head and side airbags help provide protection in
the event of side impact. The relevant side air-
bag supports the side upper body area. The
head air bag supports the head.
The airbags are deliberately not triggered in
every impact situation, e.g. less severe acci-
dents or rear-end collisions.
Do not apply adhesive materials to the
cover panels of the airbags, cover them or
modify them in any other way.
Keep the instrument cluster and window in the
region of the passenger seat free of foreign
materials, i.e. do not cover them with adhesive
film or covers and do not attach mounts, e.g. for
a navigation device or mobile phone to them.
Do not install cosmetic covers, seat cushions,
or other items on the front seats that are not
especially approved for seats with integrated
side airbags. Do not hang articles of clothing
such as jackets over the backrests.Do not attempt to remove the airbag restraint
system from the vehicle. Do not modify or
tamper with either the wiring or the individual
components in the airbag system. This includes
the upholstery in the center of the steering
wheel, on the instrument cluster, the doors, and
the roof pillars as well as the sides of the head-
liner. Do not attempt to remove or dismantle the
steering wheel. Do not touch the individual
components immediately after the system has
been triggered, because there is a danger of
burns.
In the event of malfunctions, deactivation, or
triggering of the airbag restraint system, have
the testing, repair, removal, and disposal of air-
bag generators executed only by a BMW Sports
Activity Vehicle Center or a workshop that
works according to BMW repair procedures
with correspondingly trained personnel and has
the required explosives licenses. Otherwise
unprofessional attempts to service the system
could lead to failure in an emergency or undes-
ired airbag triggering, either of which could
result in personal injury.<
Warnings and information on the airbags is also
provided on the sun visors.
Automatic deactivation of front
passenger airbags
The occupation of the seat is detected by eval-
uating the impression on the occupied seat sur-
face of the front passenger seat. The front and
side airbags on the front passenger side are
activated or deactivated accordingly by the sys-
tem.
The current status of the front passenger
airbag, i.e. deactivated or activated, is
Page 110 of 312
Technology for comfort, convenience and safety
108 indicated by the indicator lamp over the interior
rearview mirror, refer to Operating state of front
passenger airbags in the following.<
Before transporting a child on the front
passenger seat, read the safety informa-
tion and follow the instructions under Trans-
porting children safely, refer to page54.
When teenagers and adults assume certain sit-
ting positions, this can cause the front and side
airbags to deactivate. The indicator lamp for the
front passenger airbags lights up when this
occurs. In these cases, change the sitting posi-
tion so that the front passenger airbags are acti-
vated and the indicator lamp goes out. If the
desired status cannot be produced by changing
the sitting position, transport the correspond-
ing person on the rear seat. Do not fit seat cov-
ers, seat cushion padding, ball mats or other
items onto the front passenger seat unless they
are specifically recommended by BMW. Do not
lay objects under the seat which could press
against the seat from below. Otherwise a cor-
rect evaluation of the occupied seat surface
cannot be ensured.<
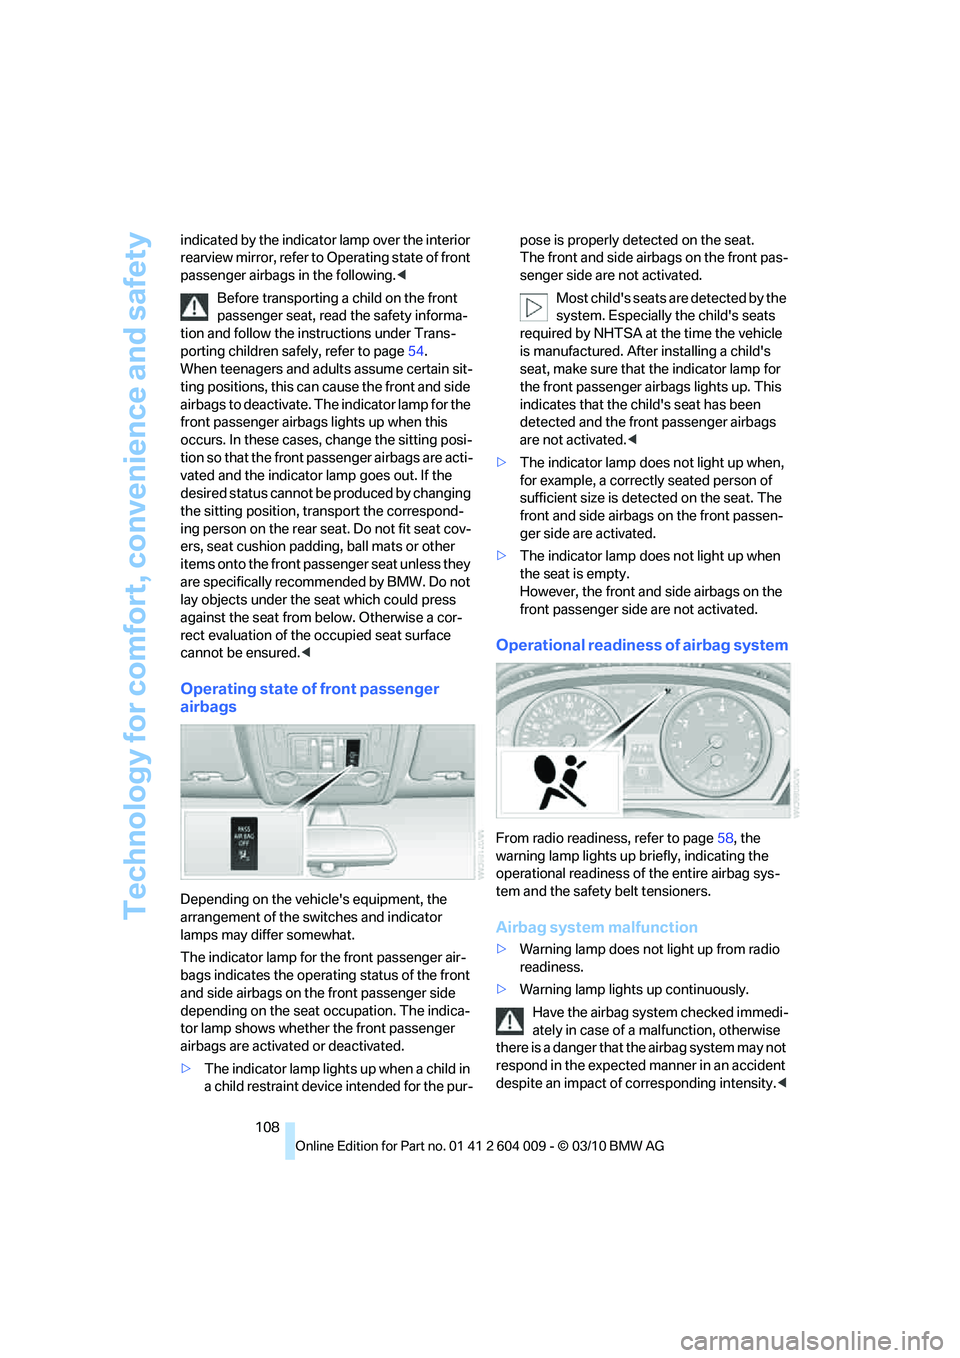
Operating state of front passenger
airbags
Depending on the vehicle's equipment, the
arrangement of the switches and indicator
lamps may differ somewhat.
The indicator lamp for the front passenger air-
bags indicates the operating status of the front
and side airbags on the front passenger side
depending on the seat occupation. The indica-
tor lamp shows whether the front passenger
airbags are activated or deactivated.
>The indicator lamp lights up when a child in
a child restraint device intended for the pur-pose is properly detected on the seat.
The front and side airbags on the front pas-
senger side are not activated.
Most child's seats are detected by the
system. Especially the child's seats
required by NHTSA at the time the vehicle
is manufactured. After installing a child's
seat, make sure that the indicator lamp for
the front passenger airbags lights up. This
indicates that the child's seat has been
detected and the front passenger airbags
are not activated.<
>The indicator lamp does not light up when,
for example, a correctly seated person of
sufficient size is detected on the seat. The
front and side airbags on the front passen-
ger side are activated.
>The indicator lamp does not light up when
the seat is empty.
However, the front and side airbags on the
front passenger side are not activated.
Operational readiness of airbag system
From radio readiness, refer to page58, the
warning lamp lights up briefly, indicating the
operational readiness of the entire airbag sys-
tem and the safety belt tensioners.
Airbag system malfunction
>Warning lamp does not light up from radio
readiness.
>Warning lamp lights up continuously.
Have the airbag system checked immedi-
ately in case of a malfunction, otherwise
there is a danger that the airbag system may not
respond in the expected manner in an accident
despite an impact of corresponding intensity.<
Page 111 of 312
Controls
109Reference
At a glance
Driving tips
Communications
Navigation
Entertainment
Mobility
Head-up Display*
The concept
With the Head-up Display important informa-
tion is projected into the driver's field of view,
e.g. navigation instructions. This enables you to
take in this information without looking away
from the road.
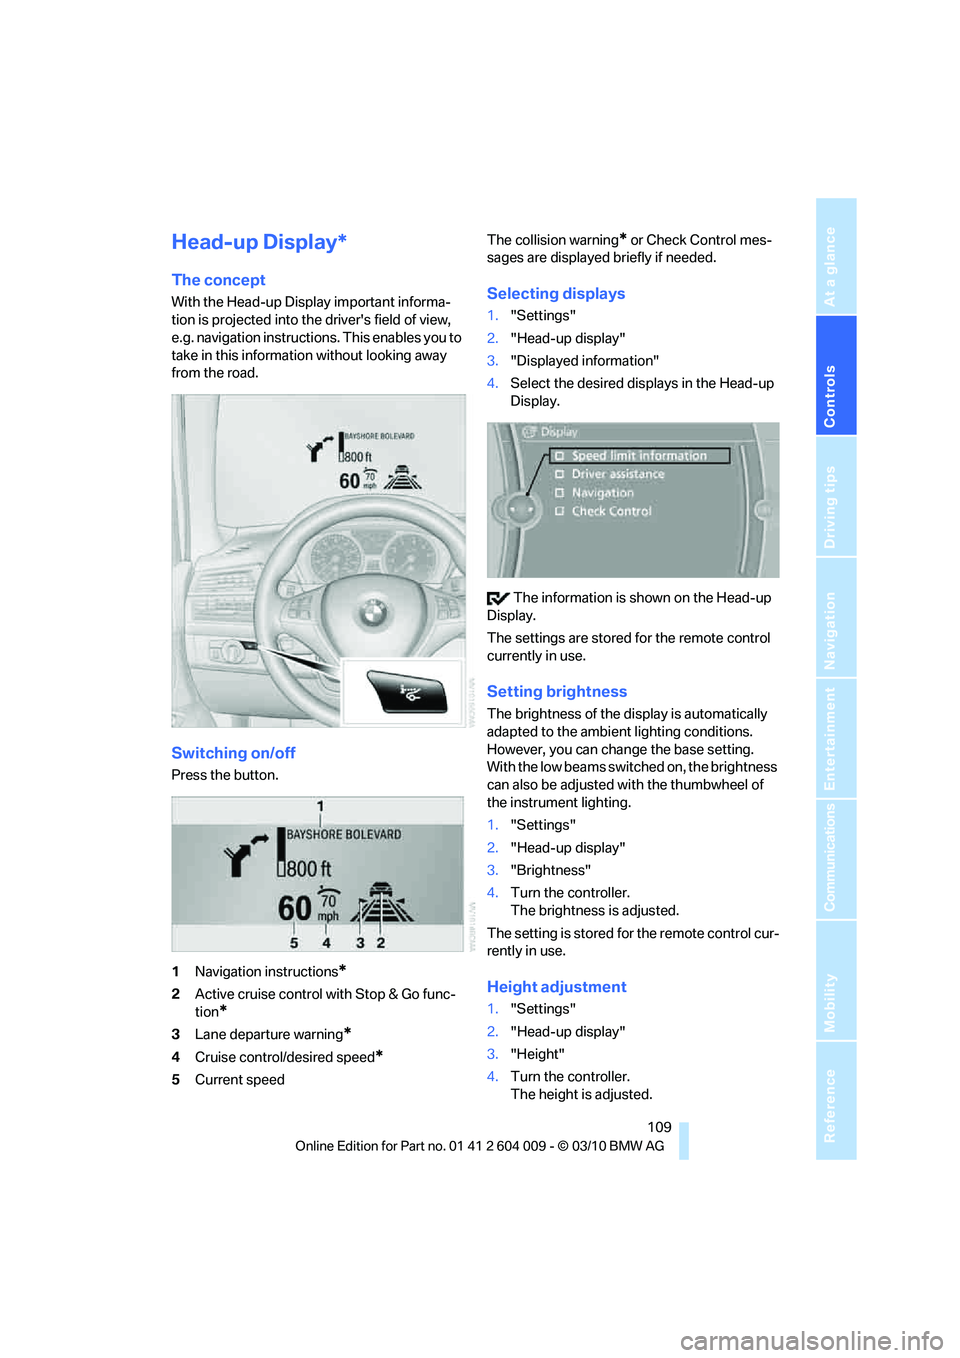
Switching on/off
Press the button.
1Navigation instructions
*
2Active cruise control with Stop & Go func-
tion
*
3Lane departure warning*
4Cruise control/desired speed*
5Current speedThe collision warning
* or Check Control mes-
sages are displayed briefly if needed.
Selecting displays
1."Settings"
2."Head-up display"
3."Displayed information"
4.Select the desired displays in the Head-up
Display.
The information is shown on the Head-up
Display.
The settings are stored for the remote control
currently in use.
Setting brightness
The brightness of the display is automatically
adapted to the ambient lighting conditions.
However, you can change the base setting.
With the low beams switched on, the brightness
can also be adjusted with the thumbwheel of
the instrument lighting.
1."Settings"
2."Head-up display"
3."Brightness"
4.Turn the controller.
The brightness is adjusted.
The setting is stored for the remote control cur-
rently in use.
Height adjustment
1."Settings"
2."Head-up display"
3."Height"
4.Turn the controller.
The height is adjusted.
Page 135 of 312
Controls
133Reference
At a glance
Driving tips
Communications
Navigation
Entertainment
Mobility
Reach into the recess and pull toward the front.
When you fold back the backrest, be sure
that the catch engages securely. The red
warning indicator disappears in the recess
when the catch is engaged. If it is not properly
engaged, transported cargo could enter the
passenger compartment during braking or eva-
sive maneuvers and endanger the vehicle occu-
pants.<
To ensure that the safety systems con-
tinue to provide optimized protection,
observe the safety belt information on
page42.<
Storage compartments in
cargo area
Depending on the vehicle's equipment, the fol-
lowing storage compartments are provided in
the cargo area.
>Storage compartments behind the remov-
able side panels on the right and left side of
the cargo area
* and under the floor panel
flap, storage compartment
* right side of
cargo area.
>Storage tray
* under the floor panel flap,
capacity approx. 21 gal/80 liters.
>Retaining straps
* on the left and right side
panel for securing small objects.
>Lashing rail with lashing eyes
*. You can
secure heavy-duty cargo straps on the lash-
ing eyes.
They can be removed at the notches in the
rails. To move the lashing eyes, press the
button.Read and comply with the information
enclosed with the heavy-duty cargo
straps.<
Floor panel flap
To access the onboard vehicle tool kit etc.
To open, swing up the flap by the handle, refer
to arrow.
The floor panel flap can be locked
*.
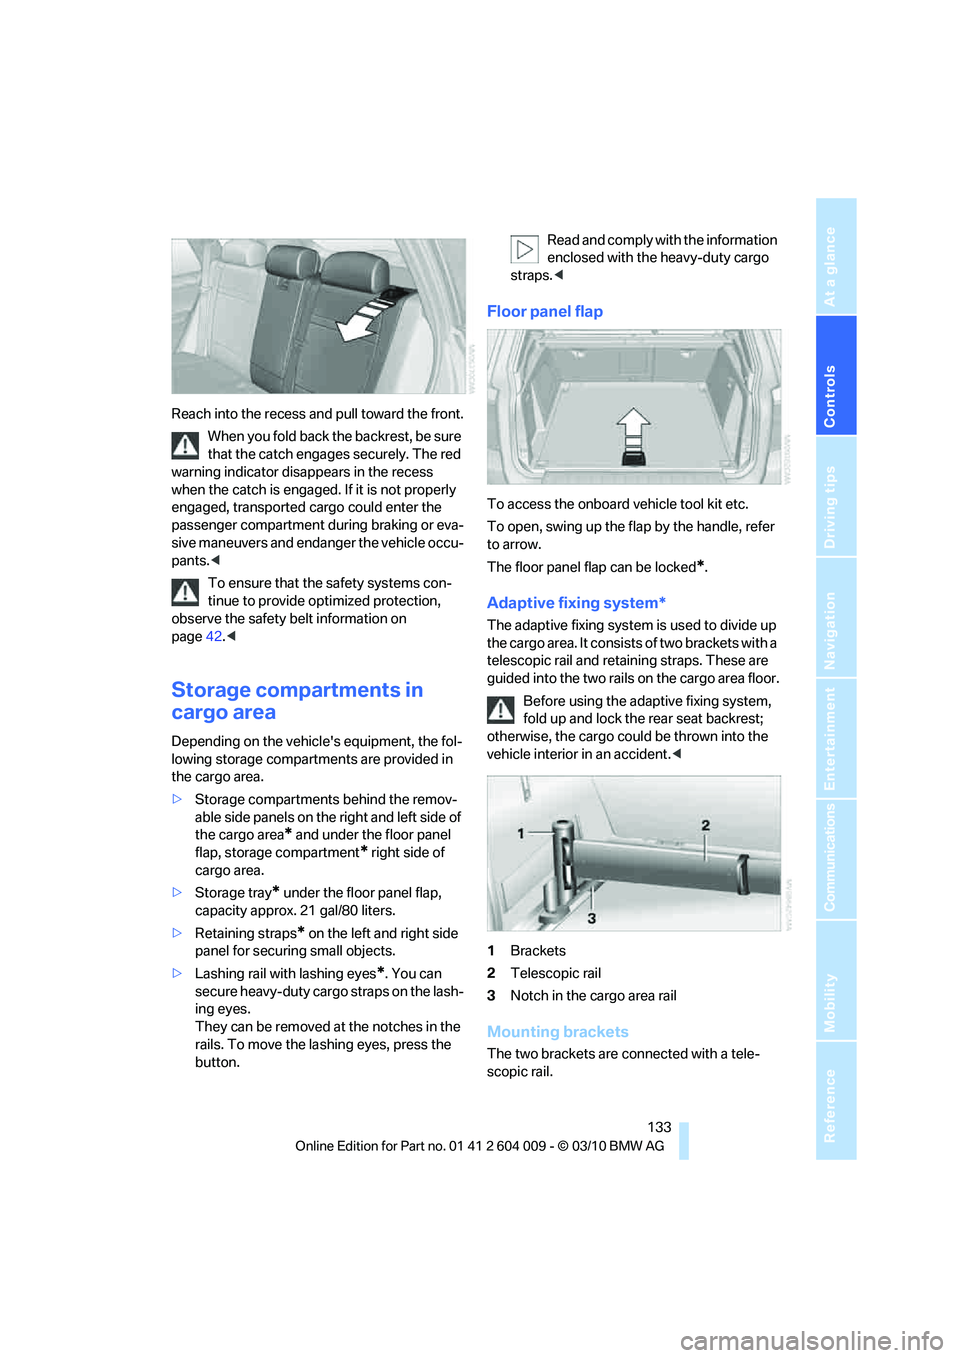
Adaptive fixing system*
The adaptive fixing system is used to divide up
the cargo area. It consists of two brackets with a
telescopic rail and retaining straps. These are
guided into the two rails on the cargo area floor.
Before using the adaptive fixing system,
fold up and lock the rear seat backrest;
otherwise, the cargo could be thrown into the
vehicle interior in an accident.<
1Brackets
2Telescopic rail
3Notch in the cargo area rail
Mounting brackets
The two brackets are connected with a tele-
scopic rail.
Page 238 of 312
Refueling
236 Do not mix in any additives or gasoline;
otherwise, there is the risk of engine dam-
age.<
BMW X5 with BMW Advanced
Diesel
The concept
BMW Advanced Diesel reduces nitrogen oxides
in the diesel exhaust of your vehicle by injecting
the reducing agent diesel exhaust fluid into the
exhaust line. In the catalytic converter, a chem-
ical reaction occurs that minimizes nitrogen
oxides.
In order to be able to start the engine in the
usual way, there must be a sufficient supply of
diesel exhaust fluid in the separate reservoir.
System heating
In order to bring the system to operating tem-
perature after a cold start of the engine, the
automatic transmission shifts into the next
higher gear at a later point.
Reserve display
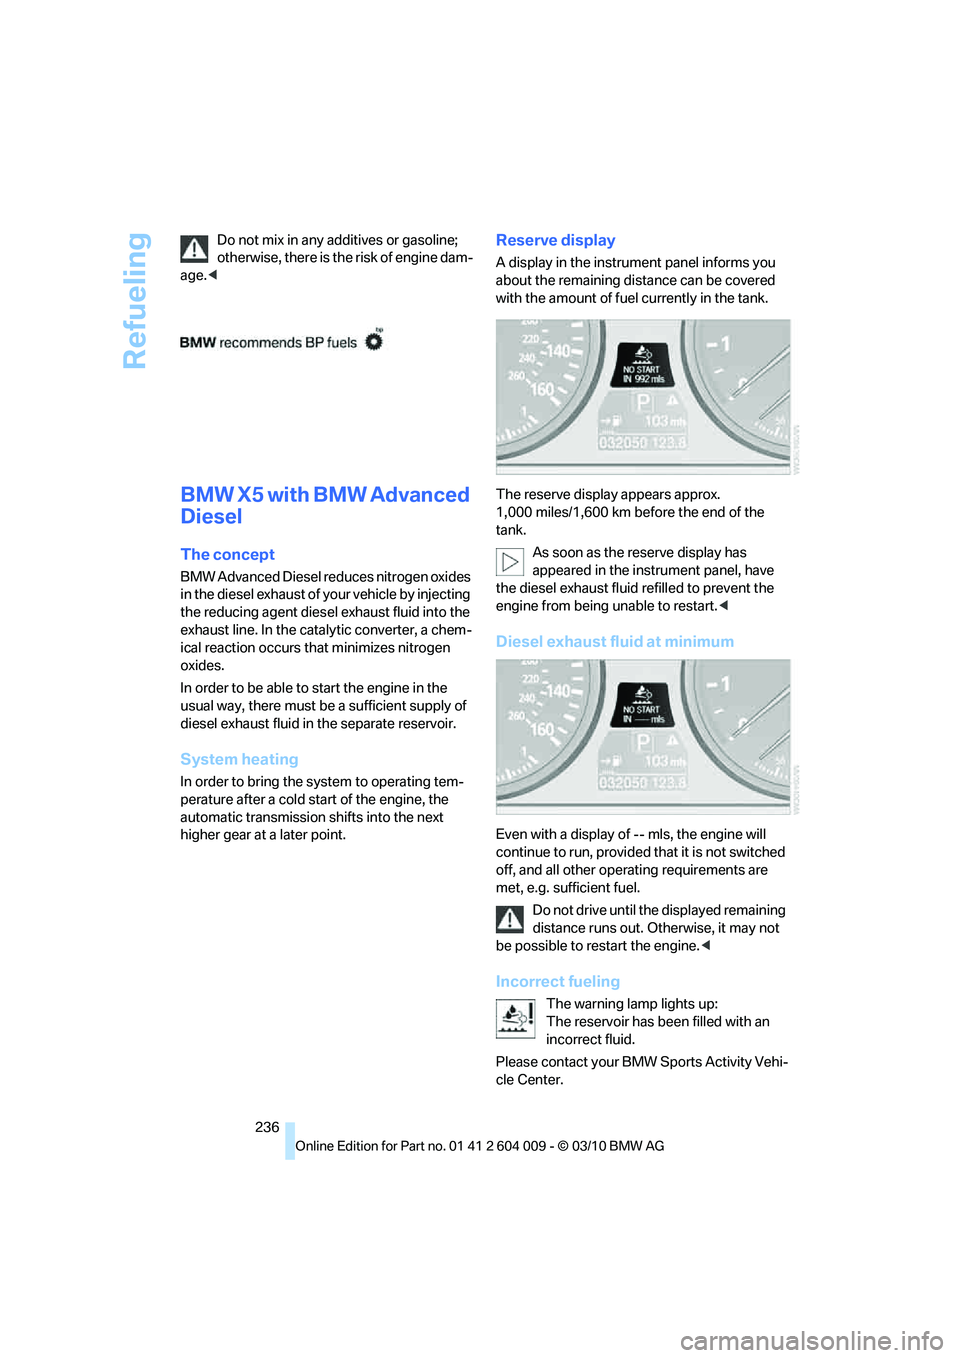
A display in the instrument panel informs you
about the remaining distance can be covered
with the amount of fuel currently in the tank.
The reserve display appears approx.
1,000 miles/1,600 km before the end of the
tank.
As soon as the reserve display has
appeared in the instrument panel, have
the diesel exhaust fluid refilled to prevent the
engine from being unable to restart.<
Diesel exhaust fluid at minimum
Even with a display of -- mls, the engine will
continue to run, provided that it is not switched
off, and all other operating requirements are
met, e.g. sufficient fuel.
Do not drive until the displayed remaining
distance runs out. Otherwise, it may not
be possible to restart the engine.<
Incorrect fueling
The warning lamp lights up:
The reservoir has been filled with an
incorrect fluid.
Please contact your BMW Sports Activity Vehi-
cle Center.
Page 239 of 312
Mobility
237Reference
At a glance
Controls
Driving tips
Communications
Navigation
Entertainment
Have diesel exhaust fluid refilled
Your BMW Sports Activity Vehicle Center refills
the diesel exhaust fluid as part of the regular
maintenance. If you adhere to this maintenance
schedule, it is usually not necessary to refill any
fluids between the maintenance dates.
Under certain circumstances, e.g. due to a par-
ticularly sporty driving style or operation of the
vehicle at high altitudes, it may be necessary to
refill fluids between maintenance dates.
As soon as the reserve display has appeared in
the instrument panel, have the diesel exhaust
fluid refilled to prevent the engine from being
unable to restart.
You can have the fluid refilled by a BMW Sports
Activity Vehicle Center.
Diesel exhaust fluid at low
temperatures
Due to its physical properties, it may be
necessary to replenish the level of diesel
exhaust fluid at temperatures below +237/
-56 even between the regular maintenance
intervals.
If the fluid needs to be refilled, this will be indi-
cated with the reserve display in the instrument
panel, refer to page236.<
Only refill the diesel exhaust fluid
yourself in exceptional circumstances
In order to get your vehicle to reach the nearest
BMW Sports Activity Vehicle Center, you may
refill the diesel exhaust fluid yourself, making
sure to heed the warning notices.
Do not allow diesel exhaust fluid to come
into contact with you. This can lead to
skin and eye irritation. Wear protective goggles
and gloves as needed. Follow the safety
instructions on the bottle.
When opening the bottle or reservoir, pungent
smelling vapors can escape. Before refilling,
close the vehicle completely so that the vapors
do not get into the interior of the vehicle. When
handling diesel exhaust fluid in enclosed
spaces, make sure to have sufficient ventilation.
After handling diesel exhaust fluid, wash hands
thoroughly. Failure to do so may lead to irrita-tion, e.g. due to inadvertent contact with the
eyes.
If eye irritation occurs, immediately rinse eyes
with ample water and contact a doctor if neces-
sary.
If diesel exhaust fluid comes into contact with
surfaces of your vehicle, rinse the affected sur-
faces with water or else damage may occur.
Keep diesel exhaust fluid out of reach of chil-
dren.<
Suitable diesel exhaust fluid
>Preferred: BMW Diesel Exhaust Fluid.
This bottle and its special adapter permit
convenient refilling with diesel exhaust
fluid.
>Alternative: NOx reduction agent AUS 32
You can get diesel exhaust fluid at your BMW
Sports Activity Vehicle Center.
Refilling quantity
Refilling quantity at the start of the reserve dis-
play: approx. 0.75 gallons/2.7 liters
Open reservoir for diesel exhaust fluid
1.Open hood, refer to page251.
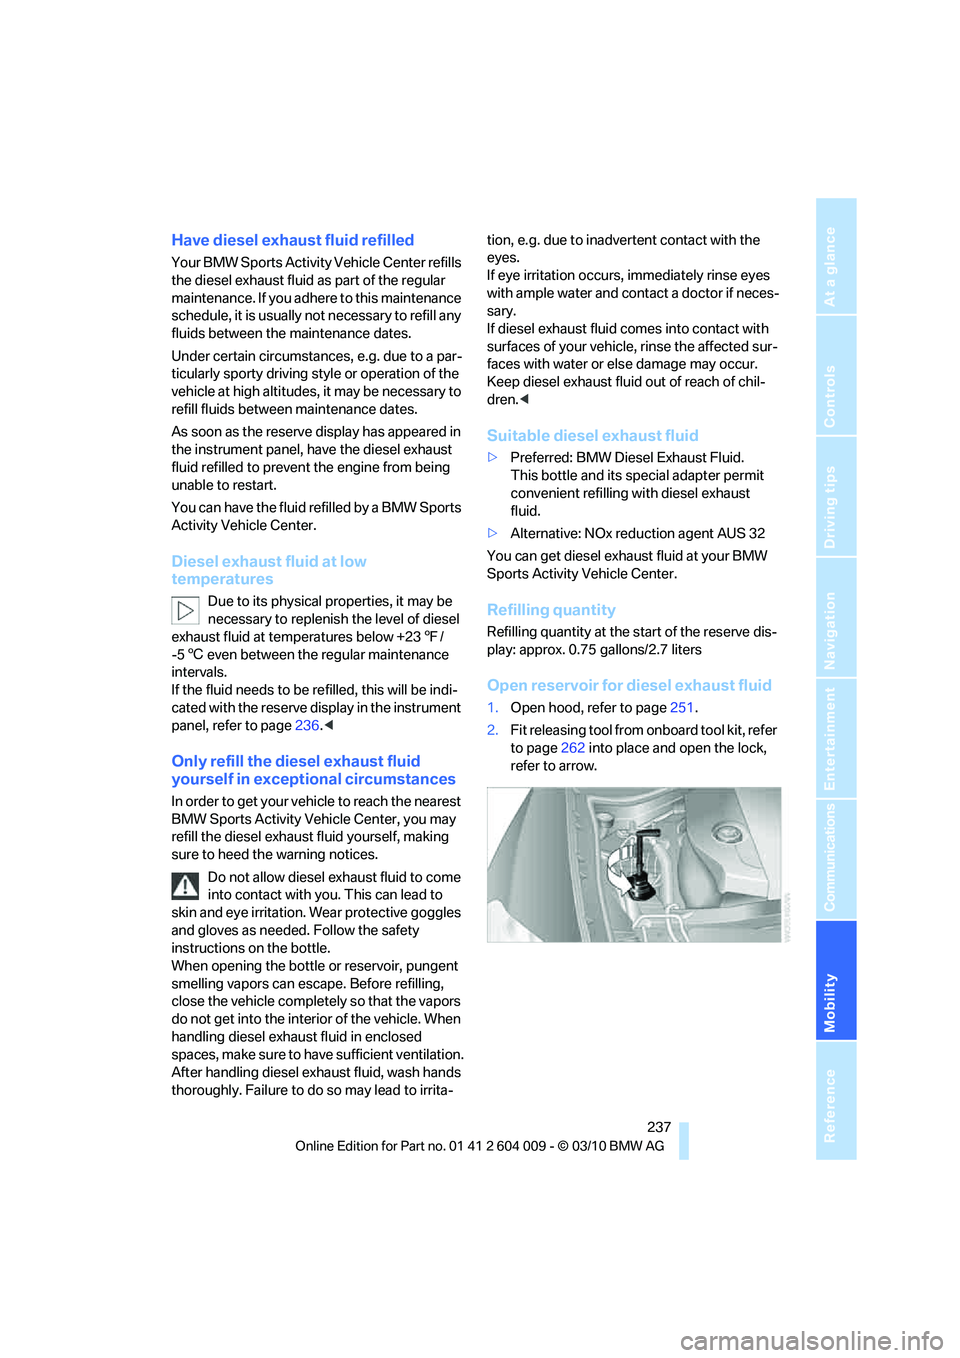
2.Fit releasing tool from onboard tool kit, refer
to page262 into place and open the lock,
refer to arrow.
Page 256 of 312

Under the hood
254 3."Engine oil level"
Possible messages
>"Engine oil level OK"
>"Measuring engine oil level...":
This can take about 3 minutes if the car is at
a standstill on a level surface and the engine
is running, and about 5 minutes while the
car is moving.
>"Engine oil level below minimum. Add 1
quart!":
Add 1 US quart/liter of engine oil at the next
opportunity.
If the oil level displayed is below mini-
mum, add engine oil immediately.
Failure to do so may lead to engine dam-
age.<
>"Engine oil level too high! Have this
checked.":
Have the vehicle checked immedi-
ately, otherwise engine damage may
result if too much oil has been added.<
>"Measurement inactive. Have this
checked.":
Do not add engine oil. Before continuing to
drive, note the recalculated remaining mile-
age until the next oil change service, refer to
Service requirements on page79. Have the
system checked as soon as possible.
Adding engine oil
BMW X5
BMW X6
Do not add 1 US quart/liter of oil until a corre-
sponding message is shown on the Control Dis-
play.
Add oil within the next 125 miles/200 km,
otherwise the engine could be dam-
aged.<
Continuous exposure to used oil has
caused cancer in laboratory testing.
For this reason, any skin areas that come into
contact with oil should be thoroughly washed
with soap and water.
Keep oil, grease etc. out of reach of children and
observe the warnings on the containers to pre-
vent health risks.<
Oil change
Only have an oil change carried out by a BMW
Sports Activity Vehicle Center or a workshop
that works in accordance with BMW guidelines
and uses appropriately trained personnel.
Oil grades
Do not use oil additives as these may
cause engine damage.<
Page 259 of 312

Mobility
257Reference
At a glance
Controls
Driving tips
Communications
Navigation
Entertainment
Socket for OBD Onboard
Diagnostics interface
The chief components that make up the emis-
sions content can be checked by a device that
uses the OBD socket.
This socket is located to the left on the driver's
side, on the underside of the instrument cluster
under a cover.
Emissions
The warning lamp lights up:
The vehicle is producing higher emis-
sions. Continued driving is possible.
Have the vehicle checked as soon as possible.
The lamp flashes under certain conditions. This
is a sign of excessive misfiring of the engine. In
this case, you should reduce your speed and
proceed to the nearest BMW Sports Activity
Vehicle Center. Heavy engine misfiring causes
serious damage to the emission-relevant com-
ponents, especially the catalytic converter,
within a short time.
The warning lamp lights up if the fuel
cap has not been properly tightened
and the OBD system detects the
escape of fuel vapors. Check that the fuel cap is
correctly seated and tighten it until you hear a
clearly audible click.
Data memory
Your vehicle records data on vehicle operation,
malfunctions and user settings. These data are
stored in the vehicle and in part in the remote
control and can be read out by suitable devices
during service, for example. The read data are
used to assist in servicing and repairing your
vehicle or for the optimization and continued development of vehicle functions. In addition, if
you signed a service contract for Assist, certain
vehicle data can be sent directly from the vehi-
cle to facilitate the desired services.