2011 BMW ACTIVEHYBRID X6 remote start
[x] Cancel search: remote startPage 97 of 312
Controls
95Reference
At a glance
Driving tips
Communications
Navigation
Entertainment
Mobility
Three-dimensionally-shaped markings are dis-
played.
Image on the Control Display
Switching on the rear view camera
using iDrive
With PDC activated:
1.Select the "Rear view camera" symbol.
2.Press the controller.
The image of the rear view camera is displayed.
The setting is stored for the remote control cur-
rently in use.
Brightness
With the rear view camera switched on:
1.Select the symbol.
2.Turn the controller until the desired setting
is displayed and then press the controller.
Contrast
With the rear view camera switched on:
1.Select the symbol.
2.Turn the controller until the desired setting
is displayed and then press the controller.
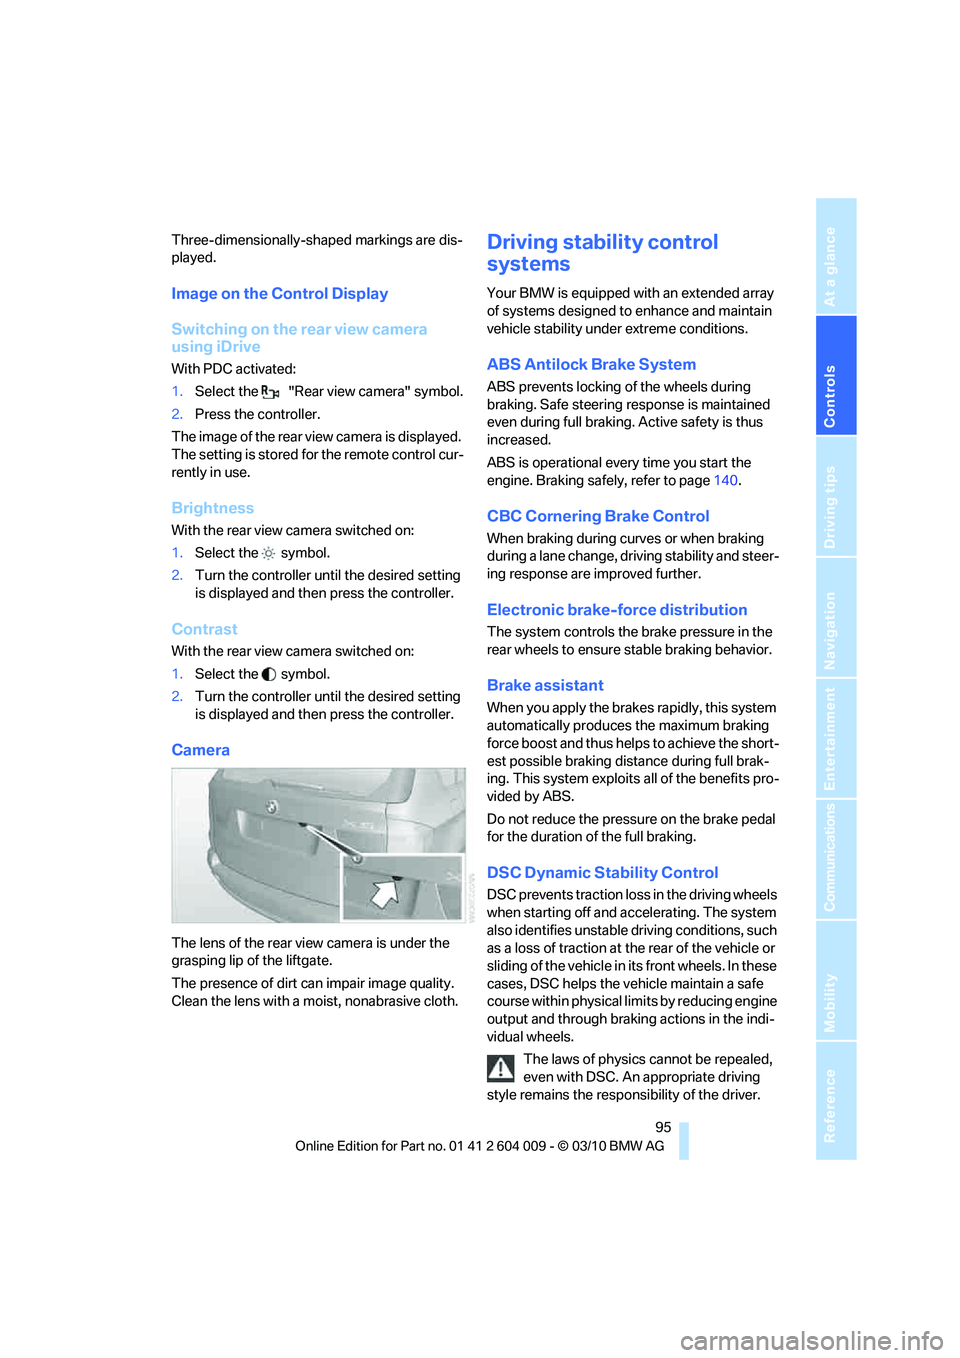
Camera
The lens of the rear view camera is under the
grasping lip of the liftgate.
The presence of dirt can impair image quality.
Clean the lens with a moist, nonabrasive cloth.
Driving stability control
systems
Your BMW is equipped with an extended array
of systems designed to enhance and maintain
vehicle stability under extreme conditions.
ABS Antilock Brake System
ABS prevents locking of the wheels during
braking. Safe steering response is maintained
even during full braking. Active safety is thus
increased.
ABS is operational every time you start the
engine. Braking safely, refer to page140.
CBC Cornering Brake Control
When braking during curves or when braking
during a lane change, driving stability and steer-
ing response are improved further.
Electronic brake-force distribution
The system controls the brake pressure in the
rear wheels to ensure stable braking behavior.
Brake assistant
When you apply the brakes rapidly, this system
automatically produces the maximum braking
force boost and thus helps to achieve the short-
est possible braking distance during full brak-
ing. This system exploits all of the benefits pro-
vided by ABS.
Do not reduce the pressure on the brake pedal
for the duration of the full braking.
DSC Dynamic Stability Control
DSC prevents traction loss in the driving wheels
when starting off and accelerating. The system
also identifies unstable driving conditions, such
as a loss of traction at the rear of the vehicle or
sliding of the vehicle in its front wheels. In these
cases, DSC helps the vehicle maintain a safe
course within physical limits by reducing engine
output and through braking actions in the indi-
vidual wheels.
The laws of physics cannot be repealed,
even with DSC. An appropriate driving
style remains the responsibility of the driver.
Page 101 of 312

Controls
99Reference
At a glance
Driving tips
Communications
Navigation
Entertainment
Mobility
reduces the steering angle requirement,
improves the running comfort and increases
the dynamic driving characteristics of your
BMW.
Chassis and suspension tuning
You can choose between two types of chassis
and suspension tuning.
>Normal:
The comfortable basic setting offers opti-
mum comfort when traveling.
>Sport:
The sporty basic setting offers increased
driving agility.
Selecting chassis and suspension
tuning
Press the button.
The system switches between the two chassis
and suspension tuning settings.
>Sport:
The LED in the button lights up and SPORT
is displayed in the instrument panel.
>Normal:
The LED in the button goes out.
The selection of the chassis and suspension
tuning setting is stored for the remote control
currently in use.
Drive-off assistant
The drive-off assistant enables you to start off
conveniently on slopes. The parking brake is
not required for this purpose.1.Hold the vehicle with the brake pedal.
2.Release the brake pedal and immediately
drive off quickly.
The drive-off assistant holds the vehicle
for approx. 2 seconds after releasing the
brake pedal. Depending on the load, the vehicle
may also roll back slightly during this time.
After releasing the brake pedal, immediately
start quickly, otherwise the drive-off assistant
no longer holds the vehicle after approx.
2 seconds and it begins to roll back.<
Self-leveling suspension*
The concept
The self-leveling suspension on the rear axle
assures a continuous ground clearance.
To do so, the height of the vehicle is measured
by sensors at both rear wheels.
If the actual height deviates from the defined
height, e.g. due to loading of the vehicle, then
this difference is compensated for very quickly.
In addition, spring motions resulting from cor-
nering or irregularities in the road surface are
reduced to a minimum.
The system functions automatically.
Malfunctions
Malfunctions are displayed via Check Control,
refer to page82.
FTM Flat Tire Monitor*
The concept
The system does not measure the actual infla-
tion pressure in the tires.
The system detects a pressure loss in a tire by
comparing the rotational speeds of the individ-
ual wheels while moving.
In the event of a pressure loss, the diameter and
therefore the rotational speed of the corre-
sponding wheel change. This is detected and
reported as a flat tire.
Page 106 of 312

Technology for comfort, convenience and safety
104 possible, and inflate them to the proper pres-
sure. Driving on a significantly underinflated tire
causes the tire to overheat and can lead to tire
failure. Underinflation also reduces fuel effi-
ciency and tire tread life, and may affect the
vehicle's handling and stopping ability.
Please note that the TPMS is not a substitute
for proper tire maintenance, and it is the driver's
responsibility to maintain correct tire pressure,
even if underinflation has not reached the level
to trigger illumination of the TPMS low tire
pressure telltale.
Your vehicle has also been equipped with a
TPMS malfunction indicator to indicate when
the system is not operating properly. The
TPMS malfunction indicator is combined with
the low tire pressure telltale. When the system
detects a malfunction, the telltale will flash for
approximately one minute and then remain con-
tinuously illuminated. This sequence will con-
tinue upon subsequent vehicle startups as long
as the malfunction exists. When the malfunc-
tion indicator is illuminated, the system may not
be able to detect or signal low tire pressure as
intended. TPMS malfunctions may occur for a
variety of reasons, including the installation of
replacement or alternate tires or wheels on the
vehicle that prevent the TPMS from functioning
properly. Always check the TPMS malfunction
telltale after replacing one or more tires or
wheels on your vehicle to ensure that the
replacement or alternate tires and wheels allow
the TPMS to continue to function properly.
Lane departure warning*
The concept
On roads with lane markings, this system warns
you at speeds exceeding approx. 40 mph/
65 km/h when the vehicle is about to leave the
lane.
The steering wheel begins vibrating lightly.
The system does not issue a warning if the turn
signal is set before leaving the lane.
Switching on/off
Press button 1 on the steering wheel.
>On: lane markings 2 light up.
>Off: lane markings 2 go out.
The system can issue warnings at speeds
exceeding approx. 40 mph/65 km/h.
The state is stored for the remote control cur-
rently in use.
Display
1The system is activated.
2Arrows: at least one lane marking was
detected and warnings can be issued.
Issuing a warning
If the vehicle begins leaving the lane and a lane
marking has been detected, the steering wheel
begins vibrating.
If the turn signal is set before the lane is
changed, a warning is not issued.
Canceling a warning
The warning is canceled:
>Automatically after approx. 3 seconds.
>After the vehicle returns to its lane.
>During heavy brake application.
Page 126 of 312
Practical interior accessories
124
Practical interior accessories
Integrated universal remote
control*
The concept
The integrated universal remote control can
replace as many as three hand-held transmit-
ters for various remote-controlled accessories,
such as garage and gate or lighting systems.
The integrated universal remote control regis-
ters and stores signals from the original hand-
held transmitters.
The signal of an original hand-held transmitter
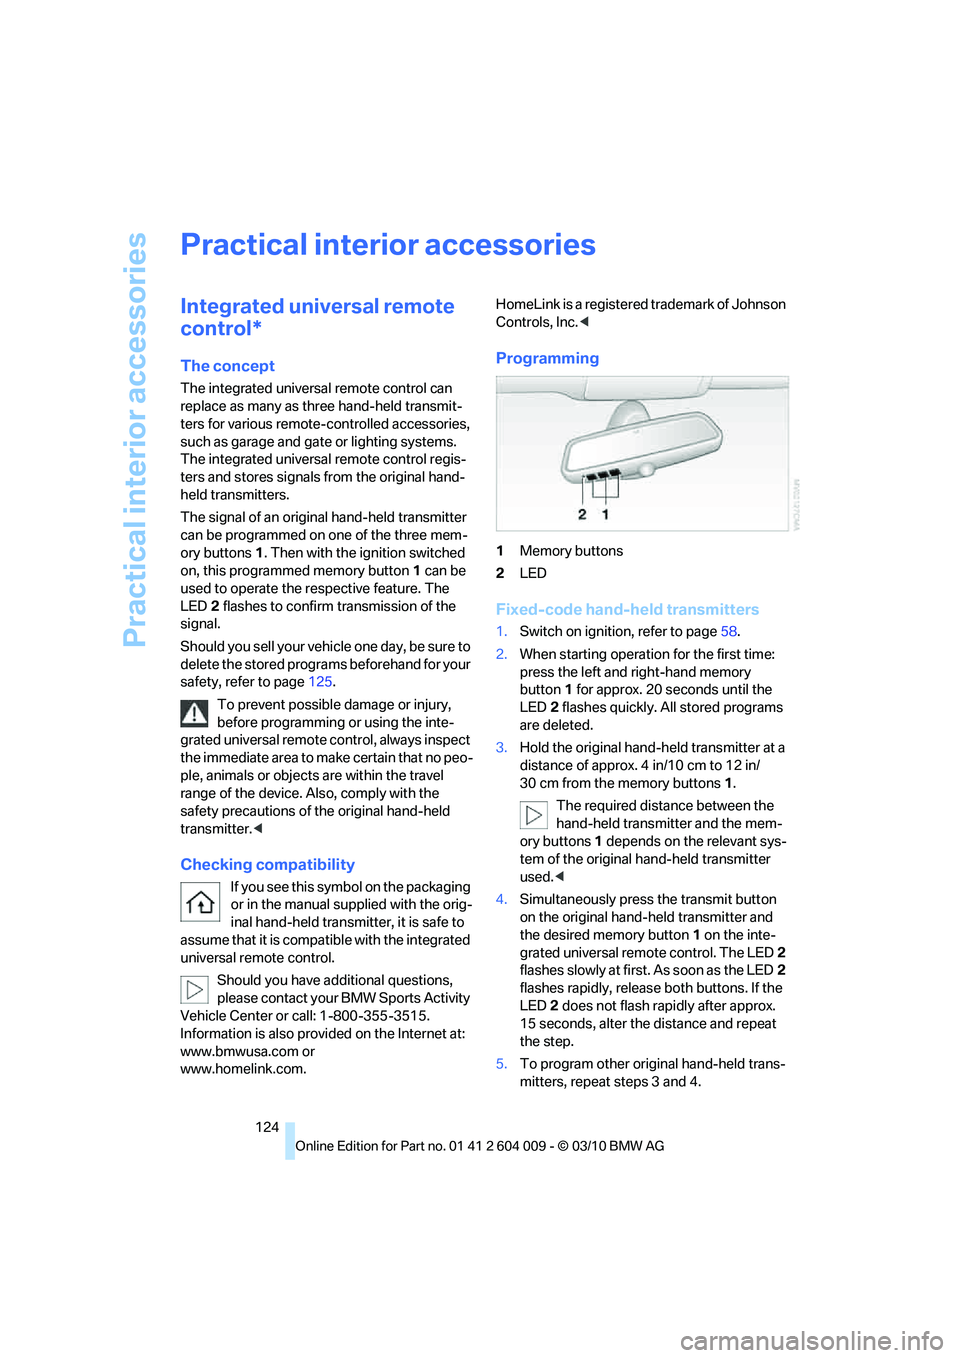
can be programmed on one of the three mem-
ory buttons1. Then with the ignition switched
on, this programmed memory button1 can be
used to operate the respective feature. The
LED2 flashes to confirm transmission of the
signal.
Should you sell your vehicle one day, be sure to
delete the stored programs beforehand for your
safety, refer to page125.
To prevent possible damage or injury,
before programming or using the inte-
grated universal remote control, always inspect
the immediate area to make certain that no peo-
ple, animals or objects are within the travel
range of the device. Also, comply with the
safety precautions of the original hand-held
transmitter.<
Checking compatibility
If you see this symbol on the packaging
or in the manual supplied with the orig-
inal hand-held transmitter, it is safe to
assume that it is compatible with the integrated
universal remote control.
Should you have additional questions,
please contact your BMW Sports Activity
Vehicle Center or call: 1-800-355-3515.
Information is also provided on the Internet at:
www.bmwusa.com or
www.homelink.com.HomeLink is a registered trademark of Johnson
Controls, Inc.<
Programming
1Memory buttons
2LED
Fixed-code hand-held transmitters
1.Switch on ignition, refer to page58.
2.When starting operation for the first time:
press the left and right-hand memory
button1 for approx. 20 seconds until the
LED2 flashes quickly. All stored programs
are deleted.
3.Hold the original hand-held transmitter at a
distance of approx. 4 in/10 cm to 12 in/
30 cm from the memory buttons1.
The required distance between the
hand-held transmitter and the mem-
ory buttons1 depends on the relevant sys-
tem of the original hand-held transmitter
used.<
4.Simultaneously press the transmit button
on the original hand-held transmitter and
the desired memory button1 on the inte-
grated universal remote control. The LED 2
flashes slowly at first. As soon as the LED2
flashes rapidly, release both buttons. If the
LED2 does not flash rapidly after approx.
15 seconds, alter the distance and repeat
the step.
5.To program other original hand-held trans-
mitters, repeat steps 3 and 4.
Page 160 of 312
Destination guidance
158
Destination guidance
Starting destination
guidance
1."Navigation"
2."Enter address"
3.Select the destination.
4."Accept destination"
5."Start guidance"
The route is displayed on the Control Display
after it is calculated.
The distance to the destination/intermediate
destination and the estimated time of arrival are
displayed in the map view.
Terminating destination
guidance
1."Navigation"
2."Map"
3.Select the symbol.
4."Stop guidance"
Continuing destination
guidance
If the destination was not reached during the
last trip, destination guidance can be resumed.
"Resume guidance"
Route criteria
General information
You can influence the calculated route by
choosing certain route criteria. You can change
the route criteria as often as you like while
entering the destination and whenever the des-
tination guidance is active.
The route is planned according to fixed rules.
The road type is taken into account, e.g. whether it is a highway or a winding road. As a
result, the routes recommended by the naviga-
tion system may not always be the same ones
that you would choose based on personal expe-
rience.
The settings are stored for the remote control
currently in use.
Changing route criteria
1."Navigation"
2."Map"
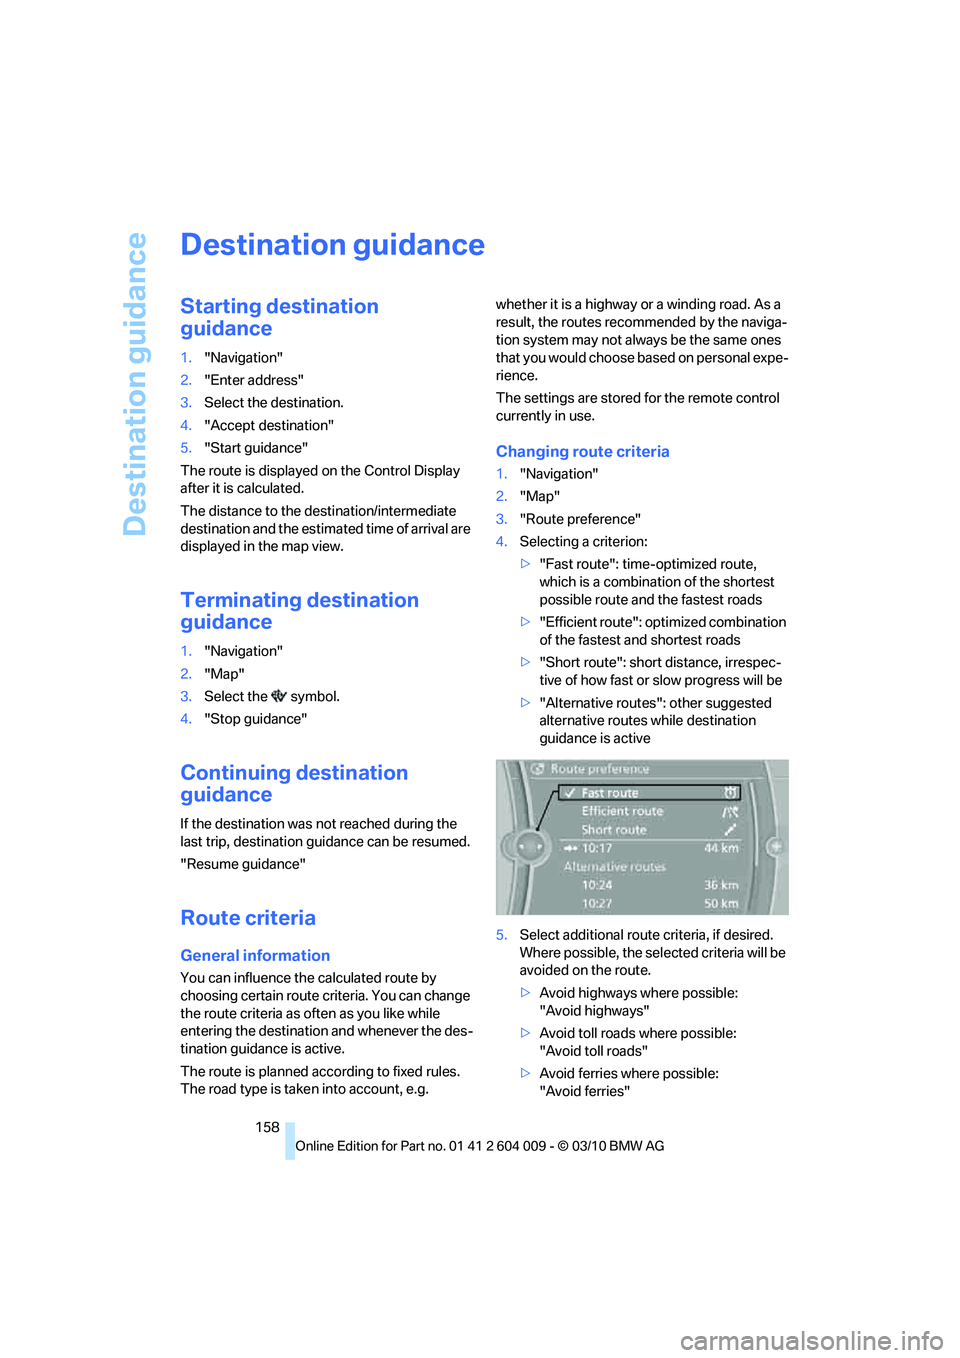
3."Route preference"
4.Selecting a criterion:
>"Fast route": time-optimized route,
which is a combination of the shortest
possible route and the fastest roads
>"Efficient route": optimized combination
of the fastest and shortest roads
>"Short route": short distance, irrespec-
tive of how fast or slow progress will be
>"Alternative routes": other suggested
alternative routes while destination
guidance is active
5.Select additional route criteria, if desired.
Where possible, the selected criteria will be
avoided on the route.
>Avoid highways where possible:
"Avoid highways"
>Avoid toll roads where possible:
"Avoid toll roads"
>Avoid ferries where possible:
"Avoid ferries"
Page 162 of 312
Destination guidance
160
Destination guidance via
voice instructions
Switching voice instructions on/off
Voice instructions can be switched on or off
during destination guidance.
1."Navigation"
2."Map"
3.Select the symbol.
For rapid access, the feature can be stored on a
programmable memory button, refer to
page20.
Repeating a voice instruction
1."Navigation"
2."Map"
3. Highlight the symbol.
4.Press the controller twice.
Adjusting the volume of voice
instructions*
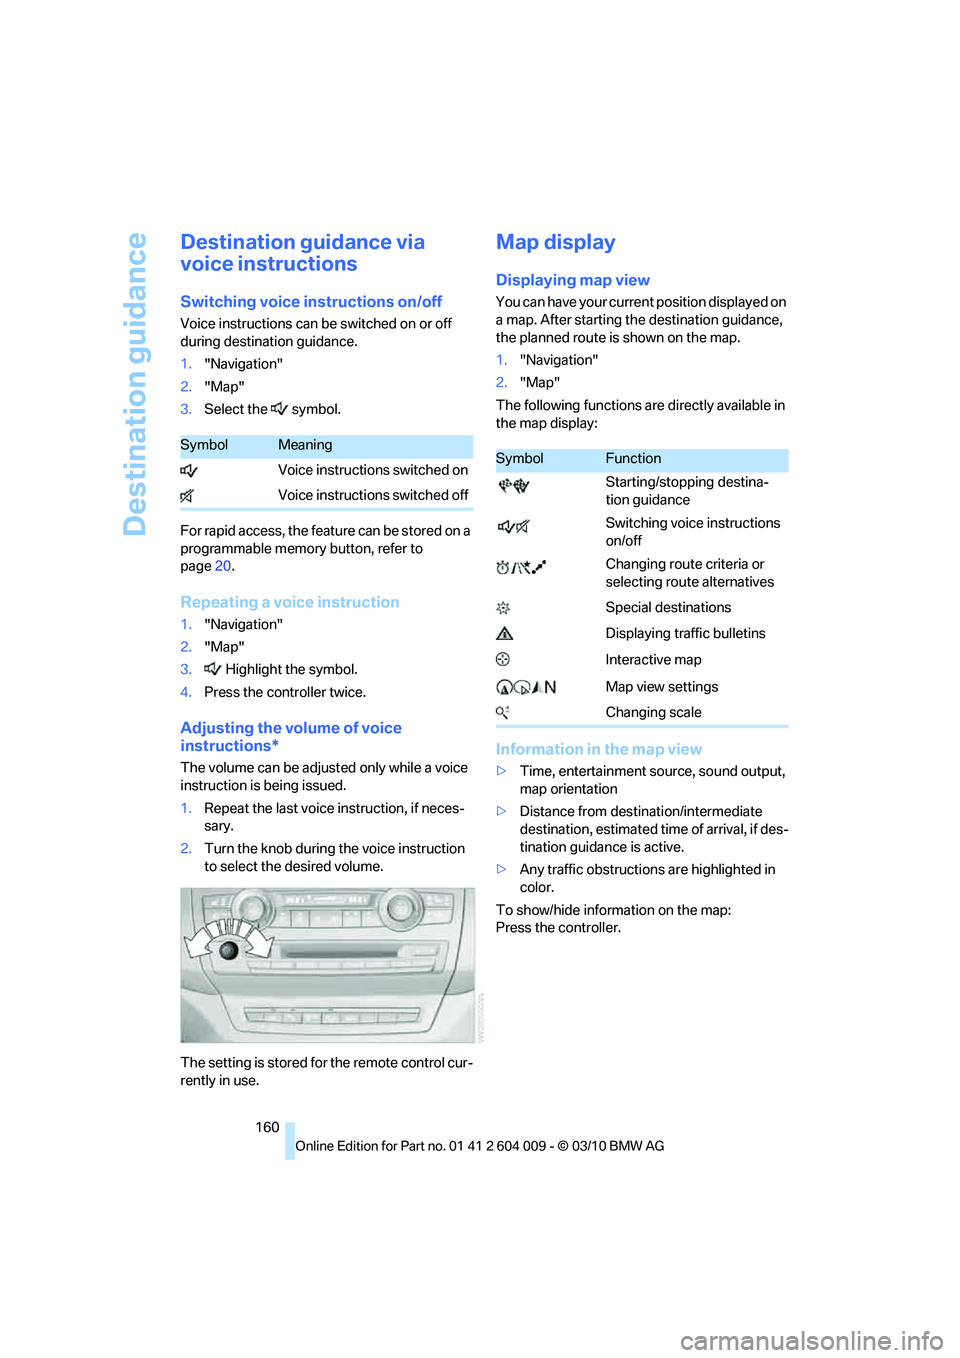
The volume can be adjusted only while a voice
instruction is being issued.
1.Repeat the last voice instruction, if neces-
sary.
2.Turn the knob during the voice instruction
to select the desired volume.
The setting is stored for the remote control cur-
rently in use.
Map display
Displaying map view
You can have your current position displayed on
a map. After starting the destination guidance,
the planned route is shown on the map.
1."Navigation"
2."Map"
The following functions are directly available in
the map display:
Information in the map view
>Time, entertainment source, sound output,
map orientation
>Distance from destination/intermediate
destination, estimated time of arrival, if des-
tination guidance is active.
>Any traffic obstructions are highlighted in
color.
To show/hide information on the map:
Press the controller.
SymbolMeaning
Voice instructions switched on
Voice instructions switched offSymbolFunction
Starting/stopping destina-
tion guidance
Switching voice instructions
on/off
Changing route criteria or
selecting route alternatives
Special destinations
Displaying traffic bulletins
Interactive map
Map view settings
Changing scale
Page 199 of 312
Navigation
Entertainment
Driving tips
197Reference
At a glance
Controls
Communications
Mobility
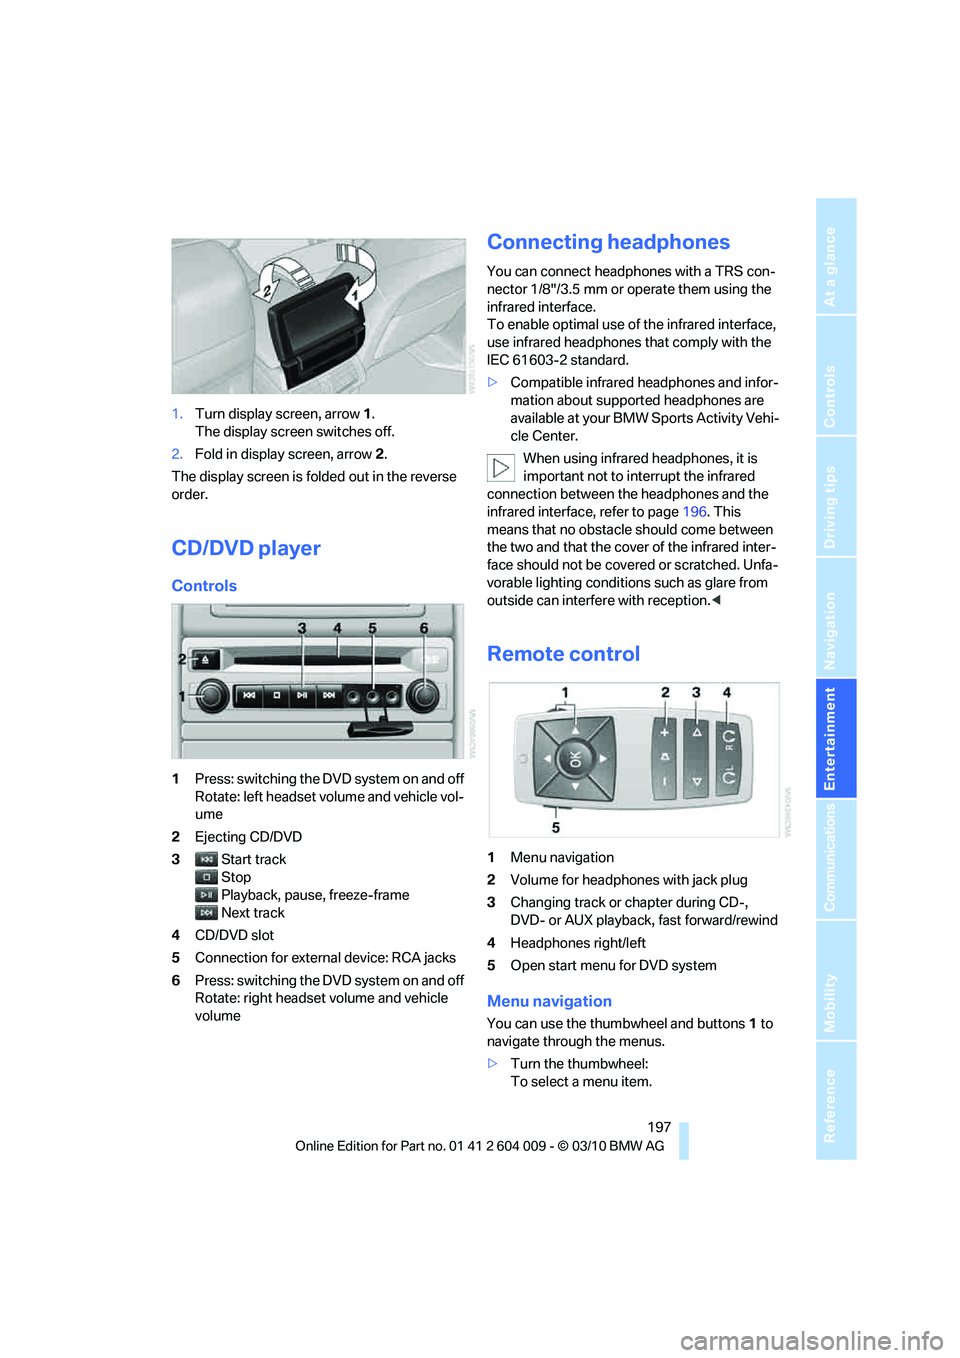
1.Turn display screen, arrow1.
The display screen switches off.
2.Fold in display screen, arrow2.
The display screen is folded out in the reverse
order.
CD/DVD player
Controls
1Press: switching the DVD system on and off
Rotate: left headset volume and vehicle vol-
ume
2Ejecting CD/DVD
3Start track
Stop
Playback, pause, freeze-frame
Next track
4CD/DVD slot
5Connection for external device: RCA jacks
6Press: switching the DVD system on and off
Rotate: right headset volume and vehicle
volume
Connecting headphones
You can connect headphones with a TRS con-
nector 1/8"/3.5 mm or operate them using the
infrared interface.
To enable optimal use of the infrared interface,
use infrared headphones that comply with the
IEC 61603-2 standard.
>Compatible infrared headphones and infor-
mation about supported headphones are
available at your BMW Sports Activity Vehi-
cle Center.
When using infrared headphones, it is
important not to interrupt the infrared
connection between the headphones and the
infrared interface, refer to page196. This
means that no obstacle should come between
the two and that the cover of the infrared inter-
face should not be covered or scratched. Unfa-
vorable lighting conditions such as glare from
outside can interfere with reception.<
Remote control
1Menu navigation
2Volume for headphones with jack plug
3Changing track or chapter during CD-,
DVD- or AUX playback, fast forward/rewind
4Headphones right/left
5Open start menu for DVD system
Menu navigation
You can use the thumbwheel and buttons1 to
navigate through the menus.
>Turn the thumbwheel:
To select a menu item.
Page 201 of 312
Navigation
Entertainment
Driving tips
199Reference
At a glance
Controls
Communications
Mobility
Playing videos from CDs/
DVDs
Country codes of DVDs
Your DVD player only plays DVDs with the cod-
ing of your home region, e.g. Europe = 2. The
country codes supported by your DVD are con-
tained in the information on your DVD.
An overview of the coding zones:
D V D s w i t h t he c o d e 0 c a n b e p l a y e d o n a l l
devices.<
Starting playback
1.Push the CD/DVD into the drive with the
labeled side facing upward.
The CD/DVD is automatically pulled in.
>Playback begins automatically after a
few seconds.
>If it does not:
Select "DVD".
Press the button.
2.If the DVD control or the DVD-specific
menu is displayed when a DVD is inserted,
use the remote control buttons for menu
navigation to select the desired option.
Or:
Press the button on the CD/DVD player.
You can control the playback with the buttons
on the CD/DVD player or the DVD control.
Video CDs (VCDs) and Super Video CDs
(SVCDs) can only be played if they do not
have a DVD-specific menu.<
Ejecting CD/DVD
Press the button on the CD/DVD player.
The DVD emerges slightly from the drive.
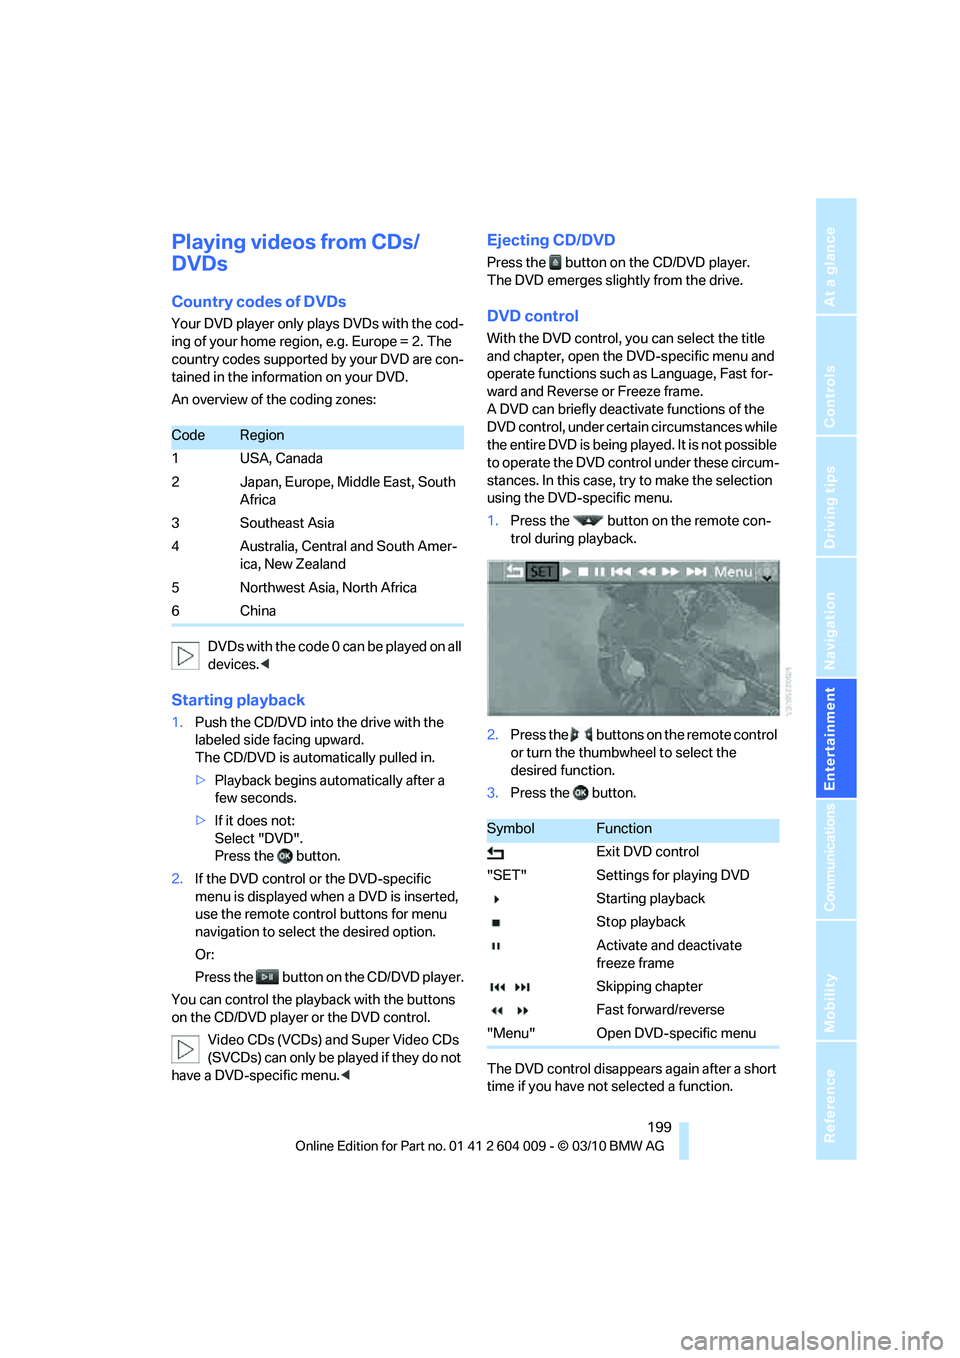
DVD control
With the DVD control, you can select the title
and chapter, open the DVD-specific menu and
operate functions such as Language, Fast for-
ward and Reverse or Freeze frame.
A DVD can briefly deactivate functions of the
DVD control, under certain circumstances while
the entire DVD is being played. It is not possible
to operate the DVD control under these circum-
stances. In this case, try to make the selection
using the DVD-specific menu.
1.Press the button on the remote con-
trol during playback.
2.Press the buttons on the remote control
or turn the thumbwheel to select the
desired function.
3.Press the button.
The DVD control disappears again after a short
time if you have not selected a function.
CodeRegion
1USA, Canada
2 Japan, Europe, Middle East, South
Africa
3 Southeast Asia
4 Australia, Central and South Amer-
ica, New Zealand
5 Northwest Asia, North Africa
6China
SymbolFunction
Exit DVD control
"SET" Settings for playing DVD
Starting playback
Stop playback
Activate and deactivate
freeze frame
Skipping chapter
Fast forward/reverse
"Menu" Open DVD-specific menu