2011 BMW 750LI XDRIVE SEDAN power steering
[x] Cancel search: power steeringPage 12 of 299

Cockpit
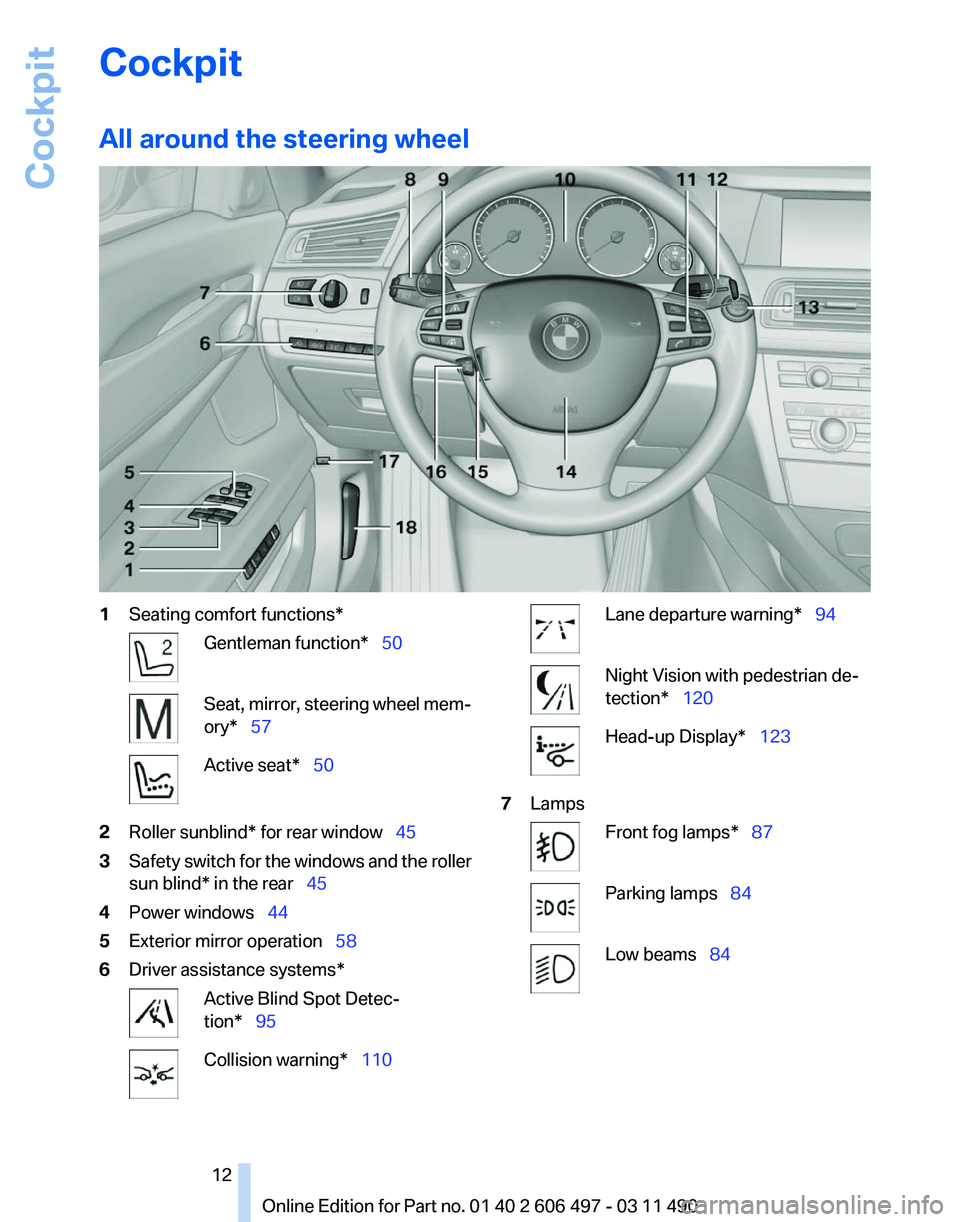
All around the steering wheel
1
Seating comfort functions* Gentleman function* 50
Seat, mirror, steering wheel mem‐
ory* 57
Active seat* 50
2 Roller sunblind* for rear window 45
3 Safety switch for the windows and the roller
sun blind* in the rear 45
4 Power windows 44
5 Exterior mirror operation 58
6 Driver assistance systems* Active Blind Spot Detec‐
tion* 95
Collision warning* 110 Lane departure warning* 94
Night Vision with pedestrian de‐
tection* 120
Head-up Display*
123
7 Lamps Front fog lamps* 87
Parking lamps
84 Low beams 84
Seite 12
12 Online Edition for Part no. 01 40 2 606 497 - 03 11 490Cockpit
Page 37 of 299

Press the button on the remote control
for at least 3 seconds.
To switch off the alarm: press any button.
Switching on the headlamp courtesy
delay feature Briefly press the button on the remote
control.
The duration can be set in the Control Display.
Opening the trunk lid Press
the button on the remote control
for approx. 1 second and release.
The trunk lid opens, regardless of whether it was
previously locked or unlocked.
During opening, the trunk lid pivots back and up.
Ensure that adequate clearance is available be‐
fore opening.
In some vehicle equipment variants, the trunk lid
can only be opened using the remote control if
the vehicle was unlocked first.
To avoid locking yourself out of the vehicle, do
not place the remote control into the cargo area.
The trunk lid is locked again as soon as it is
pushed closed.
Confirmation signals from the vehicle
1. "Settings"
2. "Door locks"
3. Deactivate or activate the desired confirma‐
tion signals.
▷"Acoustic sig. lock/unlock"
▷ "Flash when lock/unlock" Retrieving the seat, mirror, and
steering wheel settings
The driver's seat, exterior mirror, and steering
wheel positions selected last are stored for the
currently used remote control.
When the vehicle is unlocked, these positions
are automatically retrieved if this function was
activated.
Pinch hazard when moving back the seat
If
this function is used, first make sure that
the footwell behind the driver's seat is empty.
Otherwise, people can be injured or objects
damaged when the seat is moved back.◀
The adjustment procedure is interrupted:
▷ When a seat position switch is pressed.
▷ When a button of the seat, mirror, and steer‐
ing wheel memory is pressed briefly.
Activating the setting
1. "Settings"
2. "Door locks"
3. "Last seat position auto." Malfunction
If the vehicle can no longer be locked or un‐
locked
with the remote control, the battery may
be discharged or there may be interference from
external sources such as mobile phones, metal
objects, overhead power lines, transmission
towers, etc.
If this occurs, unlock or lock the vehicle at the
door lock using the key. Seite 37
37Online Edition for Part no. 01 40 2 606 497 - 03 11 490
Reference Mobility Communication Entertainment Navigation Driving tips
Controls At a glance
Page 43 of 299

Monitor the closing process
Monitor
the closing process to ensure that
no one becomes trapped.◀
Unlocking the trunk lid separately
Press the button on the exterior of the trunk lid,
refer to page 39.
This corresponds to pressing the button.
Do not place the remote control in the
cargo area
Take the remote control with you and do not
leave
it in the cargo area; otherwise, the remote
control may be locked inside the vehicle when
the trunk lid is closed.◀
Malfunction
Comfort Access may not function properly if it
experiences interference from external sources
such as mobile phones, metal objects, overhead
power lines, transmission towers, etc.
If this occurs, open or close the vehicle using the
buttons on the remote control or use a key in the
door lock.
To subsequently start the engine, hold the re‐
mote control against the marked area on the
steering column, refer to page 33.
Alarm system*
The concept
The vehicle alarm system responds to:
▷ Opening of a door, the hood or the trunk lid.
▷ Movements in the vehicle: interior motion
sensor, refer to page 44.
▷ Changes in the vehicle tilt, e.g., during at‐
tempts to steal a wheel or when towing the
car.
▷ Interruptions in battery voltage.
The alarm system briefly indicates tampering:
▷ By sounding an acoustic alarm.
▷ By switching on the hazard warning system.
▷ By flashing the high beams. Arming and disarming the alarm
system
General information
When
you lock or unlock the vehicle, either with
the remote control or at the door lock*, the alarm
system is armed or disarmed at the same time.
Door lock and armed alarm system
Unlocking via the door lock will trigger the alarm
on some country-specific versions.
Trunk lid and armed alarm system
The trunk lid can be opened using the remote
control, even if the alarm system is armed.
Press the button on the remote control
for approx. 1 second and release.
After the trunk lid is closed, it is locked and
monitored again by the alarm system. The haz‐
ard warning system flashes once.
In some vehicle equipment variants, the trunk lid
can only be opened using the remote control if
the vehicle was unlocked first.
Panic mode* Press the button on the remote control
for at least 3 seconds.
Switching off the alarm
▷ Unlock the vehicle using the remote control.
▷ With Comfort Access: If you are carrying the
remote control with you, pull on the door
handle. Seite 43
43Online Edition for Part no. 01 40 2 606 497 - 03 11 490
Reference Mobility Communication Entertainment Navigation Driving tips
Controls At a glance
Page 58 of 299

Calling up settings
Do not retrieve the memory while driving
Do not retrieve the memory setting while
driving,
as an unexpected movement of the seat
or steering wheel could result in an accident.◀
Comfort function
1. Open the driver's door.
2. Switch off the ignition.
3. Briefly press the desired button 1 or 2.
The corresponding seat position is performed
automatically.
The procedure stops when a switch for adjust‐
ing the seat or one of the buttons is pressed.
Safety mode
1. Close the driver's door or switch on the ig‐
nition.
2. Press and hold the desired button 1 or 2 until
the adjustment procedure is completed.
Calling up of a seat position
deactivated
After
a brief period, the calling up of stored seat
positions is deactivated to save battery power.
To reactivate calling up of a seat position:
▷ Open or close the door or trunk lid.
▷ Press a button on the remote control.
▷ Press the Start/Stop button. Mirrors
Exterior mirrors
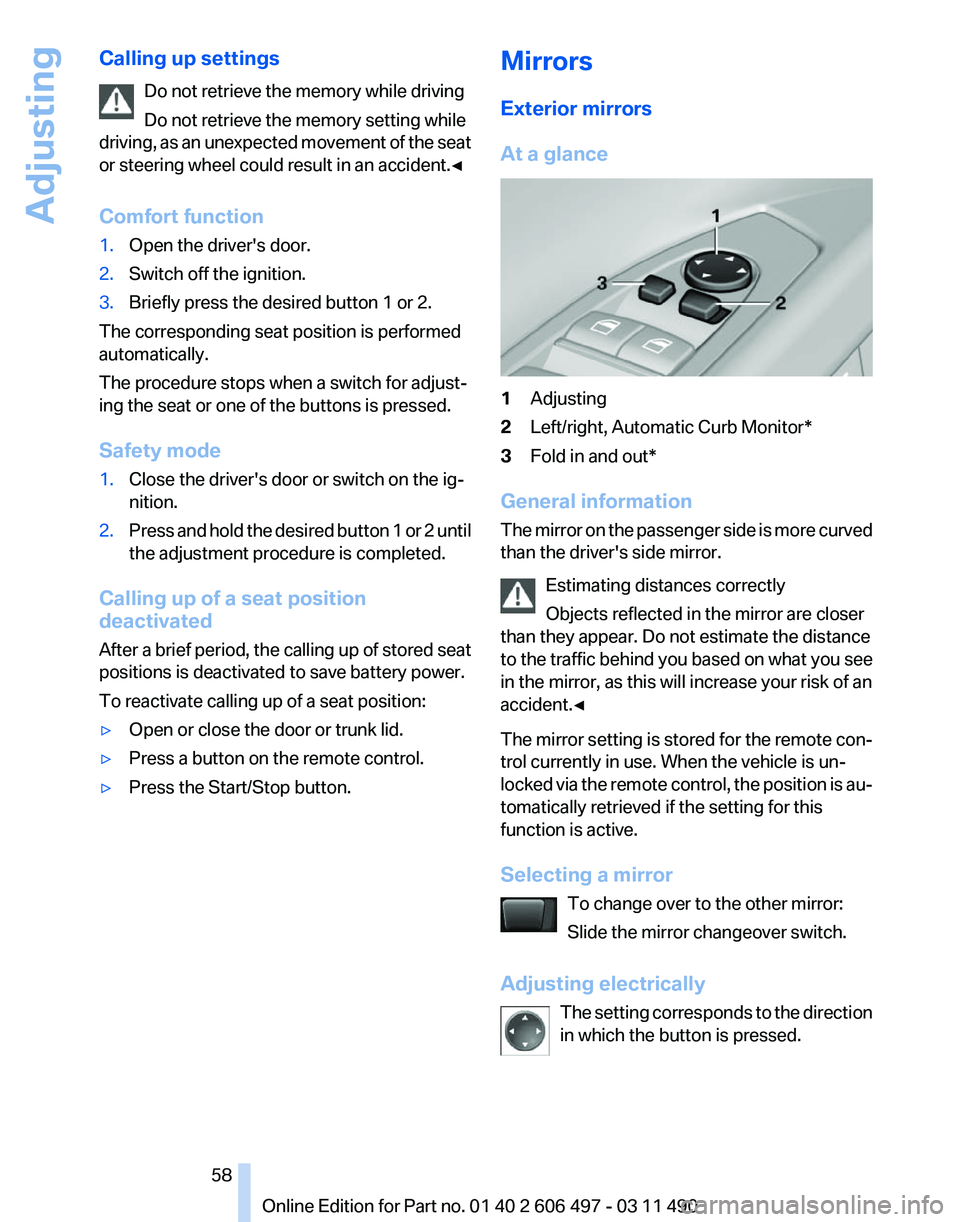
At a glance
1
Adjusting
2 Left/right, Automatic Curb Monitor*
3 Fold in and out*
General information
The
mirror on the passenger side is more curved
than the driver's side mirror.
Estimating distances correctly
Objects reflected in the mirror are closer
than they appear. Do not estimate the distance
to the traffic behind you based on what you see
in the mirror, as this will increase your risk of an
accident.◀
The mirror setting is stored for the remote con‐
trol currently in use. When the vehicle is un‐
locked via the remote control, the position is au‐
tomatically retrieved if the setting for this
function is active.
Selecting a mirror
To change over to the other mirror:
Slide the mirror changeover switch.
Adjusting electrically The setting corresponds to the direction
in which the button is pressed. Seite 58
58 Online Edition for Part no. 01 40 2 606 497 - 03 11 490
Adjusting
Page 67 of 299

Set the parking brake and further secure
the vehicle as required
Set the parking brake firmly when parking; oth‐
erwise, the vehicle could roll. On steep upward
and
downward inclines, further secure the vehi‐
cle, for example, by turning the steering wheel in
the direction of the curb. ◀
While driving
Use while driving:
Pull the switch and hold it. The vehicle brakes
hard while the button is being pulled.
The indicator lamp lights up in red, a sig‐
nal sounds and the brake lamps light up.
Lower lamp: indicator lamp in Canadian
models
If the vehicle is braked to a speed of approx.
2 mph/3 km/h, the parking brake remains set.
Releasing Press the switch while the brake pedal is
pressed or transmission position P is en‐
gaged.
The LED and indicator lamp go out.
The parking brake is released.
Take the remote control with you
Take the remote control with you when
leaving the vehicle so that children, for example,
cannot release the parking brake.◀
Manual release
The parking brake can be released manually in
the event of a power failure or electrical fault.
Before releasing, secure the vehicle
against rolling
Before releasing the parking brake manually,
and whenever you park the vehicle with the
parking brake released, ensure that position P of
the automatic transmission is engaged. Secure the vehicle in a manner appropriate to
the inclination of the road, e.g., with a wheel
chock; otherwise, there is the danger of the ve‐
hicle rolling.◀
Unlocking
1.
Remove the release tool from the tool kit. 2.
Raise the floor panel in the cargo area. 3.
Take out the floor trim in the cargo area, re‐
moving
the screws with the release tool, ar‐
rows. Seite 67
67Online Edition for Part no. 01 40 2 606 497 - 03 11 490
Reference Mobility Communication Entertainment Navigation Driving tips
Controls At a glance
Page 105 of 299

Driving comfort
Active Cruise Control with
Stop & Go function, ACC*
The concept
This system can be used to select a desired
speed that the vehicle will maintain automati‐
cally on clear roads.
To
the extent possible, the system automatically
adjusts the speed to a slower vehicle ahead of
you.
The distance that the vehicle maintains to the
vehicle ahead of you can be varied.
For safety reasons, it depends on the speed.
To maintain a certain distance, the system au‐
tomatically decelerates, applies the brakes
lightly, or accelerates again if the vehicle ahead
begins moving faster.
If the vehicle ahead of you brakes to a halt, the
system is able to detect this within the given
system limits. If the vehicle ahead of your drives
away again from a halt, your vehicle is able to
accelerate if operated accordingly.
Even if some time passes before the vehicle
drives away again, the BMW can still be accel‐
erated automatically and simply.
As soon as the road is clear, it accelerates to the
desired speed.
The speed is also maintained on downhill gra‐
dients, but may not be maintained on uphill
slopes if engine power is insufficient. Buttons at a glance 1
System on/off, interrupt
2 Resume speed
3 Store speed*
4 Reduce distance
5 Store, maintain/change speed
6 Increase distance
Switching on/off and interrupting
cruise control
Switching on Press
the button on the steering wheel.
The indicator lamps in the instrument cluster
light up and the marking in the speedometer is
set to the current speed.
Cruise control can be used.
Switching off Deactivated or interrupted system
If the system is deactivated or interrupted,
actively intervene by braking and, if necessary,
with evasive maneuvers; otherwise, there is the
danger of an accident occurring.◀
If switching off the system while stationary,
press on the brake pedal at the same time.
Press the button.
▷ If active: press twice.
▷ If interrupted: press once. Seite 105
105Online Edition for Part no. 01 40 2 606 497 - 03 11 490
Reference Mobility Communication Entertainment Navigation Driving tips
Controls At a glance
Page 265 of 299

Vehicle battery
Maintenance
The battery is maintenance-free, i.e., the elec‐
trolyte will last for the life of the battery.
Your
service center will be glad to advise you on
questions regarding the battery.
Battery replacement
Use approved vehicle batteries only.
Only use vehicle batteries that have been
approved for your vehicle by the manufacturer;
otherwise, the vehicle could be damaged and
systems or functions may not be fully availa‐
ble.◀
After a battery replacement, have the battery
registered on the vehicle by your service center
to ensure that all comfort functions are fully
available.
Charging the battery
In the vehicle, only charge the battery via the
terminals, refer to page 268, in the engine com‐
partment with the engine off.
Power failure
After a temporary power loss, some equipment
needs to be reinitialized.
Individual settings need to be reprogrammed:
▷ Seat, mirror, and steering wheel memory:
store the positions again.
▷ Time: update.
▷ Date: update.
▷ Radio station: save again.
▷ Navigation system: wait for the operability of
the navigation.
Disposing of old batteries Have old batteries disposed of by your
service center or bring them to a recy‐
cling center.
Maintain the battery in an upright position for
transport and storage. Secure the battery so
that it does not tip over during transport. Fuses
Notes
Replacing fuses
Never attempt to repair a blown fuse and
do
not replace a defective fuse with a substitute
of another color or amperage rating; this could
lead to a circuit overload, ultimately resulting in
a fire in the vehicle.◀
Plastic tweezers and information on the fuse
types and locations are stored in the fuse box in
the cargo area.
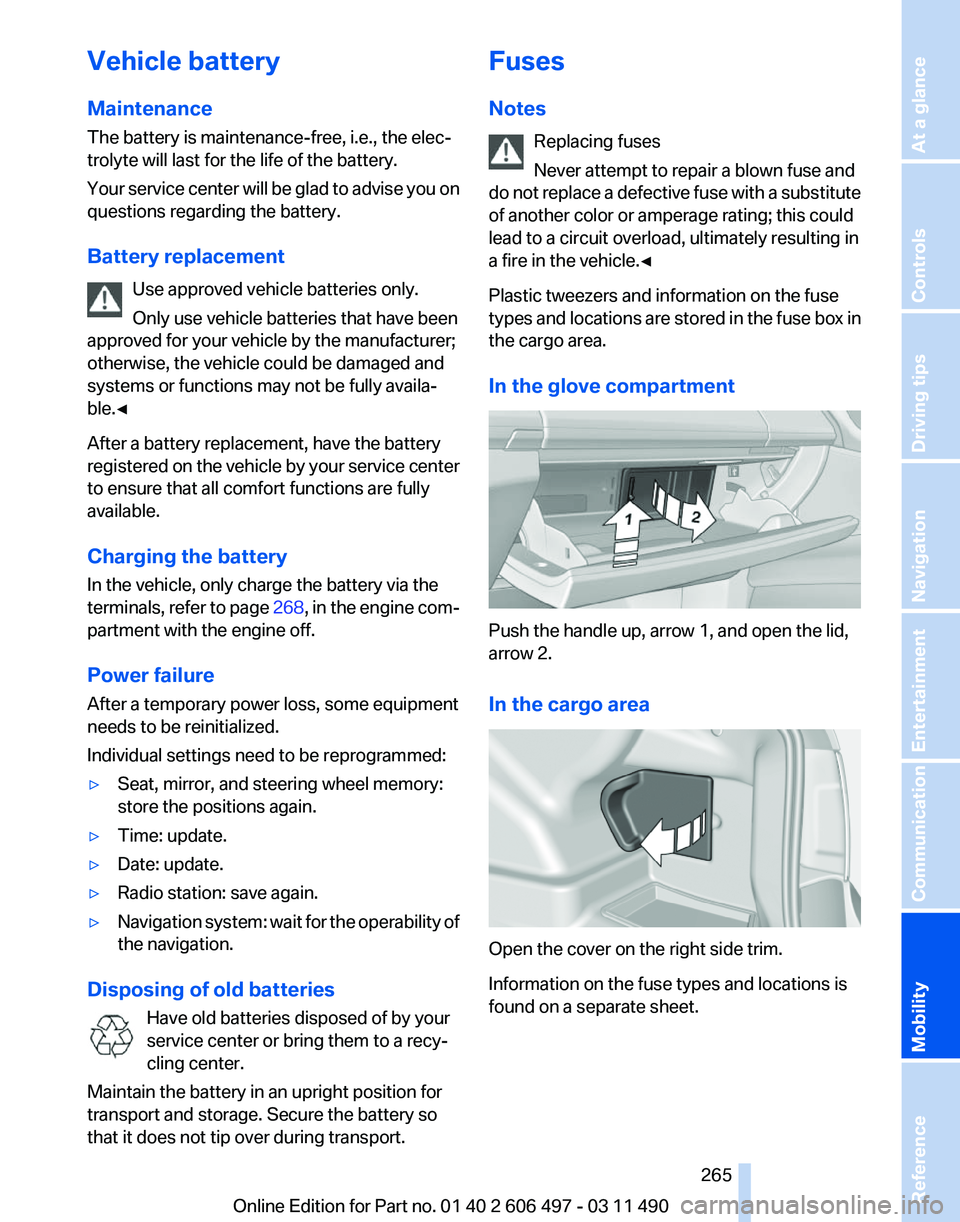
In the glove compartment Push the handle up, arrow 1, and open the lid,
arrow 2.
In the cargo area
Open the cover on the right side trim.
Information on the fuse types and locations is
found on a separate sheet. Seite 265
265Online Edition for Part no. 01 40 2 606 497 - 03 11 490
Reference
Mobility Communication Entertainment Navigation Driving tips Controls At a glance
Page 291 of 299

Engine start, refer to Starting
the engine 65
Engine start, Starting aid 267
Engine stop 66
Engine temperature 76
Entering/exiting
vehicle, assis‐
tance, steering wheel 60
Equalizer 170
Equipment, interior 132
ESP Electronic Stability Pro‐ gram, refer to DSC 98
Exchanging wheels/tires 250
Exhaust system 144
Exterior mirror, automatic dim‐ ming feature, dimmable exte‐
rior mirrors 59
Exterior mirrors 58
External devices 190
External start 267
External temperature dis‐ play 76
External temperature warn‐ ing 76
Eyes for securing cargo 147
F
Fader 170
Failure message, refer to Check Control 82
False alarm, refer to Uninten‐ tional alarm 44
Fan, refer to Air volume 126
Fault displays, refer to Check Control 82
Filler neck for engine oil 255
Fine wood, care 273
First aid kit 267
Fitting for towing, refer to Tow fitting 269
Flat tire, Tire Pressure Monitor TPM 91
Flat tire, warning lamp 92
Flat tire, wheel change 264
Flooding 145
Floor carpet, care 273
Floor mats, care 273
FM/AM station 172 Folding table in the rear
136
Fold-out position, windshield wipers 72
Foot brake 145
Front airbags 88
Front fog lamps 87
Front
fog lamps, front, bulb re‐
placement 262
Front lamps 261
Front passenger airbags, au‐ tomatic deactivation 89
Front passenger airbags, indi‐ cator lamp 90
Front passenger seat, adjust‐ ing 50
Front seats, adjusting 48
Fuel cap 242
Fuel consumption, current 76
Fuel consumption, refer to Average fuel consump‐
tion 78
Fuel filler flap 242
Fuel gauge 75
Fuel quality 243
Fuel, tank capacity 279
Fuse 265
G
Garage door opener, refer to Integrated universal remote
control 132
Gas station recommenda‐ tion 161
Gear change, automatic trans‐ mission 73
General driving notes 144
Gentleman function 50
Glass sunroof, powered 46
Glove compartment 138
GPS navigation, refer to Navi‐ gation system 152
Gross vehicle weight, ap‐ proved 278
Gross weight, permissible for trailer towing 278 H
Hand brake, refer to Parking
brake 66
Hand-held transmitter, alter‐ nating code 133
Hazard warning flashers 266
HDC Hill Descent Control 99
HD Radio 173
Head airbags 88
Headlamp control, auto‐ matic 85
Headlamp courtesy delay fea‐ ture 84
Headlamp courtesy delay fea‐ ture via remote control 37
Headlamp flasher 70
Headlamp glass 261
Headlamps 261
Headlamps, care 272
Headlamp washer system 70
Headliner 18
Headphones, rear entertain‐ ment 202, 207
Head restraints 48
Head restraints, front 54
Head restraints, rear 55
Head-up Display 123
Head-up Display, care 273
Heavy cargo, stowing 147
Height, seats 48
Height
with roof-mounted aer‐
ial, vehicle 276
High-beam Assistant 86
High beams 70
High beams/low beams, refer to High-beam Assistant 86
Hill Descent Control HDC 99
Hills 146
Hill start assistant, refer to Drive-off assistant 98
Hints 6
Holder for beverages 140
Homepage 6
Hood 253
Horn 12
Hotel function, trunk lid 41
Hot exhaust system 144
Seite 291
291Online Edition for Part no. 01 40 2 606 497 - 03 11 490
Reference Mobility Communication Entertainment Navigation Driving tips Controls At a glance