2011 BMW 750LI XDRIVE Panel
[x] Cancel search: PanelPage 20 of 299

3.
Move in four directions. Buttons on controller
Press the button Function
MENU
Open the main menu.
RADIO Opens the Radio menu.
CD Opens the CD/Multimedia
menu.
NAV Opens the Navigation map
view.
TEL Opens the Telephone
menu.
BACK Displays the previous
panel.
OPTION Opens the Options menu. Operating concept
Opening the main menu
Press the button. The main menu is displayed. All iDrive functions can be called up via the main
menu.
Selecting menu items
Menu items shown in white can be selected.
1.
Turn the controller until the desired menu
item is highlighted. 2.
Press the controller.
Menu items in the Owner's Manual
In the Owner's Manual, menu items that can be
selected are set in quotation marks, e.g.,
"Settings".
Changing between panels
After a menu item is selected, e.g.,
"Radio", a
new panel is displayed. Panels can overlap.
▷ Move the controller to the left.
The
current panel is closed and the previous
panel is displayed.
The previous panel is opened again by
pressing the BACK button. In this case, the
current panel is not closed.
▷ Move the controller to the right.
A
new panel is opened on top of the previous
display. Seite 20
20 Online Edition for Part no. 01 40 2 606 497 - 03 11 490
iDrive
Page 21 of 299

White arrows pointing to the left or right indicate
that additional panels can be opened.
View of an opened menu
When
a menu is opened, it generally opens with
the panel that was last selected in that menu. To
display the first panel of a menu:
▷ Move the controller to the left repeatedly
until the first panel is displayed.
▷ Press the menu button on the controller
twice.
Opening the Options menu Press the button.
The "Options" menu is displayed. Additional options: move the controller to the
right
repeatedly until the "Options" menu is dis‐
played.
Options menu
The "Options" menu consists of various areas:
▷ Screen settings, e.g., "Split screen".
This area remains unchanged.
▷ Control options for the selected main menu,
e.g., for "Radio".
▷ If applicable, further operating options for
the selected menu, e.g.,
"Store station".
Changing settings
1. Select a field. 2.
Turn the controller until the desired setting
is displayed. 3.
Press the controller.
Activating/deactivating the functions
Several menu items are preceded by a check‐
box. It indicates whether the function is acti‐
vated or deactivated. Selecting the menu item
activates or deactivates the function. The function is activated.
The function is deactivated.
Example: setting the clock
Setting the clock
1. Press the button. The main menu is
displayed.
2. Turn the controller until "Settings" is high‐
lighted, and then press the controller. 3.
If necessary, move the controller to the left
to display "Time/Date"
.
Seite 21
21Online Edition for Part no. 01 40 2 606 497 - 03 11 490
Reference Mobility Communication Entertainment Navigation Driving tips Controls
At a glance
Page 28 of 299

1. Press the button or move the controller
to the right repeatedly until the "Options"
menu is displayed.
2. "Display Owner's Manual"
Opening when a Check Control
message is displayed
Directly
from the Check Control message on the
Control Display:
"Display Owner's Manual"
Changing between a function and the
Owner's Manual
To change from a function, e.g., radio, to the
Owner's Manual on the Control Display and to
switch between the two displays:
1. Press the button or move the controller
to the right repeatedly until the
"Options"
menu is displayed.
2. "Display Owner's Manual"
3. Select the desired page in the Owner's
Manual.
4. Press
the button again to return to the
function displayed last.
5. Press the button to return to the page
of the Owner's Manual displayed last.
To switch back and forth repeatedly between
the function displayed last and the page of the
Owner's Manual displayed last, repeat steps 4
and 5. This opens a new panel every time.
Programmable memory
buttons
General information
The Owner's Manual can be stored on the pro‐
grammable memory buttons and called up di‐
rectly. Storing
1.
Select "Owner's Manual" via the iDrive.
2. Press the desired button for more
than 2 seconds.
Executing Press the button.
The Owner's Manual is displayed im‐
mediately. Seite 28
28 Online Edition for Part no. 01 40 2 606 497 - 03 11 490
Integrated Owner's Manual in the vehicle
Page 67 of 299

Set the parking brake and further secure
the vehicle as required
Set the parking brake firmly when parking; oth‐
erwise, the vehicle could roll. On steep upward
and
downward inclines, further secure the vehi‐
cle, for example, by turning the steering wheel in
the direction of the curb. ◀
While driving
Use while driving:
Pull the switch and hold it. The vehicle brakes
hard while the button is being pulled.
The indicator lamp lights up in red, a sig‐
nal sounds and the brake lamps light up.
Lower lamp: indicator lamp in Canadian
models
If the vehicle is braked to a speed of approx.
2 mph/3 km/h, the parking brake remains set.
Releasing Press the switch while the brake pedal is
pressed or transmission position P is en‐
gaged.
The LED and indicator lamp go out.
The parking brake is released.
Take the remote control with you
Take the remote control with you when
leaving the vehicle so that children, for example,
cannot release the parking brake.◀
Manual release
The parking brake can be released manually in
the event of a power failure or electrical fault.
Before releasing, secure the vehicle
against rolling
Before releasing the parking brake manually,
and whenever you park the vehicle with the
parking brake released, ensure that position P of
the automatic transmission is engaged. Secure the vehicle in a manner appropriate to
the inclination of the road, e.g., with a wheel
chock; otherwise, there is the danger of the ve‐
hicle rolling.◀
Unlocking
1.
Remove the release tool from the tool kit. 2.
Raise the floor panel in the cargo area. 3.
Take out the floor trim in the cargo area, re‐
moving
the screws with the release tool, ar‐
rows. Seite 67
67Online Edition for Part no. 01 40 2 606 497 - 03 11 490
Reference Mobility Communication Entertainment Navigation Driving tips
Controls At a glance
Page 89 of 299

▷
There should be no people, animals, or ob‐
jects between an airbag and a person.
▷ Do not use the cover of the front airbag on
the front passenger side as a storage area.
▷ Keep the dashboard and window on the
front
passenger side clear, i.e., do not cover
with adhesive labels or coverings, and do not
attach holders such as for navigation instru‐
ments and mobile phones.
▷ Make sure that the front passenger is sitting
correctly, i.e., keeps his or her feet and legs
in the footwell; otherwise, leg injuries can
occur if the front airbag is triggered.
▷ Do not place slip covers, seat cushions or
other objects on the front passenger seat
that are not approved specifically for seats
with integrated side airbags.
▷ Do not hang pieces of clothing, such as jack‐
ets, over the backrests.
▷ Make sure that occupants keep their heads
away from the side airbag and do not rest
against the head airbag; otherwise, injuries
can occur if the airbags are triggered.
▷ Do not remove the airbag restraint system.
▷ Do not remove the steering wheel.
▷ Do not apply adhesive materials to the air‐
bag cover panels, cover them or modify
them in any way.
▷ Never modify either the individual compo‐
nents
or the wiring in the airbag system. This
also applies to steering wheel covers, the
dashboard, the seats, the roof pillars and the
sides of the headliner.◀
Even when all instructions are followed closely,
injury from contact with the airbags cannot be
ruled out in certain situations.
The ignition and inflation noise may lead to
short-term
and, in most cases, temporary hear‐
ing impairment in sensitive individuals.
In the case of a malfunction, deactivation
and after triggering of the airbags
Do not touch the individual components imme‐
diately after the system has been triggered; oth‐
erwise, there is the danger of burns. Only have the airbags checked, repaired or dis‐
mantled and the airbag generator scrapped by
your service center or a workshop that has the
necessary
authorization for handling explosives.
Non-professional attempts to service the sys‐
tem could lead to failure in an emergency or un‐
desired triggering of the airbag, either of which
could result in injury.◀
Warnings and information on the airbags are
also found on the sun visors.
Functional readiness of the airbag
system When the ignition is switch on, the warn‐
ing lamp in the instrument cluster lights
up briefly and thereby indicates the op‐
erational readiness of the entire airbag system
and the belt tensioner.
Airbag system malfunctioning
▷ In radio ready state, the warning lamp does
not come on.
▷ The warning lamp lights up continuously.
When there is a malfunction, have the air‐
bag system checked immediately
When there is a malfunction, have the airbag
system checked immediately; otherwise, there
is
a risk that the system does not function as ex‐
pected in the event of an accident despite cor‐
responding severity of the accident.◀
Automatic deactivation of the front
passenger airbags
The system determines whether the front pas‐
senger seat is occupied by measuring the re‐
sistance of the human body.
The front, knee, and side airbag on the front
passenger side are activated or deactivated ac‐
cordingly.
Leave feet in the footwell
Make sure that the front passenger keeps
his or her feet in the footwell; otherwise, the front
passenger airbags may not function properly.◀ Seite 89
89Online Edition for Part no. 01 40 2 606 497 - 03 11 490
Reference Mobility Communication Entertainment Navigation Driving tips
Controls At a glance
Page 103 of 299

The indicator lamp lights up: TRACTION
is activated.
SPORT+
Sporty driving with optimized chassis and sus‐
pension during limited driving stabilization.
Dynamic Traction Control is switched on.
The driver handles several of the stabilization
tasks.
Activating SPORT+ Press the button repeatedly until
SPORT+ appears in the tachometer
and the DSC indicator lamp lights up in the in‐
strument cluster.
Indicator/warning lamps
SPORT+ is displayed in the instrument cluster.
The indicator lamp lights up: DTC Dy‐
namic Traction Control is activated.
SPORT
Consistently
sporty tuning of the suspension for
greater driving agility with maximum driving sta‐
bilization.
The program can be configured to individual
specifications.
The configuration is stored for the remote con‐
trol currently in use.
Activating SPORT
Press the button repeatedly until
SPORT appears in the tachometer.
Configuring SPORT
When the display is activated on the Control
Display, refer to page 104, the sport program
can be set to individual specifications.
After the sport program is activated, select
"Configure SPORT mode" on the displayed
panel and configure the program.
Optionally, the sport program can be configured
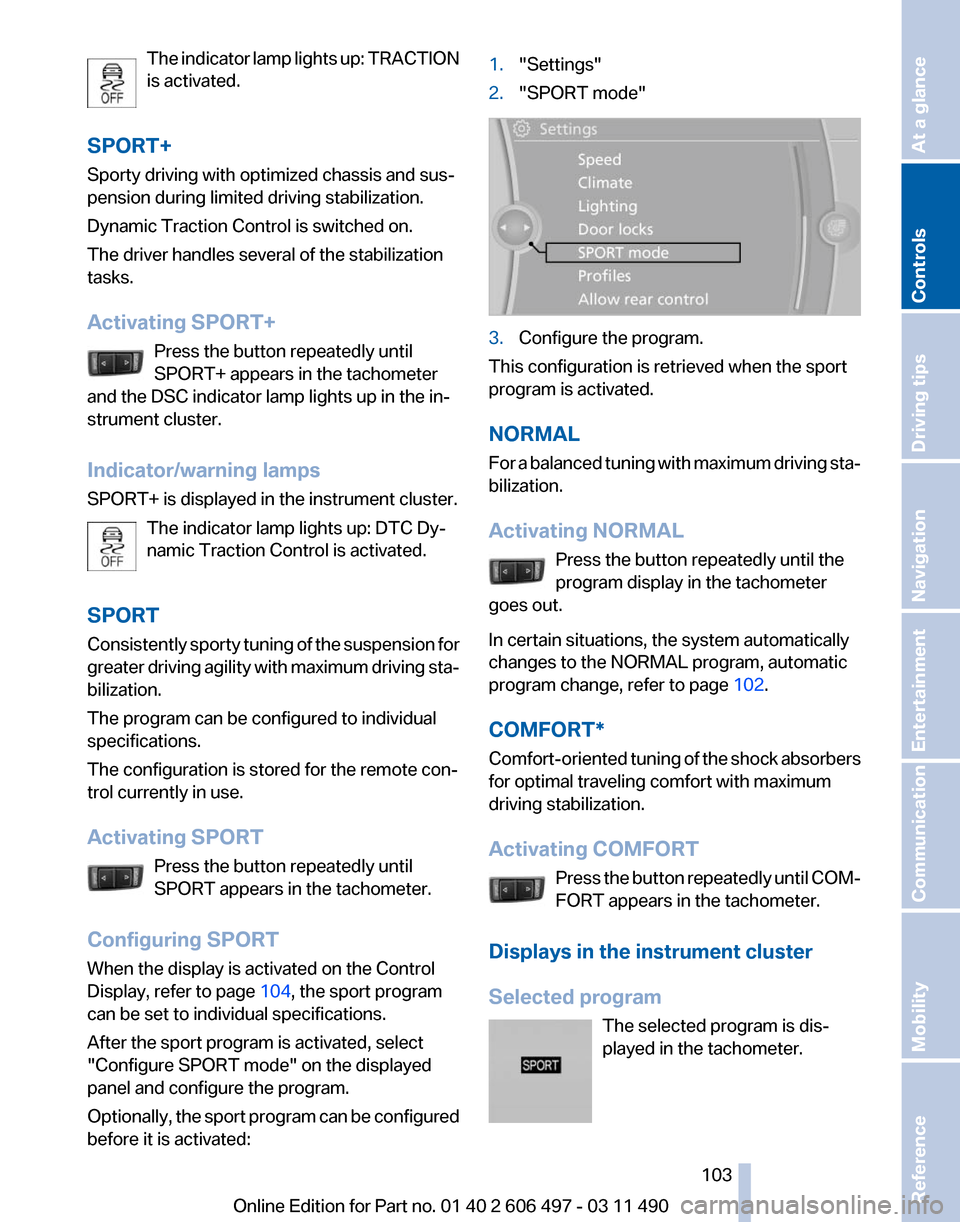
before it is activated: 1.
"Settings"
2. "SPORT mode" 3.
Configure the program.
This configuration is retrieved when the sport
program is activated.
NORMAL
For
a balanced tuning with maximum driving sta‐
bilization.
Activating NORMAL
Press the button repeatedly until the
program display in the tachometer
goes out.
In certain situations, the system automatically
changes to the NORMAL program, automatic
program change, refer to page 102.
COMFORT*
Comfort-oriented tuning of the shock absorbers
for optimal traveling comfort with maximum
driving stabilization.
Activating COMFORT Press the button repeatedly until COM‐
FORT appears in the tachometer.
Displays in the instrument cluster
Selected program The selected program is dis‐
played in the tachometer. Seite 103
103Online Edition for Part no. 01 40 2 606 497 - 03 11 490
Reference Mobility Communication Entertainment Navigation Driving tips
Controls At a glance
Page 140 of 299

Cupholders
Notes
Shatter-proof containers and no hot
drinks
Use light and shatter-proof containers and do
not
transport hot drinks. Otherwise, there is the
increased danger of injury in an accident.◀
Unsuitable containers
Do not forcefully push unsuitable contain‐
ers into the cupholders. This may result in dam‐
age.◀
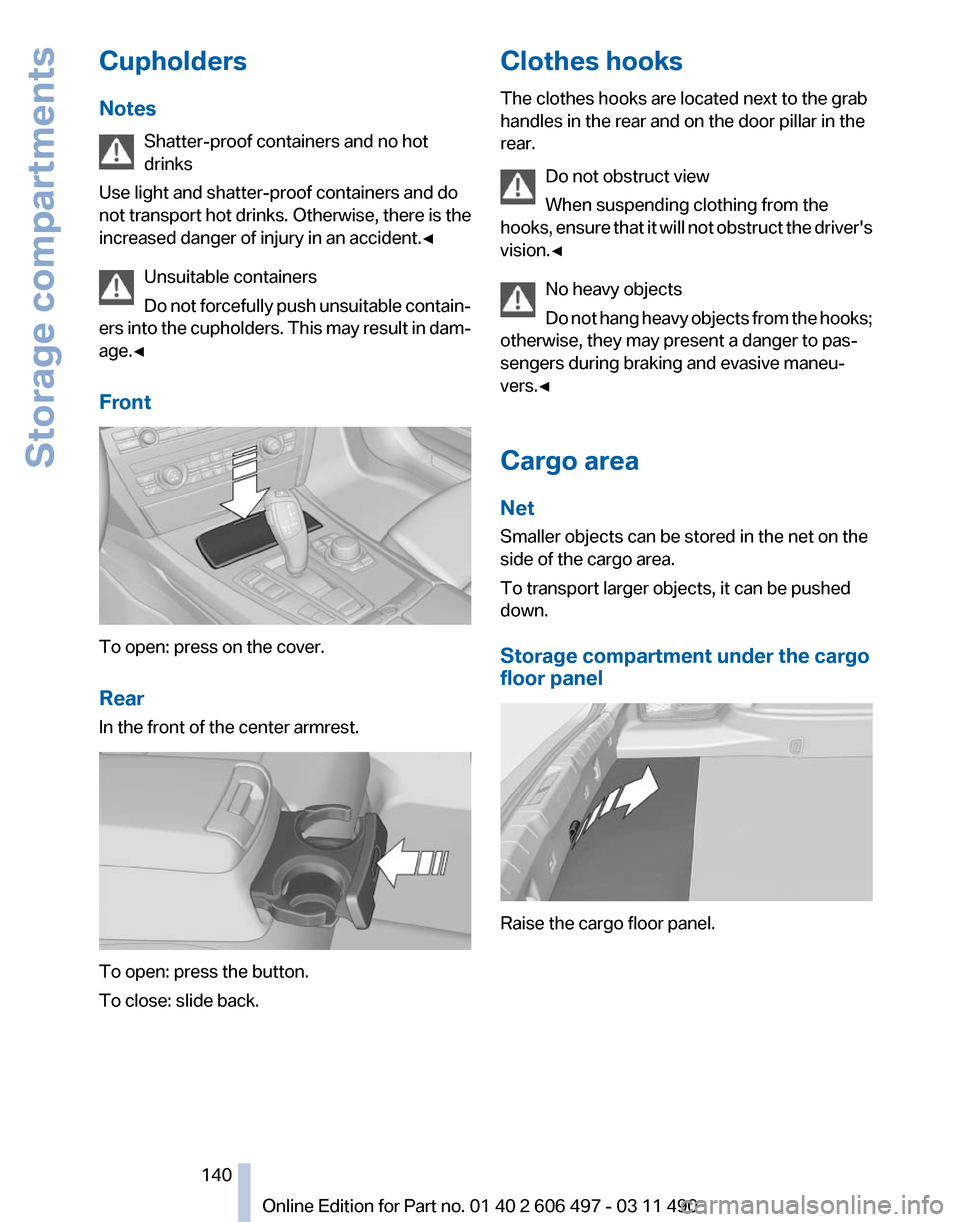
Front To open: press on the cover.
Rear
In the front of the center armrest.
To open: press the button.
To close: slide back. Clothes hooks
The clothes hooks are located next to the grab
handles in the rear and on the door pillar in the
rear.
Do not obstruct view
When suspending clothing from the
hooks,
ensure that it will not obstruct the driver's
vision.◀
No heavy objects
Do not hang heavy objects from the hooks;
otherwise, they may present a danger to pas‐
sengers during braking and evasive maneu‐
vers.◀
Cargo area
Net
Smaller objects can be stored in the net on the
side of the cargo area.
To transport larger objects, it can be pushed
down.
Storage compartment under the cargo
floor panel Raise the cargo floor panel. Seite 140
140 Online Edition for Part no. 01 40 2 606 497 - 03 11 490
Storage compartments
Page 177 of 299

Storing the league or team
Leagues
or teams can be added to the favorites
from a selection list.
1. "Radio"
2. "Satellite radio"
3. "Manage favorites"
4. "Add sports information" 5.
Select the league.
6. Select "Add all teams" or the desired team.
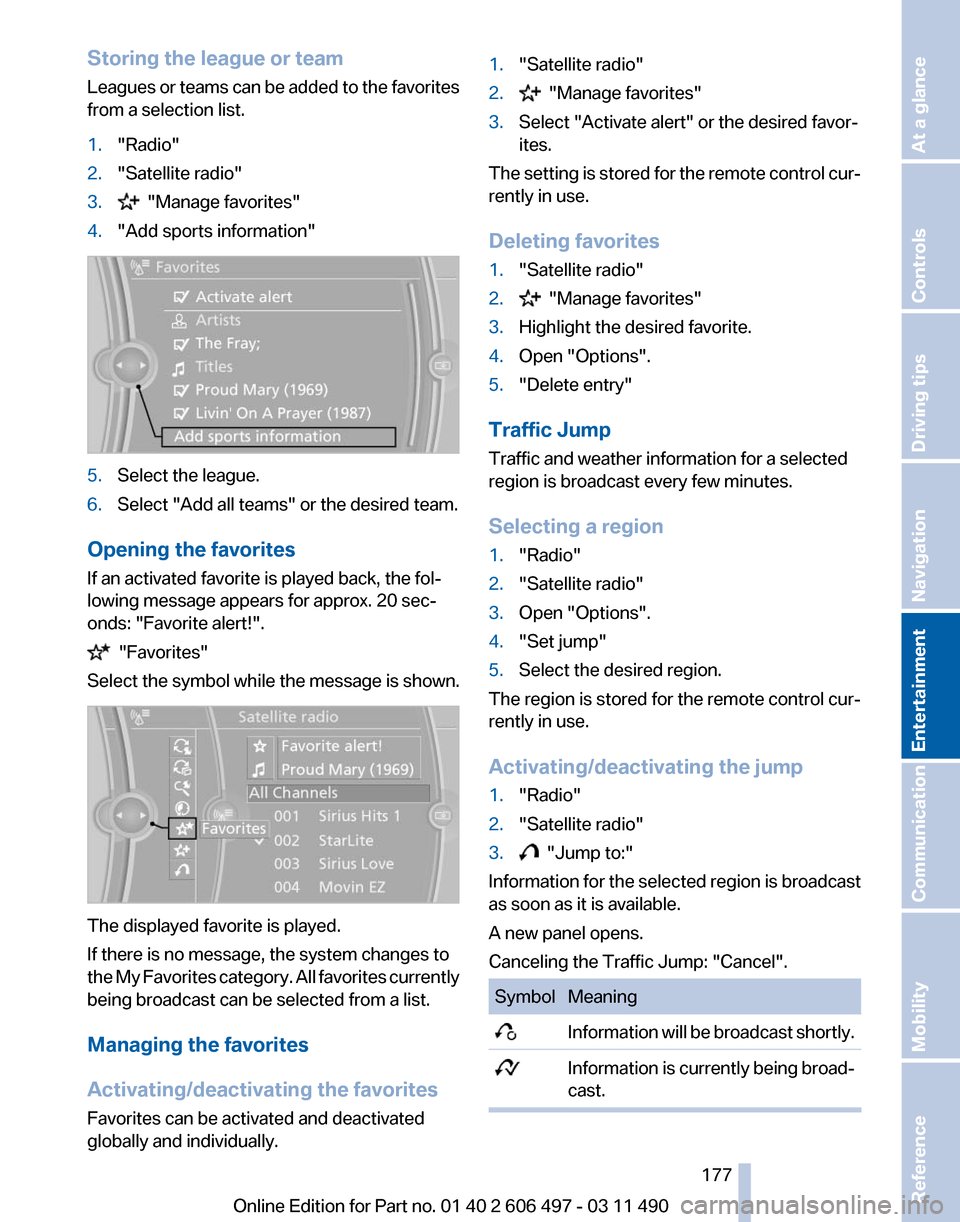
Opening the favorites
If an activated favorite is played back, the fol‐
lowing message appears for approx. 20 sec‐
onds: "Favorite alert!". "Favorites"
Select the symbol while the message is shown. The displayed favorite is played.
If there is no message, the system changes to
the
My Favorites category. All favorites currently
being broadcast can be selected from a list.
Managing the favorites
Activating/deactivating the favorites
Favorites can be activated and deactivated
globally and individually. 1.
"Satellite radio"
2. "Manage favorites"
3. Select "Activate alert" or the desired favor‐
ites.
The setting is stored for the remote control cur‐
rently in use.
Deleting favorites
1. "Satellite radio"
2. "Manage favorites"
3. Highlight the desired favorite.
4. Open "Options".
5. "Delete entry"
Traffic Jump
Traffic and weather information for a selected
region is broadcast every few minutes.
Selecting a region
1. "Radio"
2. "Satellite radio"
3. Open "Options".
4. "Set jump"
5. Select the desired region.
The region is stored for the remote control cur‐
rently in use.
Activating/deactivating the jump
1. "Radio"
2. "Satellite radio"
3. "Jump to:"
Information for the selected region is broadcast
as soon as it is available.
A new panel opens.
Canceling the Traffic Jump: "Cancel". Symbol Meaning
Information will be broadcast shortly.
Information is currently being broad‐
cast. Seite 177
177Online Edition for Part no. 01 40 2 606 497 - 03 11 490
Reference Mobility Communication
Entertainment Navigation Driving tips Controls At a glance