2011 BMW 750LI XDRIVE navigation
[x] Cancel search: navigationPage 129 of 299
▷
Lever for changing the air flow direction, ar‐
row 2.
Rear automatic climate
control*
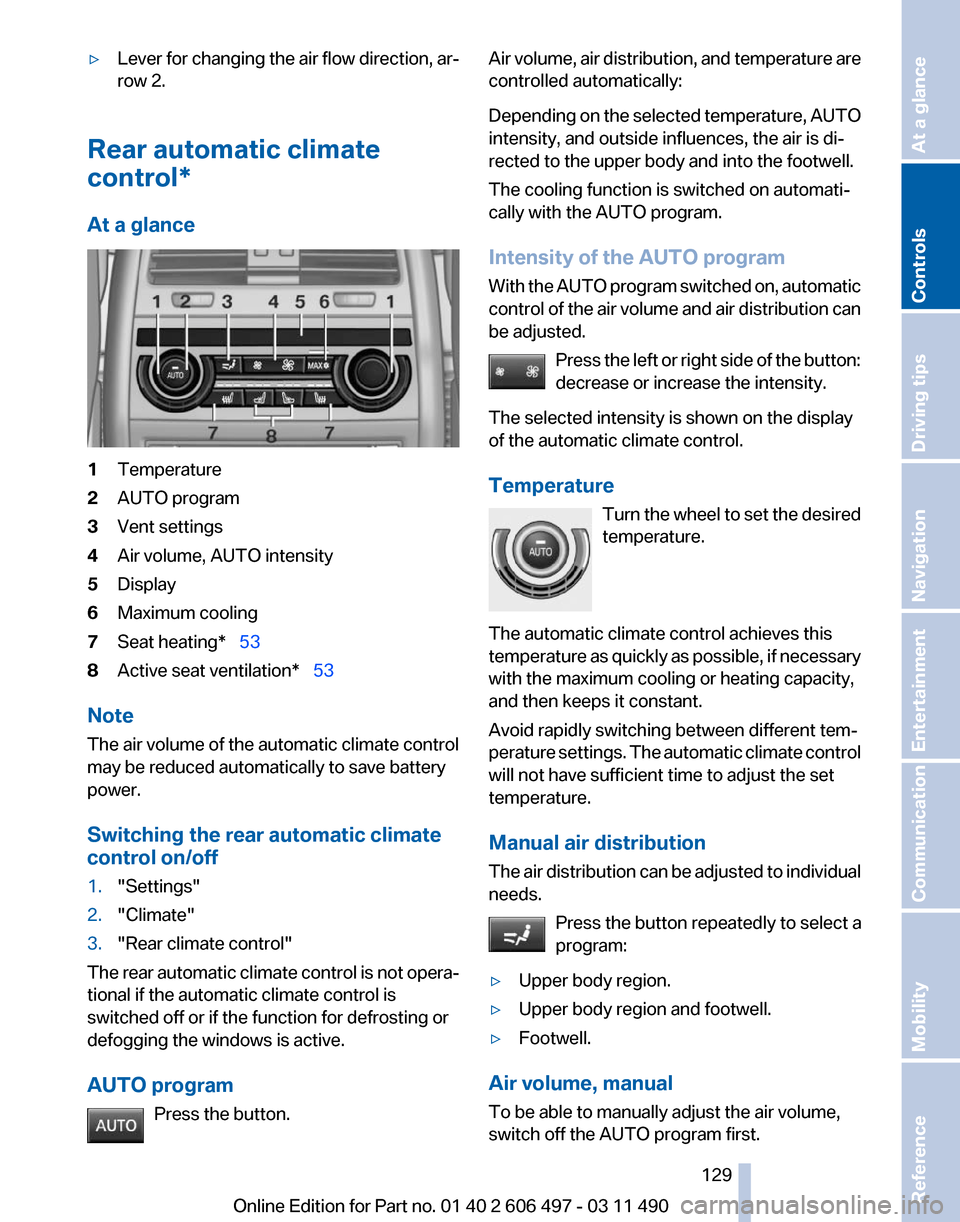
At a glance 1
Temperature
2 AUTO program
3 Vent settings
4 Air volume, AUTO intensity
5 Display
6 Maximum cooling
7 Seat heating* 53
8 Active seat ventilation* 53
Note
The air volume of the automatic climate control
may be reduced automatically to save battery
power.
Switching the rear automatic climate
control on/off
1. "Settings"
2. "Climate"
3. "Rear climate control"
The rear automatic climate control is not opera‐
tional if the automatic climate control is
switched off or if the function for defrosting or
defogging the windows is active.
AUTO program Press the button. Air volume, air distribution, and temperature are
controlled automatically:
Depending
on the selected temperature, AUTO
intensity, and outside influences, the air is di‐
rected to the upper body and into the footwell.
The cooling function is switched on automati‐
cally with the AUTO program.
Intensity of the AUTO program
With the AUTO program switched on, automatic
control of the air volume and air distribution can
be adjusted.
Press the left or right side of the button:
decrease or increase the intensity.
The selected intensity is shown on the display
of the automatic climate control.
Temperature Turn the wheel to set the desired
temperature.
The automatic climate control achieves this
temperature as quickly as possible, if necessary
with the maximum cooling or heating capacity,
and then keeps it constant.
Avoid rapidly switching between different tem‐
perature settings. The automatic climate control
will not have sufficient time to adjust the set
temperature.
Manual air distribution
The air distribution can be adjusted to individual
needs. Press the button repeatedly to select a
program:
▷ Upper body region.
▷ Upper body region and footwell.
▷ Footwell.
Air volume, manual
To be able to manually adjust the air volume,
switch off the AUTO program first. Seite 129
129Online Edition for Part no. 01 40 2 606 497 - 03 11 490
Reference Mobility Communication Entertainment Navigation Driving tips
Controls At a glance
Page 131 of 299
The system continues to run for some time after
being switched off.
Preselecting the switch-on time
1.
"Settings"
2. "Climate"
3. "Timer 1:" or "Timer 2:"
4. Set the desired time.
Activating the switch-on time
1. "Settings"
2. "Climate"
3. "Activate Timer 1" or "Activate Timer 2" The symbol on the automatic climate control
lights up when the switch-on time is activated. The symbol on the automatic climate control
flashes when the system has been switched on.
The system will only be switched on within the
next 24 hours. After that, it needs to reactivated.
Seite 131
131Online Edition for Part no. 01 40 2 606 497 - 03 11 490
Reference Mobility Communication Entertainment Navigation Driving tips
Controls At a glance
Page 133 of 299
To do so:
▷
Read the instructions of the hand-held
transmitter.
▷ Press the memory button of the universal
remote control for an extended period.
If the LED flashes rapidly for a brief period and
then lights up continuously for approx. 2 sec‐
onds, the hand-held transmitter is equipped
with an alternating code system.
In this case, program the memory buttons as
described under Alternating-code hand-held
transmitters.
Alternating-code hand-held
transmitters
Please obtain information on synchronizing the
device
in the operating manual of the device be‐
ing set up.
Programming will be easier with the aid of a sec‐
ond person.
1. Park the vehicle within range of the remote-
controlled device.
2. Program the universal remote control as de‐
scribed above under Fixed-code hand-held
transmitters.
3. Press and hold the programmed button on
the
interior rearview mirror for approx. 5 sec‐
onds until the device to be adjusted is acti‐
vated.
If the device does not become activated,
press and hold the button and watch the
LED:
▷ If the LED lights up continuously, the
programming is completed. The device
should
become activated when the but‐
ton is pressed briefly.
▷ If the LED flashes for approx. 2 seconds
and then lights up continuously, con‐
tinue the programming procedure be‐
ginning with step 4.
4. Locate the button on the receiver of the de‐
vice to be set, e.g., on the drive. 5.
Press the button on the receiver of the de‐
vice
to be set. You have approx. 30 seconds
for the next step.
6. Press the programmed memory button of
the universal remote control three times.
The device can be operated when the engine is
running or the ignition is switched on.
Reassigning individual programs
1. Switch on the ignition.
2. Hold the hand-held transmitter a distance of
approx.
2 to 8 in/5 to 20 cm from the memory
buttons.
3. Press the memory button of the universal
remote control.
4. If the LED flashes slowly after approx.
20 seconds, press the transmit button on
the hand-held transmitter.
5. Release both buttons when the LED flashes
rapidly.
If
the LED does not flash rapidly after approx.
15 seconds, change the distance and repeat
the step.
Deleting all stored programs
Press the left and right memory buttons for ap‐
prox. 20 seconds until the LED flashes rapidly.
All stored programs are deleted.
The programs cannot be deleted individually.
Seite 133
133Online Edition for Part no. 01 40 2 606 497 - 03 11 490
Reference Mobility Communication Entertainment Navigation Driving tips
Controls At a glance
Page 135 of 299

load of all sockets must not exceed 140 Watt at
12 V.
Do not damage the socket by using unsuitable
connectors.
Front center console
Press on the cover.
Remove the cover or cigarette lighter*.
Rear center console
Remove the cover or cigarette lighter*.
In the cargo area*
Remove the cover. Rear cooler*
Behind the center armrest The cooler is located behind the center armrest
in the rear.
Fold the center armrest down.
Opening
Pull on the opener and fold the cooler forward.
Switching on
The cooler can be operated at two levels.
1.
Switch on the ignition.
2. Press the button once for each cool‐
ing level.
The highest cooling power is active when
two LEDs are lit.
If the cooler was switched on the last time the
ignition was switched on, it will likewise be
switched on the next time the ignition is
switched on.
Switching off
Press the button repeatedly until the LEDs go
out.
Seite 135
135Online Edition for Part no. 01 40 2 606 497 - 03 11 490
Reference Mobility Communication Entertainment Navigation Driving tips
Controls At a glance
Page 137 of 299
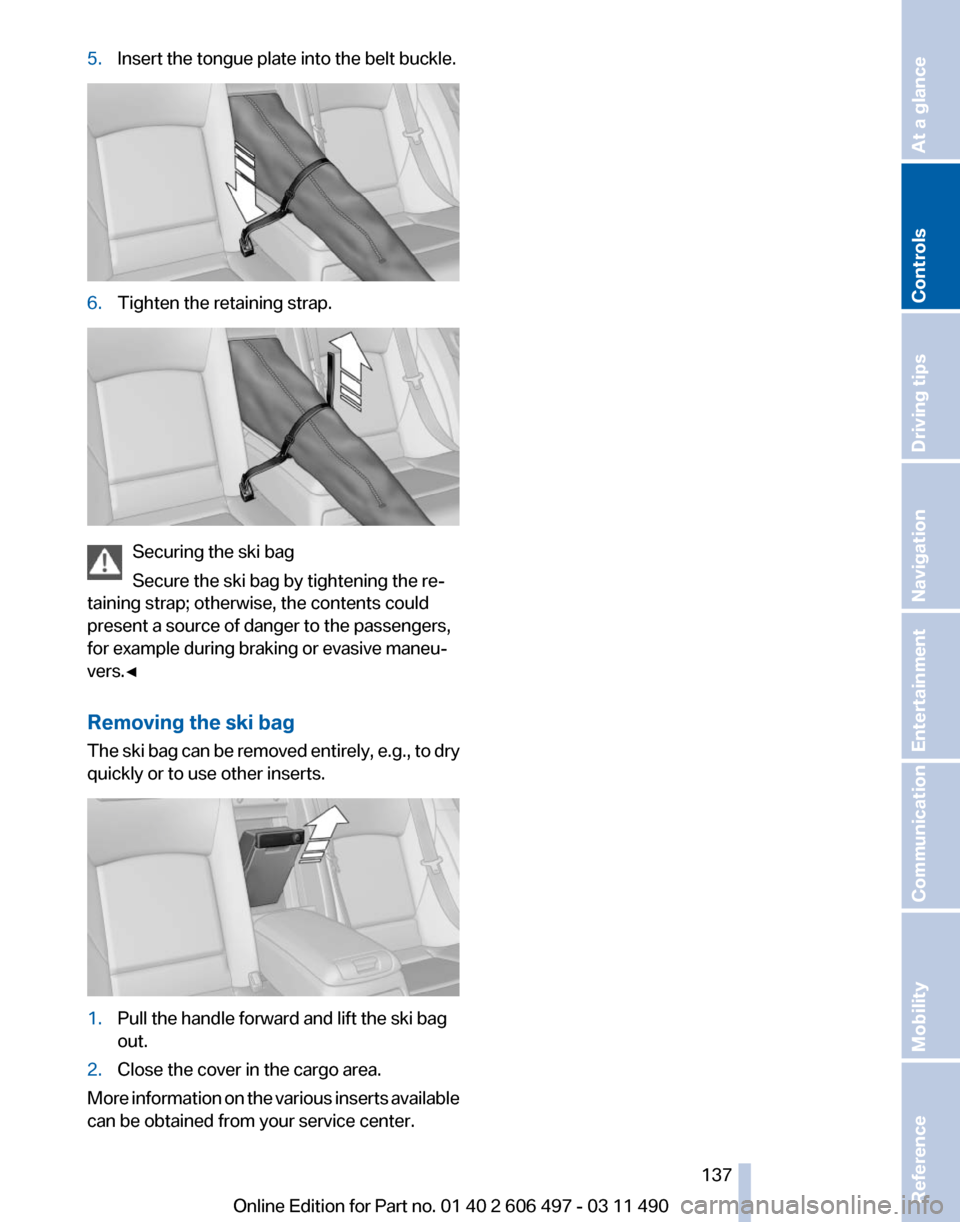
5.
Insert the tongue plate into the belt buckle. 6.
Tighten the retaining strap. Securing the ski bag
Secure the ski bag by tightening the re‐
taining strap; otherwise, the contents could
present a source of danger to the passengers,
for example during braking or evasive maneu‐
vers.◀
Removing the ski bag
The
ski bag can be removed entirely, e.g., to dry
quickly or to use other inserts. 1.
Pull the handle forward and lift the ski bag
out.
2. Close the cover in the cargo area.
More information on the various inserts available
can be obtained from your service center. Seite 137
137Online Edition for Part no. 01 40 2 606 497 - 03 11 490
Reference Mobility Communication Entertainment Navigation Driving tips
Controls At a glance
Page 139 of 299

Driver's side
Opening
Pull the handle.
Close the glove compartment again im‐
mediately
Close
the glove compartment immediately after
use while driving; otherwise, injury may occur
during accidents.◀
Closing
Fold up the cover.
Center armrest
Front
A storage compartment is located in the center
armrest between the front seats.
Opening Press the buttons next to the lock. Locking the storage compartment
The storage compartment in the armrest can be
locked with an integrated key to separately se‐
cure
the trunk lid, refer to page 41, for example.
After the storage compartment is locked, the re‐
mote control can be handed out without the
integrated key, refer to page 32, for instance at
a hotel.
This prevents access to the storage compart‐
ment and to the cargo area.
Connection for an external audio
device This can be used to connect an external audio
device, such as a CD or MP3 player.
▷
AUX-IN port, refer to page 190.
▷ USB audio interface*, refer to page 191.
Rear
A storage compartment is located in the center
armrest between the seats.
Opening
Depending
on the equipment in your vehicle, the
button is in the depression at the front of the
center armrest or on top of the center armrest.
Seite 139
139Online Edition for Part no. 01 40 2 606 497 - 03 11 490
Reference Mobility Communication Entertainment Navigation Driving tips
Controls At a glance
Page 141 of 299
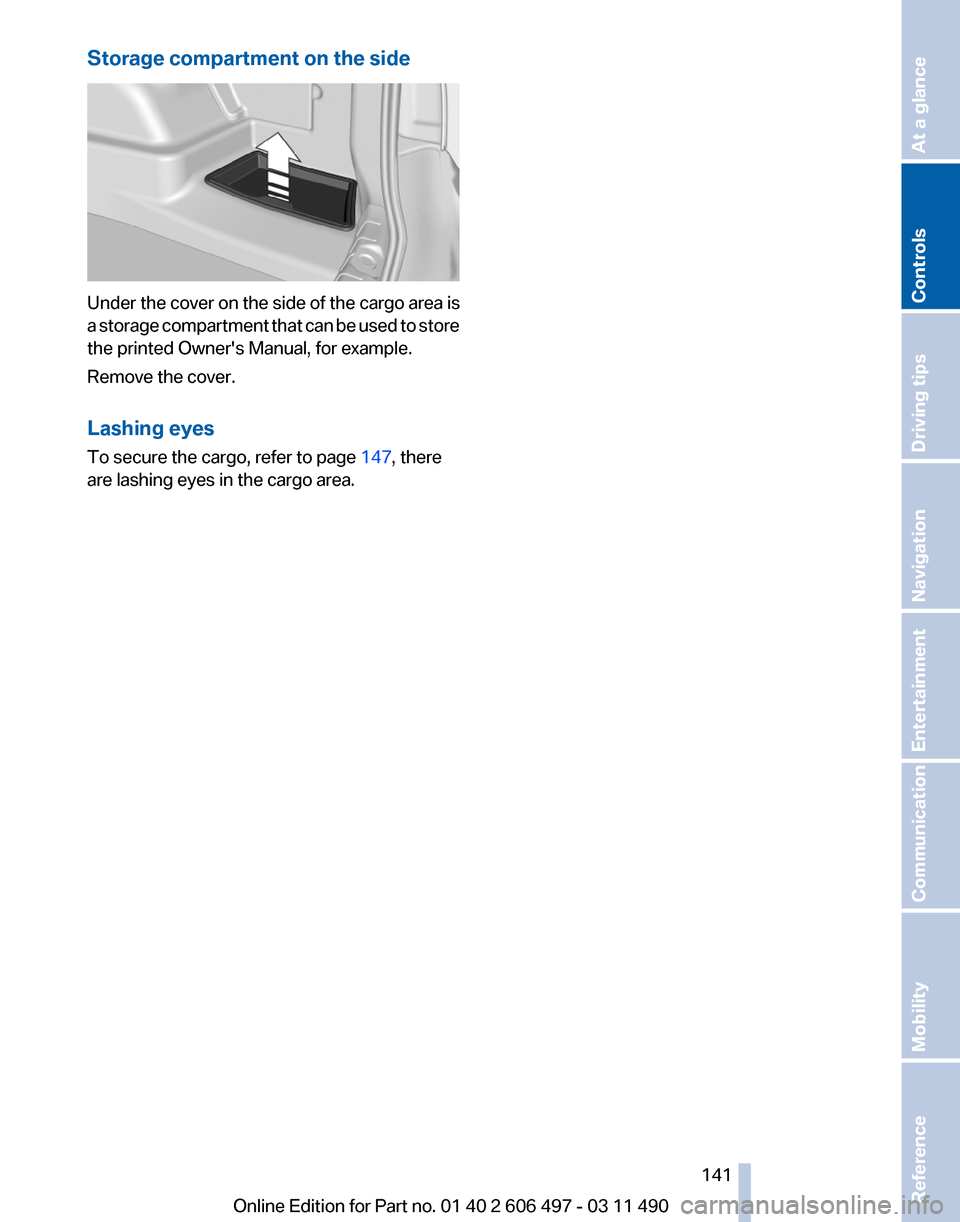
Storage compartment on the side
Under the cover on the side of the cargo area is
a
storage compartment that can be used to store
the printed Owner's Manual, for example.
Remove the cover.
Lashing eyes
To secure the cargo, refer to page 147, there
are lashing eyes in the cargo area.
Seite 141
141Online Edition for Part no. 01 40 2 606 497 - 03 11 490
Reference Mobility Communication Entertainment Navigation Driving tips
Controls At a glance
Page 145 of 299

Climate control windshield*
The marked area is not covered with heat re‐
flective coating.
Use this area for garage door openers, devices
for electronic toll collection, etc.
Climate
control laminated tinted safety
glass*
The vehicle glass provides full protection
against the harmful effects of UV radiation on the
skin.
Mobile communication devices in the
vehicle
Mobile communication devices in the ve‐
hicle
It is advised that you do not use mobile commu‐
nication devices, e.g., mobile phones, inside the
vehicle without connecting them directly to the
external antenna. Otherwise, the vehicle elec‐
tronics and mobile communication devices can
interfere with each other. In addition, there is no
assurance that the radiation generated during
transmission will be discharged from the vehicle
interior.◀
Hydroplaning
On wet or slushy roads, a wedge of water can
form between the tires and road surface.
This phenomenon is referred to as hydroplan‐
ing. It is characterized by a partial or complete
loss of contact between the tires and the road
surface, ultimately undermining your ability to
steer and brake the vehicle. Hydroplaning
When driving on wet or slushy roads, re‐
duce your speed to prevent hydroplaning.
◀
Driving through water
Drive though calm water only if it is not deeper
than 9.8 inches/25 cm and at this height, no
faster than walking speed, up to 6 mph/10 km/h. Adhere to water depth and speed limita‐
tions
Do not exceed this water depth and walking
speed; otherwise, the vehicle's engine, the elec‐
trical systems and the transmission may be
damaged.◀
Braking safely
Your vehicle is equipped with ABS as a standard
feature.
Applying the brakes fully is the most effective
way of braking in situations when this is neces‐
sary.
The vehicle maintains steering responsiveness.
You can still avoid any obstacles with a minimum
of steering effort.
Pulsation of the brake pedal and sounds from
the hydraulic circuits indicate that ABS is in its
active mode.
Objects in the area around the pedals
No objects in the area around the pedals
Keep floor mats, carpets, and any other
objects out of the area of motion of the pedals;
otherwise, the function of the pedals could be
impeded while driving
Do not place additional floor mats over existing
mats or other objects.
Only use floor mats that have been approved for
the vehicle and can be properly fixed in place.
Ensure that the floor mats are securely fastened
again after they were removed for cleaning, for
example.◀ Seite 145
145Online Edition for Part no. 01 40 2 606 497 - 03 11 490
Reference Mobility Communication Entertainment Navigation
Driving tips Controls At a glance