2011 BMW 740I service
[x] Cancel search: servicePage 202 of 299
To set the source in the rear via the iDrive in the
front:
1.
"CD/Multimedia" or"Radio"
2. Open "Options".
3. "Select rear source"
4. Select the desired audio or video source.
Same priority
▷ All audio and video sources can be operated
via the iDrive in the front and rear.
▷ Sound is output in the rear via headphones:
the
source selected via the iDrive in the front
is output on the vehicle loudspeakers.
▷ Sound is output via loudspeakers: the
source
selected last via the iDrive in the front
or rear is output via the vehicle loudspeak‐
ers.
The rear has priority
▷ When the source selected in the rear is
played on headphones, it can be selected
but
not operated via iDrive in the front. Other
audio or video sources can be operated.
▷ Sound is output in the rear via headphones:
the
source selected via the iDrive in the front
is output on the vehicle loudspeakers.
▷ Sound is output via loudspeakers: the
source selected in the rear is output on the
vehicle loudspeakers. Audio or video sour‐
ces cannot be selected via the iDrive in the
front.
Switching off the rear DVD
▷ Rear entertainment is switched off.
▷ To switch rear entertainment back on: select
a different priority via the iDrive in the front
and switch on the system, refer to
page 199. Headphones, vehicle
loudspeakers
Connecting the headphones
Normal headphones
Connect via the jack 1/8"/3.5 mm, refer to
page
199, on the rear CD/DVD player.
Infrared headphones
Connection via the infrared interface on the
lower edge of the screen.
Fitting infrared headphones and information on
which headphones are supported can be ob‐
tained from your service center.
When using infrared headphones, ensure that
the connection between the headphones and
the infrared interface is not disrupted:
▷ Do not place an obstacle between the inter‐
face and headphones.
▷ Do not cover the interface.
▷ Do not scratch the interface.
Fold up display screens for interference-free re‐
ception.
Unfavorable light conditions such as bright am‐
bient light can impair reception.
Sound output on the headphones or
vehicle loudspeakers
Operation is only possible in the rear.
1. Open "Options".
2. "Headphones" or "Loudspeakers"
With the following setting, sound output in the
rear is not possible via the vehicle speakers:
"Driver control".
External devices
General information
External audio and video devices and digital
cameras
can be connected to cinch sockets, re‐
fer to page 199, on the CD/DVD player. Opera‐
tion takes place on the external device.
Seite 202
202 Online Edition for Part no. 01 40 2 606 497 - 03 11 490
Rear entertainment
Page 207 of 299
The rear has priority
▷
When the source selected in the rear is
played on headphones, it can be selected
but
not operated via iDrive in the front. Other
audio or video sources can be operated.
▷ Sound is output in the rear via headphones:
the
source selected via the iDrive in the front
is output on the vehicle loudspeakers.
▷ Sound is output via loudspeakers: the
source selected in the rear is output on the
vehicle loudspeakers. Audio or video sour‐
ces cannot be selected via the iDrive in the
front.
Switching off the rear DVD
▷ Rear entertainment is switched off.
▷ To switch rear entertainment back on: select
a different priority via the iDrive in the front
and switch on the system, refer to
page 204.
Headphones, vehicle
loudspeakers
Connecting the headphones
Normal headphones
Connect via the jack 1/8"/3.5 mm, refer to
page 204, on the rear CD/DVD player.
Infrared headphones
Connection via the infrared interface on the
lower edge of the screen.
Fitting infrared headphones and information on
which headphones are supported can be ob‐
tained from your service center.
When using infrared headphones, ensure that
the connection between the headphones and
the infrared interface is not disrupted:
▷ Do not place an obstacle between the inter‐
face and headphones.
▷ Do not cover the interface.
▷ Do not scratch the interface. Fold up display screens for interference-free re‐
ception.
Unfavorable light conditions such as bright am‐
bient light can impair reception.
Sound output on the headphones or
vehicle loudspeakers
Operation is only possible in the rear.
1.
Open "Options".
2. "Headphones" or "Loudspeakers"
With the following setting, sound output in the
rear is not possible via the vehicle speakers:
"Driver control".
External devices
General information
External audio and video devices and digital
cameras
can be connected to cinch sockets, re‐
fer to page 204, on the CD/DVD player. Opera‐
tion takes place on the external device.
Due to the large number of different audio and
video devices available on the market, it cannot
be ensured that every audio and video device
will be displayed correctly on the screen.
Connecting an external device
1. Fold down the cover in front of the cinch
sockets on the CD/DVD player.
2. Connect the external device to the RCA
sockets.
▷Video: yellow socket.
▷ Audio: white and red socket.
Starting playback
1. "CD/Multimedia"
2. "External devices"
3. Select the or symbol.
Volume
The volume of the sound output is dependent
on the audio device. If this volume differs mark‐
Seite 207
207Online Edition for Part no. 01 40 2 606 497 - 03 11 490
Reference Mobility Communication
Entertainment Navigation Driving tips Controls At a glance
Page 211 of 299
Communication
All of the options available to you for mobile
communication with family, friends, business
partners, and service providers are described in this chapter.
Online Edition for Part no. 01 40 2 606 497 - 03 11 490
Page 212 of 299

Telephone*
At a glance
The concept
Mobile
phones or other external devices such as
audio players can be connected to the vehicle
via Bluetooth.
After these devices are paired once, they are
recognized automatically when the ignition is
switched on as soon as they are inside the ve‐
hicle and can be operated via iDrive, the buttons
on the steering wheel, and via voice activation*.
Depending on their functionality, external devi‐
ces can be used via the vehicle as a telephone
or as an audio source.
The telephone functions are described in the
following. Operating the audio functions, refer to
page 194.
Up to four external devices can be paired.
Certain functions may need to be enabled by the
mobile phone provider or service provider.
Using the mobile phone while driving
Make entries only when traffic and road
conditions allow. Do not hold the mobile phone
in your hand while you are driving; use the
hands-free system instead. If you do not ob‐
serve this precaution, you can endanger the ve‐
hicle occupants and other road users.◀
Snap-in adapter*
The snap-in adapter is used to:
▷ Hold the mobile phone.
▷ Recharge the battery.
▷ Connect the mobile phone to an outside an‐
tenna of the vehicle.
This provides for better network reception
and consistent sound quality.
Approved mobile phones
Details on which mobile phones and external
devices with a Bluetooth interface are sup‐
ported by the mobile phone preparation pack‐ age can be obtained at www.bmwusa.com/blue‐
tooth.
Displaying the vehicle identification
number and software part number
The vehicle identification number and software
part
number are needed to determine which mo‐
bile phones are supported by the mobile phone
preparation package. The software version of
the mobile phone may also be required.
1. "Telephone"
2. Open "Options".
3. "Bluetooth® info"
4. "Display system information"
These approved mobile phones with a certain
software version, support the vehicle functions
described below.
Malfunctions may occur with other mobile
phones or software versions.
Do
not operate a mobile phone that is connected
to the vehicle on the mobile phone keypad, as
this may lead to a malfunction.
A software update can be performed if neces‐
sary.
Pairing/unpairing the mobile
phone
General information
The following functions are available:
▷ Use of a mobile phone as a telephone.
▷ Use of a mobile phone as an additional tele‐
phone.
▷ Use of a mobile phone as an audio source.
▷ Use of an audio device as an audio source,
refer to page 194.
Requirements
▷ The mobile phone is suitable.
Seite 212
212 Online Edition for Part no. 01 40 2 606 497 - 03 11 490
Telephone
Page 215 of 299
The mobile phone could not be paired or con‐
nected.
▷
Is Bluetooth activated in the vehicle and on
the
mobile phone? Activate Bluetooth in the
vehicle and on the mobile phone.
▷ Do the Bluetooth passkeys on the mobile
phone and the vehicle match? Enter the
same passkey on the mobile phone and via
iDrive.
▷ Did it take longer than 30 seconds to enter
the
passkey? Repeat the pairing procedure.
▷ Are too many Bluetooth devices connected
to
the mobile phone or vehicle? Delete con‐
nections with other devices if necessary.
▷ Is the audio connection activated? Deacti‐
vate the audio connection.
▷ Is the mobile phone in power-save mode or
does
it have only a limited remaining battery
life? Charge the mobile phone in the snap-
in adapter* or via the charging cable.
▷ Depending on the mobile phone, it is possi‐
ble that only one device can be connected
to the vehicle. Unpair the connected device
from the vehicle and pair and connect only
one device.
▷ The mobile phone no longer reacts? Switch
the mobile phone off and on again. Repeat
the pairing procedure.
The telephone functions are not available.
▷ Is the mobile phone paired as an additional
telephone and is the additional telephone
function
deactivated? Activate the function.
▷ Is an outgoing call not possible? Connect
the mobile phone as a telephone.
No or not all phone book entries are displayed,
or they are incomplete.
▷ Transmission of the phone book entries is
not yet complete.
▷ It is possible that only the phone book en‐
tries of the mobile phone or the
SIM card*
are transmitted.
▷ It may not be possible to display phone book
entries with special characters. ▷
The number of phone book entries being
stored is too high.
▷ Is the data volume of the contact too large,
e.g., due to stored information such as
notes? Reduce the data volume of the con‐
tact.
▷ Is the mobile phone connected as an audio
source
or additional telephone? The mobile
phone must be connected as a telephone.
The phone connection quality is poor.
▷ The strength of the Bluetooth signal on the
mobile phone can be adjusted, depending
on the mobile phone.
▷ Insert the mobile phone into the snap-in
adapter* or place it in the area of the center
console.
▷ Adjust the volume of the microphone and
loudspeakers separately.
If all points in this list have been checked and the
required function is still not available, please
contact the hotline or service center.
Controls
Adjusting the volume
Turn the knob until the desired volume is se‐
lected.
The setting is stored for the remote con‐
trol currently in use.
The vehicle automatically adjusts the volume of
the microphone on the telephone and the vol‐
ume of the called party. Depending on the mo‐
bile phone, the volumes may need to be ad‐
justed. The settings can only be created during
a call and must be adjusted separately for each
telephone. The settings are deleted when the
telephone is unpaired.
1. "Settings"
2. "Tone"
3. "Volume settings"
4. Select the desired setting: "Microphone" or
"Loudspeak."
5. To adjust: turn the controller.
6. To store: press the controller.
Seite 215
215Online Edition for Part no. 01 40 2 606 497 - 03 11 490
Reference Mobility
Communication Entertainment Navigation Driving tips Controls At a glance
Page 217 of 299
must be supported by the mobile phone and
service provider.
Accepting a call while speaking to
another party
This function might have to be activated by the
service provider and the mobile phone must be
adjusted accordingly.
If
a second call comes in during an ongoing call,
a call waiting signal is sounded where appropri‐
ate. "Accept"
The call is accepted and the existing call is put
on hold.
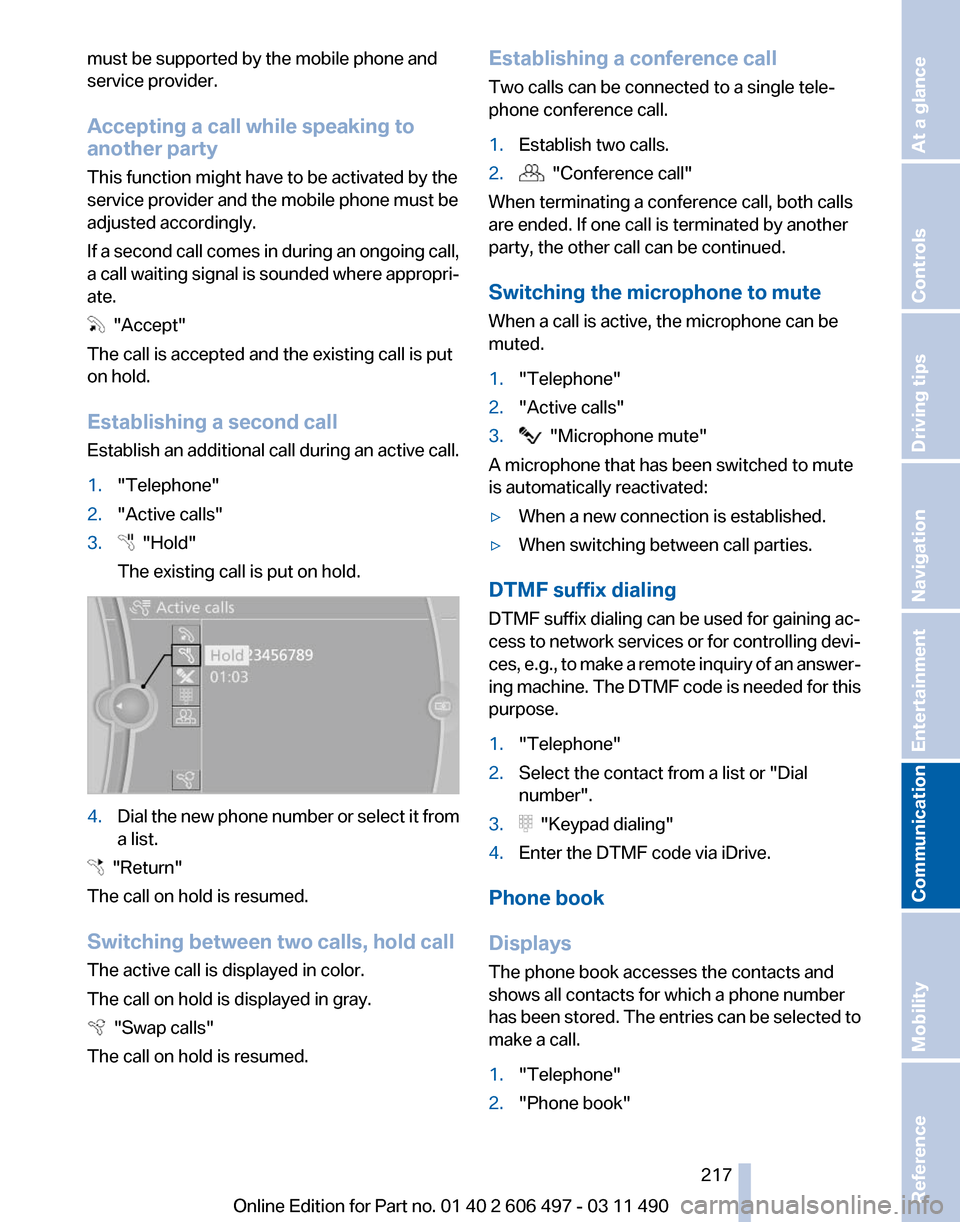
Establishing a second call
Establish
an additional call during an active call.
1. "Telephone"
2. "Active calls"
3. "Hold"
The existing call is put on hold. 4.
Dial the new phone number or select it from
a list. "Return"
The call on hold is resumed.
Switching between two calls, hold call
The active call is displayed in color.
The call on hold is displayed in gray. "Swap calls"
The call on hold is resumed. Establishing a conference call
Two calls can be connected to a single tele‐
phone conference call.
1.
Establish two calls.
2. "Conference call"
When terminating a conference call, both calls
are ended. If one call is terminated by another
party, the other call can be continued.
Switching the microphone to mute
When a call is active, the microphone can be
muted.
1. "Telephone"
2. "Active calls"
3. "Microphone mute"
A microphone that has been switched to mute
is automatically reactivated:
▷ When a new connection is established.
▷ When switching between call parties.
DTMF suffix dialing
DTMF suffix dialing can be used for gaining ac‐
cess
to network services or for controlling devi‐
ces, e.g., to make a remote inquiry of an answer‐
ing machine. The DTMF code is needed for this
purpose.
1. "Telephone"
2. Select the contact from a list or "Dial
number".
3. "Keypad dialing"
4. Enter the DTMF code via iDrive.
Phone book
Displays
The phone book accesses the contacts and
shows all contacts for which a phone number
has
been stored. The entries can be selected to
make a call.
1. "Telephone"
2. "Phone book"
Seite 217
217Online Edition for Part no. 01 40 2 606 497 - 03 11 490
Reference Mobility
Communication Entertainment Navigation Driving tips Controls At a glance
Page 218 of 299
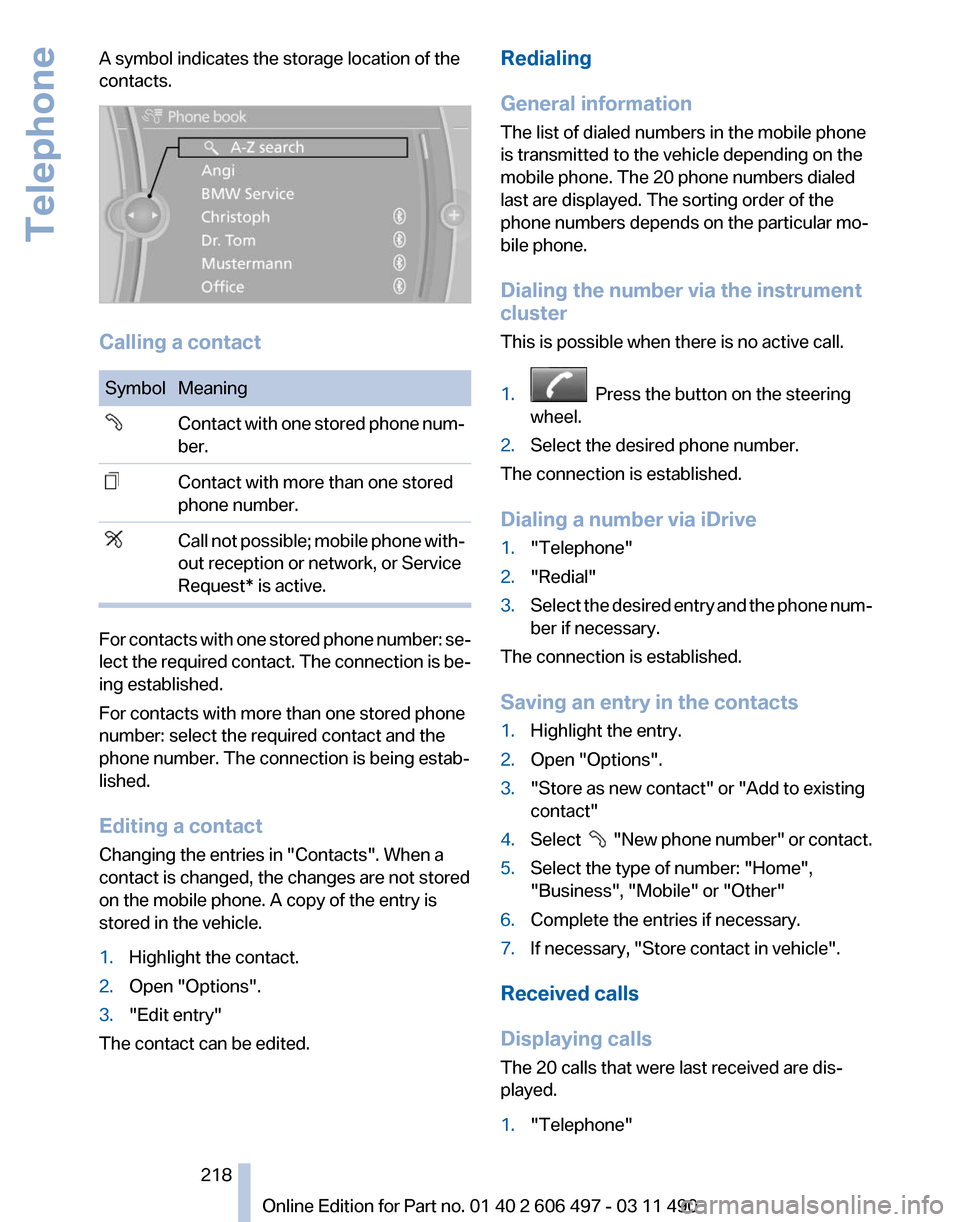
A symbol indicates the storage location of the
contacts.
Calling a contact
Symbol Meaning
Contact with one stored phone num‐
ber.
Contact with more than one stored
phone number.
Call not possible; mobile phone with‐
out reception or network, or Service
Request* is active.
For contacts with one stored phone number: se‐
lect
the required contact. The connection is be‐
ing established.
For contacts with more than one stored phone
number: select the required contact and the
phone number. The connection is being estab‐
lished.
Editing a contact
Changing the entries in "Contacts". When a
contact is changed, the changes are not stored
on the mobile phone. A copy of the entry is
stored in the vehicle.
1. Highlight the contact.
2. Open "Options".
3. "Edit entry"
The contact can be edited. Redialing
General information
The list of dialed numbers in the mobile phone
is transmitted to the vehicle depending on the
mobile phone. The 20 phone numbers dialed
last are displayed. The sorting order of the
phone numbers depends on the particular mo‐
bile phone.
Dialing the number via the instrument
cluster
This is possible when there is no active call.
1.
Press the button on the steering
wheel.
2. Select the desired phone number.
The connection is established.
Dialing a number via iDrive
1. "Telephone"
2. "Redial"
3. Select the desired entry and the phone num‐
ber if necessary.
The connection is established.
Saving an entry in the contacts
1. Highlight the entry.
2. Open "Options".
3. "Store as new contact" or "Add to existing
contact"
4. Select
"New phone number" or contact.
5. Select the type of number: "Home",
"Business", "Mobile" or "Other"
6. Complete the entries if necessary.
7. If necessary, "Store contact in vehicle".
Received calls
Displaying calls
The 20 calls that were last received are dis‐
played.
1. "Telephone"
Seite 218
218 Online Edition for Part no. 01 40 2 606 497 - 03 11 490
Telephone
Page 226 of 299
5.
"Delete contact"or "Delete all contacts".
6. If necessary. "Yes"
Messages
General information
Whether
or not text messages and e-mails from
the mobile phone are displayed depends on
whether transmission from the mobile phone to
the vehicle is supported. Text messages and e-
mails may not be supported by the service pro‐
vider, or the function may need to be enabled
separately. After the mobile phone is first paired,
transmission may take several minutes. Mes‐
sages are only displayed in full length when the
vehicle is stationary. Messages from the addi‐
tional telephone are not transmitted.
Display of different messages:
▷ Text messages.
▷ My Info* messages from the BMW Assist
Portal.
▷ Messages from the BMW Assist Concierge
service*.
▷ Messages from BMW Info*.
▷ E-mails from the mobile phone.
Displaying messages
1. "Office"
2. "Messages"
A symbol identifies the type of message. Symbol Message type
Text messages.
My Info
Message from the Concierge serv‐
ice. Message from BMW Info.
E-mail from mobile phone. Filtering the message list
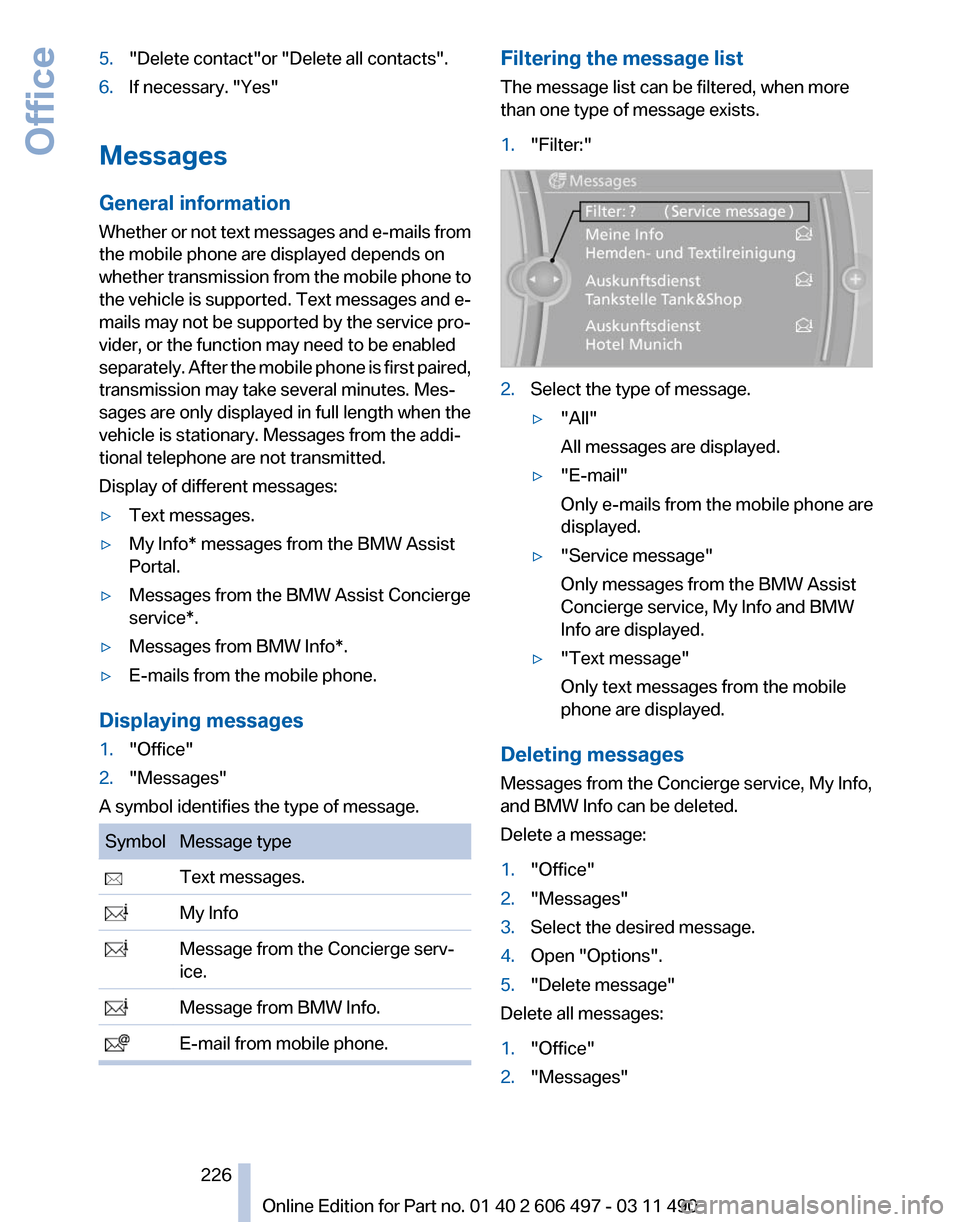
The message list can be filtered, when more
than one type of message exists.
1.
"Filter:" 2.
Select the type of message.
▷"All"
All messages are displayed.
▷ "E-mail"
Only e-mails from the mobile phone are
displayed.
▷ "Service message"
Only messages from the BMW Assist
Concierge service, My Info and BMW
Info are displayed.
▷ "Text message"
Only text messages from the mobile
phone are displayed.
Deleting messages
Messages from the Concierge service, My Info,
and BMW Info can be deleted.
Delete a message:
1. "Office"
2. "Messages"
3. Select the desired message.
4. Open "Options".
5. "Delete message"
Delete all messages:
1. "Office"
2. "Messages"
Seite 226
226 Online Edition for Part no. 01 40 2 606 497 - 03 11 490Office