2011 BMW 550I front center arm rest
[x] Cancel search: front center arm restPage 28 of 304

Opening and closing
Remote control/key
Buttons on the remote control
1
Unlocking
2 Locking
3 Trunk lid
4 Panic mode*, headlamp courtesy delay fea‐
ture
General information
The vehicle is supplied with two remote controls
with keys.
Every remote control contains a replaceable
battery.
The settings called up and implemented when
the vehicle is unlocked depend on which remote
control is used to unlock the vehicle, Personal
Profile, refer to page 29.
In addition, information about service require‐
ments is stored in the remote control, Service
data in the remote control, refer to page 260.Integrated key Press the button on the back of the remote con‐
trol, arrow 1, and pull out the key, arrow 2.
The integrated key fits the following locks:
▷
Driver's door.
▷ Storage compartment in the front center
armrest.
The storage compartment contains a switch for
separately securing the trunk lid, refer to
page 37.
Replacing the battery 1.
Take the integrated key out of the remote
control.
2. Push in the catch with the key, arrow 1.
3. Remove the cover of the battery compart‐
ment; see arrow 2.
4. Insert a battery of the same type with the
positive side facing upwards.
5. Press the cover closed.
Take the used battery to a recycling cen‐
ter or to your service center. Seite 28
28 Online Edition for Part no. 01 40 2 606 469 - 03 11 490
Opening and closing
Page 37 of 304

With Comfort Access:
▷
Press the button, arrow 1, on the inside of
the trunk lid.
The trunk lid closes automatically.
Pressing again stops the motion.
▷ Press the button, arrow 2.
The trunk lid closes automatically and the
vehicle is locked. ▷
Press the button on the exterior of the trunk
lid.
Pressing again stops the motion.
The closing operation is interrupted:
▷ When starting the engine.
▷ The vehicle starts off with jerks.
Danger of pinching
Make sure that the closing path of the
trunk
lid is clear; otherwise, injuries may result.◀ Do not place the remote control in the
cargo area
Take the remote control with you and do not
leave it in the cargo area; otherwise, the remote
control may be locked inside the vehicle when
the trunk lid is closed.◀ Manual operation
In the event of an electrical fault, manually op‐
erate the unlocked trunk lid slowly and
smoothly.
Locking separately
The
trunk lid can be locked separately using the
switch in the front center armrest.
▷Trunk lid secured, arrow 1.
▷ Trunk lid not secured, ar‐
row 2.
Slide the switch into the arrow 1 position. This
secures
the trunk lid and disconnects it from the
central locking system.
When the center armrest is locked, the tailgate
cannot be accessed. This is beneficial when the
vehicle is parked using valet service. The infra‐
red remote control can be handed out without
the key.
Emergency unlocking* Pull the handle inside the cargo area.
The trunk lid unlocks.
Comfort Access*
The concept
The vehicle can be accessed without activating
the remote control.
All you need to do is to have the remote control
with you, e.g., in your jacket pocket. Seite 37
37Online Edition for Part no. 01 40 2 606 469 - 03 11 490
Reference Mobility Communication Entertainment Navigation Driving tips
Controls At a glance
Page 135 of 304

Rear
Opening
Press on the cover.
Emptying
Take out the insert.
Lighter
Push in the lighter.
The lighter can be removed as soon as it pops
back out.
Danger of burns
Only hold the hot lighter by its knob; oth‐
erwise, there is the danger of getting burned.
Take the remote control with you when leaving
the vehicle so that children cannot use the
lighter and burn themselves.◀
Connecting
electrical devices
Sockets*
The lighter socket can be used as a socket for
electrical equipment while the engine is running
or when the ignition is switched on. The total load of all sockets must not exceed 140 Watt at
12 V.
Do not damage the socket by using unsuitable
connectors.
Front center console: manual
transmission
Press on the cover.
Remove the cover or cigarette lighter*.
Front center console:
automatic
transmission* Press on the cover.
Remove the cover or cigarette lighter*.
Center armrest*
Remove the cover.
Seite 135
135Online Edition for Part no. 01 40 2 606 469 - 03 11 490
Reference Mobility Communication Entertainment Navigation Driving tips
Controls At a glance
Page 138 of 304

Storage compartments
Storage compartments
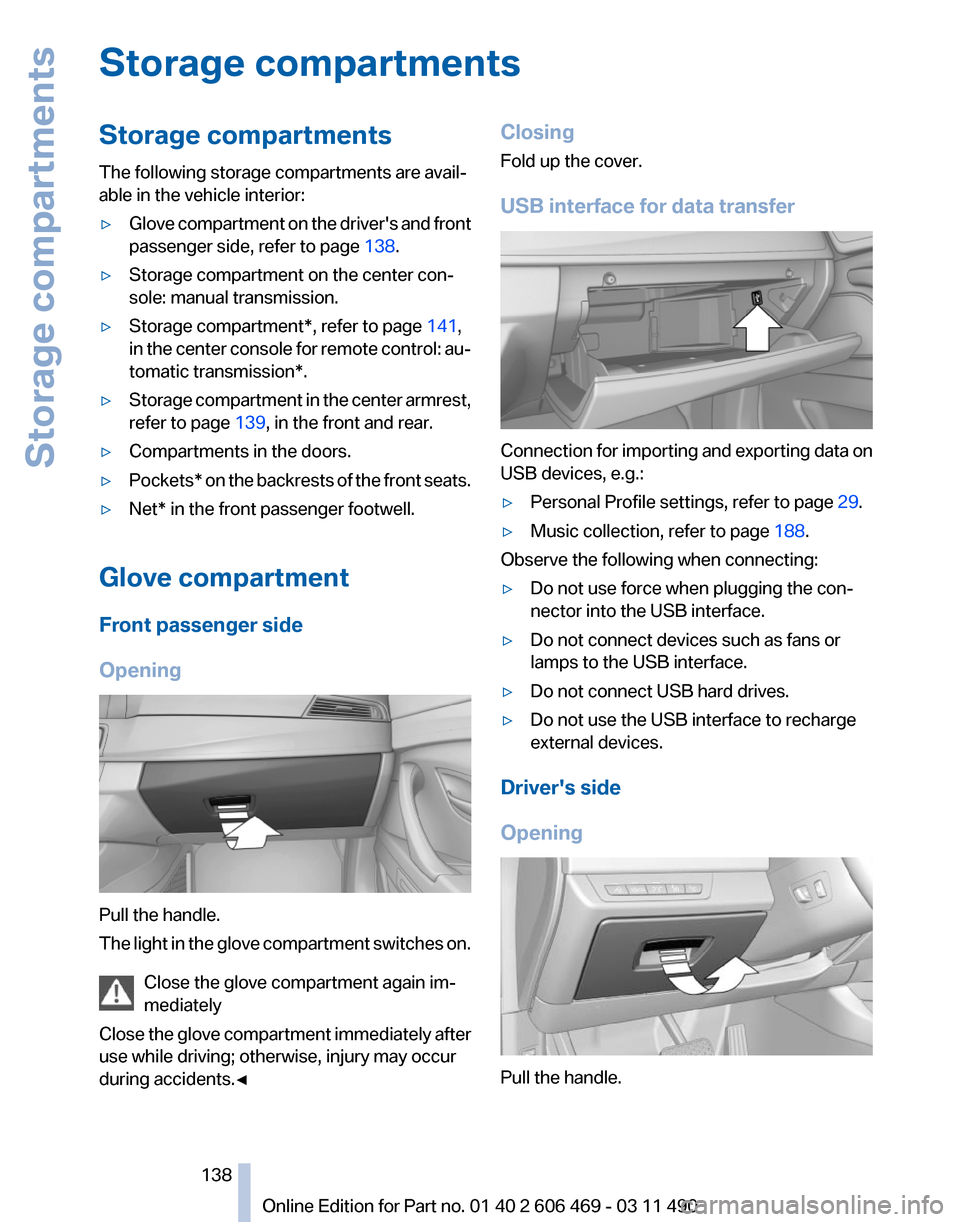
The following storage compartments are avail‐
able in the vehicle interior:
▷
Glove compartment on the driver's and front
passenger side, refer to page 138.
▷ Storage compartment on the center con‐
sole: manual transmission.
▷ Storage compartment*, refer to page 141,
in the center console for remote control: au‐
tomatic transmission*.
▷ Storage compartment in the center armrest,
refer to page 139, in the front and rear.
▷ Compartments in the doors.
▷ Pockets*
on the backrests of the front seats.
▷ Net* in the front passenger footwell.
Glove compartment
Front passenger side
Opening Pull the handle.
The
light in the glove compartment switches on.
Close the glove compartment again im‐
mediately
Close the glove compartment immediately after
use while driving; otherwise, injury may occur
during accidents.◀ Closing
Fold up the cover.
USB interface for data transfer
Connection for importing and exporting data on
USB devices, e.g.:
▷
Personal Profile settings, refer to page 29.
▷ Music collection, refer to page 188.
Observe the following when connecting:
▷ Do not use force when plugging the con‐
nector into the USB interface.
▷ Do not connect devices such as fans or
lamps to the USB interface.
▷ Do not connect USB hard drives.
▷ Do not use the USB interface to recharge
external devices.
Driver's side
Opening Pull the handle.
Seite 138
138 Online Edition for Part no. 01 40 2 606 469 - 03 11 490
Storage compartments
Page 139 of 304

Close the glove compartment again im‐
mediately
Close
the glove compartment immediately after
use while driving; otherwise, injury may occur
during accidents.◀
Closing
Fold up the cover.
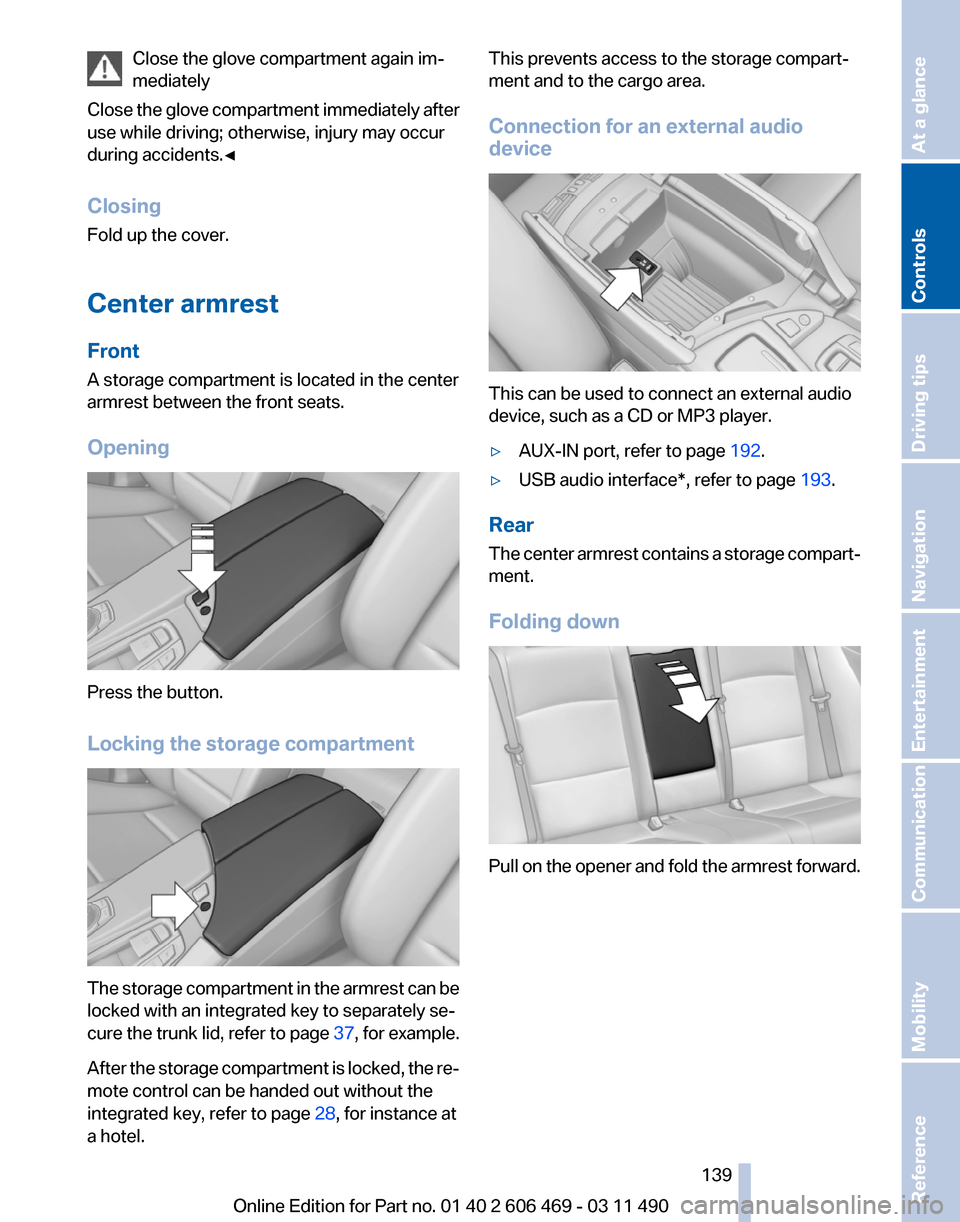
Center armrest
Front
A storage compartment is located in the center
armrest between the front seats.
Opening Press the button.
Locking the storage compartment
The storage compartment in the armrest can be
locked with an integrated key to separately se‐
cure
the trunk lid, refer to page 37, for example.
After the storage compartment is locked, the re‐
mote control can be handed out without the
integrated key, refer to page 28, for instance at
a hotel. This prevents access to the storage compart‐
ment and to the cargo area.
Connection for an external audio
device
This can be used to connect an external audio
device, such as a CD or MP3 player.
▷
AUX-IN port, refer to page 192.
▷ USB audio interface*, refer to page 193.
Rear
The
center armrest contains a storage compart‐
ment.
Folding down Pull on the opener and fold the armrest forward.
Seite 139
139Online Edition for Part no. 01 40 2 606 469 - 03 11 490
Reference Mobility Communication Entertainment Navigation Driving tips
Controls At a glance
Page 140 of 304

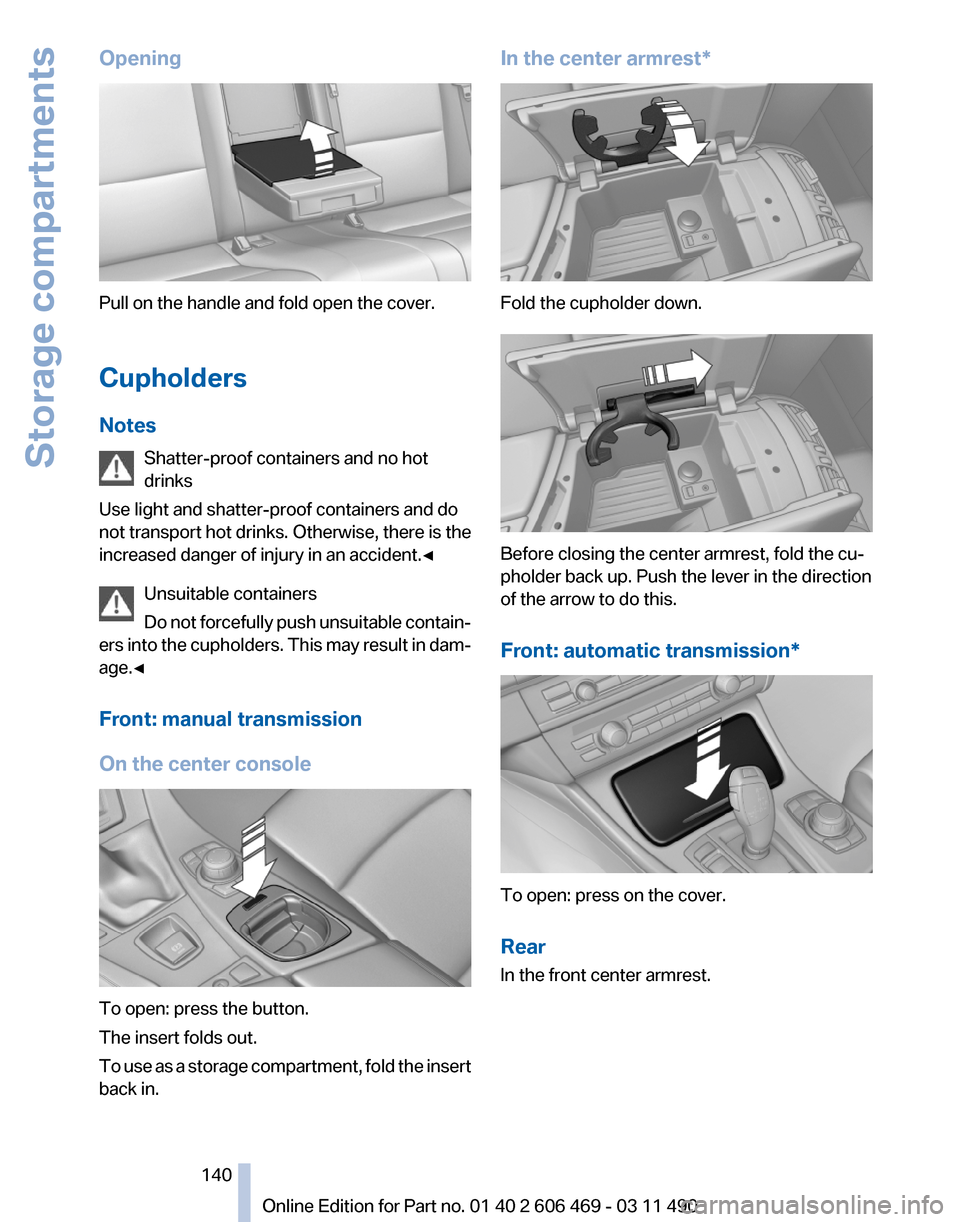
Opening
Pull on the handle and fold open the cover.
Cupholders
Notes
Shatter-proof containers and no hot
drinks
Use light and shatter-proof containers and do
not
transport hot drinks. Otherwise, there is the
increased danger of injury in an accident.◀
Unsuitable containers
Do not forcefully push unsuitable contain‐
ers into the cupholders. This may result in dam‐
age.◀
Front: manual transmission
On the center console To open: press the button.
The insert folds out.
To
use as a storage compartment, fold the insert
back in. In the center armrest*
Fold the cupholder down.
Before closing the center armrest, fold the cu‐
pholder back up. Push the lever in the direction
of the arrow to do this.
Front: automatic transmission
* To open: press on the cover.
Rear
In the front center armrest.
Seite 140
140 Online Edition for Part no. 01 40 2 606 469 - 03 11 490
Storage compartments
Page 193 of 304

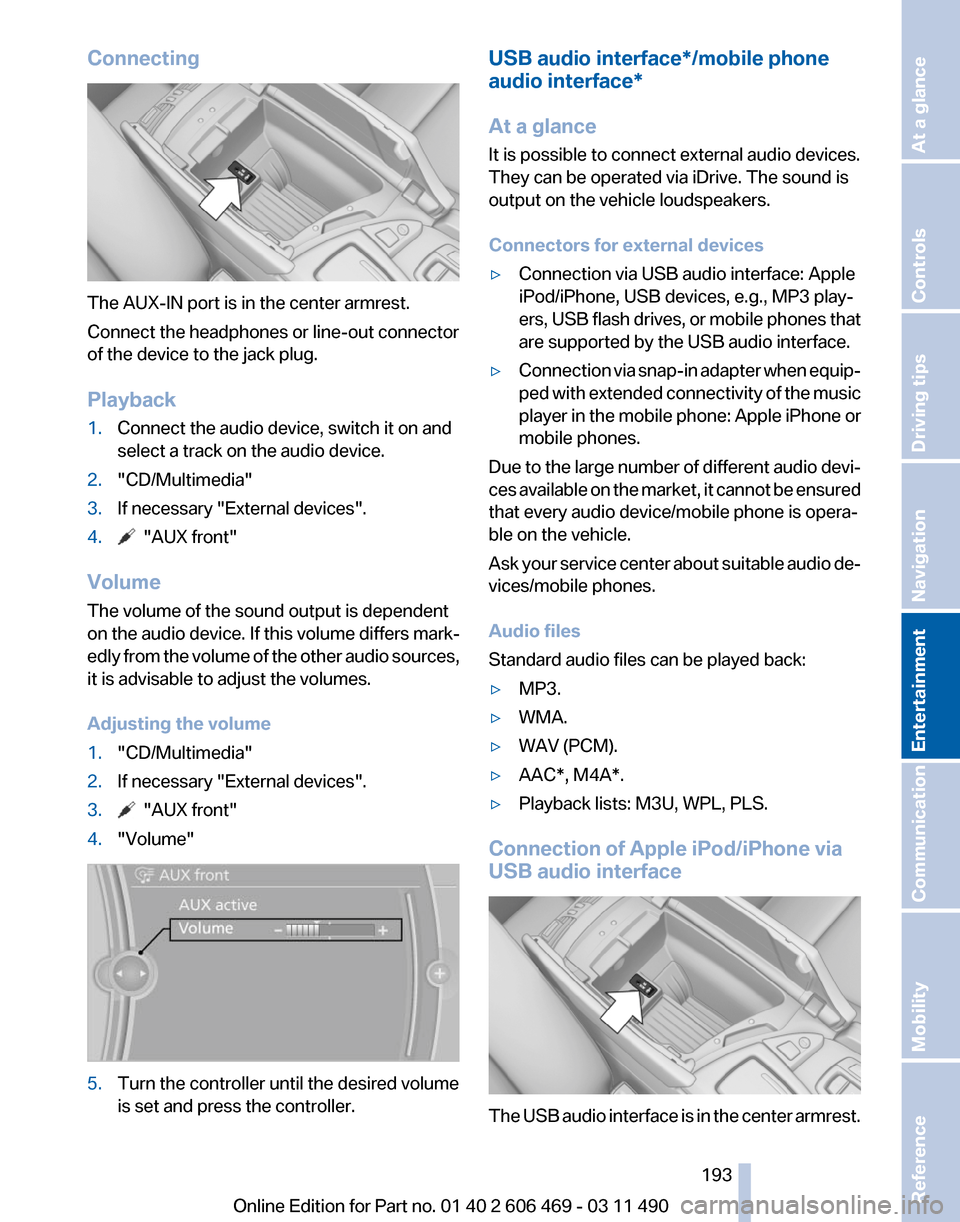
Connecting
The AUX-IN port is in the center armrest.
Connect the headphones or line-out connector
of the device to the jack plug.
Playback
1.
Connect the audio device, switch it on and
select a track on the audio device.
2. "CD/Multimedia"
3. If necessary "External devices".
4. "AUX front"
Volume
The volume of the sound output is dependent
on the audio device. If this volume differs mark‐
edly
from the volume of the other audio sources,
it is advisable to adjust the volumes.
Adjusting the volume
1. "CD/Multimedia"
2. If necessary "External devices".
3. "AUX front"
4. "Volume" 5.
Turn the controller until the desired volume
is set and press the controller. USB audio interface*/mobile phone
audio interface
*
At a glance
It is possible to connect external audio devices.
They can be operated via iDrive. The sound is
output on the vehicle loudspeakers.
Connectors for external devices
▷ Connection via USB audio interface: Apple
iPod/iPhone, USB devices, e.g., MP3 play‐
ers,
USB flash drives, or mobile phones that
are supported by the USB audio interface.
▷ Connection via snap-in adapter when equip‐
ped
with extended connectivity of the music
player in the mobile phone: Apple iPhone or
mobile phones.
Due to the large number of different audio devi‐
ces
available on the market, it cannot be ensured
that every audio device/mobile phone is opera‐
ble on the vehicle.
Ask your service center about suitable audio de‐
vices/mobile phones.
Audio files
Standard audio files can be played back:
▷ MP3.
▷ WMA.
▷ WAV (PCM).
▷ AAC*, M4A*.
▷ Playback lists: M3U, WPL, PLS.
Connection of Apple iPod/iPhone via
USB audio interface The USB audio interface is in the center armrest.
Seite 193
193Online Edition for Part no. 01 40 2 606 469 - 03 11 490
Reference Mobility Communication
Entertainment Navigation Driving tips Controls At a glance
Page 201 of 304

Rear entertainment*
Controls
1
Screen, left
2 Screen, right
3 Center armrest, remote control
4 CD/DVD player
Rear CD/DVD player 1
CD/DVD slot
2 Eject CD/DVD
3 On/off, right
4 Headphone connection, right
5 RCA sockets
6 Headphone connection, left
7 On/off, left
Switching the system on/off Press the left or right side of the button
on the CD/DVD player in the rear for the
respective page. Rear entertainment and screens are switched
on/off.
After
switching off the ignition, the system must
be switched on again.
Screens
Adjusting
Danger of burns when screen is folded out
Do not reach behind the screen; other‐
wise, there is the danger of getting burned. The
back of the screen can become very hot.◀ ▷
To fold out: pull at the bottom edge.
▷ To fold in: press against the bottom edge.
Notes
▷ Do not cover lower screen edge, since this
is where the sensors and the infrared inter‐
face are installed.
▷ When loading the rear seats and adjusting
the backrest of the front seat, fold in the
screens.
▷ When using the through-loading system*,
fold the screens down.
▷ When cleaning the screen, follow the care
instructions, refer to page 276. Seite 201
201Online Edition for Part no. 01 40 2 606 469 - 03 11 490
Reference Mobility Communication
Entertainment Navigation Driving tips Controls At a glance