2011 BMW 535I XDRIVE SEDAN open hood
[x] Cancel search: open hoodPage 13 of 304

8
Steering column stalk, left Turn signal 62
High beams, head‐
lamp flasher 62
High-beam Assistant* 82
Roadside parking lamps 81
Computer 75
9 Steering wheel buttons, left Store speed* 110 103
Resume speed 111 104
Cruise control on/off, interrupt‐
ing 110 102
Increase distance* 104
Decrease distance* 104
10 Instrument cluster 67
11 Steering wheel buttons, right Entertainment source
Volume Voice activation* 22
Telephone* 210
12 Steering column stalk, right Windshield wipers 62
Rain sensor*
63 Clean the windshields and head‐
lamps* 62
13 Start/stop the engine and switch
the ignition on/off 59
14 Horn
15 Steering wheel heating* 53
16 Adjust the steering wheel
53
17 Open the trunk lid
35
18 Unlocking the hood
Seite 13
13Online Edition for Part no. 01 40 2 606 469 - 03 11 490
Reference Mobility Communication Entertainment Navigation Driving tips Controls
At a glance
Page 39 of 304

If this occurs, open or close the vehicle using the
buttons
on the remote control or use a key in the
door lock.
To subsequently start the engine, hold the re‐
mote control against the marked area on the
steering column, refer to page 29.
Alarm system*
The concept
The vehicle alarm system responds to:
▷ Opening of a door, the hood or the trunk lid.
▷ Movements in the vehicle: interior motion
sensor, refer to page 40.
▷ Changes in the vehicle tilt, e.g., during at‐
tempts to steal a wheel or when towing the
car.
▷ Interruptions in battery voltage.
The alarm system briefly indicates tampering:
▷ By sounding an acoustic alarm.
▷ By switching on the hazard warning system.
▷ By flashing the high beams.
Arming and disarming the alarm
system
General information
When
you lock or unlock the vehicle, either with
the remote control or at the door lock*, the alarm
system is armed or disarmed at the same time.
Door lock and armed alarm system
Unlocking via the door lock will trigger the alarm
on some country-specific versions.
Trunk lid and armed alarm system
The trunk lid can be opened using the remote
control, even if the alarm system is armed.
Press the button on the remote control
for approx. 1 second and release.
After the trunk lid is closed, it is locked and
monitored again by the alarm system. The haz‐
ard warning system flashes once. In some vehicle equipment variants, the trunk lid
can only be opened using the remote control if
the vehicle was unlocked first.
Panic mode*
Press
the button on the remote control
for at least 3 seconds.
Switching off the alarm
▷ Unlock the vehicle using the remote control.
▷ With Comfort Access: If you are carrying the
remote control with you, pull on the door
handle.
Indicator lamp on the interior rearview
mirror ▷
The indicator lamp flashes briefly every
2 seconds:
The system is armed.
▷ The indicator lamp flashes after locking:
The doors, hood or trunk lid is not closed
properly, but the rest of the vehicle is se‐
cured.
After
10 seconds, the indicator lamp flashes
continuously. The interior motion sensor is
not active.
▷ The indicator lamp goes out after unlocking:
The vehicle has not been tampered with.
▷ The indicator lamp flashes after unlocking
until
the engine is started, but no longer than
approx. 5 minutes:
An alarm has been triggered.
Tilt alarm sensor
The tilt of the vehicle is monitored. Seite 39
39Online Edition for Part no. 01 40 2 606 469 - 03 11 490
Reference Mobility Communication Entertainment Navigation Driving tips
Controls At a glance
Page 255 of 304

Engine compartment
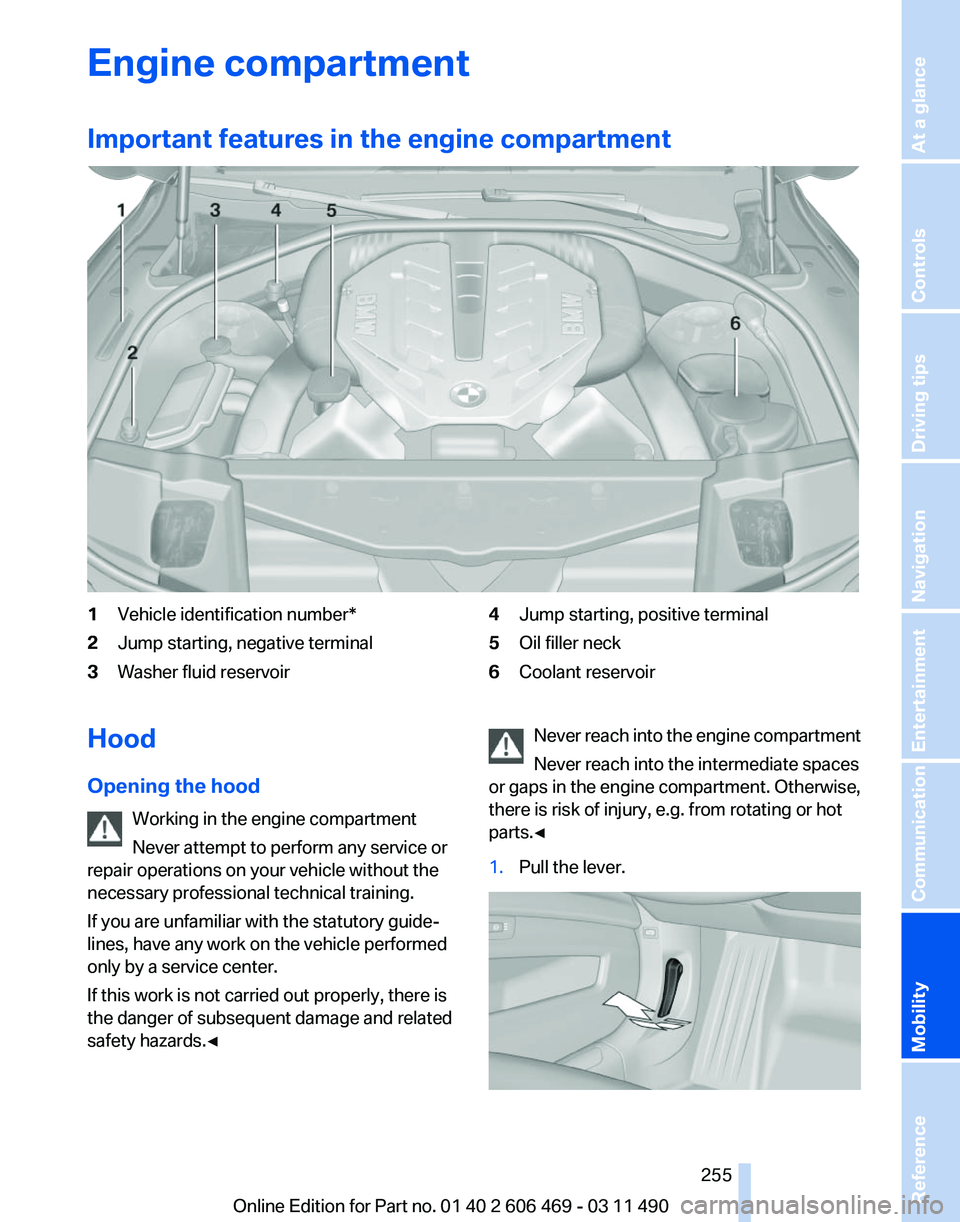
Important features in the engine compartment
1
Vehicle identification number*
2 Jump starting, negative terminal
3 Washer fluid reservoir 4
Jump starting, positive terminal
5 Oil filler neck
6 Coolant reservoir
Hood
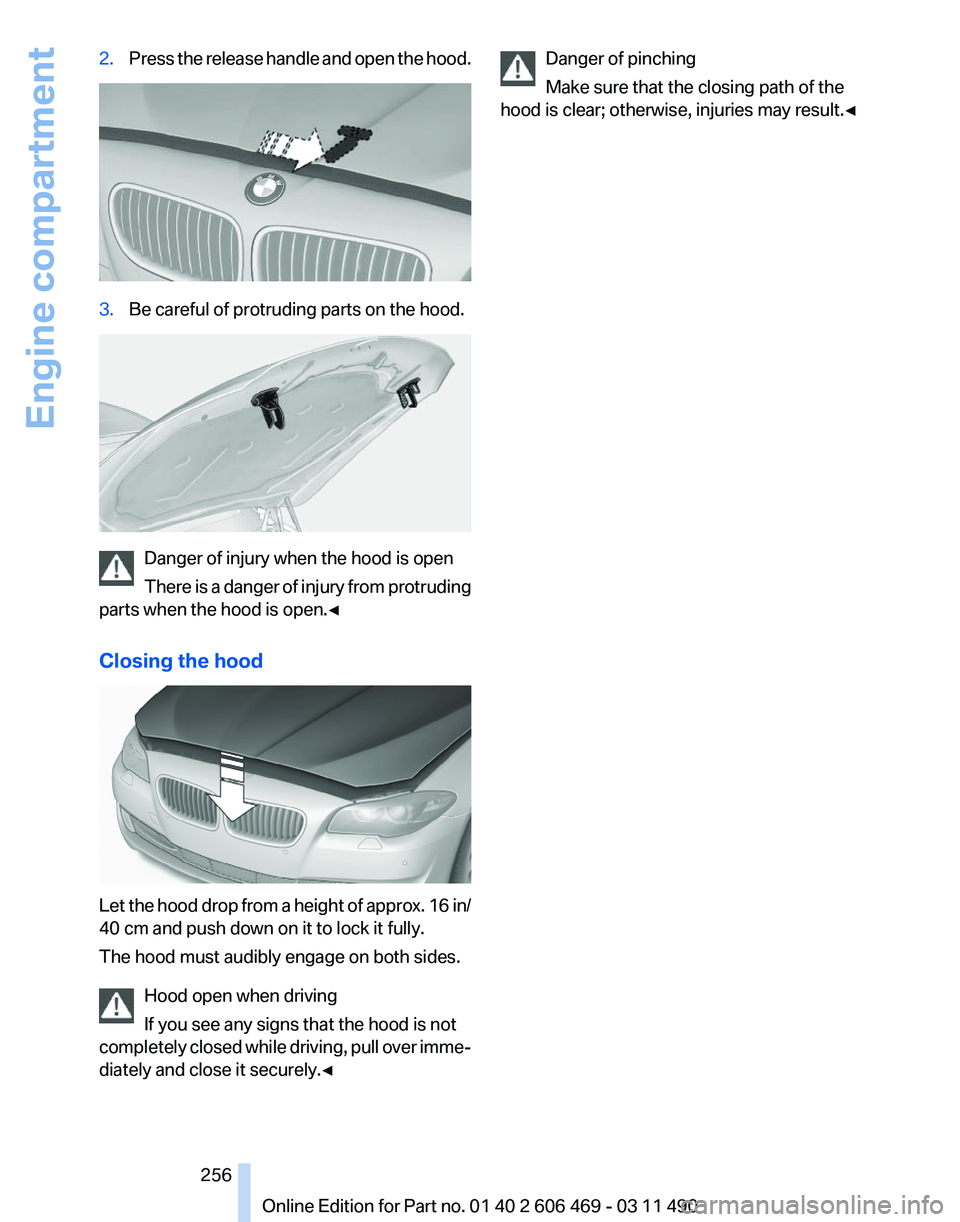
Opening the hood Working in the engine compartment
Never attempt to perform any service or
repair operations on your vehicle without the
necessary professional technical training.
If you are unfamiliar with the statutory guide‐
lines, have any work on the vehicle performed
only by a service center.
If this work is not carried out properly, there is
the danger of subsequent damage and related
safety hazards.◀ Never reach into the engine compartment
Never reach into the intermediate spaces
or gaps in the engine compartment. Otherwise,
there is risk of injury, e.g. from rotating or hot
parts.◀
1. Pull the lever. Seite 255
255Online Edition for Part no. 01 40 2 606 469 - 03 11 490
Reference
Mobility Communication Entertainment Navigation Driving tips Controls At a glance
Page 256 of 304

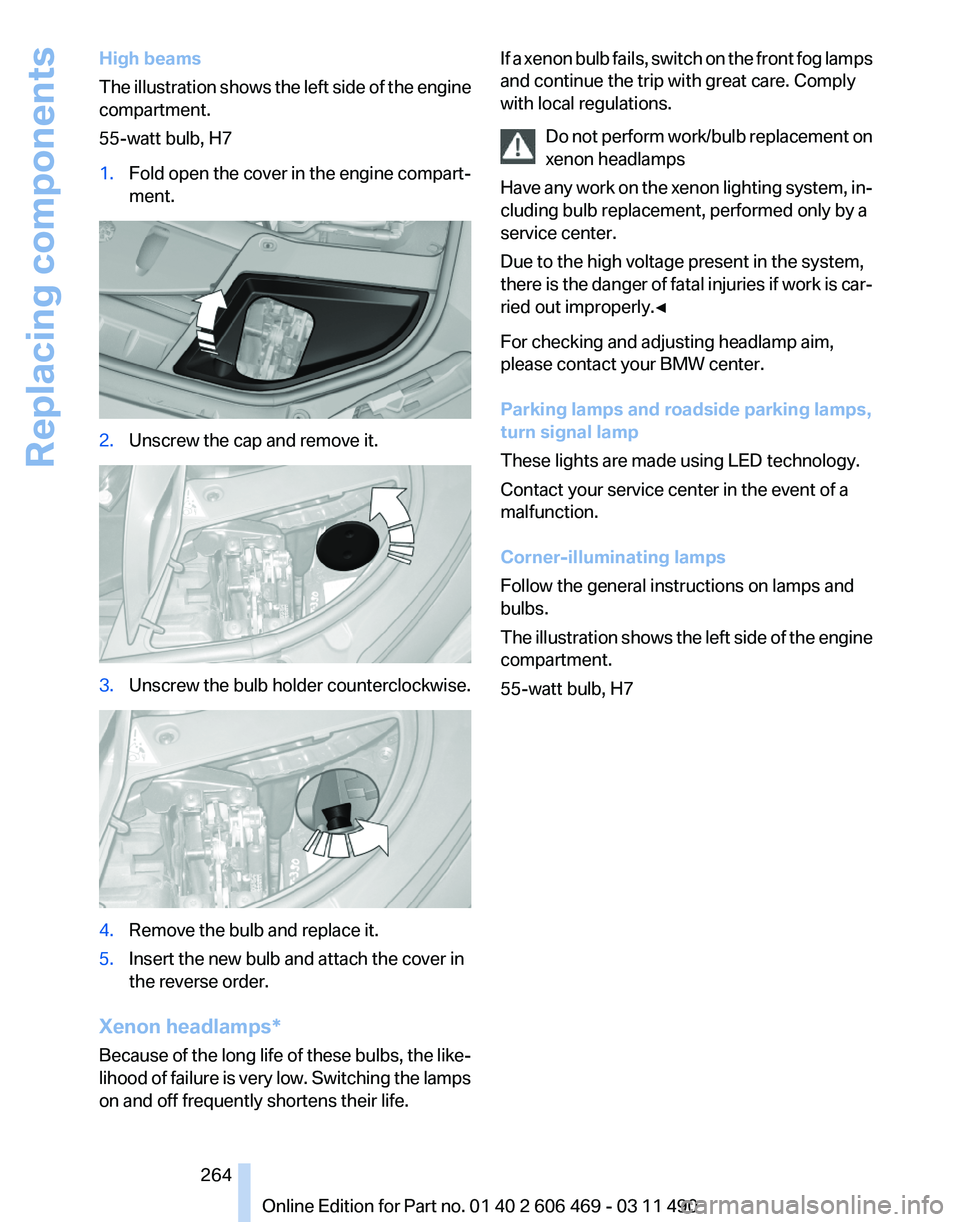
2.
Press the release handle and open the hood. 3.
Be careful of protruding parts on the hood. Danger of injury when the hood is open
There
is a danger of injury from protruding
parts when the hood is open.◀
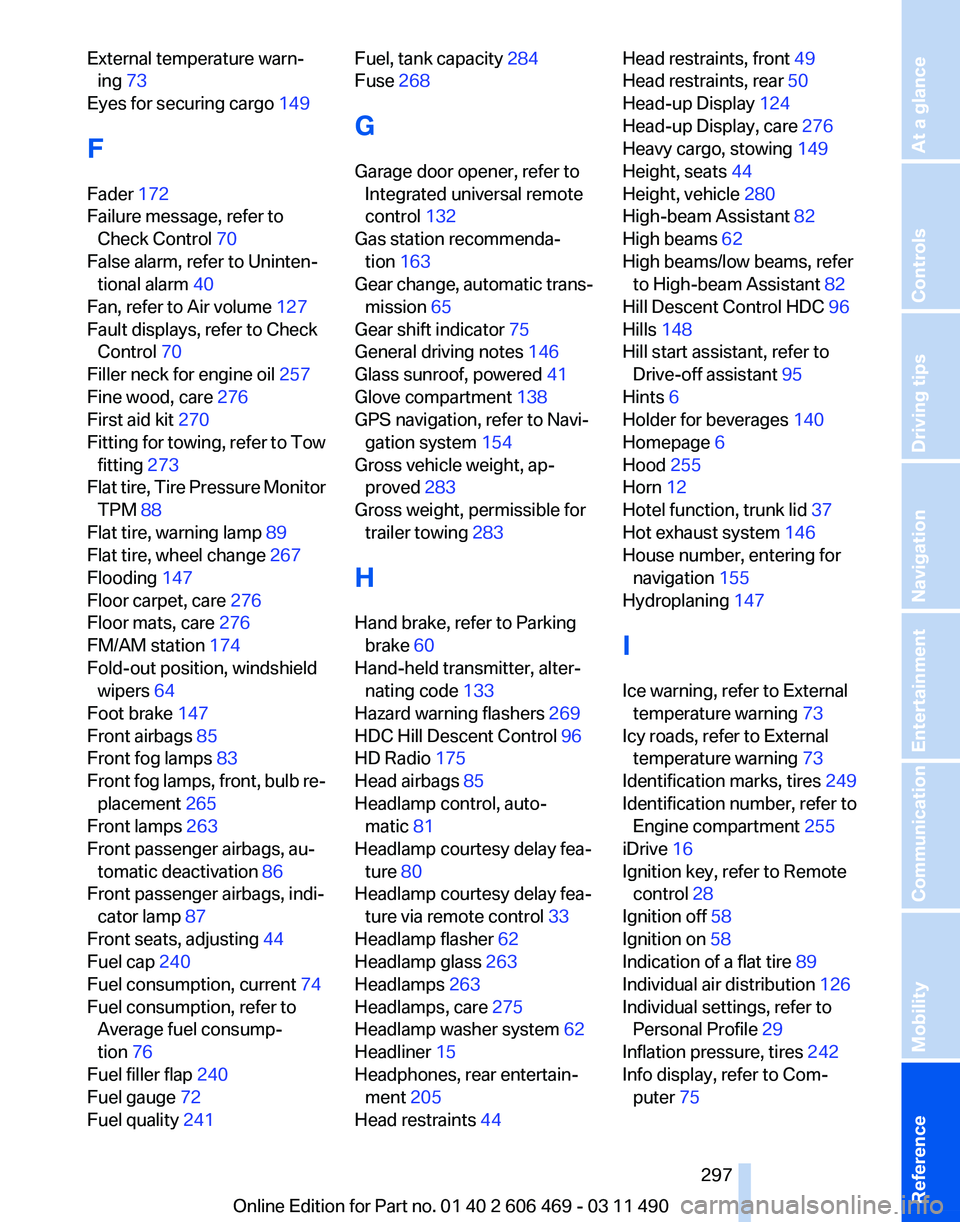
Closing the hood Let the hood drop from a height of approx. 16 in/
40 cm and push down on it to lock it fully.
The hood must audibly engage on both sides.
Hood open when driving
If you see any signs that the hood is not
completely
closed while driving, pull over imme‐
diately and close it securely.◀ Danger of pinching
Make sure that the closing path of the
hood is clear; otherwise, injuries may result.◀ Seite 256
256 Online Edition for Part no. 01 40 2 606 469 - 03 11 490
Engine compartment
Page 264 of 304

High beams
The
illustration shows the left side of the engine
compartment.
55-watt bulb, H7
1. Fold open the cover in the engine compart‐
ment. 2.
Unscrew the cap and remove it. 3.
Unscrew the bulb holder counterclockwise. 4.
Remove the bulb and replace it.
5. Insert the new bulb and attach the cover in
the reverse order.
Xenon headlamps*
Because
of the long life of these bulbs, the like‐
lihood of failure is very low. Switching the lamps
on and off frequently shortens their life. If a xenon bulb fails, switch on the front fog lamps
and continue the trip with great care. Comply
with local regulations.
Do
not perform work/bulb replacement on
xenon headlamps
Have any work on the xenon lighting system, in‐
cluding bulb replacement, performed only by a
service center.
Due to the high voltage present in the system,
there is the danger of fatal injuries if work is car‐
ried out improperly.◀
For checking and adjusting headlamp aim,
please contact your BMW center.
Parking lamps and roadside parking lamps,
turn signal lamp
These lights are made using LED technology.
Contact your service center in the event of a
malfunction.
Corner-illuminating lamps
Follow the general instructions on lamps and
bulbs.
The illustration shows the left side of the engine
compartment.
55-watt bulb, H7 Seite 264
264 Online Edition for Part no. 01 40 2 606 469 - 03 11 490
Replacing components
Page 297 of 304

External temperature warn‐
ing 73
Eyes for securing cargo 149
F
Fader 172
Failure message, refer to Check Control 70
False alarm, refer to Uninten‐ tional alarm 40
Fan, refer to Air volume 127
Fault displays, refer to Check Control 70
Filler neck for engine oil 257
Fine wood, care 276
First aid kit 270
Fitting
for towing, refer to Tow
fitting 273
Flat tire, Tire Pressure Monitor TPM 88
Flat tire, warning lamp 89
Flat tire, wheel change 267
Flooding 147
Floor carpet, care 276
Floor mats, care 276
FM/AM station 174
Fold-out position, windshield wipers 64
Foot brake 147
Front airbags 85
Front fog lamps 83
Front fog lamps, front, bulb re‐ placement 265
Front lamps 263
Front passenger airbags, au‐ tomatic deactivation 86
Front passenger airbags, indi‐ cator lamp 87
Front seats, adjusting 44
Fuel cap 240
Fuel consumption, current 74
Fuel consumption, refer to Average fuel consump‐
tion 76
Fuel filler flap 240
Fuel gauge 72
Fuel quality 241 Fuel, tank capacity
284
Fuse 268
G
Garage door opener, refer to Integrated universal remote
control 132
Gas station recommenda‐ tion 163
Gear
change, automatic trans‐
mission 65
Gear shift indicator 75
General driving notes 146
Glass sunroof, powered 41
Glove compartment 138
GPS navigation, refer to Navi‐ gation system 154
Gross vehicle weight, ap‐ proved 283
Gross weight, permissible for trailer towing 283
H
Hand brake, refer to Parking brake 60
Hand-held transmitter, alter‐ nating code 133
Hazard warning flashers 269
HDC Hill Descent Control 96
HD Radio 175
Head airbags 85
Headlamp control, auto‐ matic 81
Headlamp courtesy delay fea‐ ture 80
Headlamp courtesy delay fea‐ ture via remote control 33
Headlamp flasher 62
Headlamp glass 263
Headlamps 263
Headlamps, care 275
Headlamp washer system 62
Headliner 15
Headphones, rear entertain‐ ment 205
Head restraints 44 Head restraints, front 49
Head restraints, rear 50
Head-up Display
124
Head-up Display, care 276
Heavy cargo, stowing 149
Height, seats 44
Height, vehicle 280
High-beam Assistant 82
High beams 62
High beams/low beams, refer to High-beam Assistant 82
Hill Descent Control HDC 96
Hills 148
Hill start assistant, refer to Drive-off assistant 95
Hints 6
Holder for beverages 140
Homepage 6
Hood 255
Horn 12
Hotel function, trunk lid 37
Hot exhaust system 146
House number, entering for navigation 155
Hydroplaning 147
I
Ice warning, refer to External temperature warning 73
Icy roads, refer to External temperature warning 73
Identification marks, tires 249
Identification number, refer to Engine compartment 255
iDrive 16
Ignition key, refer to Remote control 28
Ignition off 58
Ignition on 58
Indication of a flat tire 89
Individual air distribution 126
Individual settings, refer to Personal Profile 29
Inflation pressure, tires 242
Info display, refer to Com‐ puter 75
Seite 297
297Online Edition for Part no. 01 40 2 606 469 - 03 11 490
Reference Mobility Communication Entertainment Navigation Driving tips Controls At a glance